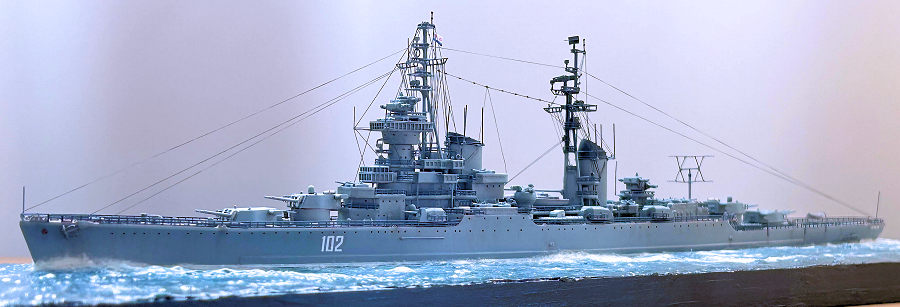
Combrig 1/700 Sverdlov
| KIT #: | 70311 |
| PRICE: | $120.00 |
| DECALS: | Pennant numbers, names, flags |
| REVIEWER: | Marcello Rosa |
| NOTES: | Resin |
| HISTORY |
 The
“Project 68 bis” (Sverdlov class) cruisers, commissioned between 1952 and 1955,
were the first major surface combatant program of the Soviet navy during the
Cold War. They caused quite a commotion among the NATO allies, with the British
Admiralty in particular reacting badly at the idea of Sverdlov "swarms" raiding
the shipping lanes worldwide (a fact made at least plausible due to their range
(estimated 9,000 nm at 18 knots). They incorporated lessons from World War II
into what was considered a state-of-the art cruiser at the time. But that was a
time of rapid technological advance. Of the 30 planned ships, only 14 were
completed, making way to new classes of missile-capable cruisers. Nonetheless,
they continued serving until the late 1980’s.
The
“Project 68 bis” (Sverdlov class) cruisers, commissioned between 1952 and 1955,
were the first major surface combatant program of the Soviet navy during the
Cold War. They caused quite a commotion among the NATO allies, with the British
Admiralty in particular reacting badly at the idea of Sverdlov "swarms" raiding
the shipping lanes worldwide (a fact made at least plausible due to their range
(estimated 9,000 nm at 18 knots). They incorporated lessons from World War II
into what was considered a state-of-the art cruiser at the time. But that was a
time of rapid technological advance. Of the 30 planned ships, only 14 were
completed, making way to new classes of missile-capable cruisers. Nonetheless,
they continued serving until the late 1980’s.
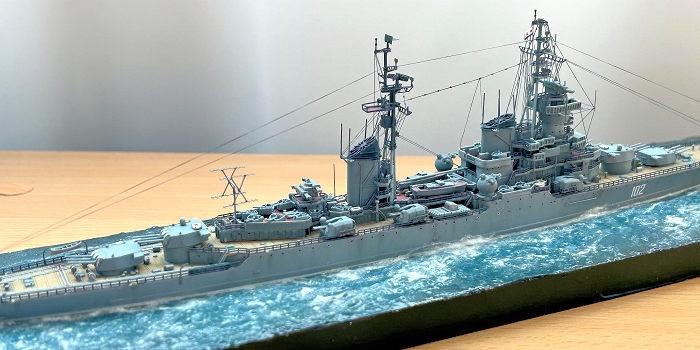
Sverdlov’s first major assignment was to represent the Soviet Navy at Queen Elizabeth II’s Coronation Naval Review in 1953. Most of her subsequent career was spent “showing the flag”, visiting many foreign harbours. She was mothballed in 1978 and stricken in 1989. A small note: the box art indicates that the kit is for Sverdlov in 1952, just after commissioning. This did not match the photographic evidence I could find. For example, the model has the large antenna in the aft deck for the “Knife Rest” radar, which in reality was installed later. The kit matches photos taken around 1965.
| THE KIT |
I was hugely enthusiastic when I opened the box. The resin parts were finely cast, had zero flash, and showed no signs of warping. The photoetch also appeared comprehensive, and everything subsequently proved to be precisely measured to fit the destinations. Perhaps my only negative comment at that stage would be that the kit appeared over-engineered. The manufacturers clearly can do superbly detailed resin parts, and sometimes it was hard to understand why some sub-assemblies required so many tiny bits of photoetch or resin to be attached to them, one by one. I also grumbled a bit about the fact that the kit does not provide some parts, such as the masts and yardarms, and instead asks you to make your own.
 But most
of the positivity disappeared during the build. This kit is the quintessential
“for experienced modellers only”, and this is primarily due to the terrible
instructions. They tell you what to build, admittedly using good pictures, but
not how. And I can tell you from experience that if you follow the instructions
in the sequence they are presented, you will never be able to finish.
Fortunately, I have the habit of using Micro Krystal Klear instead of
cyanoacrylate to join large parts such as the several levels of the bridge
superstructure. This gave me the opportunity to backtrack and rebuild several
times, following overnight soaking in water, whenever something became
impossible to fit.
But most
of the positivity disappeared during the build. This kit is the quintessential
“for experienced modellers only”, and this is primarily due to the terrible
instructions. They tell you what to build, admittedly using good pictures, but
not how. And I can tell you from experience that if you follow the instructions
in the sequence they are presented, you will never be able to finish.
Fortunately, I have the habit of using Micro Krystal Klear instead of
cyanoacrylate to join large parts such as the several levels of the bridge
superstructure. This gave me the opportunity to backtrack and rebuild several
times, following overnight soaking in water, whenever something became
impossible to fit.
One particularly annoying problem is that the instructions don’t mention the fact that you need to completely sand off the resin base under the parts forming the superstructure. The fine looking, super smooth resin lulled me into the interpretation that one just had to break around them. I can tell you from experience that this is not the case. You have to break off the part from the resin sprue, and then completely sand the fraction of a millimetre added by the base. Otherwise, multi-level structures such as the bridge will never come together due to the compounding errors added at each level. Again, the use of white glue was my friend here. There is also no painting information whatsoever.
| CONSTRUCTION |
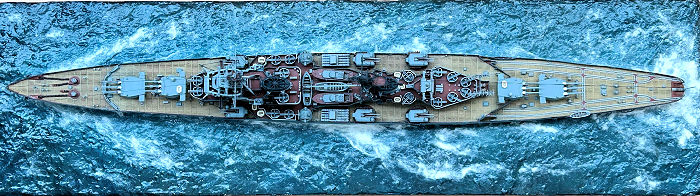
The construction starts with building many sub-assemblies including the armament, directors, radar antennas, smokestacks, boats and Carley float stacks. Here you get the first taste of the over-engineering problem. For example, each of the main turrets requires joining no less than 6 resin and 12 photoetch parts each.
But problems really start in page 8, where you are asked to build the aft mast. This is a complex sub-assembly of ~40 parts, including resin and photoetch, plus the "make your own" tripod legs. I dutifully completed it, but with alarm bells gradually building up. This made me skip a few pages to find out, to my horror, that this now was supposed to fit precisely around another complex subassembly, which in turn had to fit to the aft smokestack. That's when it dawned on me that the makers of this kit expect us to have super-human abilities. From that point on, I decided to build everything with white glue first, and only fix with cyanoacrylate once I was convinced that things would really come together.
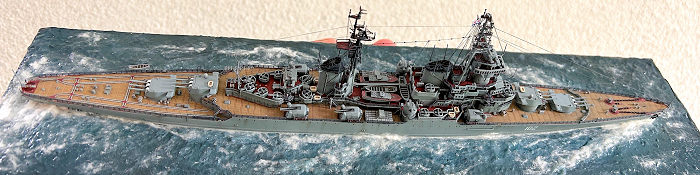 The next
steps make you festoon the deck with many dozen small parts (vents, lockers,
reels). I refrained from following the instructions in installing the armament,
railing, jackstaff and other highly breakable bits at this early stage. One
difficult part was the mine rails in the aft deck, which are provided as a
single large photoetch part. The quality is superb, but this makes it difficult
to attach in good alignment. I opted for doing the initial alignment with white
glue, and then gradually applying cyanoacrylate in small bits, starting from one
end to the other. This is probably a good point to mention that all small bits
and pieces were painted first, then applied. Their large number creates a
“target rich environment” for a careless hand, so I didn’t trust myself to
attach first, then try to paint.
The next
steps make you festoon the deck with many dozen small parts (vents, lockers,
reels). I refrained from following the instructions in installing the armament,
railing, jackstaff and other highly breakable bits at this early stage. One
difficult part was the mine rails in the aft deck, which are provided as a
single large photoetch part. The quality is superb, but this makes it difficult
to attach in good alignment. I opted for doing the initial alignment with white
glue, and then gradually applying cyanoacrylate in small bits, starting from one
end to the other. This is probably a good point to mention that all small bits
and pieces were painted first, then applied. Their large number creates a
“target rich environment” for a careless hand, so I didn’t trust myself to
attach first, then try to paint.
The next big steps were to build up the various decks, each also dotted with myriad of tiny parts. Having built the aft mast as a subassembly (A20), here I had to contend with fitting it around a series of delicate platforms (subassembly A24), which in turn encircle the aft smokestack (A18). Cutting a long story short, this did not go well, and you can see in the photos that the platforms look a bit shonky. Oh, well…
Building the fore superstructure according to the instructions would bring you to certain grief. They would make you add a complex set of multiple decks, each precisely aligned, and then, at the very end, try to shove the fore smokestack through a hole crossing various decks. This was never going to work! Having been forewarned by my experience with the aft stack, I opted instead for building the decks around the fore stack and then assembling the fore mast around them. This worked, except that the entire assembly had to be rebuilt a few times due to the problem mentioned above, of having to sand off the resin bottoms. A simple sentence in the instructions would have helped.
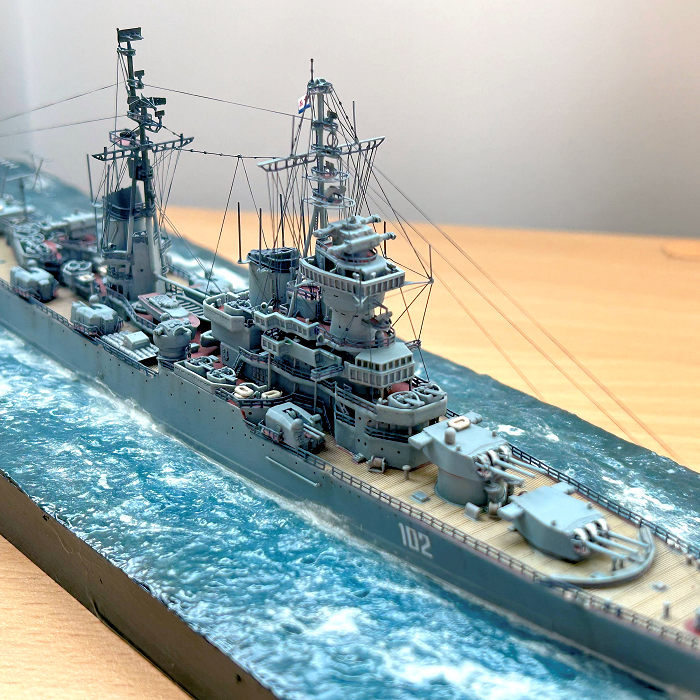
Having battled all the way, the final steps went comparatively smoothly. These consisted of adding the armament, railing, rigging and many other breakable bits (like the whip antennas, anchors, and Knife Rest radar antenna). I added a sea base using a standard technique (if you are interested, visit this link)
| COLORS & MARKINGS |
As already mentioned the resin parts looked superb, and they needed no treatment other than soaking in dishwashing liquid and a quick spray of isopropyl to remove any residue. On the other hand the decals were printed completely out of register, so only the ones that were pure white (like the hull numbers) could be salvaged. I used an aftermarket Soviet Navy flag from Tauro Models. During this build I learned the fun fact that the Soviet navy constantly changed the pennant numbers of their ships to confuse Western intelligence, sometimes going to the extreme of painting different numbers on the two sides of the hull. Therefore, my model can be precisely timed to 1965, when Sverdlov was photographed with the hull number 102 in the Mediterranean.
 There are
no good colour pictures of Sverdlov class cruisers in the 1960s. Fortunately, a
sister ship (Mikhail Kutuzov) was kept as a museum, and in the absence of any
instructions in the kit I used recent photos of this ship (and a blurry old
photo of Sverdlov in 1974) to decide. Both resin and photoetch were airbrushed
with Mr. Surfacer 1000 diluted 1:1 with Mr. Color Levelling Thinner and allowed
to dry for 24h before any painting.
There are
no good colour pictures of Sverdlov class cruisers in the 1960s. Fortunately, a
sister ship (Mikhail Kutuzov) was kept as a museum, and in the absence of any
instructions in the kit I used recent photos of this ship (and a blurry old
photo of Sverdlov in 1974) to decide. Both resin and photoetch were airbrushed
with Mr. Surfacer 1000 diluted 1:1 with Mr. Color Levelling Thinner and allowed
to dry for 24h before any painting.
The main colour used for all vertical surfaces was Tamiya enamel light sea grey (XF-25). Grey highlights were done with XF-54 (dark sea grey), XF-56 (Metallic grey) and XF-63 (German grey). The deck planking was painted with XF-59 (desert yellow). One interesting feature of soviet major naval combatants was the use of antifouling red on some of the horizontal surfaces. For those, I used AK11328 (acrylic) Rotbraun. The smokestack caps were painted with Tamiya XF-1. And, yes, in what seems like a decision aimed at creating a whole new way of torturing sailors, the waterline was actually painted white in these cruisers (done with SMS PL72 insignia white). The rear mast above the level of the smokestack was black, including all radar dishes and other antennas. Here I tried a new technique where this dark colour was gradually built with successive applications of Tamiya panel line accent 87131 (black). This resulted in a matte black finish, but with some variations that (in my opinion) make this part look more real.
Everything was covered with SMS Premium clear gloss (PL09) for application of the decals and subsequently weathered with very diluted Tamiya enamels (e.g. XF-9 hull red for rust streaks in the hull, X-19 smoke to create dirt patches in the greys). The decking was highlighted with Tamiya panel line accent 87132 (brown). After rigging was applied, the last step was to seal everything with SMS Premium flat clear (PL10).
| CONCLUSIONS |
The Combrig 1/700 Sverdlov is in some ways brilliant, but mostly frustrating. Brilliant because the quality of the parts is among the best I have seen. Frustrating because the instructions are the worst I have ever come across, and this did have an impact on what I could achieve. But being the only kit available of these beautiful ships, one had to pay the price. I can only hope that this report will help the next person to circumvent the problems that got me. If you would like to see more pictures or ask questions please visit my modelling web site (www.marcellorosa.com).
| REFERENCES |
The Imperial War Museum has some excellent footage of Sverdlov during the Coronation Naval Review: https://www.iwm.org.uk/collections/item/object/1060023813
The historical impact of the Sverdlov class ships is well discussed here: https://globalmaritimehistory.com/sverdlov_class_rn_response/
Good photos of Sverdlov, including my references for her appearance in 1965, can be found here: https://www.history.navy.mil/content/history/nhhc/search.html?q=Sverdlov
19 May 2026
Copyright ModelingMadness.com. All rights reserved. No reproduction in part or in whole without express permission.
If you would like your product reviewed fairly and fairly quickly, please contact the editor or see other details in the Note to Contributors.