Revell 1/350 K-141 'Kursk'
| KIT #: | 05022 |
| PRICE: | SEK 139 (approx. $23,0) |
| DECALS: | See review |
| REVIEWER: | Ingemar Caisander |
| NOTES: |
Some inaccuracies
but in general a nice kit |
| HISTORY |
The
ill-fated Russian submarine "Kursk" sank on 12 August 2000, following an
internal malfunction and explosion in one of the huge Type 65-76 anti-ship
torpedoes onboard. All 118 crew perished in this tragic
 accident.
The "Kursk" was a Project 949A "Antey" (NATO reporting name "Oscar II")
nuclear-powered cruise missile submarine. Primary armament consisted of 24
P-700 (NATO: SS-N-19 "Shipwreck") supersonic cruise missiles, capable of
being fitted with either nuclear or conventional high explosive warheads.
accident.
The "Kursk" was a Project 949A "Antey" (NATO reporting name "Oscar II")
nuclear-powered cruise missile submarine. Primary armament consisted of 24
P-700 (NATO: SS-N-19 "Shipwreck") supersonic cruise missiles, capable of
being fitted with either nuclear or conventional high explosive warheads.
In addition to this,
the "Kursk" was also equipped with two 650mm bow torpedo tubes for a total
of 12 large Type 65-76 anti-ship, wake-homing torpedoes, and four 533mm bow
torpedo tubes for a total of 16 Type 53-65K anti-ship and SET-65
anti-submarine torpedoes. Two OK-650B/VM-5 pressurized water nuclear
reactors provided steam to twin GTZA OK-9DM geared turbines, developing a
total of 98.000 shaft horsepower and providing an underwater speed of up to
28 knots.
| THE KIT |
The kit I used is the
old Revell offering, #05022. The hull is separated into two parts (upper and
lower) and you also get two sprues with the smaller details and parts for a
stand. All of this is moulded in black plastic. Also included is a small
clear sprue with the bridge windbreaker and an insert for the front windows
in the conning tower.
A few inaccuries of
the kit are also present, however:
-
The outer bow torpedo
doors are missing on the starboard side. I don´t know if this is only on my
example or if all kits lack them. The doors can relatively easy be
re-scribed, though.
-
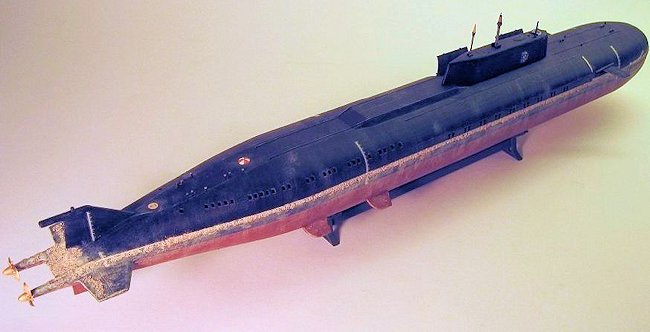
The screws are
incorrectly moulded with the blades going the wrong way. On the real
949A-class submarines, the seven-bladed skewback propellers should rotate
outwards (when seen from behind), with the tip of the blades trailing. In
the kit this has been reversed, with the tip of the blades leading. The fix
is relatively simple: cut off the rounded end of the screws, turn the blade
section 180 degrees, and glue it all back together again.
-
The single lower
rudder should be replaced by two units, one on each lower propeller shaft
casing. Unfortunately I found this out too late so I didn’t get around to
correct it on my model.
 -
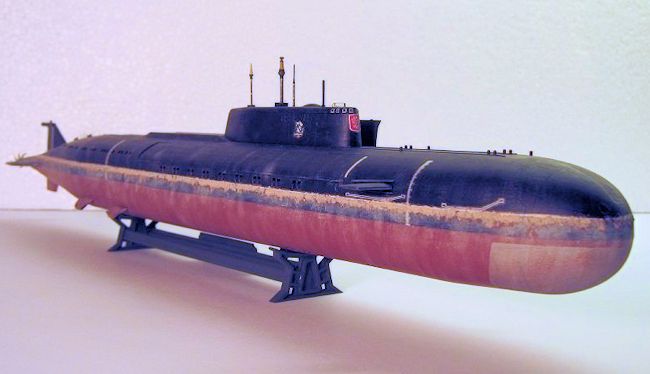
The upper hull is
slightly too rounded, especially at the missile area. This is quite obvious
when comparing the kit with the real thing, as the upper hull should be more
"square" or flat. Unfortunately this is very difficult to correct and would
require extensive surgery of the kit – I didn´t bother.
-
The upper hull is
slightly too rounded, especially at the missile area. This is quite obvious
when comparing the kit with the real thing, as the upper hull should be more
"square" or flat. Unfortunately this is very difficult to correct and would
require extensive surgery of the kit – I didn´t bother.
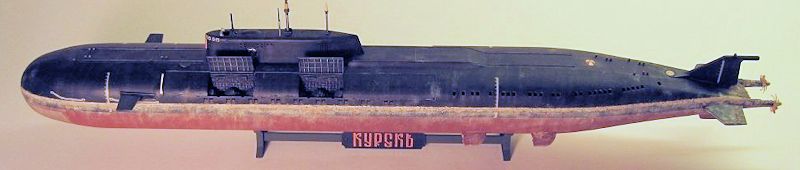
However, most (if not
all) 949A-class submarines feature a lower hull finished in red/brown
corrosion inhibiting paint and fortunately the line between this and the
black upper hull coincides with the kit parts split line, so this will help
"disguise" any imperfections in the seam.
| CONSTRUCTION |
I began by
preparing the two hull halves. All flood holes were drilled out, carved,
and sanded into shape, then I added black plastic sheets on the inside
in order to prevent any see-through effect. The hull halves were
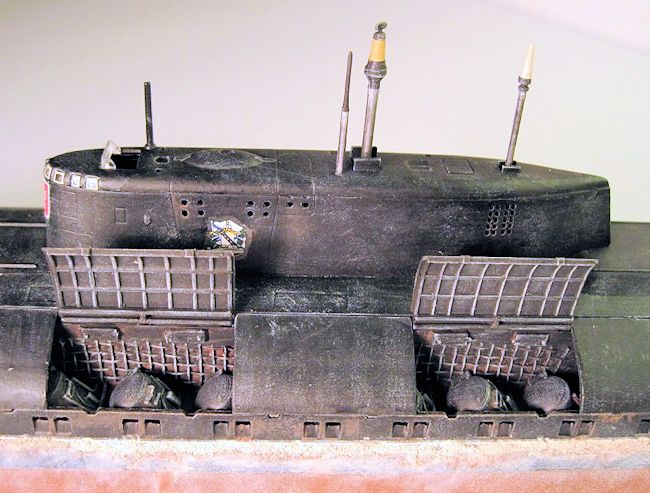
cemented together and the seam sanded smooth.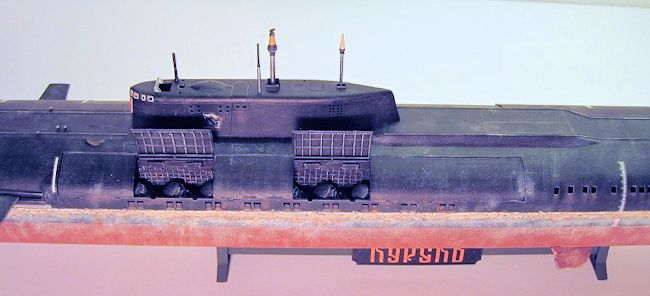 ted
to show off a few of the missile tubes I cut one of the long cover
hatches in pieces. Note that each individual part of the hatch cover two
missile tubes.
ted
to show off a few of the missile tubes I cut one of the long cover
hatches in pieces. Note that each individual part of the hatch cover two
missile tubes.
I couldn´t get the
closed portions of the hatches to line up properly with the upper hull,
so in the end I had to sand off the uppermost internal part of the hatch
rim. When this is removed the hatches fell into place just fine. Not
sure if this is a fault of the kit or if I messed something up. The
missile tubes that were going to be exposed were detailed with some
scratch material, mostly small pieces of tubing, soldering wire, and
some plastic netting.
The conning tower
was next. It goes together nicely and feature an internal floor which
also include the bases for the various masts. The upper hatches for the
rear "Molniya-M" satellite navigation mast and the center MRKP-58
"Radian" surface radar /ESM were cut apart and cemented in the open
position, the rest of the hatches were closed.
I cemented the
forward hydroplanes in the extended position but the kit also give you
the option of having them retracted (using a different cover plate). The
rest of the hull details were then ad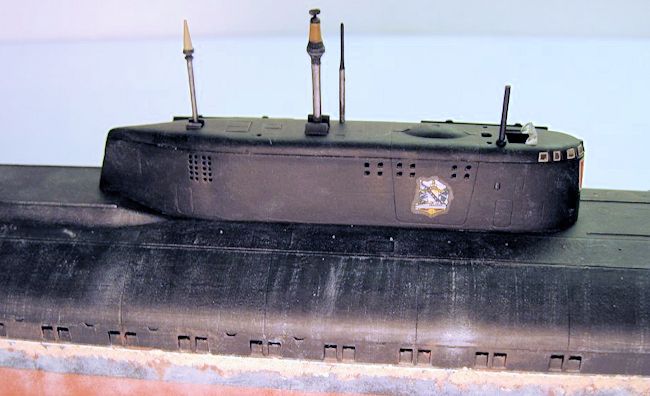 ded
and everything fit nicely. At the lower aft hull there are four reactor
condenser cooling water intakes, these are to be cemented inclined
downwards at about 45 degrees – make sure you get them all equal as any
error in alignment will look funny. I also drilled open the end of the
dispenser in the top of the aft fin: this dispenser is for the "Pelamida"
towed sonar array.
ded
and everything fit nicely. At the lower aft hull there are four reactor
condenser cooling water intakes, these are to be cemented inclined
downwards at about 45 degrees – make sure you get them all equal as any
error in alignment will look funny. I also drilled open the end of the
dispenser in the top of the aft fin: this dispenser is for the "Pelamida"
towed sonar array.
As mentioned
before, I re-scribed the missing starboard outer torpedo hatches as well
as corrected the skewback propellers by cutting them apart and turning
the blade sections 180 degrees before cementing them back together.
| COLORS & MARKINGS |
I usually always brush
paint my models, but in this case I did an exception with the lower hull
which was spray painted in red oxide primer from a rattle-can (it is
actually intended for use on cars…).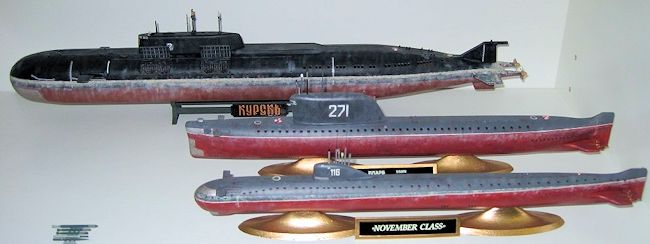 nd
conning tower was painted in flat black (Revell 9), as was the open areas of
the port missile bay. These latter were then accentuated with rust (Humbrol
160) and drybrushed with off-white (Humbrol 121) in order to bring out the
details.
nd
conning tower was painted in flat black (Revell 9), as was the open areas of
the port missile bay. These latter were then accentuated with rust (Humbrol
160) and drybrushed with off-white (Humbrol 121) in order to bring out the
details.
To add a bit of
interest, I masked off and painted the dome for the MGK-540 Skat-3 bow sonar
in aluminum – this is even shown in the instructions, but is actually
incorrect as all 949A-class submarines have the entire lower hull finished
in red. The aluminum sonar dome does however break up the monotony of the
lower hull.
The stand was painted
in flat dark green (Humbrol 75) with the text on the nameplate in copper (Humbrol
12) and then clear-coated.
| FINAL CONSTRUCTION |
As I wanted to depict the
"Kursk" as she looked a few months before her final mission, weathering was
quite extensive in order to simulate a rather long time tied up in dock with
minimal maintenance.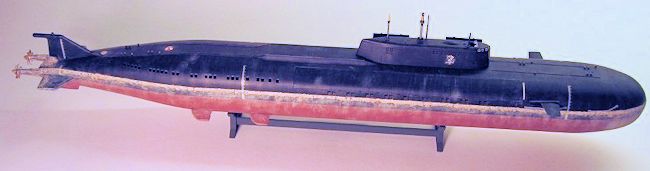 some of
the flood holes, mooring bollards etc.
some of
the flood holes, mooring bollards etc.
The lower hull below the
waterline was even more heavily drybrushed using both previously mentioned
colours, as well as fine beach sand mixed with white glue in order to simulate
heavy growth of barnacles just below the surface waterline. When dry, the sand
was also painted rust-red and then heavily drybrushed with off-white.
| CONCLUSIONS |
And there you have it – an
impressive addition to your naval collection that will dwarf most of your other
1/350 submarines.
True, there are some
inaccuracies present in the kit, but most of these can relatively easy be
corrected. And, considering the rather cheap cost of the kit (typical of Revell
kits, at least here in Sweden), I would definitely recommend it.
April 2014
If you would like your product reviewed fairly and fairly quickly, please contact the editor or see other details in the Note to Contributors.