
Dragon 1/700th USS Antietam CV-36
| KIT #: | 7064 |
| PRICE: | $35.95 MSRP |
| DECALS: | One option |
| REVIEWER: | Paul S Teixeira |
| NOTES: |
| HISTORY |
One
of my favorite modeling subjects is late WW-II, and early post-war naval vessels and aircraft. Especially military hardware which exemplifies the experimental, “can-do” attitude of military engineers, pilots, and crews who were involved in the fast paced technological advances of this era. The “jet-age” pushed many involved in this era to the limit, as well as, the naval hardware to support it. Early jets were faster, more complicated, heavier, and not as agile, as their proven piston powered cousins. This was especially notable in the growing field of Naval Aviation. The straight decked fleet carriers of the era did not suit the jet age very well. If you missed the number 3-wire, and hopped over the fourth, you were heading for the fragile barrier, or worst yet, aircraft parked at the bow of the ship. Not a good end to a perfectly good day. As a result, something was needed, in relations to straight decked jet-borne carriers.
 This
This
After
a significant amount of time conducting shake-down exercises the Antietam arrived in Pearl Harbor on the 19th of June 1945 and remained in the Hawaiian Islands conducting training missions until August 12th. On that day she shaped a course for the western Pacific. Three days out of Oahu she received word of the Japanese’s capitulation and the consequent cessation of hostilities. Throughout this early post-war exercise she conducted missions related to the support of occupied Japanese territories, and other related far-east support missions. Early in 1949 she finished her mission and headed back to the United States for deactivation. The Antietam remained in reserve at Alameda, Ca. until communist forces from the north invaded South Korea in the summer of 1950. She began reactivation preparation on December 6th and went back into commission on January 17, 1951. The Antietam arrived in the Far East later in the fall of 1952 and by late November began the only combat deployment of her career. During that tour she made four cruises with Task Force 77 in the combat zone off the coast of Korea.The
aircraft carrier returned home in April and rejoined the Pacific Reserve Fleet briefly. She was reactivated later that summer and in August transited the Panama Canal to join the Atlantic Fleet for major alterations. In October she was redesigned an attack aircraft carrier, CVA-36. In December the Antietam emerged from the yard as America's first angled deck aircraft carrier. She operated out of Quonset Point, R.I. until the beginning of 1955.| THE KIT |
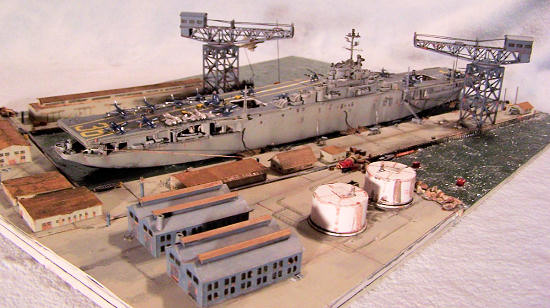
Being
a native Rhode Islander and spending many years in, and around the carrier docks of this historical industrial naval base I decided to re-create a typical, “day-in the life” of this fabulous, break-through vessel as it may have appeared shortly after its modification while docked at Quonset. The funny thing is that although I have collected many aircraft carrier kits over the years, and
have
not
built
one
in
over
5
years,
I
did
not
know
anything
about
this
particular
vessel
until
I
decided
to
build
one.
I
had
ordered
this
particular
kit
because
it
appeared
different
than
my
others,
and
the
box
art
depicted
a
post-war
Essex
class
carrier
with
post-war
looking
aircraft,
as
I
mentioned
earlier,
being
one
of
my
favorite
topics.
I
did
not
know
this
was
the
1st
angle-deck
carrier,
or
that
it
was
home-ported
at
Quonset
Point
until
I
decided
to
pull
it
out
of
storage,
and
conducted
research
looking
for
the
correct
color
schemes.
Something
I
still
am
not
sure
I
got
right,
because
there
is
such
little
available
color
photos,
or
paint
chips,
illustrating
early
post
war
naval
colors.
It
was
at
this
point
that
I
decided
to
not
just
build
the
kit,
but
to
display
it
in
it’s
native
environment
of
Quonset
Point
during
it’s
mid
50’s
hay-day.
and
have
not
built
one
in
over
5
years,
I
did
not
know
anything
about
this
particular
vessel
until
I
decided
to
build
one.
I
had
ordered
this
particular
kit
because
it
appeared
different
than
my
others,
and
the
box
art
depicted
a
post-war
Essex
class
carrier
with
post-war
looking
aircraft,
as
I
mentioned
earlier,
being
one
of
my
favorite
topics.
I
did
not
know
this
was
the
1st
angle-deck
carrier,
or
that
it
was
home-ported
at
Quonset
Point
until
I
decided
to
pull
it
out
of
storage,
and
conducted
research
looking
for
the
correct
color
schemes.
Something
I
still
am
not
sure
I
got
right,
because
there
is
such
little
available
color
photos,
or
paint
chips,
illustrating
early
post
war
naval
colors.
It
was
at
this
point
that
I
decided
to
not
just
build
the
kit,
but
to
display
it
in
it’s
native
environment
of
Quonset
Point
during
it’s
mid
50’s
hay-day.
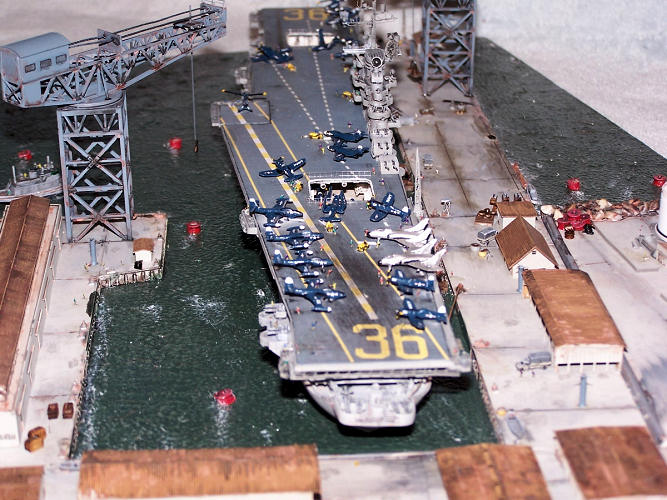
I started with the Dragon 1/700th CVA-36 USS Antietam kit, #7064, released a few years ago. As are all the new tooled dragon naval vessels, this kit is outstanding with excellent fit, and many options, including an optional clear flight deck, detailed hanger bay, photo etched details, 50’s era aircraft, and excellent deck markings and other decals. The kit allows you to produce either the early style modified angle deck, with temporary external deck braces, or the more permanent style fully enclosed deck bracing. I choose the earlier external bracing option due to it’s interesting appearance, uniqueness, and it allowed more side hanger deck doors to be viewed, the latter covered much of the port side detail below the flight deck.
I
also
used
the
“Battlefleet
models”
1/700th
Dock
set #704A
for
the
main
dock
sections
and
resin
dock
style
structures.
I
built
the
external
aspect
of
the
model
mostly
out
of
th e
box
using
the
included
photo
etch,
and
decals.
I
also
added
much
of
the
Gold
Medal
Models
Essex
Class
Photo
etch
details,
especially
deck
railings,
electronics
gear,
and
catwalks.
I
purchased
an
extra
set
of
post-war
1/700th
cyber-model
aircraft
to
allow
for
a
more
crowded
flight
deck,
with
more
aircraft
left
over
to
also
populate
the
hanger
deck.
e
box
using
the
included
photo
etch,
and
decals.
I
also
added
much
of
the
Gold
Medal
Models
Essex
Class
Photo
etch
details,
especially
deck
railings,
electronics
gear,
and
catwalks.
I
purchased
an
extra
set
of
post-war
1/700th
cyber-model
aircraft
to
allow
for
a
more
crowded
flight
deck,
with
more
aircraft
left
over
to
also
populate
the
hanger
deck.
| CONSTRUCTION |
I did a significant amount of scratch building to busy up the appearance of the hanger deck, especially around the open deck elevators. Even though the kit includes a clear flight deck option, I utilized the standard opaque deck because of it’s far superior deck detailing, and I don’t enjoy working with clear styrene. If you do not use the clear deck option I would think twice about building up the hanger deck as I did due to not being able to really see it.. The included hanger deck detail should suffice for most. I do recommend building up some details around the deck elevators if you have them in the down position.
The other after-market detail I strongly recommend is a 1/700th detail set for the aircraft. The included kit parts are thick for the scale, and the clear styrene of the aircraft parts make it very brittle and hard to work. I modified these parts slightly but I’m not happy with my results. I may re-do this in the future.
| COLORS AND MARKINGS |
In
regards
to
painting
I
airbrushed
Model
Masters
acrylic
Haze
Grey
for
most
of
the
hull
and
superstructure
with
white/black
added
to
create
subtle
shades
as
needed.
I
also
dry
brushed
highlights
extensively.
Many
oil
washes
of
rust,
wood,
black,
and
burnt
umber
were
applied
liberally
to
create
stains,
rust,
and
usage.
In
regards
to
the
flight
deck
the
kit
recommends
intermediate
blue.
The
box
cover
art
shows
what
appears
to
be
a
brownish
color,
and/or
stain,
with
the
landing
section
depicted
as
a
black,
or
 darker
grey,
with
landing
stripes.
I
could
not
find
any
photos
which
duplicated
this
appearance,
although
late
model,
heavily
modified
Essex
class
ships
such
as
the
Lexington,
Bon-Homme,
and
Oriskinay
come
close
when
shown
in
training
roles,
or
on
Southeast
Asian
tours
during
the
60’s.
It
does
appear
that
many
modified
post
war
Essex
class
fleet
carriers
do
have
a
blue
like
stain
reminiscent
of
WWII
carriers.
I
went
with
this
look
and
airbrushed
WEM
enamel
Flight
Deck
Blue
Stain
to
simulate
this
appearance.
Future
followed
by
significant
oil
washes
to
simulate
wear
and
tear.
darker
grey,
with
landing
stripes.
I
could
not
find
any
photos
which
duplicated
this
appearance,
although
late
model,
heavily
modified
Essex
class
ships
such
as
the
Lexington,
Bon-Homme,
and
Oriskinay
come
close
when
shown
in
training
roles,
or
on
Southeast
Asian
tours
during
the
60’s.
It
does
appear
that
many
modified
post
war
Essex
class
fleet
carriers
do
have
a
blue
like
stain
reminiscent
of
WWII
carriers.
I
went
with
this
look
and
airbrushed
WEM
enamel
Flight
Deck
Blue
Stain
to
simulate
this
appearance.
Future
followed
by
significant
oil
washes
to
simulate
wear
and
tear.
Building
up the diorama scenery was the most fun. Experimenting with different techniques helped to reproduce the water. Essentially, its fairly straight forward and easy to replicate. I started with a plain white poster board. Sprayed a combination of dark blues and greens to cover the board completely. I then follow with 3 to 4 coats of “Mod Podge” applied using a sponge brush, while experimenting with different brush stokes to simulate texture appropriate for scale. Finally small detailed waves, flow, and wakes were simulated with “Woodland Scenics Water Effects”. An outstanding and very simple product to use. Finally some Model
Masters
Flat
White
was
lightly
applied
with
dry-brushing
to
highlight
these
effects.
Model
Masters
Flat
White
was
lightly
applied
with
dry-brushing
to
highlight
these
effects.
This was all finished off with several coats of “Future” to give it a nice “Wet-Effect. In addition to the “Battlefleet” Dock sections and buildings, I also used sections of poster board to simulate the land sections of the docks topped with engraved sheet styrene. I also purchased 2 sets of Hasegawa’s “Harbor Set” to busy up the docks. Although not 100% accurate to the Quonset Point scene it “fit the bill“ in regards the look I needed. Finally the Dragon Antietam kit also includes a nice bonus. A very detailed, mini kit of a Navy Harbor Tug. This complimented the scene nicely. Finally, I hit up the “Spare Parts Bin” for everything else including some left over photo-etch 1/700th dock buildings, resin vehicles, styrene small boats, model RR rocks, various bits of model marine equipment, and 1/700th photo-etch sailors.
| CONCLUSIONS |
 Overall
If you would like your product reviewed fairly and quickly, please contact me or see other details in the Note to Contributors.