| KIT #: | 7220 |
| PRICE: | $Not free |
| DECALS: | One option |
| REVIEWER: | Frank Spahr |
| NOTES: |
| BACKGROUND |
 Over the
years, my fondness for older kits has become well known amongst fellow modelers.
Now and then it even happens that modelers pass kits on me to build, preferably
kits whose molds were cut when the Beatles still went to school. It happened
some years ago at a modeler´s meeting, when the founder of www.modellmarine.de
pushed the recently reissued Lindberg Tuna Clipper into my rather
reluctant arms. He said there was a great video about the boats somewhere on
youtube and I would sure make something nice from the kit.
Over the
years, my fondness for older kits has become well known amongst fellow modelers.
Now and then it even happens that modelers pass kits on me to build, preferably
kits whose molds were cut when the Beatles still went to school. It happened
some years ago at a modeler´s meeting, when the founder of www.modellmarine.de
pushed the recently reissued Lindberg Tuna Clipper into my rather
reluctant arms. He said there was a great video about the boats somewhere on
youtube and I would sure make something nice from the kit.
| THE KIT |
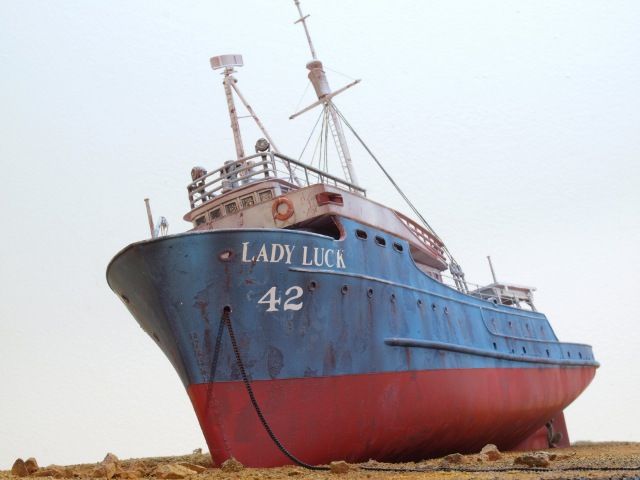
The kit depicts a tuna boat of the type used in the Gulf of Mexico in the 1950s.
For „research“, I looked into the video on youtube. It shows very clearly how
these vessels operated, a bit like tuna is still caught in some African nations.
The fish were baited and brought into a true feeding frenzy. Whilst greedily
and
 indiscrimatingly
gobbling up anything in the water, several hard-working crewmen literally angled
them with stout fishing rods, flipped them on the deck where they were
immediately processed and frozen below decks. The
fishermen stood on flimsy outriggers, hip deep in the water, and angled tuna as
fast as they could.
indiscrimatingly
gobbling up anything in the water, several hard-working crewmen literally angled
them with stout fishing rods, flipped them on the deck where they were
immediately processed and frozen below decks. The
fishermen stood on flimsy outriggers, hip deep in the water, and angled tuna as
fast as they could.
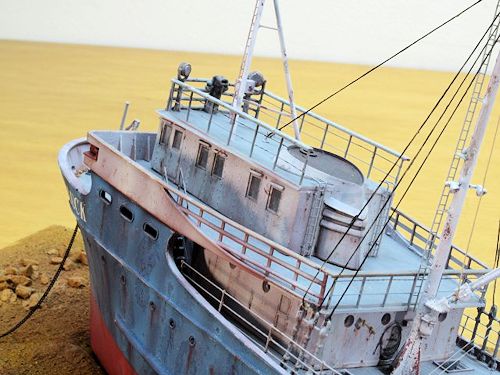
The kit is typical for its time. The scale is somewhere around 1:60, and it´s
generally accurate, with some nice details yet some items looking overly clunky
from a current perspective. The plastic is rather soft, which led to severe
warping of the tripod mast. On the whole, this was a very neat starting point.
I
had sometimes over the past years mused about how to build this kit, and had
settled on building it as a stranded and deserted vessel. Thus I would be able
to apply more intense weathering than in my usual projects, with the large scale
making it somewhat easier.
| CONSTRUCTION |
The hull was built easily, same as various other subassemblies of the
superstructure. I proceeded fast and enjoyed it. Rather little putty was used,
mainly at the seam between the deck and the hull – but that was a while later. I
did drill out all the portholes and scuppers at this stage, too.
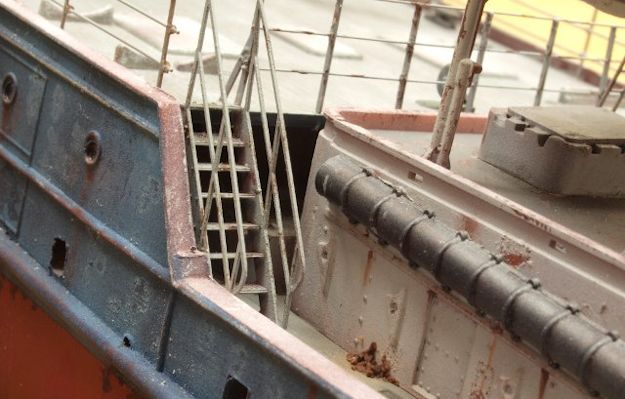
 Parallel
to starting construction, I determined which parts to improve or to replace.
This concerned mainly the railings, but also ladders and inclined ladders and handwheels.
Saemann, a German provider of photo etch, had some helpful items in their
catalogue, which I ordered and received a few days later.
Parallel
to starting construction, I determined which parts to improve or to replace.
This concerned mainly the railings, but also ladders and inclined ladders and handwheels.
Saemann, a German provider of photo etch, had some helpful items in their
catalogue, which I ordered and received a few days later.
Having a hull to work with, I started the base. A piece of foam board was cut
and ground out to receive the hull, which was supposed to lie on a beach. The
base was then coated with white glue and various ground
working powders and grains. I even used Thai Curry which had a nice
texture and colour, but made the base smell like a Thai takeaway for a long
time. Some little stones and some pieces of Iceland moss were also used. My
airbrush and various acrylic paints were used to arrive at the desired colouring.
The base prepared, I continued on the vessel. The hull was primed using a rattle can and then sprayed rust red. That cured, I applied a mixture of salt and water. Yes, I know, the salt technique is soo several years ago, dahling, but hey, I´m not with facebook and my cell phone still has buttons, so what?
| COLORS & MARKINGS |
 Next the
lower hull was sprayed a brighter red and the upper hull (after masking the
waterline) in various shades of blue. The superstructure was sprayed a very
light grey from my dwindling stocks of JPS acrylics. That done, a crude and
bristly brush was very well suited to remove the paint from the salted areas and
disclose the rust red below. Apart from scarring and removing the paint, I
liberally used artist´s oils in various shades and consistencies to further
improve the impression of a pretty beaten old vessel.
Next the
lower hull was sprayed a brighter red and the upper hull (after masking the
waterline) in various shades of blue. The superstructure was sprayed a very
light grey from my dwindling stocks of JPS acrylics. That done, a crude and
bristly brush was very well suited to remove the paint from the salted areas and
disclose the rust red below. Apart from scarring and removing the paint, I
liberally used artist´s oils in various shades and consistencies to further
improve the impression of a pretty beaten old vessel.
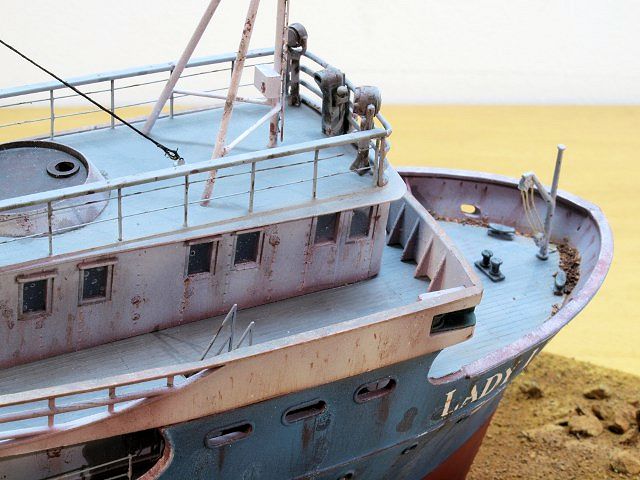
I
imagined the wooden decks to be terminally bleached by sun and salt, hence in a
light grey. They were sprayed in an appropriate grey and accentuated with
artist´s oils.
| FINAL BITS |
The Seamann PE was very strong and easy to work with. I had to make adjustments
as to the length of the railing posts and inclined ladders, but it was no real
problem. The railing bars were made from 0.2 mm brass wire, the wooden handrails
atop the railings from Evergreen profiles.
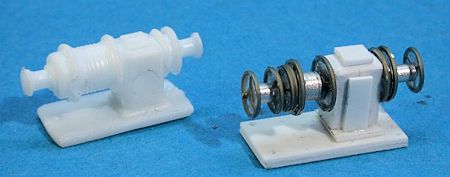
 The
tripod mast was rebuilt from brass tubing, wire, PE and styrene parts and proved
to be strong enough. The windlass was also rebuilt as per the kit part´s
dimensions from styrene and PE parts.
The
tripod mast was rebuilt from brass tubing, wire, PE and styrene parts and proved
to be strong enough. The windlass was also rebuilt as per the kit part´s
dimensions from styrene and PE parts.
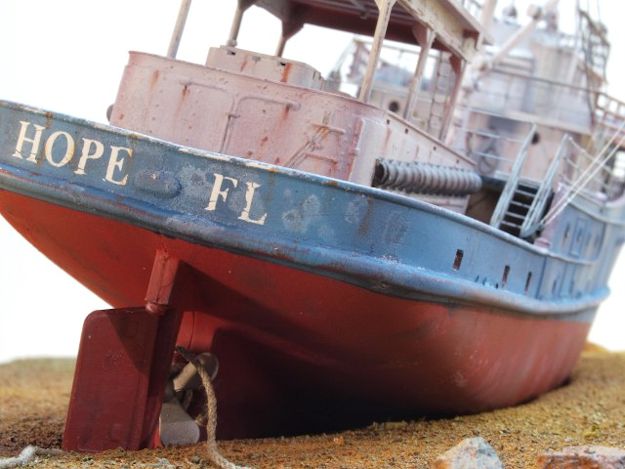
 Getting
the lettering was a bit tricky. I couldn´t and wouldn´t use the kit decals. So I
looked for and found Woodland Scenics dry transfers, originally intended for
U.S. Railway rolling stock and available in various fonts, colours and sizes,
which looked very convenient. Finding an online supplier delivering the items to
me for a reasonable rate was much tougher, but a solution eventually arrived at.
Getting
the lettering was a bit tricky. I couldn´t and wouldn´t use the kit decals. So I
looked for and found Woodland Scenics dry transfers, originally intended for
U.S. Railway rolling stock and available in various fonts, colours and sizes,
which looked very convenient. Finding an online supplier delivering the items to
me for a reasonable rate was much tougher, but a solution eventually arrived at.
The dry transfers were harder to work with than expected, but I managed to apply
the desired name „Lady Luck“ and the homeport „Hope, FL“ (in reference to our
hopes not always being fulfilled) and the hull number 42 (as an obvious
reference to the works of the late Douglas Adams).
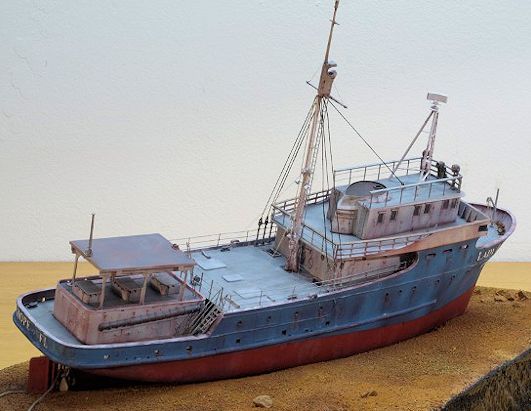
The derrick was strengthened with wire and detailed with some PE. It was mounted
swung out to starboard. My landlubber´s idea of the vessels loss was that the
propeller had become fouled with a
 rope, in
poor weather off a leeward coast and that the crew had taken to the boats prior
to the vessel stranding. Hence the boats are gone and the derrick is deployed. I
used various threads from my spares box for the rigging.
rope, in
poor weather off a leeward coast and that the crew had taken to the boats prior
to the vessel stranding. Hence the boats are gone and the derrick is deployed. I
used various threads from my spares box for the rigging.
A
piece of stouter thread was wound around the propeller shaft and its ends
frayed. The propeller had been sprayed in Alclad brass and toned down to
simulate bronze. An anchor was mounted to a piece of anchor chain and this led
through the hawsepipe, around the windlass and through an opening drilled into
the deck.
Having assembled all the parts, I „glazed“ all the windows and portholes using
white glue. After curing, the „glass“ was blinded using matt varnish. Some nooks
and crannies of the deck were dirtied up with white glue and groundwork powders.
Finally I was able to mount the vessel to the base and to drape the fouled rope
and the anchor chain in a reasonably convincing manner.
| CONCLUSIONS |
This model is not based on any concrete ship or event, it was merely a fun build
– and fun I had!
| REFERENCES |
Here is the link to the tuna fishing video:
http://www.youtube.com/watch?v=u5dOLiF9fjk
November 2014 If you would like your product reviewed fairly and fairly
quickly, please
contact
the editor or see other details in the
Note to
Contributors.