Dragon 1/700 USS Boxer (LPH-4)
| KIT #: | 7070 |
| PRICE: | 35 € |
| DECALS: | One option |
| REVIEWER: | Frank Spahr |
| NOTES: |
Generic PE railings, e.g. Lion Roar LE 700061 (@ 8€), WEM AS 7049 PE
for kit helos (fret for three aircraft @
2€) WEM AS 7067 S-56 Mojave (pack with three aircraft @ 7 €), WEM
AS 7049 S-58 (pack with three aircraft @ 7 €, if available), Lion Roar
USN Floater Net Baskets, No. 700063, @ 8 €,
Lion Roar
WW II USN
Carrier Cranes & Landing Set, Nr. LE 700158 (), Starfighter Decals
700-24 LPH 4-5-8 (@ 15 €);Trumpeter Display Box |
| HISTORY |
 USS Boxer (originally CV-21, later CVA-21, then
Technical
data:
Displacement 27.000 t, Length 888ft / 271 m, Width at waterline 93 ft / 28 m , draft 28 ft / 8,70 m, Propulsion 8 boilers and four geared turbines @ 150,000 hp, top speed 31 kn, crew appr. 1400 (including 450 Airwing), 30-40 helicopters, appr. 1,450 embarked troops, armament as helicopter carrier 8 x 5 in DP guns
| THE KIT |
Dragon
has produced a number of kits of  my
view. This kit appealed to me who is anything but a USN buff. It looked complete
and buildable without much thinking or modifications. Or so I thought.
my
view. This kit appealed to me who is anything but a USN buff. It looked complete
and buildable without much thinking or modifications. Or so I thought.
Research – bane or benefit?
Those that enjoy a state of blissful ignorance about a kit´s accuracy need to
steer clear from researching the subject. Those that intend to get it really,
really right are in danger of researching to such an extent that they lack time
for building. Getting all the books deemed necessary on a subject can easily
cost way more than the kit, so for all those with limited wallets, a pragmatic
approach may work well, especially if the subject is outside your normal
subjects. So I tried to steer a sensible middle course by looking up all the
reference images I could find on the net and badger my more USN-savvy friends
for the rest ;-)
I soon
found out what I would have to change. Boxer as an LPH had retained only the
four twin 5 inch turrets as armament, with all the rest of her original AA gone,
including the splinter shields. These were retained in the kit and would have to
be removed. The kit PE is anything but comprehensive and its selection rather on
the arbitrary side. Most notably, the kit cranes would very much benefit from PE
replacements. PE railings are only provided for the island, but much more is
actually needed. The underside of the deckside aircraft lift is finely detailed
with spidery PE, but the extensive catwalks and the numerous whip antennae
surrounding the deck have not been addressed. Sadly, only eight UH-34/S-58 helos
are provided with the kit, when many more were present on board and oftentimes
visible on deck or through the hangar doors. The clear styrene helo rotors are
way below the general level of detailing – they should be replaced. The decal
sheet is in no way complete, neither where the ship nor where the aircraft are
concerned. Finally there are no deck vehicles whatsoever included, neither
tractors nor forklifts or the signature Tilly crane. All in all I found numerous
issues to address even without going overboard with my researching.
| CONSTRUCTION |
Method building – my way
I tend to
prepare the bases for my models right at the start of the process, when the
model is uncritical to handle. I try to complete the base so that I only need to
glue or screw the finished model to it, and maybe fill some gaps with acrylic
gel. The model´s respectable size necessitated the use of Trumpeter´s largest
acrylic display box. Even though not perfect, I prefer these boxes for
 the good
value for money they give in storing the model dust-free and transporting it to
shows. The hull was placed on the base and holes were drilled through the hull
stiffeners and the base. Screws were secured to the hull with resin, their
length was selected so they could be fastened from below the base with the
respective nuts. During the
build, the screws were used to hold the model in my vise. For me, this vise has
become an indispensable tool as I can handle the model easily without touching
it and position it in virtually any desired angle. With the hull screwed to the
base, I lightly misted grey paint from my airbrush around it to mark the hull´s
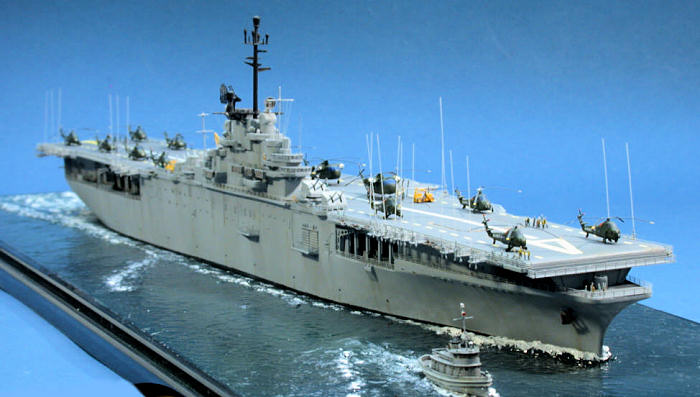
perimeter in the waterline. I
wanted to show the carrier at moderate speed with one of the tugs steaming on
her starboar
the good
value for money they give in storing the model dust-free and transporting it to
shows. The hull was placed on the base and holes were drilled through the hull
stiffeners and the base. Screws were secured to the hull with resin, their
length was selected so they could be fastened from below the base with the
respective nuts. During the
build, the screws were used to hold the model in my vise. For me, this vise has
become an indispensable tool as I can handle the model easily without touching
it and position it in virtually any desired angle. With the hull screwed to the
base, I lightly misted grey paint from my airbrush around it to mark the hull´s
perimeter in the waterline. I
wanted to show the carrier at moderate speed with one of the tugs steaming on
her starboar d side. After removing the hull, the necessary waves and wakes and
any larger structure on the base was sculpted with one-component wall spackle
from the hardware supermarket. This stuff cures rather fast
and both sands and paints over easily. To achieve the slightly irregular surface
texture of the water, wall paint was stippled to the base using a large brush
you´d use for painting corners of rooms. According to the amount of paint used
and the stippling pressure and frequency, you can easily produce all sorts of
patterns to your surface. With
the wall p
d side. After removing the hull, the necessary waves and wakes and
any larger structure on the base was sculpted with one-component wall spackle
from the hardware supermarket. This stuff cures rather fast
and both sands and paints over easily. To achieve the slightly irregular surface
texture of the water, wall paint was stippled to the base using a large brush
you´d use for painting corners of rooms. According to the amount of paint used
and the stippling pressure and frequency, you can easily produce all sorts of
patterns to your surface. With
the wall p aint cured, I brought out my airbrush and various blue and green hues
of acrylics and sprayed the base, aiming at lighter and greener shades closer to
the hull and especially
aint cured, I brought out my airbrush and various blue and green hues
of acrylics and sprayed the base, aiming at lighter and greener shades closer to
the hull and especially astern.
This is fun, it is not hard,
and it´s easily corrected. When I felt I had done the best I could, I set the
base aside to dry. This is especially important at this stage, as all the
previous materials are water-based, and excess moisture needs time to evaporate.
Otherwise, bubbles will appear after sealing the base. The sealer I use is gloss
clear lacquer in a rattle can, also from the hardware supermarket. It´s
solvent-based and effectively seals the surface after some passes, bringing it
to life and reflecting the light virtually like w
astern.
This is fun, it is not hard,
and it´s easily corrected. When I felt I had done the best I could, I set the
base aside to dry. This is especially important at this stage, as all the
previous materials are water-based, and excess moisture needs time to evaporate.
Otherwise, bubbles will appear after sealing the base. The sealer I use is gloss
clear lacquer in a rattle can, also from the hardware supermarket. It´s
solvent-based and effectively seals the surface after some passes, bringing it
to life and reflecting the light virtually like w ater. One word of caution
- even if this clear coat feels dry to the touch, it may still not be
fully cured and still be able to glue a model temporarily left on the base to
it. Allow a few weeks before you feel secure about
that. I learned it the hard way, with a 1:700 Flower Class somersaulting
on a tile floor. You don´t want to live through
that. Believe me.
ater. One word of caution
- even if this clear coat feels dry to the touch, it may still not be
fully cured and still be able to glue a model temporarily left on the base to
it. Allow a few weeks before you feel secure about
that. I learned it the hard way, with a 1:700 Flower Class somersaulting
on a tile floor. You don´t want to live through
that. Believe me.
Disturbed
water and the wake were hinted at by drybrushing white artist´s oil paint. That
cured, the base was considered complete and I continued on the ship proper.
Always
start at the centerline
 Master
modeler and friend Frank Ilse counselled me years ago always to start at the
centerline of the model and then work towards its periphery – thus minimizing
the risk of accidentally destroying things already completed. I've tried to heed
this advice ever since. In this case, the starting point obviously was the
hangar. I spent some time
thinking about viewing angles and then decided which of the doors to open and
which to close, and what to display where in the hangar to make it look busy
with minimal effort. Torben
Keitel suggested using lots of boxes to block the lines of sight where wanted,
so I made a lot of them from styrene stock. two of the kit helos were also
placed inside the
Master
modeler and friend Frank Ilse counselled me years ago always to start at the
centerline of the model and then work towards its periphery – thus minimizing
the risk of accidentally destroying things already completed. I've tried to heed
this advice ever since. In this case, the starting point obviously was the
hangar. I spent some time
thinking about viewing angles and then decided which of the doors to open and
which to close, and what to display where in the hangar to make it look busy
with minimal effort. Torben
Keitel suggested using lots of boxes to block the lines of sight where wanted,
so I made a lot of them from styrene stock. two of the kit helos were also
placed inside the
 hangar, together with a goodly number of Lion Roar crew
figures. As I mainly use
acrylic paints, it wasn´t that easy to find proper USN shades, but I did find
some equivalents. I substituted the ubiquitous haze grey with Vallejo Sky Grey
and Deck Grey with Vallejo Dark Blue Grey. The hangar bulkheads were painted off
white, using JPS RAF White. The helos posed problems of their own. I personally don´t like clear
styrene and wouldn't be sad if the manufacturers reversed their trend of molding
particularly exciting parts in clear. The stuff is brittle and harder to clean
up, as I find it hard to see excess material. In this case, I had to do the
serious cleanup after priming the helo. The kit decals turned out to be too
small, but luckily Starfighter D
hangar, together with a goodly number of Lion Roar crew
figures. As I mainly use
acrylic paints, it wasn´t that easy to find proper USN shades, but I did find
some equivalents. I substituted the ubiquitous haze grey with Vallejo Sky Grey
and Deck Grey with Vallejo Dark Blue Grey. The hangar bulkheads were painted off
white, using JPS RAF White. The helos posed problems of their own. I personally don´t like clear
styrene and wouldn't be sad if the manufacturers reversed their trend of molding
particularly exciting parts in clear. The stuff is brittle and harder to clean
up, as I find it hard to see excess material. In this case, I had to do the
serious cleanup after priming the helo. The kit decals turned out to be too
small, but luckily Starfighter D ecals has a great sheet on the LPH´s, which I
immediately ordered. This sheet has very useful decals for both the ship and
vast numbers of helos. As with
some
Starfighter decals, the sheet has a continuous carrier film and needs careful
trimming of each individual decal. While I was waiting for the decals (w
ecals has a great sheet on the LPH´s, which I
immediately ordered. This sheet has very useful decals for both the ship and
vast numbers of helos. As with
some
Starfighter decals, the sheet has a continuous carrier film and needs careful
trimming of each individual decal. While I was waiting for the decals (w hich
arrived as fast as usual with this manufacturer), the two hangar deck helos were
completed retaining the kit decals, all the numerous others would receive the
aftermarket decals.
Parallel to
working on the hangar deck, I painted and weathered the flight deck, with
obviously different wear patterns from a carrier with fixed-wing aircraft. Various oil paints applied by
drybrushing plus some washes worked fine. Prior to decaling the flight deck, it
was sprayed with clear gloss to prevent silvering.
hich
arrived as fast as usual with this manufacturer), the two hangar deck helos were
completed retaining the kit decals, all the numerous others would receive the
aftermarket decals.
Parallel to
working on the hangar deck, I painted and weathered the flight deck, with
obviously different wear patterns from a carrier with fixed-wing aircraft. Various oil paints applied by
drybrushing plus some washes worked fine. Prior to decaling the flight deck, it
was sprayed with clear gloss to prevent silvering.
Both the
quarterdeck and the foredeck needed some rework to remove the molded on splinter
shields.
Some filling and sanding
was needed. Now I was able to paint
 and lightly weather the hull sides. Thinned
oil paint worked well on the acrylics.
and lightly weather the hull sides. Thinned
oil paint worked well on the acrylics.
„Marrying“ hull and flight deck was an interesting experience, as I needed to
apply considerable pressure.
If I had tried to use the clear styrene flight deck, at this point I would most
certainly have failed, as in no way would I have been able to prevent glue from
running under it and b linding the plastic. As I mentioned above, I don´t regard
the extensive use of clear styrene on ship models as progress or improvement,
especially not in small scale like 1:700.
linding the plastic. As I mentioned above, I don´t regard
the extensive use of clear styrene on ship models as progress or improvement,
especially not in small scale like 1:700.
Continuing the work, I started with all the features around the hull. Courtesy
by Guido Hopp, I was lucky in having received a pre-production sample of Lion
Roar´s PE USN carrier cranes fret. These parts were way more convincing than the
kit items.
I also started adding the numerous rai lings and the fiddly fore and aft
catwalks. These were made from Saemann PE grating stock, styrene stock and PE
railing, very carefully glued in order not to block the gratings. I also did the deck markings,
which were partly masked and sprayed, and partly made using the kit decals.
Additional decals were used
from the Starfighter sheet, though not their l
lings and the fiddly fore and aft
catwalks. These were made from Saemann PE grating stock, styrene stock and PE
railing, very carefully glued in order not to block the gratings. I also did the deck markings,
which were partly masked and sprayed, and partly made using the kit decals.
Additional decals were used
from the Starfighter sheet, though not their l anding spot markings as I couldn´t
find them in the reference images from the period I aimed at. I was particularly
intrigued when I could read the ship´s name at her stern, but the additional
mar
anding spot markings as I couldn´t
find them in the reference images from the period I aimed at. I was particularly
intrigued when I could read the ship´s name at her stern, but the additional
mar kings for the island improved its look, too. It all went fine and the
markings looked as if they were painted on.
kings for the island improved its look, too. It all went fine and the
markings looked as if they were painted on.
Working
on ships means you oftentimes have the opportunity of procrastinating a
particularly unnerving subassembly in favor of something less fiddly. In this
spirit, I tackled the gun turrets and the island. The only fiddly thing was the
main radar dish, whi ch was very iffy to work on. Even worse was building the PE
aircraft lift supports, as the PE is very soft and bends very easily. Only a good amount of
patience, CA glue and s
ch was very iffy to work on. Even worse was building the PE
aircraft lift supports, as the PE is very soft and bends very easily. Only a good amount of
patience, CA glue and s ome Mr Surfacer helped to get this item completed.
Now I was
past avoiding and procrastinating, I was forced to tackle the eighteen whip
antennae festooning the deck I had identified on the reference images. They all
had individual bases with counterweights and could be lowered or raised in the
real ship. As I had seen them on many images, I felt the need to somehow
replicate them on my model. After some attempts, they were made from styrene
stock, sections of brass tubing, some brass sheet, pieces of 1:250 scale PE
railings and pieces of stretched sprue. I had originally made the antennae from .2 mm brass wire, but
that was too thick and had to be s ubstituted with stretched sprue. Mounting the
eighteen bases to the catwalks and adding the appropriate railings severely
tested my patience. The antennae themselves were mounted only later to
ubstituted with stretched sprue. Mounting the
eighteen bases to the catwalks and adding the appropriate railings severely
tested my patience. The antennae themselves were mounted only later to
 prevent
breakage.
prevent
breakage.
Another
visible and missing feature were the numerous floater net baskets. They are
readily available from Lion Roar, and with some practice build easily. I just
didn´t know what to put into them – making nets with floating devices in 1:700
is nothing obvious in my book. I found my solution when I opened a teabag and
saw the dusty tea inside. So I put some tea dust into each basket and added
clear lacquer to glue the particles together. A washing with tan acrylic
completed the procedure. Now
the whip antennae were added, and some rigging of flaglines was done using tan
stretched sprue. Now the vessel was virtually complete, yet still waiting for
the air
group.
 I had
decided to get more UH-34 for a fuller deck, but also wanted some of the
unusually looking S-56 Mojave. Both are available as resin/PE sets from WEM, but
the S-58 were sold out and unavailable for the foreseeable future. So I only got
the Mojaves plus some PE sets for the S-58 I already had, as their cl
I had
decided to get more UH-34 for a fuller deck, but also wanted some of the
unusually looking S-56 Mojave. Both are available as resin/PE sets from WEM, but
the S-58 were sold out and unavailable for the foreseeable future. So I only got
the Mojaves plus some PE sets for the S-58 I already had, as their cl ear styrene
landing gear was overly brittle and the styrene rotors definitely too coarse.
The Mojaves were soon built and painted, and looked fine. I beefed up the rotor
hub and the wheels with white glue, and applied the Starfighter decals.
ear styrene
landing gear was overly brittle and the styrene rotors definitely too coarse.
The Mojaves were soon built and painted, and looked fine. I beefed up the rotor
hub and the wheels with white glue, and applied the Starfighter decals.
With a
measly nine helos, the deck still looked like a plate at a gourmet restaurant,
so I asked around and received help. My friend Christian Bruer had some Fujimi
helos, and Norbert Thiel of NNT gave me a PE fret of his excellent Atlantic
Conveyor kit which contains all the land ing gear and rotors you can wish for.
Having built the helos, things looked way better. For the finishing touches, I
received advice and help from Frank Ilse. He had leftover deck vehicles and PE
from a GMM USS Saipan fret he kindly gave me, including a correct Tilly crane.
Now I was able to build some forklifts and tractors, which was tricky but could
be done, and now it was
time to arrange the deck and
ing gear and rotors you can wish for.
Having built the helos, things looked way better. For the finishing touches, I
received advice and help from Frank Ilse. He had leftover deck vehicles and PE
from a GMM USS Saipan fret he kindly gave me, including a correct Tilly crane.
Now I was able to build some forklifts and tractors, which was tricky but could
be done, and now it was
time to arrange the deck and
 bring it to life.
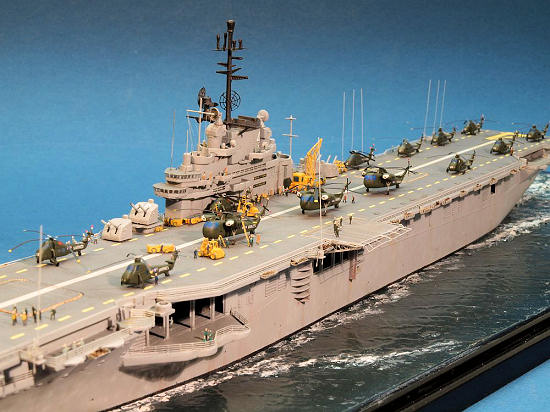
Some
research (mostly asking Frank, actually …) showed me who´s who on a flight deck
and their respective coloured jerseys. So I repainted a number of my PE figures.
I ended up with khaki office rs, light blue naval crew, tractor drivers in blue,
plane captains in brown, plane handlers in green, plane directors in yellow –
and of course marines in olive. Frank also gave me some hints on how to display
the figures in credible arrangements and poses, so I sat down one rainy Sunday
and started crewing the ship. I didn´t count the figures, it must have been
about 150 of them – almost all of them do something credible and most of them
interact with others. There´s life on the flight deck without just distributing
the figures evenly. Some are watching the tug closing in on the carrier, some
are working on helos and equipment, some take a break – so hopefully it looks as
it really would during a break in flight ops. To hide glue spots, the entire
model was then sprayed Vallejo Model Air Matt varnish, which works just great
out of the bottle. Now I was able to finally mount the model to the base, and I
declared the build complete.
rs, light blue naval crew, tractor drivers in blue,
plane captains in brown, plane handlers in green, plane directors in yellow –
and of course marines in olive. Frank also gave me some hints on how to display
the figures in credible arrangements and poses, so I sat down one rainy Sunday
and started crewing the ship. I didn´t count the figures, it must have been
about 150 of them – almost all of them do something credible and most of them
interact with others. There´s life on the flight deck without just distributing
the figures evenly. Some are watching the tug closing in on the carrier, some
are working on helos and equipment, some take a break – so hopefully it looks as
it really would during a break in flight ops. To hide glue spots, the entire
model was then sprayed Vallejo Model Air Matt varnish, which works just great
out of the bottle. Now I was able to finally mount the model to the base, and I
declared the build complete.
| CONCLUSIONS |
 It was
quite some fun, as always there was a lot to be learned, and some things
developed quite different than expected. Many thanks to my friends, the German
Gamblers, all of whom have helped in this project!
It was
quite some fun, as always there was a lot to be learned, and some things
developed quite different than expected. Many thanks to my friends, the German
Gamblers, all of whom have helped in this project!
February 2011 If you would like your product reviewed fairly and quickly, please
contact
me or see other details in the Note to
Contributors.