Revell 1/285 USCGC Burton Island
| KIT #: | 05040 |
| PRICE: | |
| DECALS: | |
| REVIEWER: | Frank Spahr |
| NOTES: |
| HISTORY |
Burton Island belonged to the Wind Class of icebreakers built for the US Navy during and soon after World War 2. These ships were the first proper USN icebreakers, their design was based on European pre-war vessels with the aim of improving on them. They had diesel-electric propulsion with six diesels powering three generators, driving three shafts (two astern and one in the bow). Their hulls were short and wide with pointed bow and stern to ease breaking ice in both directions. The hulls were built very strong and sturdy. The wartime builds were heavily armed with two twin 5 inch turrets plus a good number of 40 mm and 20 mm AA guns plus depth charges. A Grumman Duck amphibian was shipped for reconnaissance. Burton Island, built after the war, started with a lighter armament with only one single 5 inch gun turret.
The vessel served with the US Navy until the end of 1966 when she was transferred to the US Coast Guard. She served there until being decommisioned in 1978. She was scrapped in 1980.
 Originally
designated AG-88, the vessel was redesignated ABG-1 in 1949. In USCG service,
her designation was WAGB-283. Her USCG callsign was NEVK. Her nickname was White
Antarctic Garbage Barge.The ship had several refits and rebuilds over her life.
The amphibian was exchanged with a helicopter which needed adding a landing pad.
The armament was first reduced and completely removed when in Coast Guard
service. The helo deck was enlarged and a telescopic hangar added which could
house two HH-52 helos. The boat complement was modified and reduced. Originally,
the vessel had had two LCVP, which was reduced to one with the changes to the
helo deck. A large enclosed ice lookout was erected atop the bridge, and the
mast rebuilt with a new radar fit. Originally painted grey, the ship was
repainted white with a USCG „racing stripe“ and later in red.
Originally
designated AG-88, the vessel was redesignated ABG-1 in 1949. In USCG service,
her designation was WAGB-283. Her USCG callsign was NEVK. Her nickname was White
Antarctic Garbage Barge.The ship had several refits and rebuilds over her life.
The amphibian was exchanged with a helicopter which needed adding a landing pad.
The armament was first reduced and completely removed when in Coast Guard
service. The helo deck was enlarged and a telescopic hangar added which could
house two HH-52 helos. The boat complement was modified and reduced. Originally,
the vessel had had two LCVP, which was reduced to one with the changes to the
helo deck. A large enclosed ice lookout was erected atop the bridge, and the
mast rebuilt with a new radar fit. Originally painted grey, the ship was
repainted white with a USCG „racing stripe“ and later in red.
Burton Island´s first major operation was her participation in the US Navy´s massive operation Highjump in Antarctica in 1947. 19 cruises to the Arctic and Alaska followed, including an operation in Antarctica in 1958 where she assisted the Japanese vessel Soya.
During her USCG service, she was both used for icebreaking and survey work in the Arctic, and regularly was deployed to the Antarctic for a series of Deep Freeze operations.
I can but recommend to get the book „Ice is where you find it“ written by Rear Admiral Charles W Thomas, who commanded the icebreakers Northland and Eastwind. It is a candid and most intriguing account of his service on icebreakers during WW2 and postwar including Operation Highjump. It is quite affordable in the Kindle version.
| THE KIT |
This kit, according to Scalemates, dates back to 1957. It was orginally marketed as Burton Island, but later also as Eastwind. The scale was originally given as 1:285, but has later been changed to 1:300. Given the year of origin, it depicts the vessel as an armed US Navy icebreaker, with a twin 5 inch gun turret and several 40 mm Bofors AA lafettes. Two cranes for landing craft are shipped, and the vessel has a helicopter landing pad. A Sikorsky S-55 helicopter is also provided.
Given the age of the molds, this is another quite neat and proper kit, with some surprisingly delicate structures, and some rather crude ones, especially the AA guns. But the shape looks good enough for me, and the parts fit turned out to be not that bad at all.
I had – a long time ago – bought this kit and the PE set by Gold Model Models, which is a twin sheet also catering to the very hard to get USCG Campbell / Roger B Taney Treasury Class Coast Guard cutter. The sheet comes with virtually all you need to detail the model in its 1950s fit.
 My modeling
pal Lars Scharff had built a 1:700 version of this ship several years ago, and
kindly let me have a good number of reference images and drawings. I first had
to decide on the timeframe determining the fit, paint scheme and markings. As I
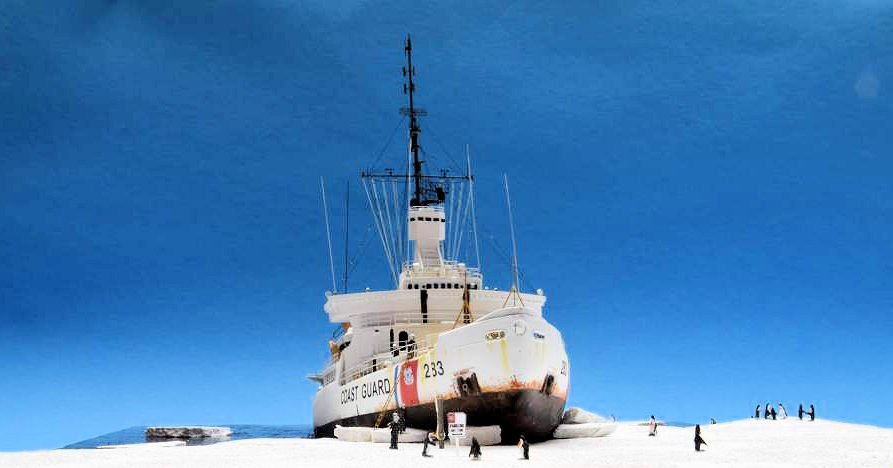
really enjoyed the header photo for Burton Island on Wikipedia, it had to be
after the Coast Guard took over.
My modeling
pal Lars Scharff had built a 1:700 version of this ship several years ago, and
kindly let me have a good number of reference images and drawings. I first had
to decide on the timeframe determining the fit, paint scheme and markings. As I
really enjoyed the header photo for Burton Island on Wikipedia, it had to be
after the Coast Guard took over.
So the ship needed to be painted white with Coast Guard markings, be disarmed, and have several modifications to the bridgework and the helo deck plus the mast. I found that the bridge wings were rebuilt and enlarged, the turret area plated over, a new enclosed ice lookout built atop the bridge, the mast seriously rebuilt, one crane removed and the helo deck enlarged, plus a telescopic hangar added behind the funnel. The helo then shipped was a HH-52 aka Sikorsky S-62, a smaller relative of the S-61 Sea King with only one turbine, and the three-bladed rotor assembly of the S-55.
So a good amount of modifications would be needed, and quite some freedom enjoyed. Those modifications would entail that a lot of the PE parts for the earlier version would not fit anymore, so I needed generic PE. That started with railings, inclined ladders, ladders, helo deck netting and ended with various odds and ends. Those I found available from German supplier Saemann Ätztechnik, where you can order directly.
For the helo, I found a 1:350 Airfix S-61 from their HMS Illustrious kit in my spares box. Being smaller scale, I found I could just about get away with modifying it to resemble a S-62.
The decals for both the ship and the helicopter had to be tailormade. My friend, master modeler Frank Ilse, kindly took over this chore and produced lovely decals.
Bill Michaels, known as rcboater here on the M2 Forum, helped me out widely with Coast Guard info. Many thanks to all who helped me!
| CONSTRUCTION |
 I
started this project on New Year´s Day 2022, with a freshly cleared desk and
some enthusiasm. The early part was dominated by identifying what needed
corrections and then saw and grind and trim and glue away. The hull halves were
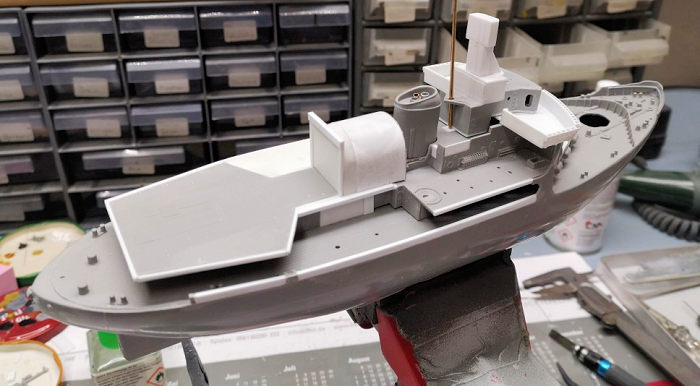
assembled early on, after removing molded on railings and making corrections.
The biggest single item was the bridge which needed a total rebuild including
wind deflectors. The deck below had to be re-planked with styrene strips as
remiving the molded on detail obliterated the planking. The base for the twin 5
inch turret had to be removed and some creative plating over be substituted.
I
started this project on New Year´s Day 2022, with a freshly cleared desk and
some enthusiasm. The early part was dominated by identifying what needed
corrections and then saw and grind and trim and glue away. The hull halves were
assembled early on, after removing molded on railings and making corrections.
The biggest single item was the bridge which needed a total rebuild including
wind deflectors. The deck below had to be re-planked with styrene strips as
remiving the molded on detail obliterated the planking. The base for the twin 5
inch turret had to be removed and some creative plating over be substituted.
The distinctive ice lookout and how it blended with the existing bridgework took some thought and trying. The mast needed a distinct footing and the items surrounding the mast needed to be added. I added several probably spurious exhausts to the top of the funnel, but the look better than the original. It took me some thought to determine what and where to add to the helo deck, and the structures below it. Quite some openings in the decks needed to be filled, and quite some styrene stock was used to add borders and framing.
Parallel to that, I worked on smaller subassemblies as the landing craft, its supports, the boat and its cradles and the crane. The quite intricate mast was a project in itself, and needed checking for height and clearing the ice lookout for the radar arrays. I tried to make the mast as sturdy as possible, especially the attachment of the yards to the mast, for which I used generic PE stock perforated strips. Much better than just gluing the yards.
The telescopic hangar took two tries until I was satisfied. The curved part is CA-infused paper.
Quite early on I started work on the base (see below).
 Once my
subassemblies were ready, I started priming and painting. Bill Michaels had
recommended the shade Vallejo Model Color 70860 for the distinctive „Spar“ shade
used on USCG vessels. That worked brilliantly. I used Stynylrez primer in white,
grey and black, and apart from that Vallejo shades. A lot needed to be brush
painted, but wherever I could I rather masked and sprayed. The decks were
characterized with reddish-brown artist´s oil paint.
Once my
subassemblies were ready, I started priming and painting. Bill Michaels had
recommended the shade Vallejo Model Color 70860 for the distinctive „Spar“ shade
used on USCG vessels. That worked brilliantly. I used Stynylrez primer in white,
grey and black, and apart from that Vallejo shades. A lot needed to be brush
painted, but wherever I could I rather masked and sprayed. The decks were
characterized with reddish-brown artist´s oil paint.
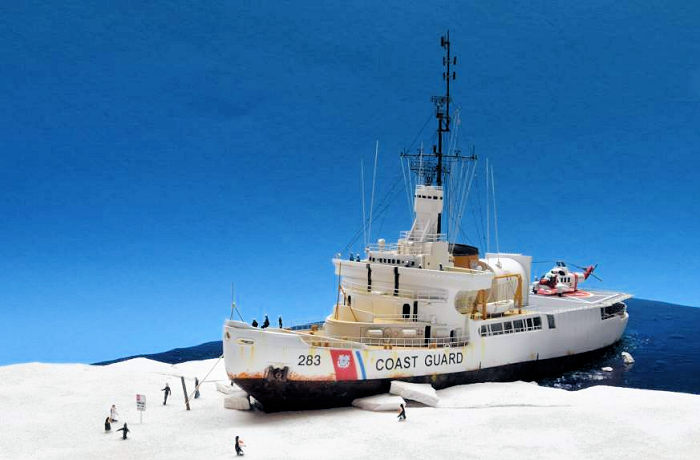
I knew the hull paint was heavily eroded by the ice, and rusty or primed areas widely visible around the waterline. So I used reddish primer and the salt chipping technique for good measure, and in my eyes to good effect here.
It needed quite some determining where to put the top of the boot topping, and I had to redo it. I then sent photos with measurements to Frank Ilse who then produced the necessary decals.
They were applied after glosscoating the requisite areas with Future. They fit well and conformed well, and that was a big relief for me. After another layer of Future and a good flat coat I continued weathering the hull, relying on artist´s oils.
I then continued on the helicopter, modifying the Airfix item with relocated sponsons and a conversion to single engine. Luckily the overall dimensions of the 1:350 item fit with the 1:285 rotor, so I feel I am not too far off. After a lot of sanding and priming, I handed the helo to Frank to design the decals.
I spent more time on the boat davits, and the helo nettings, adding some modifications and supports plus mounting pins for the netting. Moreover I prepared the inclined ladders and the various customized railings. That was in March.
Then the project stalled for several months, and it was only in November that I returned to it. I added PE eyelets to rigging belaying points, and started adding my prepared subassemblies, as always working from the center to the periphery. I was mostly spared from collateral damage, luckily. Having added what I could, I took the plunge and added the mast. Now I really had to be careful! That properly cured, I rigged the model within two days, mostly using tan and black UNI thread. Isolators were simulated with white glue. Having the eyelets on the decks helped a lot in getting the proper tension to the lines.
 I had
prepared the numerous VHF antennae using scrap PE and .2 mm wire, and added them
to the bridgework and hangar. They make the bridgework looking properly busy.
The boat davit rigging and the rigging of the crane was done using Saemann parts
and leftover PE from my scrap book.
I had
prepared the numerous VHF antennae using scrap PE and .2 mm wire, and added them
to the bridgework and hangar. They make the bridgework looking properly busy.
The boat davit rigging and the rigging of the crane was done using Saemann parts
and leftover PE from my scrap book.
Having come so far, I added the remaining railings, helo netting, the helo and the figures, plus some odds and ends, like signal lamps and bridge wing gratings.
At some point, I added the usual final flat coat, picking out the bridge windows and searchlight lenses with clear gloss. I then decided I was done with the vessel.
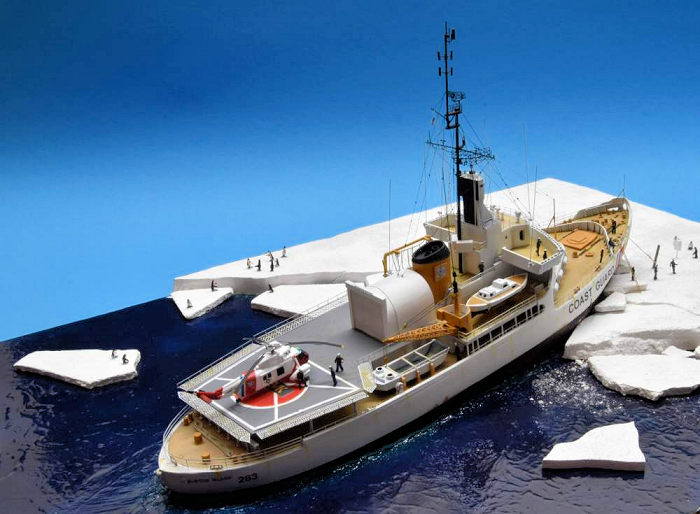
Making the base
As usual, I started preparing the base early on, when the hull was as little prone to damage as possible. I had from the start wanted to show the ship partly driven up on the edge of the ice, with a ladder and a mooring rope, and inquisitive penguins. So I first decided on the size of the base, and then made a cutout. Some thinner pieces of foam board would represent the ice. My hot wire cutter helped nicely overall. Once I was decided on the shape of the ice, the pieces could be joined with white glue. Only then was the base cut to its actual size, to achieve neat and uniform edges.
The water area was prepared as usual, with white wall paint applied in a stippling motion to get a credible surface texture. It was then sprayed deep dark blue for that extra frigid antarctic look. After ample curing time (read that as at least a week, two is better), some good layers of solvent-based clear gloss were applied for the proper sheen and reflectivity.
The ice area was structured by brushing white glue onto it and applying sand (from a beach holiday) to it. White paint did the rest.
The individual ice floes were trickier to make. I had hoped to cut them from foam board, too, but the edges wouldn´t look right. So I cast a plate of plaster and broke that into individual pieces – that left properly structured borders. These pieces were also painted with wall paint.
The “ice floes” were arranged around the vessel and glued to the base using heavy body clear acrylic gel. The same gel was used to anchor smaller “debris” around the vessel, as it cures transparent and glossy.
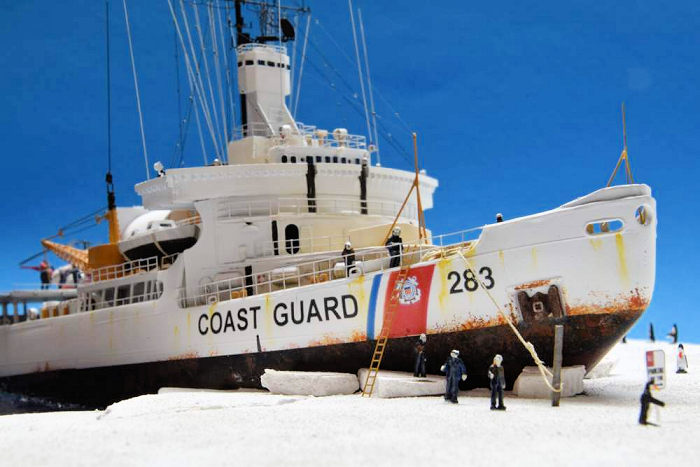 Once the
vessel was entirely completed, it was placed into the prepared cutout and glued
to the base with some dabs of heavy bodied gloss acrylic gel. The same gel,
applied from a syringe, was used to close the small remaining gap around the
vessel.
Once the
vessel was entirely completed, it was placed into the prepared cutout and glued
to the base with some dabs of heavy bodied gloss acrylic gel. The same gel,
applied from a syringe, was used to close the small remaining gap around the
vessel.
I had at some point bought a plastic bag full of architect´s plastic figures, rather crude and not that helpful, but the best I could find for scales between N-scale and 1:350 scale. I chose some of them, cleaned them up, glued them to toothpicks and painted them rather basically with blue uniforms, black shoes, white caps and tan faces and hands. I designed and printed the “No Parking” sign as small as needed and glued it to a square styrene profile. The ladder is Saemann stock, painted the hopefully appropriate USCG shade.
For the penguins, I spent a lovely Sunday morning at Tierpark Sababurg, the zoological garden in our region. They have Humboldt penguins, a small species, but you can get really close to them. So I watched the critters and took a few photos. Later back home I made my first penguins. I started with a piece of styrene rod 1 mm in diameter. I filed two notches into it, one for the beak, the other for the feet. The top was then rounded off a bit. Beak, fins and feet were cut from thin styrene stock and glued with Tamiya Extra Thin. Dental casting wax was used to round the body off a bit. The penguins were then primed in Stynylrez white. The back was hand painted black, the beak orange and the feet dark grey. They do not represent any given species, but are simply generic penguins.
In the end, I made 16 of the critters and placed them on the dio using flat-curing white glue (Bindan RS).
Having placed the figures and mooring post with rope plus the ladder, I called things quits and was happy with the end result.
| CONCLUSIONS |
I very much enjoyed this project, building it took what I like best about modeling, finding my own solutions and techniques. I enjoy the finished model, and it´s one you rarely see so it´s something special.
| REFERENCES |
https://en.wikipedia.org/wiki/USCGC_Burton_Island
http://www.navsource.org/archives/09/08/0801.htm
https://www.amazon.com/where-find-Captain-Charles-Thomas/dp/B0007I2BDY
https://en.wikipedia.org/wiki/Charles_W._Thomas_(captain)
Thanks to: Lars Scharff, Bill Michaels, Frank Ilse
17 March 2023
Copyright ModelingMadness.com. All rights reserved.
No reproduction in part or in whole without express permission. If you would like your product reviewed fairly and fairly quickly, please
contact
the editor
or see other details in the
Note to
Contributors.