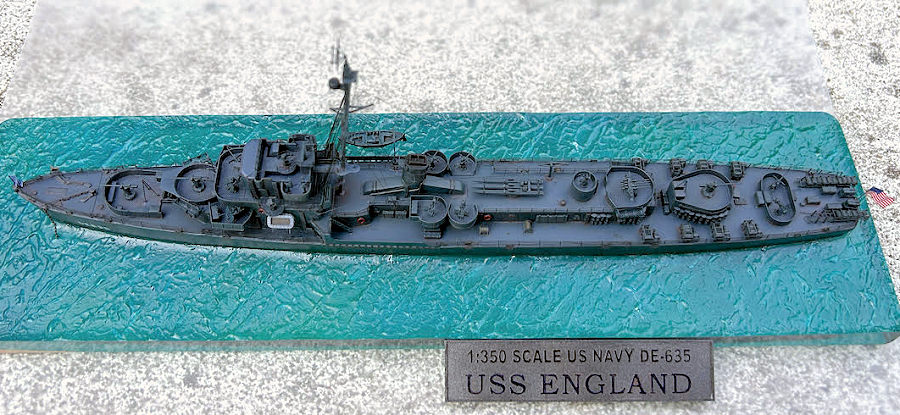
Trumpeter 1/350 USS England DE635
| KIT #: | 05305 |
| PRICE: | $ |
| DECALS: | One option |
| REVIEWER: | Marcello Rosa |
| NOTES: | Upgrade set by Five Star Models (FS350035) |
| HISTORY |
 To those in
charge of allied naval strategy, it was clear from the very early days that
winning the war would require "workhorse" ships that could be produced
relatively quickly, and in large numbers, to sustain operations wherever the
large fleet units could not be. This included, in particular, ships capable of
chasing and sinking submarines. Enter the US industrial machine, and between
late 1942 and the end of the war more than 500 Destroyer Escorts (hull
designation DE) had been launched to cover this need. Among these more than 140
formed the Buckley class, which included England (named after Ensign John C.
England, who died during the Pearl Harbor attack while saving several of his
shipmates). The Buckleys were slower, smaller and less heavily armed in
comparison with contemporary fleet destroyers but did not lack in the
antisubmarine department.
To those in
charge of allied naval strategy, it was clear from the very early days that
winning the war would require "workhorse" ships that could be produced
relatively quickly, and in large numbers, to sustain operations wherever the
large fleet units could not be. This included, in particular, ships capable of
chasing and sinking submarines. Enter the US industrial machine, and between
late 1942 and the end of the war more than 500 Destroyer Escorts (hull
designation DE) had been launched to cover this need. Among these more than 140
formed the Buckley class, which included England (named after Ensign John C.
England, who died during the Pearl Harbor attack while saving several of his
shipmates). The Buckleys were slower, smaller and less heavily armed in
comparison with contemporary fleet destroyers but did not lack in the
antisubmarine department.
Despite the humble origins, England (DE-635) is on record for achieving a combat performance unlikely to be ever matched: the sinking of 6 submarines in 12 days. As with most things in war, this was not an individual performance, but teamwork. Nonetheless, England is emblematic of the thousands of small ships and boats that did a lot of the heavy lifting on both sides of the war.
| THE KIT |
 The
Trumpeter kit can yield an excellent model of a Buckley class destroyer out of
the box. It includes options for full hull or waterline and even has some
photoetch parts (depth charge racks, radar, and a mast platform). Maybe I should
have opted for just adding some railing and rigging, which would have cut the
build time from 5 months to 2. But that was not to be...
The
Trumpeter kit can yield an excellent model of a Buckley class destroyer out of
the box. It includes options for full hull or waterline and even has some
photoetch parts (depth charge racks, radar, and a mast platform). Maybe I should
have opted for just adding some railing and rigging, which would have cut the
build time from 5 months to 2. But that was not to be...
Instead, I opted to use the Five Star models upgrade set, which is very extensive: six large sheets of photoetch, many resin parts, and metal parts for the guns. This set is in equal parts superb in quality, and frustrating. The biggest source of frustration are the instructions. They are just photos of what you are supposed to end up with but make no attempt to tell you how to bend metal, where, or in which order. For example, I did manage to build something that resembles a 1.1" quad "Chicago piano", by joining nine different small pieces of photoetch, and 4 turned brass barrels. I am not 100% sure that this is what the creators of the set wanted me to do, but the results look close enough. But I was thoroughly defeated when trying to build the 20 mm Oerlikons, each of which (presumably) requiring 4 pieces of photoetch, and 2 turned brass parts. I just could not figure out what to do.
| CONSTRUCTION |
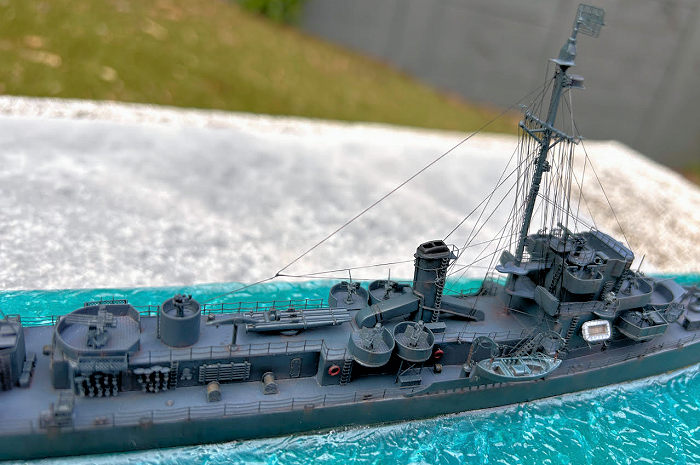
There were no dramas associated with the Trumpeter kit itself. It still requires a respectable amount of filling and sanding: for example, joining the hull bottom part results in a deep seam. But this is well within the capacity of average modellers (like me). Keep in mind that all the nice engraved and raised detail you see in the plastic parts representing the superstructures will need to be sanded off thoroughly, to allow the photoetch surfaces to stick properly. I used Micro Krystal Klear to join the large photoetch surfaces to the plastic, and this worked well. A slight suggestion of hull plating was added by engraving.
For the Oerlikons, having given up on the photoetch, I ended up using 3D printed units from Bunker studios, which are superb. I also used searchlights and sky lookout chairs resin parts sent by my friend Neil, spares from his build of HMS Rupert (a Royal Navy “Captain”-class frigate; these used the same hull as the Buckleys). Rigging was done with a mix of Uschi and AK elastic line.
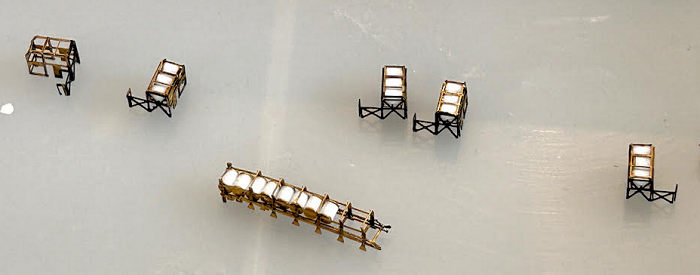 One of
the frustrations derived from the decision to use the Five Star Models set is
the fact that you must deal with building several dozen depth charge arbors, one
by one. Each requires finding a suitably sized "stem" (not provided in the set)
and gluing it individually to the "plate" (provided in the set). Then, you must
insert each arbor into a rack glued to a vertical surface (each requiring 2
bends in the metal). I used leftover supports from 3D printed resin parts for
the stems. At least an entire week was dedicated to this step. Similarly, each
depth charge must be made individually. For each, you need to find some plastic
rod (I used Evergreen), and glue 2 metal circles (provided by Five Star models)
to the ends. If you have ever asked yourself “how much patience do I actually
have”, this is your chance to find out. Also to keep in mind: in what you can
see as a disappointment or a small blessing, the upgrade set does not provide
enough arbor plates to fill all racks, not enough depth charges to fill all
racks. It is up to you to decide which ones will remain empty, and it is better
to do this in advance.
One of
the frustrations derived from the decision to use the Five Star Models set is
the fact that you must deal with building several dozen depth charge arbors, one
by one. Each requires finding a suitably sized "stem" (not provided in the set)
and gluing it individually to the "plate" (provided in the set). Then, you must
insert each arbor into a rack glued to a vertical surface (each requiring 2
bends in the metal). I used leftover supports from 3D printed resin parts for
the stems. At least an entire week was dedicated to this step. Similarly, each
depth charge must be made individually. For each, you need to find some plastic
rod (I used Evergreen), and glue 2 metal circles (provided by Five Star models)
to the ends. If you have ever asked yourself “how much patience do I actually
have”, this is your chance to find out. Also to keep in mind: in what you can
see as a disappointment or a small blessing, the upgrade set does not provide
enough arbor plates to fill all racks, not enough depth charges to fill all
racks. It is up to you to decide which ones will remain empty, and it is better
to do this in advance.
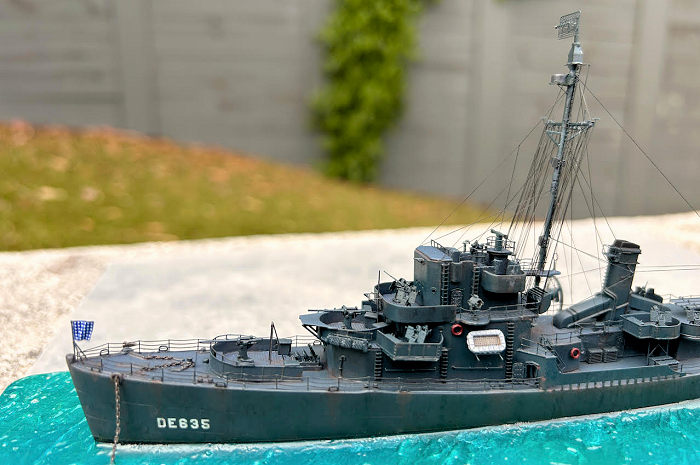
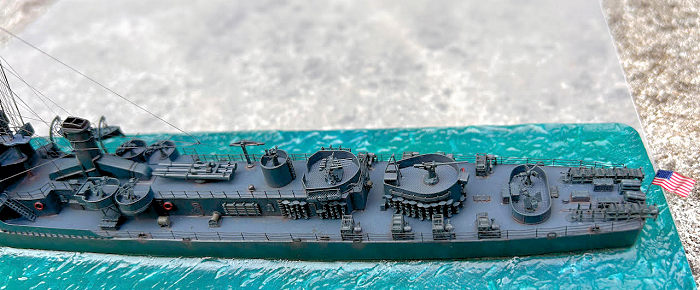
The sea base was done with generic two-part resin. The was meant to show England taking a well-deserved break in an idyllic blue lagoon. The historical records indicate that this is at least possible, as she visited a resupply base in Palau between the sub-sinking bonanza (May 1944) and being crashed on by a Japanese dive bomber (May 1945). Because she is represented at anchor, flags are being flown from the jackstaff and flagstaff (the latter had to be made from tungsten wire). The final colour of the blue surface is result of some light tinting of the resin (see below), followed by painting the surface with diluted acrylic paints, (various tones of green, clear green, and clear blue).
| COLORS & MARKINGS |
Following Mr. Surfacer 1000, the main colour used for vertical surfaces was Mr. Color 14 (Navy Blue; close enough to 5-N) and for horizontal surfaces was Mr. Color 375 (JADSF Deep Ocean Blue; close enough to Deck Blue 20-B). As I learned, even the radar and antennas were painted 5-N blue in Measure 21. Everything was sprayed with SMS clear gloss (PL09) before application of decals, and then again after these. Weathering came next (see below), and finally a 50:50 mix of SMS clear gloss and flat (PL10).
 The real
challenge was to make the model look a bit more interesting, considering that
everything was dark blue. To try to counteract that, a few things were done.
Some spraying with very diluted SMS Pru Blue (PL73) was used to lighten the hull
a bit in some places, trying not to be too systematic. Selected parts were
lightly sprayed or brush painted with PL73 other tones of dark blue (e.g. Tamiya
XF-17 Sea Blue, or XF-50 Field Blue), or even extra dark sea grey. The idea was
to create some variations, without breaking the camouflage rules. Some
impression of rust was created by applying a wash made from very diluted Tamiya
hull red (XF-9) with a paintbrush and allowing it to run along crevices and
surface joints. The hull was treated with some (hopefully) random-looking
"streaks" created with XF-9, XF-17, and XF-50 washes, to add the variations seen
in contemporary pictures. Enhancing some of the surface detail used Tamiya
Weathering Master powders applied with soft paintbrushes.
The real
challenge was to make the model look a bit more interesting, considering that
everything was dark blue. To try to counteract that, a few things were done.
Some spraying with very diluted SMS Pru Blue (PL73) was used to lighten the hull
a bit in some places, trying not to be too systematic. Selected parts were
lightly sprayed or brush painted with PL73 other tones of dark blue (e.g. Tamiya
XF-17 Sea Blue, or XF-50 Field Blue), or even extra dark sea grey. The idea was
to create some variations, without breaking the camouflage rules. Some
impression of rust was created by applying a wash made from very diluted Tamiya
hull red (XF-9) with a paintbrush and allowing it to run along crevices and
surface joints. The hull was treated with some (hopefully) random-looking
"streaks" created with XF-9, XF-17, and XF-50 washes, to add the variations seen
in contemporary pictures. Enhancing some of the surface detail used Tamiya
Weathering Master powders applied with soft paintbrushes.
Sadly, the hull number decals proved too thin, and disintegrated when pulled into position. They were substituted with generic hull number decals form eBay.
| CONCLUSIONS |
The Trumpeter kit is highly recommended, and the Five Star set does add significantly to the result. I just wish the latter came with better instructions. If you want a more detailed illustration of the building steps, or need to see additional photos, please check https://www.marcellorosa.com/1-350ussenglandde-635.
| REFERENCES |
Buckley class: https://en.wikipedia.org/wiki/Buckley-class_destroyer_escort
USS England: https://en.wikipedia.org/wiki/USS_England_(DE-635)
Ensign John England: https://en.wikipedia.org/wiki/John_C._England
13 January 2026
Copyright ModelingMadness.com. All rights reserved. No reproduction in part or in whole without express permission
If you would like your product reviewed fairly and fairly quickly, please contact the editor or see other details in the Note to Contributors.