Niko Models 1/700 USS Philadelphia (CL-41)
| KIT #: | 7035 |
| PRICE: | $65.00 SRP |
| DECALS: | None included |
| REVIEWER: | Marcello Rosa |
| NOTES: |
| HISTORY |
 The
Brooklyn class comprised 9 light cruisers commissioned between 1937 and
1939, which were in the thick of all the action for the entire duration of
the US involvement in World War II. Several suffered battle damage,
including Savannah, survivor of a direct hit from a Fritz X guided bomb off
Salerno, and St. Louis, hit by a Kamikaze in the Philippines. However, only
one (Helena) was lost to enemy action, this after being hit by 2 Japanese
long lances during the Battle of Kula Gulf, in 1943.
The
Brooklyn class comprised 9 light cruisers commissioned between 1937 and
1939, which were in the thick of all the action for the entire duration of
the US involvement in World War II. Several suffered battle damage,
including Savannah, survivor of a direct hit from a Fritz X guided bomb off
Salerno, and St. Louis, hit by a Kamikaze in the Philippines. However, only
one (Helena) was lost to enemy action, this after being hit by 2 Japanese
long lances during the Battle of Kula Gulf, in 1943.
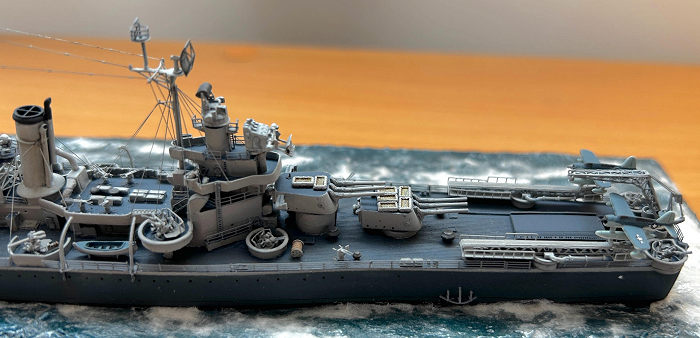
Their most obvious characteristic was the heavy main battery: no less than fifteen 6” guns, in 5 triple turrets, each capable of firing 10 rounds per minute. They were considered a successful design, and many of the lessons learned from their operation went into the design of equally successful successors, the Cleveland class. In fact, six of the survivors had long post-war careers in South American navies, including Phoenix, renamed General Belgrano, which was lost to British submarine action in 1982.
| THE KIT |
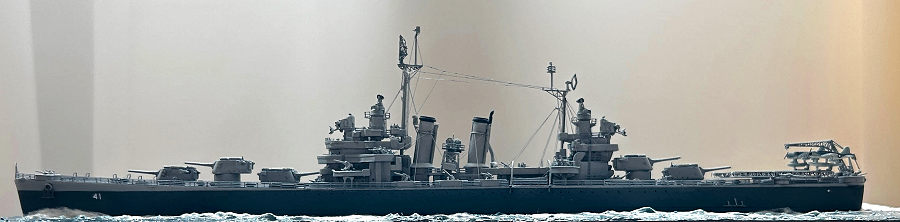
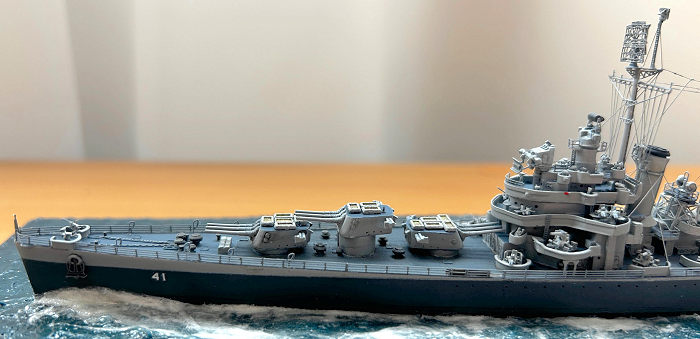
Considering such a rich history, and the fact that they were really good-looking ships (IMHO), I am baffled by the fact that no injection mould kit of a Brooklyn class cruiser exists. I don’t mean a modern one – none ever. This class has remained in the realm of short run resin kits. This includes the one I review here, made by Polish company Niko Model. This company’s catalogue includes Brooklyns as they appeared at different stages of the war, all in 1:700 scale. I chose to build USS Philadelphia, which is offered as it appeared in at the end of the war (1945). Like most ships in the US Navy, this meant a lot more antennas and AA armament in comparison with earlier versions.
 In the box
you get all resin parts needed (Resin parts.jpg), including some spares of the
smaller ones (just in case the “carpet monster” is hungry). There is also a
generous assortment of photoetch, spread over two frets (Metal parts.jpg). I
only needed to use about half of the railing provided. Finally, two extremely
nice turned wire masts, and some thin metal wire (the latter intended to provide
material for some details near the tips of the masts). The only obvious thing
missing from the kit is any sort of decals. In summary, you get a lot for your
$65 US dollars.
In the box
you get all resin parts needed (Resin parts.jpg), including some spares of the
smaller ones (just in case the “carpet monster” is hungry). There is also a
generous assortment of photoetch, spread over two frets (Metal parts.jpg). I
only needed to use about half of the railing provided. Finally, two extremely
nice turned wire masts, and some thin metal wire (the latter intended to provide
material for some details near the tips of the masts). The only obvious thing
missing from the kit is any sort of decals. In summary, you get a lot for your
$65 US dollars.
I was also impressed by the quality. Not having ever built a resin kit, I enjoyed the fine level of detail this medium affords – even if parts like the Bofors 40 mm gun barrels were so delicate that they were a constant source of grief during the build. If were to I build a similar kit again, I would leave them out until the last moment. There is some flash, which however came off easily (yellow arrows, in Resin parts.jpg). The part representing the main hull had nice details such as planking and watertight doors (Fore deck detail.jpg), but required some work to remove excess resin at the base, and to tone down the armoured belt (which appeared exaggerated; Waterline problem.jpg). There were some twisted parts Turrets.jpg) which were easily fixed by immersion in hot water and gentle coaxing.
| CONSTRUCTION |
The first thing you notice comparing the kit and reference photos is the lack of portholes and hull detail in the former. Thus, before any serious assembly I took some time to fix this (Hull fixed.jpg). This was followed by painting the hull, deck and lower superstructures in measure 22 camouflage (Painting hull part.jpg).
 After that
it was a matter to build things from bottom up, starting on the fore
superstructure, and working my way towards the back. All photoetched parts were
relatively easy to deal with (well, as easy as it can be doing metal origami in
1:700 scale), with clearly marked bend lines. The biggest challenge in this
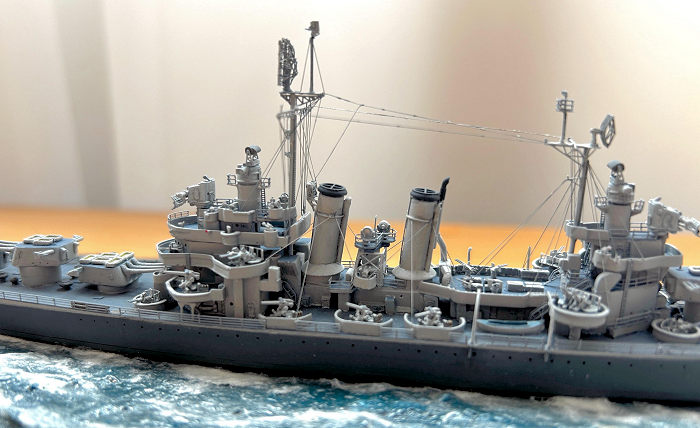
build was adding the main mast. The instructions are particularly obscure about
where this is supposed to go relative to all other bits, and I could not find
any reference images to help. Suffice to say that the turned wire mast has to go
through holes you have to drill in two levels of the superstructure (levels 3
and 4), avoid level 2 completely, and end attached to level 1. Doing this
without ending up with a tilted mast is challenging (Superstructure and main
mast added.jpg). The only other advice is not to do what I did, and leave all
guns to the very end. The fine barrels seem to break just by looking at them. I
also ended up substituting the wire provided for upper mast sections with
tungsten wire, because I found the originals were difficult to straighten.
After that
it was a matter to build things from bottom up, starting on the fore
superstructure, and working my way towards the back. All photoetched parts were
relatively easy to deal with (well, as easy as it can be doing metal origami in
1:700 scale), with clearly marked bend lines. The biggest challenge in this
build was adding the main mast. The instructions are particularly obscure about
where this is supposed to go relative to all other bits, and I could not find
any reference images to help. Suffice to say that the turned wire mast has to go
through holes you have to drill in two levels of the superstructure (levels 3
and 4), avoid level 2 completely, and end attached to level 1. Doing this
without ending up with a tilted mast is challenging (Superstructure and main
mast added.jpg). The only other advice is not to do what I did, and leave all
guns to the very end. The fine barrels seem to break just by looking at them. I
also ended up substituting the wire provided for upper mast sections with
tungsten wire, because I found the originals were difficult to straighten.
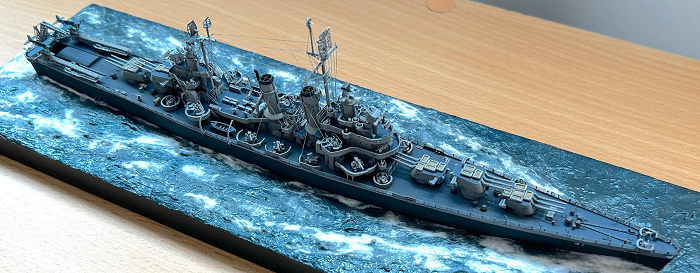
Rigging was done with Uschi elastic thread (0.03 mm). With the model completed, the only remaining step was to add a sea base, using a standard technique (if you are interested visit this link).
| COLORS & MARKINGS |
 I used Mr
Color #14 for the Navy Blue 5N (most of the hull), Mission Models MMP-104 for
the Haze Grey 5H, and Mr Color #375 for the deck and horizontal surfaces. The MM
paint was great with the paintbrush, and blended well with airbrushed parts, but
scratched off a bit too easily. I learned the hard way to cover it with Tamiya
X-22 every step of the way, when I became happy with a stage being reached. The
deck planking was “weathered” by spreading some Tamiya panel line wash (brown)
and wiping the excess with lighter fluid. Metal parts were primed with dark grey
automotive etch primer. Most were then painted with the MM Haze grey and covered
with X-22, except for the railing (I think a darker grey makes them less “in
your face”, particularly in a 1:700 model).
I used Mr
Color #14 for the Navy Blue 5N (most of the hull), Mission Models MMP-104 for
the Haze Grey 5H, and Mr Color #375 for the deck and horizontal surfaces. The MM
paint was great with the paintbrush, and blended well with airbrushed parts, but
scratched off a bit too easily. I learned the hard way to cover it with Tamiya
X-22 every step of the way, when I became happy with a stage being reached. The
deck planking was “weathered” by spreading some Tamiya panel line wash (brown)
and wiping the excess with lighter fluid. Metal parts were primed with dark grey
automotive etch primer. Most were then painted with the MM Haze grey and covered
with X-22, except for the railing (I think a darker grey makes them less “in
your face”, particularly in a 1:700 model).
As mentioned above the kit comes without any decals, requiring addition of some generic white number decals found on eBay. The airplane markings came from Starfighter decals (USN Generic Air Group markings 1945). After the model was completed, it was just a case of covering everything with SMS Flat clear.
| CONCLUSIONS |
 This was my
first attempt at a resin kit. I do not consider myself an experienced modeller,
and would not have tried it but for the lack of any injection mould kits of this
class of ships. However, I am glad I did it. There are many microscopic parts
which require a steady hand, magnifier glasses, and a clear work space (for they
often escape the tweezers and land God knows where). In addition, some of the
Instructions leave a lot to be desired, so dry fitting several steps ahead is a
must. Yet, unlike some kits, this one just came together without major dramas.
Kudos to the manufacturer for providing spare parts, and for having a catalogue
full of unique and interesting ships.
This was my
first attempt at a resin kit. I do not consider myself an experienced modeller,
and would not have tried it but for the lack of any injection mould kits of this
class of ships. However, I am glad I did it. There are many microscopic parts
which require a steady hand, magnifier glasses, and a clear work space (for they
often escape the tweezers and land God knows where). In addition, some of the
Instructions leave a lot to be desired, so dry fitting several steps ahead is a
must. Yet, unlike some kits, this one just came together without major dramas.
Kudos to the manufacturer for providing spare parts, and for having a catalogue
full of unique and interesting ships.
If you would like to see more pictures or ask questions please visit my modelling web site .
| REFERENCES |
www.navsource.org for pictures of various Brooklyn class ships
https://www.shipcamouflage.com/measure_22.htm for the correct measure 22 colours
https://airandspace.si.edu/collection-objects/vought-os2u-3-kingfisher/nasm_A19610106000 for painting the Kingfisher planes.
5 September 2023 Copyright ModelingMadness.com. All rights reserved. No
reproduction in part or in whole without express permission from the editor.
If you would like your product reviewed fairly and fairly quickly, please contact the editor or see other details in the
Note to
Contributors.