Mikro Mir 1/350 USS George Washington
| KIT #: | 350-017 |
| PRICE: | $27.30 |
| DECALS: | Five options |
| REVIEWER: | Dan Lee |
| NOTES: | 3D prop from a previous build. |
| HISTORY |
The USS George Washington was the lead ship of the first nuclear powered ballistic missile submarine class in service. It was originally the USS Scorpion, a Skipjack class SSN, but was modified with a 130 ft long plug in between the reactor room and the forward part of the boat from just aft of the sail to the bow in the beginning of 1958. This plug would be where the vertical missile tubes for the Polaris submarine launched ballistic missiles and their equipment would be located.
The George Washington would be officially commissioned at the very end of 1959. “She” would break then US Navy tradition as submarines were named after maritime creatures rather than famous people, but there was a reason for that as nuclear ballistic submarines are incredibly expensive pieces of hardware and as the story goes when a US Navy veteran complained about the break in tradition he was told “Fish don't vote.”
 The George
Washington fired off the first four operational launches of the Polaris SLBM in
1960. By 1961, she was assigned to the Atlantic Fleet and did its first
deterrence patrol from Groton CT. In 1970, the SSBN-598 was sent back to the US
for nuclear refuelling. She was reassigned to the Pacific Fleet and stationed at
Pearl Harbor where it would finish a total of 55 deterrence patrols over 25
years as a SSBN/SSN.
The George
Washington fired off the first four operational launches of the Polaris SLBM in
1960. By 1961, she was assigned to the Atlantic Fleet and did its first
deterrence patrol from Groton CT. In 1970, the SSBN-598 was sent back to the US
for nuclear refuelling. She was reassigned to the Pacific Fleet and stationed at
Pearl Harbor where it would finish a total of 55 deterrence patrols over 25
years as a SSBN/SSN.
A SSBN or “boomer's” job was to be as quiet as a hole in the water and most of the time the George Washington did this without incident except on April 9, 1981 when it collided with the cargo ship Nissho Maru at periscope depth in heavy fog 110nm south south west from Sasebo. The sail of the George Washington was damaged in the collision, but the Nissho Maru ended up sinking for the loss of two sailors. This created a major diplomatic incident and took the reassurance from President Ronald Reagan to calm down the upset Japanese.
At the end of 1981, the George Washington was converted to a SSN when the last Polaris SLBMs were removed in compliance with the Strategic Arms Limitation Treaty 1 and she served as an SSN till 1985 when she was decommissioned for disposal where it would take till 1998 to “recycle” her. Her sail was removed and put on display at the Submarine Force Library and Museum located in Groton, CT.
/info gleaned from Wiki/
| THE KIT |
 The George
Washington kit consists of 19 plastic and photo etched parts including a two
piece main hull. The plastic seems quite brittle and with a lot of flash with
the detail fine for the scale but there will be a lot of clean up required
before assembling the model. The photo etched parts included in the kit a has
the newer seven bladed prop and the older five bladed prop the Washington used
in its career. The 19th part is the
stand which I didn't use.
The George
Washington kit consists of 19 plastic and photo etched parts including a two
piece main hull. The plastic seems quite brittle and with a lot of flash with
the detail fine for the scale but there will be a lot of clean up required
before assembling the model. The photo etched parts included in the kit a has
the newer seven bladed prop and the older five bladed prop the Washington used
in its career. The 19th part is the
stand which I didn't use.
The kit decal sheet comes with hull number decals for the five SSBNs of the Washington class as well as various hull markings.
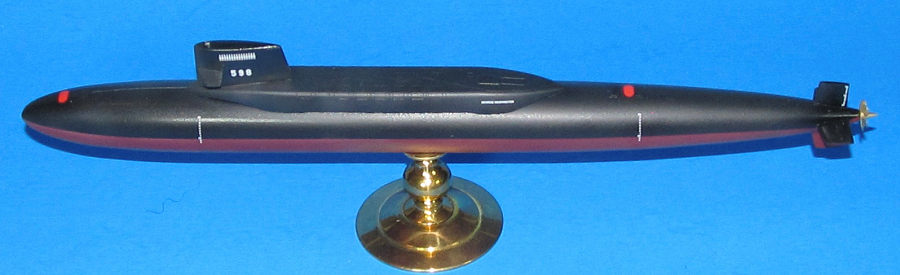
It comes with an small instruction pamphlet that has the painting instructions too (top half black and bottom half hull red.)
I found a vendor on some /redacted/ auction site who sells accurate 3D printed 1/350 scale props for my earlier Thresher kit and used the early 5 bladed prop instead of the kit one.
| CONSTRUCTION |
 I began
building the sail. It's five pieces and easy to slap together. I used CA glue
for the vertical seams and to attach the fins to the sail while I used Tamiya
extra thin cement for the top of the sail. I had to gently sand away the seam
using various grades of sandpaper and then I had to recreate the window detail
with a steady hand and a stiff sewing needle mounted in a pin vise. I left the
sail off till after painting.
I began
building the sail. It's five pieces and easy to slap together. I used CA glue
for the vertical seams and to attach the fins to the sail while I used Tamiya
extra thin cement for the top of the sail. I had to gently sand away the seam
using various grades of sandpaper and then I had to recreate the window detail
with a steady hand and a stiff sewing needle mounted in a pin vise. I left the
sail off till after painting.
I drilled a 3/8” hole through the bottom of the hull and placed the mounting nut from the Pontos brass stand I was going to use to for this model. I used a lot of CA glue to hold it in place. When all the construction was done I added the model stand to use it while painting the model.
Next I put the hull together by aligning the top and bottom halves then slathering on the CA glue to deal with gaps as well keeping it together. I used a lot of different coarser to finer grades of sandpaper to deal with the seam then to remove most of the sanding markings to polishing the surface.
After that I added the missile deck and glued it in place. I had to use Vallejo plastic putty to seal in all the gaps.
I added the four stern fins using CA glue making sure that the fins were aligned and perpendicular to each other. I think I may have had to sand them a little to ensure they sat on the hull with little or no gaps. I ended up using some Vallejo plastic putty to fill in the gaps at the joins.
| COLORS & MARKINGS |
 The model
stand was masked off and then the various model parts was primed using Stynylrez
grey primer. Once it was dry, I had to polish off the various nits and oopsies
on the primer coat before spraying it on again for the 2nd
and final primer coat. Again the coat was polished before painting.
The model
stand was masked off and then the various model parts was primed using Stynylrez
grey primer. Once it was dry, I had to polish off the various nits and oopsies
on the primer coat before spraying it on again for the 2nd
and final primer coat. Again the coat was polished before painting.
I sprayed on a mix of Tamiya Hull red paint and gloss red. The first coat went on smooth so I left it alone and masked the lower half off in preparation for the various shades of black that would be used on the upper hull. Next I sprayed on Gunze flat black then highlighted it with Tamiya German Grey and NATO Black to break up the monotone black color on the hull while I used NATO Black for the missile deck as it did have a subtle color difference to the rest of the submarine (at least that's the way it looked in the photos.)
The 3D printed prop was sprayed with the same primer and Vallejo copper acrylic paint for the paint coat.
Once it was dry I sprayed on the Vallejo Acrylic gloss coat for the decals.
The decals went on well as I had experienced with the earlier Thresher build; I used MicroSol and Set to get them to snuggle into the surface details. Once they were dry I wiped down the hull then I used a thin flat brush dipped in Tamiya Dark or Light grey panel line wash to run down the hull in random places to show streaking of the paint. I blended it in with a light wash of mineral spirits before letting the enamel wash dry. I sprayed on a mix of Gunze semi gloss and flat coat to seal everything.
The last task was brush painting the sail windows gloss black.
I glued the sail in place and added the prop then removing all the masking for the stand.
| CONCLUSIONS |
The 1/350 Mikro Mir submarine kits are pretty fun if a little crude builds. The kit does not fall into the small part count/long build trap that many similar kits fall into, but do require some modeling skills to complete.
I'm happy with how my George Washington boomer turned out.
Dan Lee
14 July 2025 Copyright ModelingMadness.com. All rights reserved. No
reproduction in part or in whole without express permission from the editor.
If you would like your product reviewed fairly and fairly quickly, please
contact
the editor or see other details in the
Note to
Contributors.