Trumpeter 1/700 USS Saratoga
| KIT #: | 05738 |
| PRICE: | $35.00 SRP |
| DECALS: | One option |
| REVIEWER: | Dave Cummings |
| NOTES: |
| HISTORY |
USS Saratoga (CV-3) was a Lexington-class aircraft carrier built for the United States Navy during the 1920s. Originally designed as a battlecruiser, she was converted into one of the Navy's first aircraft carriers during construction to comply with the Washington Naval Treaty of 1922. The ship entered service in 1928 and was assigned to the Pacific Fleet for her entire career. Saratoga and her sister ship, Lexington, were used to develop and refine carrier tactics in a series of annual exercises before World War II. On more than one occasion these included successful surprise attacks on Pearl Harbor, Hawaii. She was one of three prewar US fleet aircraft carriers, along with Enterprise and Ranger, to serve throughout World War II. Following a distinguished wartime career she was used as a target for an A-bomb test in 1946 where she was sunk.
| THE KIT |
The 1/700 Trumpeter kit consists of 17 individually
bagged sprues in grey, clear, and red plastic packaged in a sturdy box that is
compartmented to keep things from rattling around. There is a one piece hull
split at the waterline with separate red plastic hull bottoms giving you the
option of a waterline or full hull model. There is a stand to display the model
in the full hull mode. You also get a clear plastic ocean diorama base should
you desire to display the ship in the waterline mode. There is a one piece f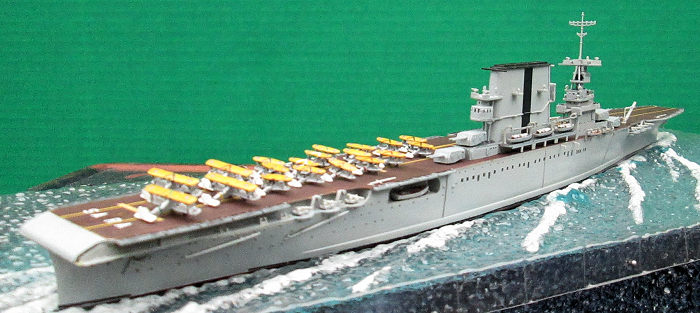 light
deck. You get some 370 parts in all. They are well molded and straight but there
is a bit of flash here and there. There are some very tiny parts with relatively
large sprue attachments. This makes cutting them from the sprue and cleaning up
the attachment points somewhat difficult. The clear plastic aircraft sprues are
individually bagged and packaged in their own box. The air group consists of six
TG-2s, nine SBUs, nine BFCs, and nine F3Fs. They are nicely done for this scale
and easily recognizable as the types they represent. The 12 page English
instructions have good construction drawings with text notes where needed. If
you carefully study the drawings as you perform each step they will get you
there. There is a separate full color 3-view painting guide for ship and
aircraft. Paint references are for Gunze and Mr Color. The decals give you all
the deck markings but no black ID stripe for the funnel. For the air group you
get all the stars for top and bottom wings. You also get the chevrons for the
top wings with a good representation of the different section colors. You do not
get the fuselage section leader stripes and the instructions have you paint
these. There are no numbers and lettering which would be a real challenge in
this scale, you can barely see the wing stars. Fitting and aircraft types depict
Saratoga around the 1936-37 time frame.
light
deck. You get some 370 parts in all. They are well molded and straight but there
is a bit of flash here and there. There are some very tiny parts with relatively
large sprue attachments. This makes cutting them from the sprue and cleaning up
the attachment points somewhat difficult. The clear plastic aircraft sprues are
individually bagged and packaged in their own box. The air group consists of six
TG-2s, nine SBUs, nine BFCs, and nine F3Fs. They are nicely done for this scale
and easily recognizable as the types they represent. The 12 page English
instructions have good construction drawings with text notes where needed. If
you carefully study the drawings as you perform each step they will get you
there. There is a separate full color 3-view painting guide for ship and
aircraft. Paint references are for Gunze and Mr Color. The decals give you all
the deck markings but no black ID stripe for the funnel. For the air group you
get all the stars for top and bottom wings. You also get the chevrons for the
top wings with a good representation of the different section colors. You do not
get the fuselage section leader stripes and the instructions have you paint
these. There are no numbers and lettering which would be a real challenge in
this scale, you can barely see the wing stars. Fitting and aircraft types depict
Saratoga around the 1936-37 time frame.
I don’t normally build ships, this is my one and only. I do have a collection of golden wings era planes and wanted something to add some context to the collection. Aircraft Carriers give you two distinctly different modeling experiences, aircraft and ship, and I will cover each separately.
Aircraft
| CONSTRUCTION |
I
love yellow wing era planes, and here I have thirty three of them to do, albeit,
very small models. SBUs and BFCs are comprised of three parts; fuselage/lower
wing, upper wing, and landing gear. The TGs add a separate tail, and the F3Fs
have separate 3-blade props. That’s a lot and I decided to not build them all.
This to lessen the effort a bit and to reserve some for spare parts because I
knew I was not going to get all those infinitesimally small landing gears
attached without zinging a few off to Neverland. I settled on four TGs, six
SBUs, two F3Fs, and all nine BFCs (I like BFCs). These pieces are tiny and
unless you have eagle eyes you will need some level of magnification, like Opti-Visor,
to work on them. I found it best to leave everything attached to their sprue
trees until they have to come off, which gives you something to hold onto while
you work, did I say tiny? I completed one sprue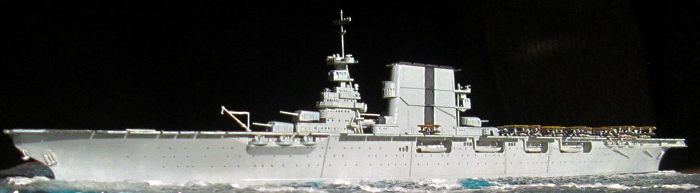 set at a time. First I gave all the landing gears a dab of black paint. This so
if I set one down I will be able to find it again (tiny is one thing, tiny and
clear is something else). I cut one at a time, cleaning up the cut spot a
little. Holding with forceps I applied thick fast setting superglue with a
toothpick. The gear fits into a slot on the fuselage. At least they are supposed
to, many were a little too big to seat down into the slots requiring filing each
one to fit (did I say tiny?). My foresight in saving some spares payed off,
although I have one BFC setting on SBU gear. With all the landing gears attached
I tackled the separate props for the F3Fs. Not that anyone is likely to notice,
but VF-3 flew F3F-1s exclusively until replaced by F2As and did not operate any
of the newer F3F types. So the F3F-2s with 3-blade props are wrong. I did some
micro-surgery to create a couple 2-bladers. Hard to tell the difference between
a -1 and a -2 in this scale. Next I attached the tails to the TGs. Construction
stopped here so I could paint everything while still on the sprues.
set at a time. First I gave all the landing gears a dab of black paint. This so
if I set one down I will be able to find it again (tiny is one thing, tiny and
clear is something else). I cut one at a time, cleaning up the cut spot a
little. Holding with forceps I applied thick fast setting superglue with a
toothpick. The gear fits into a slot on the fuselage. At least they are supposed
to, many were a little too big to seat down into the slots requiring filing each
one to fit (did I say tiny?). My foresight in saving some spares payed off,
although I have one BFC setting on SBU gear. With all the landing gears attached
I tackled the separate props for the F3Fs. Not that anyone is likely to notice,
but VF-3 flew F3F-1s exclusively until replaced by F2As and did not operate any
of the newer F3F types. So the F3F-2s with 3-blade props are wrong. I did some
micro-surgery to create a couple 2-bladers. Hard to tell the difference between
a -1 and a -2 in this scale. Next I attached the tails to the TGs. Construction
stopped here so I could paint everything while still on the sprues.
| COLORS & MARKINGS |
The
aircraft are
molded in clear plastic in order to leave you a
clear canopy when everything else is painted. Only the SBU and F3F have
greenhouses and I painted a spot of black on the bottom fuselage of these so the
prism effect will create dark cockpit interiors. There are many ideas on how to
do this, this is just how I did it. The others are open cockpit with windscreens
too tiny to differentiate. I brush painted everything (except canopies) Model
Master Aluminum. When dry I brush painted upper wing tops white enamel as a base
for the yellow. I also painted all the tail feathers white. While doing all this
try not to paint the inter-plane struts. Being clear gives an illusion that the
pieces are not the solid blocks that they are. Same
for
the TG landing gear. Yellow is a difficult color to brush so I airbrushed the
top wings with Model Master Chrome Yellow. When thoroughly dry I began picking
out some details in black with a 00 brush. Tires, rear of props, engine faces,
and open cockpits. Cowl rings were painted appropriate section colors to
correspond with the wing chevrons you are using. The nice painting instructions
will mislead you a bit here. They imply that all aircraft have fusela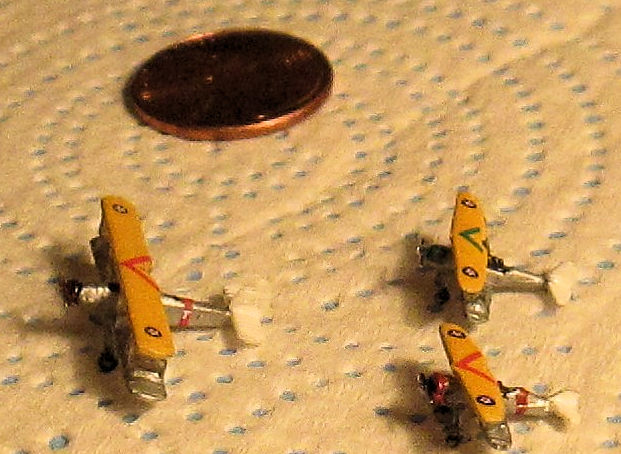 ge stripes
and the entire cowl painted when actually only Section Leader aircraft had
these. So if you use all three chevrons of a particular color to depict a
complete section of a certain aircraft type, then the leader’s aircraft is
painted as instructed. The other two have no fuselage stripe with one having the
top half of the cowl painted and the other the bottom half. The fronts of all
prop blades were painted a shiny silver.
ge stripes
and the entire cowl painted when actually only Section Leader aircraft had
these. So if you use all three chevrons of a particular color to depict a
complete section of a certain aircraft type, then the leader’s aircraft is
painted as instructed. The other two have no fuselage stripe with one having the
top half of the cowl painted and the other the bottom half. The fronts of all
prop blades were painted a shiny silver.
For the TG-2s the instructions, indeed the way they are molded, would lead you to believe these to have cowl rings to paint. They don’t. TGs did not have cowl rings but exposed cylinder heads so I painted this area black. The cowl noses were painted, but that area on these kits is really too small to do that properly. But a dabbed some paint on there anyway, hard to see.
With the paint dried it was time to decal, again everything is still on the sprue trees. The decals are well printed and apply well for something so small. There is no excess carrier film to deal with which would have been a real problem. The stars are a little out of register but at this scale someone will need a magnifying glass to notice. I started with the bigger TGs. Applying the upper and lower wing stars and chevrons is not difficult, again if you have proper magnification. Using the 00 brush I drew the appropriate fuselage stripes. It was here I decided to have a bit of fun and rummaged around in the spare decal box. I found some tiny letters and numbers from some old aircraft stenciling decals. I applied a white T on the red section leader fuselage stripe along with a number 1 on wing and fuselage. Fantastic, I did Ts on two more using up all the decals I could find for that and using just black dots in the number locations. Good thing that was all I had, my hands were shaking and eyes strained from performing this trick. I can’t wait to show this off though by handing out a magnifying glass and saying, “look closer, no, closer.”
| FINAL CONSTRUCTION |
For
my next trick, I shall attempt to remove all these parts from their trees
without breaking anything or messing up the paint too badly. The upper wings cut
off neatly with a sprue cutter, the fuselage was a different story. These are
attached to the sprue at two points. One on the rear fuselage between wing and
stabilizer, and one on a front side between cowl and wing. I attempted to get
the nose of my sprue cutter in there, barely possible on the rear but not so the
front. Attempts here led to either a broken landing gear leg, broken prop blade,
or both. Cutting them from the sprue also left blobs to be filed and scraped
risking further damage. I did a couple of these the hard way. Then a miracle, I
d iscovered
I could cut the trees leaving a small bit still attached, and simply bend and
twist this bit off. They came off pretty cleanly leaving just a little scraping
to do and without breaking stuff. Why didn’t someone tell me? Well, at least you
know.
iscovered
I could cut the trees leaving a small bit still attached, and simply bend and
twist this bit off. They came off pretty cleanly leaving just a little scraping
to do and without breaking stuff. Why didn’t someone tell me? Well, at least you
know.
The top wings were glued on with more fast setting, thick, superglue applied with a toothpick. The upper and lower wings each have a half of the inter-plane strut and these are mated together vertically. There is a pin in the cabane area of the upper wings that fit into a hole on the forward fuselage. This works OK in general if you are aware of two things. The sprue attachment points left some plastic blobs at the base of the upper wing struts that will keep the lower wing struts from seating properly, cut these away. The “cabane” pins on some did not match up with the fit of the inter-plane struts and seated in front of the mounting holes causing the wings to sit too high. Choices are sand away some of the inter-plane strut so the pin fits into the hole (tedious) or, as I did, cut the pins off and just use the Inter-plane strut glue points. All of my SBUs had this problem.
With time and patience the result is an impressive little air group with a wealth of detail to study the closer you look.
Ship
| CONSTRUCTION |
Begins with hull inserts
for the 5” gun sponsons and the small boat bays. The kit is well detailed for
1/700 scale with many small detail parts such as the two boat davits for each
bay (did I say tiny). I assembled the twelve 5” guns which are two piece, gun
and mount. The small boats are two piece. They were painted on the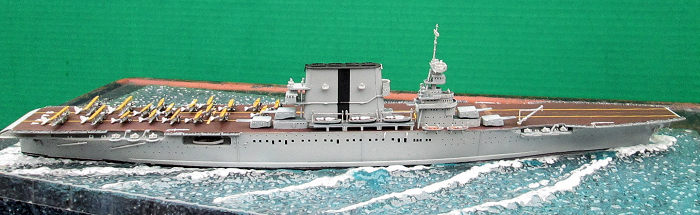 ir
sprue then assembled. Hard as I tried I could not cut the small boats from the
sprues without leaving some damage to be repaired. I completed steps 1 and 2
short of attaching all the guns and small boats. Then I skipped to steps 5 - 7
to do the superstructure assemblies and 8” gun turrets. Fit was OK but required
some Mr. Surfacer on superstructure parts to fill in gaps. Biggest issue is
cutting tiny parts from too large sprue attachments, then having to clean that
area up on parts too small to hold in your hands. There is some minor flash on
some parts, but at this scale even minor flash can cause big fit issues. I then
painted all the major sub-assemblies prior to attaching the flight deck, guns,
small boats, and other stuff that would get in the way.
ir
sprue then assembled. Hard as I tried I could not cut the small boats from the
sprues without leaving some damage to be repaired. I completed steps 1 and 2
short of attaching all the guns and small boats. Then I skipped to steps 5 - 7
to do the superstructure assemblies and 8” gun turrets. Fit was OK but required
some Mr. Surfacer on superstructure parts to fill in gaps. Biggest issue is
cutting tiny parts from too large sprue attachments, then having to clean that
area up on parts too small to hold in your hands. There is some minor flash on
some parts, but at this scale even minor flash can cause big fit issues. I then
painted all the major sub-assemblies prior to attaching the flight deck, guns,
small boats, and other stuff that would get in the way.
| COLORS & MARKINGS |
As noted the paint references are for Gunze/Mr Color and I ordered some Mr Color in the colors specified by the paint guide. I had not used this brand of paint before, it sprays great when properly thinned but does not like to be brushed. I’m glad I did some homework on this paint beforehand because it is lacquer based and requires lacquer thinner for thinning and clean-up. Something most of don’t keep readily on hand. At that, it works best with Mr. Color’s proprietary thinner which has a retarder in it to allow better leveling. I sprayed the hull and superstructure assemblies Mr. Color 308 Navy Gray. The deck areas of the superstructures are Mr. Color Deck Gray. For the black ID stripe Sara wore on her funnel, I rummaged through the big box of decals and found some black wing walks that, with a little trimming, looked about the right size.
Next was the flight deck. The box cover doesn’t show
the deck area and I could not find any useful color photos on the internet
except for other models, which varied. I bought the Squadron at Sea series
USS Saratoga book as a reference for
the project. It is an excellent reference on the subject with a wealth of
photos, but none in color for the pre-war Sara. There is a nice Don
Greer painting on the back
cover where the flight deck appears some kind of reddish brown. The kit painting
guide calls for Mr. Color 44 Deck Yellow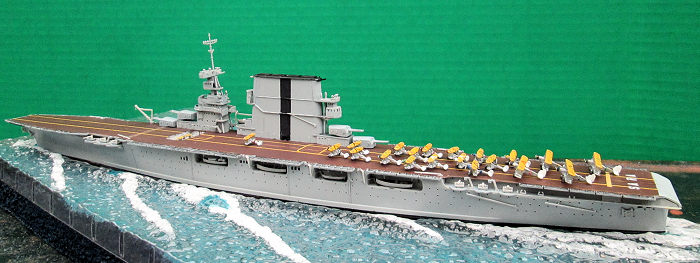 .
However, Mr. Color 44 (labeled Deck Tan) when sprayed did not look like either
the painting guide or Greer painting colors. To add to the confusion, the
Squadron book makes reference to the deck being given a dark maroon / mahogany
stain. Hmmm. The deck in black and white photos does appear to be a darker
color. So, what else could I reference? Sara did star in a movie around 1930,
Helldivers. I watched the movie again
because this gave me a good excuse to do so. But it to is in black and white, so
doesn’t offer definitive proof of anything. Wish it was in color like the movie
Dive Bomber filmed in 40-41.
That’s it, Dive Bomber.
The star is Enterprise not Saratoga (oh yeah, Errol Flynn is in there
someplace), but it is near the same time period. The military is usually pretty
consistent in the way it paints things (if it moves salute it, if it don’t move,
paint it). The opening scenes of the movie are of aircraft landing on
Enterprise’s clearly dark maroon stained flight deck. Thank you MGM for
preserving these amazing scenes in glorious Technicolor. So, the preponderance
of evidence points to maroon and I painted accordingly. So, maroon is a mix of
red and black. I mixed these two colors in various combinations that appeared to
be either too red or too black. On impulse I mixed in an earth brown to soften
the color and lighten it a bit. I decided it was as close as I was likely to get
and went with that. I used acrylics as I wasn’t sure how solvent based paint
would react with the Mr. Color lacquer already laid down. I airbrushed this on
the deck and elevators. Not sure just how exact the color is but it is certainly
more accurate than tan, I’m happy with it. When dry I gave it a coat of gloss in
prep for decaling.
.
However, Mr. Color 44 (labeled Deck Tan) when sprayed did not look like either
the painting guide or Greer painting colors. To add to the confusion, the
Squadron book makes reference to the deck being given a dark maroon / mahogany
stain. Hmmm. The deck in black and white photos does appear to be a darker
color. So, what else could I reference? Sara did star in a movie around 1930,
Helldivers. I watched the movie again
because this gave me a good excuse to do so. But it to is in black and white, so
doesn’t offer definitive proof of anything. Wish it was in color like the movie
Dive Bomber filmed in 40-41.
That’s it, Dive Bomber.
The star is Enterprise not Saratoga (oh yeah, Errol Flynn is in there
someplace), but it is near the same time period. The military is usually pretty
consistent in the way it paints things (if it moves salute it, if it don’t move,
paint it). The opening scenes of the movie are of aircraft landing on
Enterprise’s clearly dark maroon stained flight deck. Thank you MGM for
preserving these amazing scenes in glorious Technicolor. So, the preponderance
of evidence points to maroon and I painted accordingly. So, maroon is a mix of
red and black. I mixed these two colors in various combinations that appeared to
be either too red or too black. On impulse I mixed in an earth brown to soften
the color and lighten it a bit. I decided it was as close as I was likely to get
and went with that. I used acrylics as I wasn’t sure how solvent based paint
would react with the Mr. Color lacquer already laid down. I airbrushed this on
the deck and elevators. Not sure just how exact the color is but it is certainly
more accurate than tan, I’m happy with it. When dry I gave it a coat of gloss in
prep for decaling.
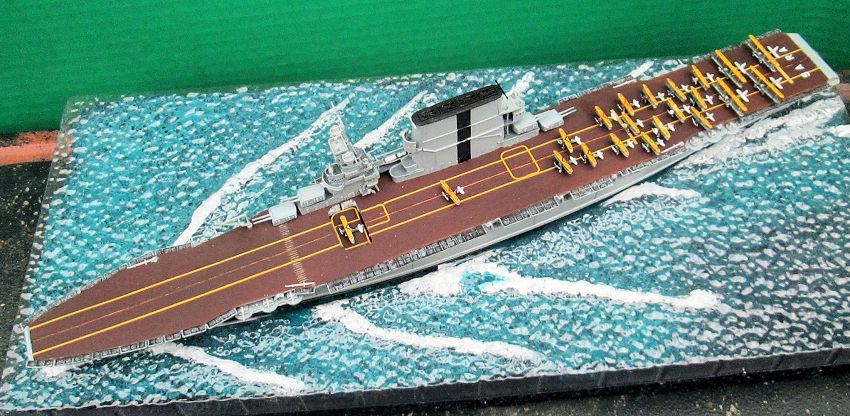
Here again the Trumpeter painting guide and decals are wrong. The kit decals have three same size yellow guide lines running the length of the deck. While there were three lines, the center one was much narrower, fainter, and harder to see than the two outer lines. Also, this line is centered between the outer ones and the instructions show it as offset to one side a bit. The kit instructions have you place these lines along some longitudinal beams or something engraved on the deck part. These engraved details do not appear in photos. There are two metal cross beams on the aft part of the deck that should be there and painted yellow, but only one of these is depicted by the kit engraving and there is no decal for it. So I applied the two outer lines as they appeared in photos, disregarding the engraved areas. I cut the third decal in manageable strips and cut these in half lengthwise. Still too wide, I cut these in half again to produce sections of pencil thin center line. I used Micro Sol to settle everything down and sealed it all with a coat of AV flat clear acrylic. The Trumpeter markings also give you yellow outlines for the elevator shafts. These do not appear in photos, but they seem a sensible safety measure so I used them.
| FINAL CONSTRUCTION |
I jumped steps here to glue on the waterline hull bottom. It’s red and really needs no painting as you can’t see much of it in waterline mode. But there is a thin black stripe at the waterline separating the gray and red. I used Pactra striping tape for this which is something the RCers use. It was perfect for the job.
The kit has you assemble
the two deck elevators in a partially down position. I wanted mine to have the
rear elevator up to give me plenty of parking space. The rear elevator is not
really designed for this and required some m inor
filing to fit flush with the deck. I assembled the front elevator per
instructions. With the elevators assembled I attached the flight deck to the
hull. Fit was OK but it wanted to set up with gaps and had to be held together
until the glue set. Some minor gaps were filled with Mr. Surfacer and spot
painted. Next all the small boats were glued to their respective stations. Note
- there are three types of boats, small one piece lifeboats, larger ones called
lifeboat 2 and 3, and the cabin boats. Lifeboats 2 and 3 are the same type and
are easy to get mixed up when gluing into position. The single 3 differs only in
having small holes to mount to an exterior davit while the 2s go inside the
bays. You will know you mixed them up when (like me) you go to glue the boat to
its davits only to find it doesn’t have the attaching holes. Next steps are
attaching a bunch of tiny detail pieces like ladders (9 of those). Then the
superstructures were attached to the deck with no issues.
inor
filing to fit flush with the deck. I assembled the front elevator per
instructions. With the elevators assembled I attached the flight deck to the
hull. Fit was OK but it wanted to set up with gaps and had to be held together
until the glue set. Some minor gaps were filled with Mr. Surfacer and spot
painted. Next all the small boats were glued to their respective stations. Note
- there are three types of boats, small one piece lifeboats, larger ones called
lifeboat 2 and 3, and the cabin boats. Lifeboats 2 and 3 are the same type and
are easy to get mixed up when gluing into position. The single 3 differs only in
having small holes to mount to an exterior davit while the 2s go inside the
bays. You will know you mixed them up when (like me) you go to glue the boat to
its davits only to find it doesn’t have the attaching holes. Next steps are
attaching a bunch of tiny detail pieces like ladders (9 of those). Then the
superstructures were attached to the deck with no issues.
Display Base. The clear display base depicts an ocean surface with wakes streaming from the recess that the waterline hull fits into. I got a block of Styrofoam packaging from something or other, and cut it so the base fitted tightly onto it (by the way, you cut Styrofoam with a hot clothes hanger wire, it’s the only way). I used rattle cans of cheap acrylic paints to paint the foam block (solvent paints will melt it) in two shades of blue. The undersides of the molded wakes were hand painted white enamel. I used a few pushpins to secure the base to the foam block. The ship was super glued into its recess and, what you think, pretty cool huh?
Lastly is to decide if you want to glue the airplanes to the deck or not. Gluing will prevent losing some or breaking one from some urge to pick it up. Not gluing will save a potential glue mess, and allows you to re-position them when that time comes that you find this absolutely necessary. I didn’t glue mine.
| CONCLUSIONS |
The Trumpeter 1/700 scale USS Saratoga is a real bargain when you consider what a major building project it provides with so many parts and I think the finished product is stunning. I know there is probably some aftermarket photo etch stuff that would enhance the realism, but the kit is plenty detailed for my taste and already complicated enough out of the box. Construction is straightforward and free of any major glitches. Just some minor annoyances as mentioned. Maybe too ambitious a project for beginners. Though the eye sight and steady hands of the young would certainly be an asset for a kit in this scale. The advantage of 1/700 is that even an aircraft carrier doesn’t require a lot of shelf space. This kit measures some 15 inches when complete. All in all highly recommended for those interested in the subject.
WWW. Wikipedia, Squadron at Sea, USS Saratoga.
MGM Dive Bomber, 1941.
26 October 2017 Copyright ModelingMadness.com.
If you would like your product reviewed fairly and fairly quickly, please contact the editor
or see other details in the
Note to
Contributors. Back to the Main Page
Back to the Review
Index Page
Back to the Previews Index Page