
Trumpeter 1/350 USS Massachusetts
| KIT: | Trumpeter 1/350 USS Massachusetts |
| KIT #: | 5306 |
| PRICE: | $149.95 DSRP |
| DECALS: | Yes |
| REVIEWER: | Tom Cleaver |
| NOTES: | Tomís Modelworks USS Massachusetts photoetch set used; Starfighter decals used. |

| HISTORY |
Launched in Quincy, Massachusetts at the Fore River Shipyard of the Bethlehem Steel Corporation on September 23, 1941, U.S.S. Massachusetts - soon known to her crew as "Big Mamie" - was commissioned in May 1942. Completing her shakedown period just in time to participate in the North African landings, "Big Mamie" became the first American battleship to engage an enemy battleship since the Spanish-American War, when she engaged in a long-range gun battle with the unfinished French battleship Jean Bart, which was moored to a pier. Five hits from the American ship put the French opponent out of action, but the American shells had similar problems to that which plagued American torpedoes, as evidenced by the fact that Jean Bart - which should have been knocked out by the hits - went on to be completed in 1951.
Massachusetts
joined the Pacific Fleet in February 1943. She saw action in the New Guinea-Solomons
area and participated in the invasion of the Gilbert Islands in November
1943, the invasion of the Marshall Islands in January 1944, the powerful
carrier
 strikes against Truk in February 1944, and a series of raids against
Japanese bases in the Western Pacific and Asia.
Following modernization in Bremerton, Massachusetts returned to action in September 1944 with the invasion of Palau and acted as an escort for the fast carrier task forces using her 5", 40mm, and 20mm guns to defend the carriers against enemy aircraft.
The one big chance for the American dreadnoughts to face a similar enemy came in the Battle of Leyte Gulf in October, 1944. Had Admiral Willis Leeís Task Force 34 been left behind by Halsey and been standing off the exit of San Bernardino strait on the morning of October 25, 1944, history might have recorded the greatest battle between surface ships in history. Instead, the battleships went with Task Force 38 when the fast carriers took the Japanese bait and left the invasion area to strike the useless Japanese carriers off Cape Engano, leaving the invasion forces to face the Japanese battle fleet on their own. To an extent, this was the unfortunate result of the over-claiming done by the USS South Dakota during the Battle of Santa Cruz in October 1942, when the ship claimed 50+ Japanese aircraft shot down and fixed in the minds of the carrier admirals (who wanted to displace battleships as the head of the fleet) that battleships were primarily useful for air defense of aircraft carriers and softening up invasion beaches.
In 1945, "Big Mamie" supported the invasions of Iwo Jima and Okinawa. In July 1945, in company with her classmates USS Alabama and USS South Dakota, Massachusetts bombarded the Imperial Iron and Steel Works at Kamaishi, following up with the bombardment of a factory at Hamamatsu. When the task group returned to Kamaishi, Massachusetts fired the last American 16" projectile of the war.
| THE KIT |
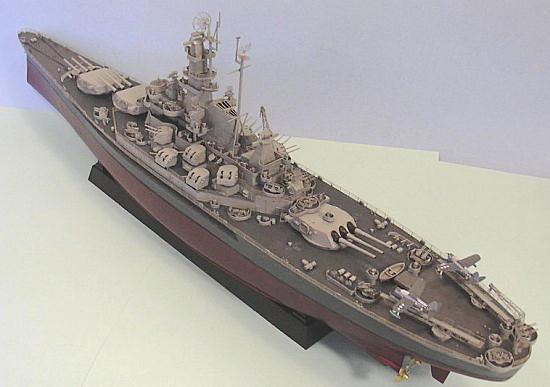
 Trumpeter is doing a good job of releasing models
of lesser-known - but still famous - ships, and their release of the South
Dakota class after the Washington class marks the first time these handsome
progenitors of the mighty Iowa class have been done in injection plastic.
Comprising more than 400 crisply-molded parts in light grey, with a red
plastic lower hull, the kit is a real "jigsaw puzzle" but there is nothing
so difficult that patience and skill will not reward the modeler with a
good-looking model.
As with most ship models, the kit really benefits from use of photoetch for railings, ladders, cranes and the aircraft catapults. Fortunately Tomís Modelworks makes a very good photoetch set that has instructions that fully lay out the detail differences between the three ships of the class, allowing a modeler to use the kit to do any of them. Trumpeter has also released a kit of the U.S.S. Alabama, but when I examined it I didnít see any real differences between it and this kit.
As best I could determine from studying photographs, this kit makes up into USS Massachusetts as she looked following her modernization at Bremerton in the late summer of 1944.
| CONSTRUCTION |
 Trumpeterís instructions say to assemble the
entire ship above the waterline before attaching the lower hull. THIS IS
WRONG!!! The one place where these kits have a serious fit problem is with
the fitting of the upper hull to the lower. This is best done at the outset,
before there are any decks attacked, so that the modeler can work that joint
from inside and outside to get it as right as possible. Even then one will
use cyanoacrylate glue to fill the seam and a substantial amount of Mr.
Surfacer 500 (assuming you can find it in stores any more) to smooth the
hull.
| COLORS & MARKINGS |
For me, construction and painting of a ship go
hand in hand. After the hull was together and the deck attached, I painted
the lower hull with Tamiya "Hull Red," then masked it off, painted the black
dividing line, masked it off, and then pain ted the hull camouflage. I used Xtracrylix "Compass Grey" and "Extra-Dark Sea Grey" throughout this project.
With the dark grey color masked off, I then painted the light grey.
I painted the main deck parts using Gunze-Sangyo "Navy Blue" for the stain of the wood decking, and Xtracrylix "Extra-Dark Sea Grey" for the metal parts of the deck. I also used the Gunze color for the stained 01 deck.
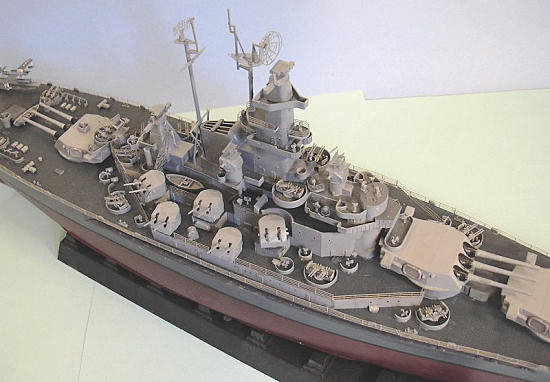
I then assembled the main parts of the separate superstructure sections, the main gun turrets and the 5-inch turrets. I painted all these parts, the superstructure bulkhead parts, the deck parts and the 20mm and 40mm guns and mounts with "Compass Grey," then hand-painted the deck areas with "Extra Dark Sea Grey," which is easy to do since Xtracrylix is a very easy paint to use with a brush. I finally shot a thinned mixture of Tamiya "smoke" to pop out detail.
| FINAL CONSTRUCTION |
 Once all the painting was done, I assembled the
superstructure, starting from the main deck and working my way up. The
hardest part of any of this was attaching the various gun tubs and splinter
shields for the light AA weapons. As I went along, I attached the photo-etch
railing and ladders as appropriate. This was considerably easier than any
other work with photoetch I have done, since I used Gator Glue, which allows
the parts time to position, doesnít glue parts to your fingers, and dries
hard fairly quickly.
I then assembled the main turrets and the 5-inch turrets, and the 40mm mounts. I used white glue for the canvas blast covers on the 5-inch mounts.
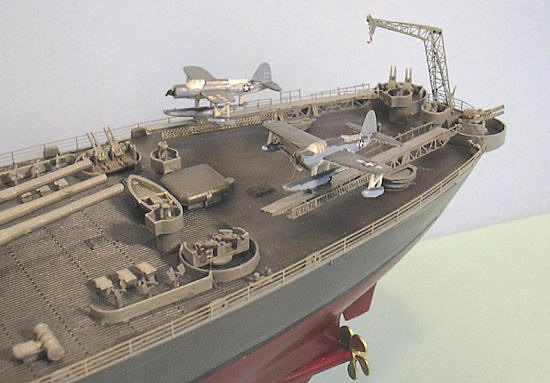
The photoetch catapults and cranes were a little time consuming to construct, but were easily assembled with Gator Glue, and look vastly better than the injection plastic parts they replace.
When all this was done, I gave everything a coat of Xtracrylix varnish.
I attached the masts and radars. The photoetch tops for the masts are another vast improvement over the plastic parts, as are the radar antennas.
I attached the 5-inch mounts next. These are all
displayed aimed out and up, per a photo of USS Massachusetts at the end of
the war, and make for a very nice display. I then attached the main turrets,
which are left in overall Compass Grey and do not have the
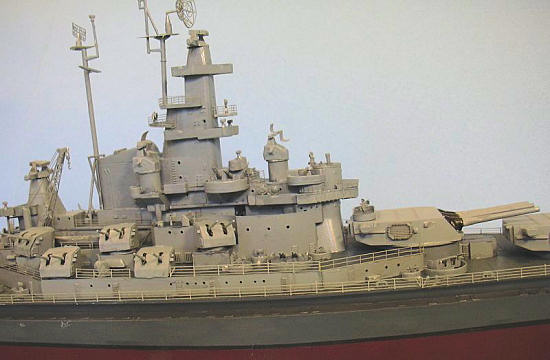 upper horizontal
surface in dark grey as the kit painting instructions would have them - that
scheme is completely post-war, and all the wartime photos I could find of
"Big Mamie" show these turrets and the 5-inch mounts in overall light grey.
I then attached the 40mm mounts, and proceeded on to the most time-consuming part of the whole project, which was attaching the splinter shields to the 20mm cannon and then getting them properly positioned. I finished off by attaching the cranes and catapults.
The OS2U Kingfisher airplanes are pretty accurate for 1/350 models, I painted them with Xtracolor white, "Blue Grey," fort he intermediate blue and "Intermediate Blue" for the dark upper color, which allowed for "scale effect" on these small models. Unfortunately, the kit-supplied decals are worthless. I used Starfighter Decalsí 1/350 US insignia set, which provides several different sizes of insignia so you can get the right ones for wings and fuselage positions. These decals are printed on an ALPS, and are very good, though you have to be careful since they do not have separate backing for each insignia. The photoetch catapult mounts made attaching the airplanes in their correct position easy.
The last thing I did was attach the screws, which were painted with ModelMaster Metalizer "Brass."
| CONCLUSIONS |
I am sure that the for-real "ship guys" can go
into detail about any detail inaccuracies of the kit, as I could with an
airplane model. But for me, I know no one who ever looks at the model will
ever know that sort of information, so I need only worry about the fact
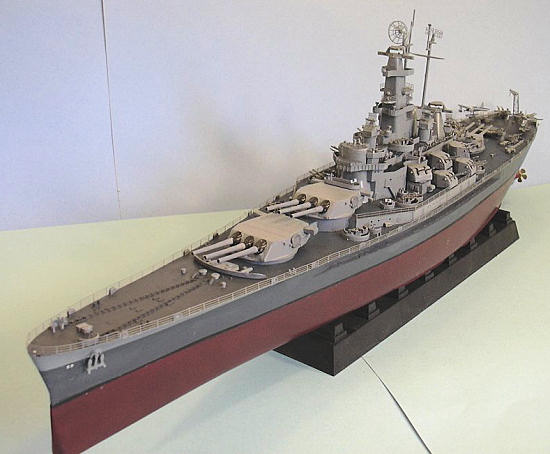 it
is a very impressive-looking model in the end. I have to say that given my
relative lack of "advanced modeler knowledge" about the kit, I had a lot of
fun doing a model that looks "close enough," and am starting to think that -
once one gets past the issue of major shape accuracy - the philosophy of
"Looks like a (insert designation here) to me" isnít really such a bad
thing. Itís a good cure for AMS. I only took about a month to do this model,
which is proof that the learning curve softens as one gets a bit more skill
into the work.
Overall, I really like the model, and like the response of those who have seen it out on display in the living room bookcase. Doing a project like this is the best antidote I can think of to both AMS and the boredom that sets in if one does the same kinds of models over and over.
I really hope Trumpeter does a Baltimore class heavy cruiser in 1/350 soon, and perhaps a model of the battle cruisers Alaska or Guam.
Thanks to Stevens International for the review copy.
May 2008
If you would like your product reviewed fairly and quickly, please contact me or see other details in the Note to Contributors.