Trumpeter 1/350 HMS Hood
| KIT #: | 5302 |
| PRICE: | $159.95 MSRP |
| DECALS: | None |
| REVIEWER: | Tom Cleaver |
| NOTES: | White Ensign photo etch set used |
| HISTORY |
The Battle Cruiser:
“There’s something wrong with our ships!” Thus exclaimed Admiral David Beattie at the Battle of Jutland, as he watched H.M.S. “Invincible,” flagship of RADM Sir Horace Hood, explode and sink with only 6 survivors from a crew of 1026 men, followed by H.M.S. “Indefatigable” with 2 survivors of a crew of 1019, followed by H.M.S. Queen Mary with 9 survivors from a crew of 1285. Beattie watched his own flagship, H.M.S. “Lion,” survive only due to quick damage control. Each great battle cruiser had been hit by long range plunging fire, which they proved unable to withstand.
Eight years earlier, H.M.S. “Invincible,” had been launched as a wonder of the naval world, the product of First Sea Lord Admiral “Jackie” Fisher, father of the all big-gun Dreadnought Battleship. Originally known as a “dreadnought battle cruiser” and later as a battle cruiser, the design was an attempt to provide a large high-speed cruiser armed with weapons close to what one would expect on a dreadnought battle ship, a ship able to close and destroy enemy cruiser forces and to hunt down commerce raiders. In December 1914, the concept of the battle cruiser appeared justified, when “Invincible” and her sister ship H.M.S. “Inflexible” ambushed the German Pacific Squadron led by Admiral Maximilian Graf Von Spee, fresh from its victory at Coronel, in the Battle of the Falklands. The two battle cruisers easily caught up with and destroyed the pre-dreadnought armored cruisers “Scharnhorst” and “Gneisenau,” as well as the rest of the fleet, killing Spee himself.
Unfortunately, in the great dreadnought race to outbuild the German Navy, the Royal Navy’s decision that they could include battle cruisers as part of the main line was a mistake that over 3,000 British sailors would pay for with their lives at Jutland, as well as another 1,415 who would perish 25 years later when the greatest battle cruiser of all met its fate on May 24, 1941.
 It
didn’t take long after Jutland for the Royal Navy to know exactly what was wrong
with their battle cruisers; their deck armor was not sufficient to protect
against long range plunging fire and they did not have sufficient fire/flash
protection below decks in the magazines. Regardless, the Admiralty not only did
not revise the role of these ships, but continued construction of H.M.S.
“Renown” and H.M.S. “Repulse.” Even with construction delayed to include
improved protection, they were so deficient that Admiral Jellicoe ordered
“Repulse” returned to the dockyard in 1918 sp that additional armor could be
fitted over her critical spaces.
It
didn’t take long after Jutland for the Royal Navy to know exactly what was wrong
with their battle cruisers; their deck armor was not sufficient to protect
against long range plunging fire and they did not have sufficient fire/flash
protection below decks in the magazines. Regardless, the Admiralty not only did
not revise the role of these ships, but continued construction of H.M.S.
“Renown” and H.M.S. “Repulse.” Even with construction delayed to include
improved protection, they were so deficient that Admiral Jellicoe ordered
“Repulse” returned to the dockyard in 1918 sp that additional armor could be
fitted over her critical spaces.
The last British battle cruiser was H.M.S. “Hood.” While she boasted dramatic improvements over all previous battle cruisers - and even some battleships - she ultimately became the definitive proof of the concept’s failure.
Sink the Bismarck!
May 1941 saw Britain alone in the war against Nazi Germany. At sea, there had been victories such as the sinking of the pocket battleship “Admiral Graf Spee,” but this had been countered earlier in the year by the cruise of the German battle cruisers “Scharnhorst” and “Gneisenau” in Operation Berlin, during which “the twins” had sunk 116,000 tons of desperately needed cargo shipping. These two ships were now in the French port of Brest.
Earlier that month, the British had noted an increase in German recon flights between Greenland and Jan Mayen Island, which it was feared were the first moves to ascertain favorable conditions for a breakout by “Bismarck.” On May 14, Home Fleet commander Admiral John Tovey received a report from the British Flag Officer in Iceland, that the Germans were most likely planning for an Atlantic breakout by “Bismarck.”
In fact, this guess was correct. Admiral Raeder and his staff were planning Operation Rheinübung, a commerce raiding sortie under the command of Admiral Günther Lütjens, who had commanded the battle cruisers in Operation Berlin. The original plan was to have “Bismarck” and the heavy cruiser “Prinz Eugen” join “Scharnhorst” and “Gneisenau” in a task force that would be nearly invincible. This changed when “Scharnhorst” experienced boiler troubles that would take weeks to complete, while “Gneisenau” was damaged on April 6 by a torpedo attack by Beauforts from Coastal Command, that would take 6 months to repair.
The new plan was for “Bismarck” and “Prinz Eugen” to depart Gotenhafen, transit the Skaggerak and disappear into the North Atlantic, where they would refuel from the tanker “Weissenberg” and then enter the western North Atlantic through the Denmark Strait where they would commence attacking British shipping.
Discovered by the Swedish cruiser “Gotland” while transiting the Skaggerak on
May 20, the two ships put into Bergen on May 21 to await bad weather, where
their presence was reported by the Swedes and the Norwegian underground. Admiral
Tovey ordered the cruisers “Suffolk” and Norfolk” to patrol the Denmark Strait
in anticipation of the Germans breaking out in the same way that had been done
in Operation Berlin. That night he ordered the battle cruiser H.M.S. “Hood,”commanded
by Captain Ralph Kerr and flying the flag of VADM Lancelot E. Holland, Commander
Battle Cruiser Squadron and Second-in-Command of the Home
 Fleet, and the new
battleship “Prince of Wales,” to sail for Hvalfjord with the destroyers
“Electra,” “Anthony,” “Echo,” “Icarus,” “Achates,” and “Antelope,” where they
would meet the two cruisers. The two capital ships and their four accompanying
destroyers departed Scapa Flow at 0100 on May 22.
Fleet, and the new
battleship “Prince of Wales,” to sail for Hvalfjord with the destroyers
“Electra,” “Anthony,” “Echo,” “Icarus,” “Achates,” and “Antelope,” where they
would meet the two cruisers. The two capital ships and their four accompanying
destroyers departed Scapa Flow at 0100 on May 22.
The Royal Navy needed to know if the Germans were still in Bergen. A daring maximum-range mission in apalling weather was flown by a Fleet Air Arm Martin Maryland that was normally used as a target tug on May 22; the crew reported the Germans were gone.
The chase was on.
Armed with this knowledge, Tovey ordered Holland to forego refueling and enter the Denmark Strait directly while the Home Fleet sortied from Scapa Flow.
At approximately 1915 on May 23, Able Seaman Newell, the starboard after look out aboard “Suffolk,” saw the Germans through the gloom of a snowstorm. Contact was made.
The two cruisers shadowed the Germans and reported contact, though “Norfolk” was driven off by several salvos from “Bismarck” when she got too close. Holland ordered battle stations and prepared to meet the Germans any time after 0200 on Mary 24, 1941. “Hood” and “Prince of Wales” increased speed to 29 knots as they headed for the interception. Their destroyers fell behind, unable to keep up in the North Atlantic gales.
At 2300, “Suffolk” lost contact with “Bismarck” when the British thought the battleship had reversed course and was heading towards them. “Suffolk” changed course, but when they realized “Bismarck” had not done so and returned to the original bearing, the Germans had disappeared in the snowstorm. “Suffolk” found it impossible to keep radar contact in the circumstances.
Aboard “Hood,” VADM Holland received the news. With no definite position for the Germans, he ordered the crews to relaxed action stations (permission to sleep) and reduced speed to 25 knots, while changing course to the north to cover any possible reversal by the Germans. At 0247, “Suffolk” regained contact. Her report placed the Germans 35 miles north-west of “Hood” and “Prince of Wales.” Holland changed course for the interception and ordered speed increased to 28 knots.
At 0510, Holland ordered, "Prepare for instant action" and the crews of both ships went to battle stations. At 0535, lookouts in “Prince of Wales” sighted smoke and mast tops at a range of 38,000 yards, 18 nautical miles. At 0537 they were confirmed as “Bismark” and “Prinz Eugen.”. “Prince of Wales” reported the contact at 0537: "Emergency to Admiralty and C in C Home Fleet. One battleship and one heavy cruiser, bearing 335, distance 17 miles. My position 63-20 North, 31-50 West. My course 240. Speed 28 knots".
At 0537, Holland ordered his ships to turn 40º starboard together, which placed the enemy fine off their starboard bows. The British ships rushed toward the enemy at 29 knots, with “Prince of Wales” 800 yards off the starboard quarter of “Hood.” Approaching thus, the rear turrets of both British ships were masked, halving their firepower.
 The
Germans had been aware of the approaching British ships through use of their
hydrophones. They expected cruisers and were unaware of what they were up
against at first. When lookouts identified the fighting top of “Hood,” a wave
of fear went through “Bismarck.” As one survivor later recalled, “HMS Hood had
been the terror of our war games.” “Bismarck” and “Prinz Eugen” went to battle
stations at 0545.
The
Germans had been aware of the approaching British ships through use of their
hydrophones. They expected cruisers and were unaware of what they were up
against at first. When lookouts identified the fighting top of “Hood,” a wave
of fear went through “Bismarck.” As one survivor later recalled, “HMS Hood had
been the terror of our war games.” “Bismarck” and “Prinz Eugen” went to battle
stations at 0545.
Knowing that “Hood” could not withstand plunging fire, Holland’s plan was to close the range quickly, then turn at short range to bring his full armament to bear, keeping his ships in close formation for gunnery concentration. Heavy sea spray posed a problem for his optical directors; the Germans were able to utilize their full armament while their superior optical equipment suffered less from wind and sea spray, since the wind was on their disengaged sides.
At 0550, Holland ordered “Hood” and “Prince of Wales” to both engage the left hand German ship which was presumed to be “Bismarck,” though it was “Prinz Eugen.” Aboard “Prince of Wales” the mistake was corrected quickly. The initial misidentification came from the fact the command vessel, “Bismarck,” had switched position the previous day after “Bismarck” lost her radar from the concussion of her main armament as she fired at “Norfolk.” Further, the German ships had similar silhouettes and were nearly indistinguishable at battle ranges.
At 0552, range was 25,000 yards and the British turned 20º toward the enemy. Action commenced when “Hood” fired her first salvo. Half a minute later, “Prince of Wales” followed suit. Hood’s first salvo fell near “Prinz Eugen” but did not actually hit. The opening salvo from “Prince of Wales” was observed to be at least 1,500 yards over and to the right/aft of “Bismarck.” “Hood” continued to fire on “Prinz Eugen” while “Prince of Wales” engaged “Bismarck.”
At 0555 Captain Lindemann gained permission to open fire from Admiral Lütjens. “Prinz Eugen” shot first, followed by “Bismarck.” Both concentrated their fire on “Hood.” The first “Bismarck” salvo fell in front and slightly to starboard of “Hood.” The second fell between “Hood” and “Prince of Wales” while the third appeared to straddle “Hood.” “Prinz Eugen” fired three salvoes, one of which straddled “Hood” at the same time the third “Bismarck” salvo fell. Either one 15 inch shell from “Bismarck” or one or more 8 inch high explosive shells from “Prinz Eugen” struck Hood near the base of the main mast on the port side of the shelter deck. Most likely this was from “Prinz Eugen,” given that a hit by “Bismarck” would have caused more damage.
This started a fire that spread across the shelter deck to port of the main mast and aft superstructure. It reached the ready-use ammunition lockers and the ammunition began “cooking off.” The shelter deck was hellish as 4 inch shells and 7 inch Unrotated Projectile rocket mines began detonating. Those who could not take cover were killed or wounded in the storm of fire.
Believing he was out of the danger zone for plunging fire, Holland ordered another 20E turn to port which allowed the rear turrets to fire. One or more of the rear turrets on “Hood” did open fire. Holland then ordered another 20E turn to port, which was executed between 0559-0600, to bring his ships broadside-on to their opponents.
At
this moment, “Hood” was dealt her death blow. The fifth salvo from “Bismarck”
straddled, with one or two shells striking “Hood” around the main mast, through
a narrow weak zone in her side. Aboard “Prince of Wales,” Captain Leach saw
Hood: "...at the moment when a salvo arrived and it appeared to be across the
ship somewhere about the mainmast. In that salvo there were, I
 think, two shots
short and one over, but it may have been the other way round. But I formed the
impression at the time that something had arrived on board Hood in a position
just before the mainmast and slightly starboard. It was not a very definite
impression that I had, but it was sufficiently definite to make me look at Hood
for a further period. In fact I wondered what the result was going to be, and
between one and two seconds after I formed that impression, an explosion took
place in the Hood, which appeared to me to come from very much the same position
in the ship. There was a very fierce upward rush of flame the shape of a funnel,
rather a thin funnel, and almost instantaneously the ship was enveloped in smoke
from one end to the other." In fact, her after magazine had blown up.
think, two shots
short and one over, but it may have been the other way round. But I formed the
impression at the time that something had arrived on board Hood in a position
just before the mainmast and slightly starboard. It was not a very definite
impression that I had, but it was sufficiently definite to make me look at Hood
for a further period. In fact I wondered what the result was going to be, and
between one and two seconds after I formed that impression, an explosion took
place in the Hood, which appeared to me to come from very much the same position
in the ship. There was a very fierce upward rush of flame the shape of a funnel,
rather a thin funnel, and almost instantaneously the ship was enveloped in smoke
from one end to the other." In fact, her after magazine had blown up.
Those on “Prince of Wales,” “Norfolk” and “Suffolk,” as well as their German adversaries, could not believe their eyes: the “Mighty Hood,” most famous of warships, had just been devastated. It was unfathomable to all. The ship - from just before the main mast aft to "Y" turret - was laid waste.
In moments, the remains of the stern swung vertical and quickly sank. The bow swung high in the air at an angle between 45º and vertical and pivoted as it sank. According to the Germans, as the bow rose, Hood’s forward turrets fired one last salvo. If this is true, it was likely from a short or mechanical failure.
The “Hood,” the most famous British battleship, symbol of the dominance of the Royal Navy, was gone. From a crew of 1,418 men, only Midshipman William Dundas, Able Seaman Robert Tilburn and Signalman Ted Briggs survived. Of the ship, all that remained was floating debris and an oil slick 4 inches deep. Fire flickered across the heaving sea.
In July 2001, a team led by David L. Mearns located the wreck of the “Hood” 9,200 feet below the surface of the Denmark Strait. The condition of the wreck confirmed a catastrophic event involving the aft magazines, with the actual damage more severe than expected. The stern was detached, and the bow was separated from the main hull.
| THE KIT |
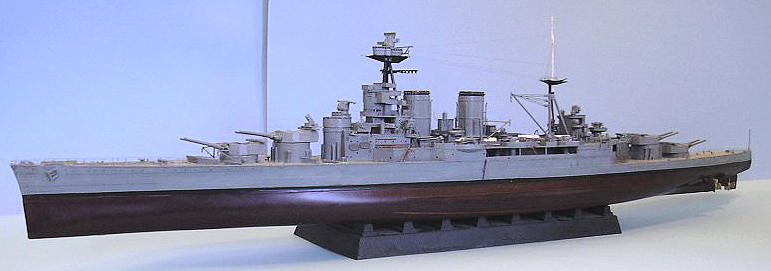
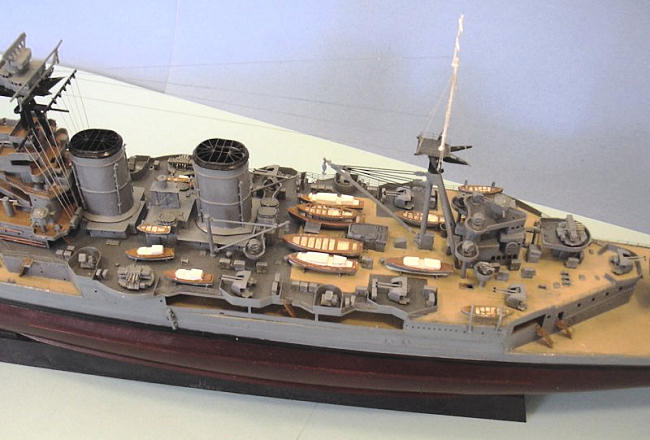
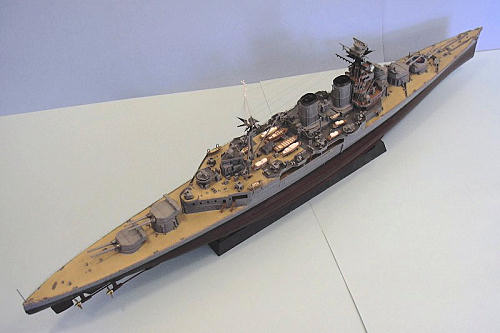
For those of us who secretly like ships, the announcement in 2006 of a 1/350 HMS Hood from Trumpeter was a happy event. Not being “serious enough” to think myself worthy of any of the 1/350 resin monsters available, and given that my bank account wasn’t about to be able to step up to a $500 kit (that being the price ten years ago of the White Ensign Models kit), an injection-molded kit at $160 was an absolute bargain.
 On
opening the box one is immediately impressed by the size of the model. The kit
has well over 400 parts in Trumpeter’s usual crisply-molded light grey plastic -
other than the red plastic lower hull.
On
opening the box one is immediately impressed by the size of the model. The kit
has well over 400 parts in Trumpeter’s usual crisply-molded light grey plastic -
other than the red plastic lower hull.
The kit is in dire need of a photoetch set. There are two available that I know of: one by Tom’s Modelworks and one by White Ensign Models. These sets are both over $40 (Disclaimer: given that the US Dollar is now skydiving without a parachute, no one may hold me accountable for actual prices of any item described here by the time you decide to buy it) There is so much small detail on the model that looks so much better in photoetch than it does in plastic that if one is going to spring for the kit, it is a crime not to spring for the aftermarket set of your choice. I used the White Ensign Models set and was entirely happy with it.
Since there is so much photoetch to completing this model, allow me to highly, highly, highly recommend a new product: Gator Glue, a water-based acrylic glue designed to attach photoetch to plastic and photoetch to photoetch, without attaching flesh to any of these other items. If you have any dislike of using photoetch on any kind of model, this product will go a very long way indeed to resolving all your problems.
| CONSTRUCTION |
I was fortunate to serve in the U.S. Navy in a time when the all-big-gun navy had not yet disappeared. I had the good fortune to see the ultimate American heavy cruiser, U.S.S. “St. Paul”, as well as U.S.S. “Baltimore.” When U.S.S. “Missouri” came to Long Beach 20-odd years ago, I was there to see her arrival, and then went aboard. There is nothing more impressive to see up close than heavy naval cannon - no land-based artillery can come close. These ships, with their vast armament and singular purpose of blowing anything they can across to kingdom come, have a beauty and majesty about them that modern warships lack.
When I was a kid, I built many of the Revell ships, but the last time I had touched a ship model before diving into this project with HMS Hood had been while I was still in high school, back in the early Triassic.
Before proceeding, I want to highly recommend the website of the HMS Hood Association. There is more information there than a would-be Hood modeler can take in at one time. The information on building a model is exhaustive. The painting information covers all of Hood’s career in detail, and is crucial to anyone who wants to get their money’s worth out of the project.
I also recommend you get an Optivisor before starting a project like this, since working in 1/350 scale will indeed drive you blind otherwise.
Trumpeter instructs a modeler to wait to attach the lower hull to the upper hull until the rest of the model has been assembled.
 This is wrong!
The fit of Trumpeter hulls has been complained about by other reviewers and I entirely agree with them. I have now assembled the hulls of HMS Hood, USS Massachusetts, and USS San Francisco, and only the latter model has an upper and lower hull that will not turn the air over the workbench a deep purple when it comes to assembling the hull.
Do the hull first, before you have put on the main deck. This will allow you to work on the upper/lower hull joint from inside and outside, which will get things better than they would otherwise. Do not be afraid to apply industrial-strength pushing and shoving to accomplish this.
And then the atmosphere got a deep royal purple when I discovered after all of that effort that the lower hull is one-quarter inch shorter than the upper hull, in the stern. Actually, it was better that it was short in the stern than had it been short in the bow, since I was able to cut a piece of Evergreen sheet to fit the profile, then fill the area with putty, and sand it smooth with the result of a hull that is right.
The hull has the wiring for the degaussing lines molded in. If you intend to use the photoetch degaussing lines in either of the two photoetch sets, you need to sand off the molded detail now. I didn’t do that, and while I am sure the photoetch would have looked better, I was not disappointed with the ultimate look (not being a Serious Professional Ship Guy). I then attached the main decks and proceeded to attach the propeller shafts and rudders.
| COLORS & MARKINGS |
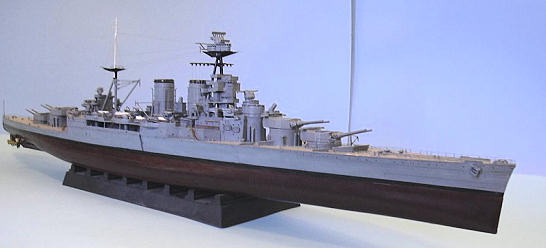
For me, painting the model was an integral part of the construction process. I had the WEM paints, but since they are all oil-based enamels, I didn’t use them. This is solely due to personal choice; the paints are excellent and have the additional quality that if one airbrushes the paint and then paints with a brush, the color will be the same both ways when they dry. I matched Xtracrylix paints to the WEM paints and used them. I know, the Xtracrylix are airplane colors while the WEM paints are proper ship colors, but it wasn’t that hard to match colors. I found the overall grey color was perfectly matched with Xtracrylix “RAF Ocean Grey”. The same was true for other colors throughout the project.
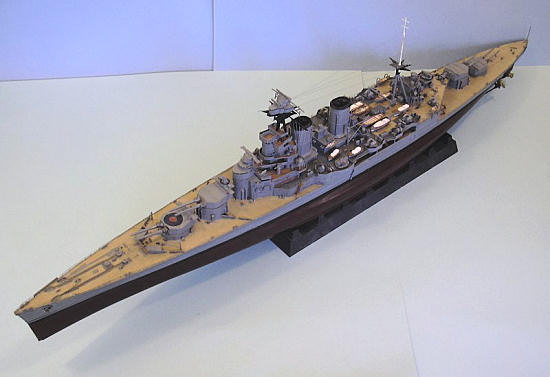
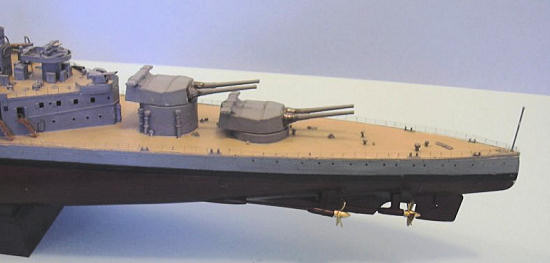
Once the hull was assembled, I painted the lower hull with Tamiya “Hull Red,”
and painted the wooden deck areas with Gunze-Sangyo “Sail Color.” The color
instructions at the Hood Association site state that the wooden decks of Hood
were a “muddy tan” at the Battle of the Denmark Strait, since the decks were not
regularly holystoned at that time. After the “Sail Color” had dried, I
airbrushed Tamiya “Smoke” over them to “pop out” detail and give the “muddy”
look. When the deck and the lower hull were
 dry, I masked those areas and
airbrushed the hull with Xtracrylix “RAF Ocean Grey.” I decided not to sand off
the anchor chains and replace them with photo-etch, though I would have done so
had I had Gator-Glue at that time. The molded-on anchor chains were “popped
out” by brush painting “Smoke” over them.
dry, I masked those areas and
airbrushed the hull with Xtracrylix “RAF Ocean Grey.” I decided not to sand off
the anchor chains and replace them with photo-etch, though I would have done so
had I had Gator-Glue at that time. The molded-on anchor chains were “popped
out” by brush painting “Smoke” over them.
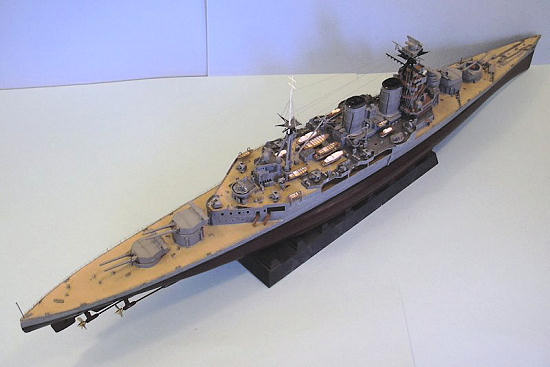
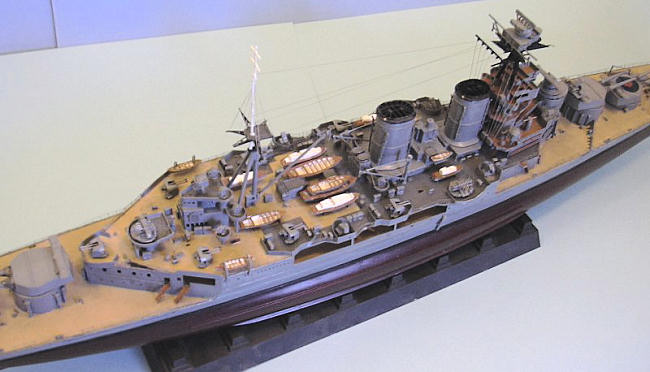
I did something I do not see many ship modelers do, which was to go back over the hull and “post-shade” it like I do an airplane model. I also did this throughout the construction of the turrets and superstructure. The reason I did this is that I never in my seagoing career on the USS Rustbucket ever saw a ship that wasn’t being painted. A metal ship in an ocean is a 24/7 battle against rust for 20 years. US Navy ships resemble modern US Navy airplanes when it comes to “multi-hue” finishes. I also saw the same thing on the Royal Navy ships I ran across during those years, so I feel safe in doing this to Hood. While this might not be that apparent in 1/350, it gives a certain “depth” to the final finish that looks much better than a large model in monochromatic finish.
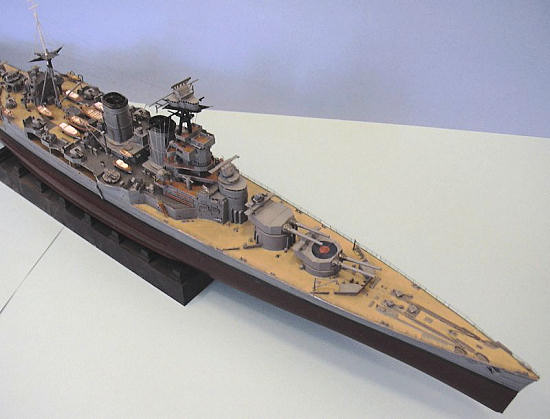
When I assembled the turrets, I decided I did not like the “bare” look of the guns without flash bags. I made the flash bags with toilet paper dipped in white glue and then wrapped around the barrels and pinched into shape. The final result looked exactly like canvas. When the turret was painted, I brush-painted over the canvas covers with “Smoke.”
The superstructure was done in sub assemblies that were pre-painted, then repainted where necessary to cover join seams. The linoleum decks on the bridge were painted with Xtracrylix “RLM 79 Sandy Brown.”
The
fighting tops had their plastic “starfish” replaced with photoetch. Since at
this point in the project I had not yet discovered Gator-Glue, they did present
the usual problems one encounters in glui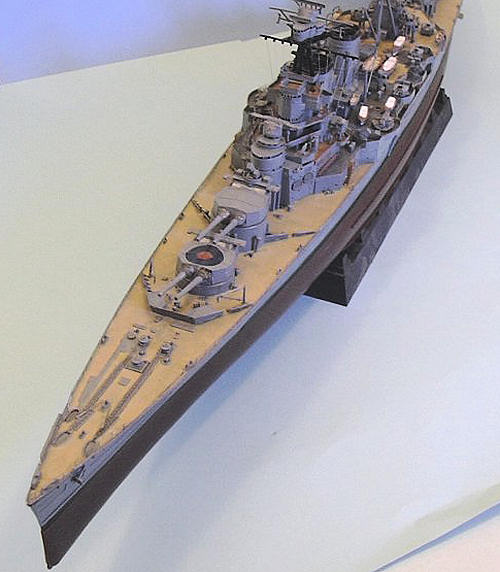 ng photoetch together.
The ladders were all replaced with photoetch, which I painted Gunze-Sangyo “Wood Brown” before assembling. The air over the workbench did take on a light purple haze when it came to bending these properly to have steps, rails etc. Patience did win the day, and all were replaced successfully.
The boats all had their details replaced with photoetch. I did leave off the photoetch oars, which are now being attached with Gator-Glue.
When replacing plastic parts with photoetch, I stuck to doing so with the more obvious parts. Where the photoetch detail was for very small parts, and where I could see that I needed the structural strength of plastic (like with the whaleboat davits) to insure a long-lasting model, I did not hesitate to leave some of the photoetch behind.
I did open up the stacks, which involved a lot of reaming-out with my Dremel tool, with the plastic structure replaced with the photoetch parts.
For those who haven’t built a ship, a good construction plan to use is to build from the centerline out. This allows you to detail everything without having to reach back into that area afterwards to put something in position.
I had tried to do the photoetch railings, and was very disappointed with the result, using cyanoacrylate glue. In fact, at this point the model went back into its box with the masts not attached, for what turned out to be a year. It was then that I discovered Gator-Glue. Using this product, the railings were done in a 5-day session without problem. I suspect that if I the Gator-Glue had been available from the outset that the model could have been completed in a few months at maximum, working on it only in my spare time.
The rigging was done with “invisible thread” and stretched sprue. I also “weathered” the model with bits of rust and such as I was assembling the various parts and sub-assemblies. I used a Type B RAF roundel from an Xtra-decals sheet for the marking on A turret.
| CONCLUSIONS |
Once the model was completed, I was pleasantly surprised when I sent photos around to friends to discover that inside every airplane modeler there is a ship modeler quaking in their boots at the thought of stepping up and doing a ship. Everyone I know has at least one ship model well-hidden in their stash, for the day they get their courage up. A very well-known modeling site owner (not here) confided to me his possession of two Trumpeter kits he is holding onto for when he retires from his day job.
Allow me to say to all of you who fit this description that it is not too late! Pull that kit out of the stash and open it up. If you can build an advanced airplane model and can follow instructions, and know that 90 percent of successful modeling is the result of patience, building a big ship model is not impossible. It’s just more time-consuming than your average Classic Airframes kit.
 There is a sense of accomplishment to finishing a ship model I haven’t had with
an airplane model in a long time. While there are people who aren’t interested
in looking at an airplane model, nobody dislikes looking at a ship model, and a
big battleship model will always attract attention.
There is a sense of accomplishment to finishing a ship model I haven’t had with
an airplane model in a long time. While there are people who aren’t interested
in looking at an airplane model, nobody dislikes looking at a ship model, and a
big battleship model will always attract attention.
With a little effort, Trumpeter’s HMS “Hood” will make up into a very nice model of this famous ship, conveying the power and beauty of the original very well.
I liked doing this HMS Hood so much I am now getting ready to do the 1/350 USS Saratoga - with the 1936 all-biplane air group.
If you’re in a rut with your hobby, doing something completely different, like a ship model, will have an exemplary effect on your fun.
Thanks to Stevens International for the review kit and to White Ensign Models for the aftermarket set.
March 2008
Copyright ModelingMadness.com
If you would like your product reviewed fairly and quickly, please contact the editor or see other details in the Note to Contributors.