HP Models 1/700 SMS Zaehringen
| KIT #: | ? |
| PRICE: | $? |
| DECALS: | No options |
| REVIEWER: | Frank Spahr |
| NOTES: | Resin kit |
| HISTORY |
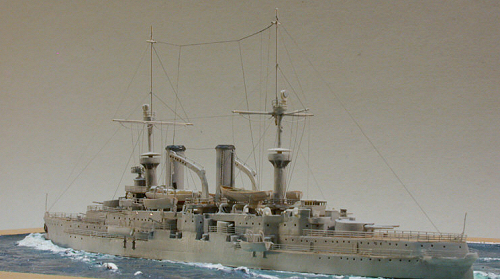
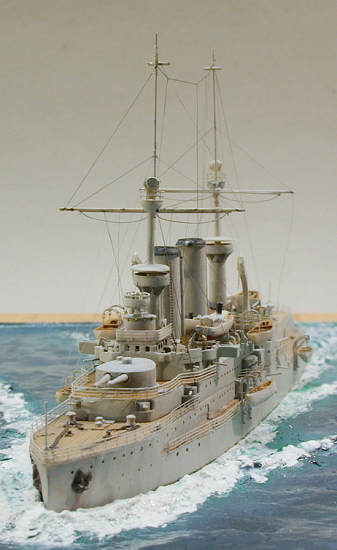
 SMS (His Majesty´s Ship)
Zaehringen belonged to the five-strong Wittelsbach class of the imperial german
navy. Named after german noble houses, the Wittelsbachs were designed and built
when Germany had not yet fully entered the naval arms race and were markedly
inferior to their British contemporaries. They soon were considered outdated and
fit not even for secondary roles. Their weak primary and strong secondary
armament were fully against the trend towards the all-big-gun ship.
SMS (His Majesty´s Ship)
Zaehringen belonged to the five-strong Wittelsbach class of the imperial german
navy. Named after german noble houses, the Wittelsbachs were designed and built
when Germany had not yet fully entered the naval arms race and were markedly
inferior to their British contemporaries. They soon were considered outdated and
fit not even for secondary roles. Their weak primary and strong secondary
armament were fully against the trend towards the all-big-gun ship.
Hence she did not participate actively in WW 1, being used as a training ship in port. After the war she belonged to the outdated units left to the new german navy, proving soon to be more of a liability than an asset and was stricken from the list. She escaped the scrapper´s torch and was converted to a radio-controlled target ship in 1927, without armament and most superstructure and with new machinery. In this role, she served for 17 years until sunk on 18 December, 1944 by RAF bombers at Gdingen harbour, which is now Gdynia in Poland. Raised by the Germans, she was scuttled to block Gdingen´s harbour on 26 March, 1945. Her remains were broken up 1949-50.
| THE KIT |
I´ve always been fascinated by pre-dreadnought warships, and asked for a kit of the Wittelsbach class once too often, unaware that it was available as a resin kit already. Martin Kohring of modellversium. de has been so kind to procure the kit at a show for me, and there it was, my first resin kit to build. My kit preview (in german) is to be found at
http://www.modellversium.de/kit/artikel.php?id=1036&origin=sparte .
 References used were the
rather unhelpful booklet "Vom Original zum Modell" by Koop and Schmolke, "Die
Schiffe der deutschen Flotten 1848-1945" von Hans Jürgen Hansen, plus
Internetsites like
http://www.bobhenneman.info/pdhome.htm
References used were the
rather unhelpful booklet "Vom Original zum Modell" by Koop and Schmolke, "Die
Schiffe der deutschen Flotten 1848-1945" von Hans Jürgen Hansen, plus
Internetsites like
http://www.bobhenneman.info/pdhome.htm
Rather helpful colour infos are to be found at http://german-navy.tripod.com/sms_paint.htm
I also asked fellow modelers Jim Baumann and Guido Hopp as to the appropriate colours, thank you guys!
|
Vital Statistics |
|
|
Builder |
Germaniawerft Kiel |
|
Keel laid |
21.11.1899 |
|
Launched |
12.06.1901 |
|
Commissioned |
25.10.1902 |
|
Fate |
1949-50 broken up |
|
Dimensions |
126,80 m Length; 22,80 m Beam; 8,04 m Draught |
|
Displacement |
12800 t |
|
Power plant |
3 triple expansion steam engines, 15.000 hp on three screws |
|
Performance |
18 kn max. speed; range @10 kn 5.850 nm |
|
Armanent |
4 x 24 cm; 18 x 15 cm; 12 x 8,8 cm |
|
Complement |
683 |
| CONSTRUCTION |
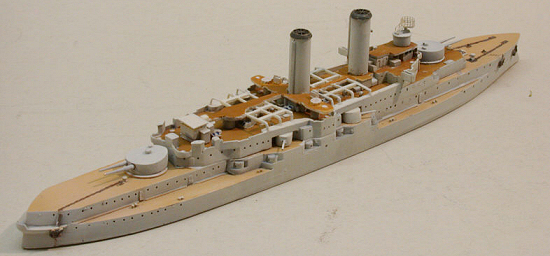
I started cleanup of all the resin parts one afternoon, using various burs and discs in a dremel, X-ACTO knife, wet sanding paper and a razor saw. I used a face mask. That process was completed in one afternoon, and I just noted the following issues:
 - One of the cranes wasn´t
cast completely: I built a mold using resin wafer material around the defect and
filled it with CA glue + filler powder. I could easily sand the part to shape
afterwards.
- One of the cranes wasn´t
cast completely: I built a mold using resin wafer material around the defect and
filled it with CA glue + filler powder. I could easily sand the part to shape
afterwards.
- One bridge wing was bent 180° and had to be sawed off and reattached correctly.
- Several gun barrels and parts of the boat supports broke off and had to be replaced by hypodermic tube material and styrene, respectively.
- The funnels had air bubbles that were filled with Mr Surfacer.
The kit instruction is a rather basic hand-drawn exploded view, but usable. I could quickly determine what went where. I also saw that some extra parts were present, especially boats, and you can always use boats.
| COLORS & MARKINGS |
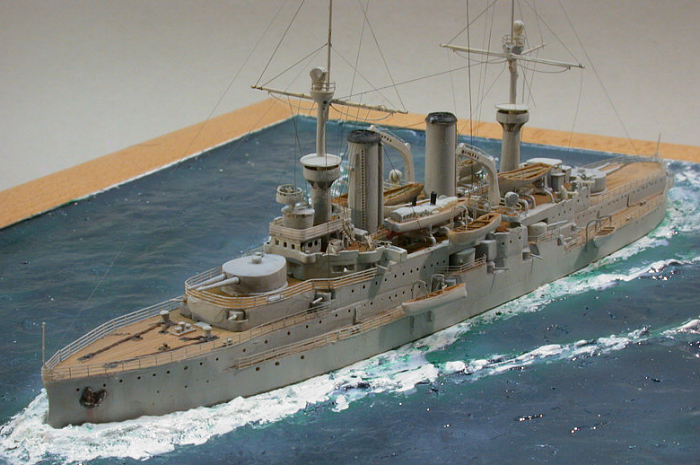
I sanded the upper deck level as well as I could to achieve a good fit, and then started painting. had decided to paint all vertical surfaces in a light grey, using WEM´s RN 03. The wooden decks were painted in MM enamels, using various tan and wood shades. The upper decks were probably coated with linoleum, so they were painted WEM RN 24 Corticene. Masking was done using Tamiya tape.
| MORE CONSTRUCTION |
 Early on, I made the water
base. I had figured out it would be best doing this with no fiddly stuff
attached to the hull. After experimenting with silicone (in modeling!), I wanted
to give plaster a try, so I used a picture frame, masked it with Tamiya tape and
poured plaster into it. During setting, I placed the model and sculpted the
waves and the wake using a wooden coffee stirrer and toothpicks. That took some
time yet got ever better the more the plaster set. After setting, I did some
more carving and sculpting using a dental sculpting instrument. My first attempt
at painting the base using watercolours looked great but failed when I added
Future - the watercolour chipped in a grand style. I then redid the paintjob
using acrylics in green, white and blues from the hardware supermarket, and that
went great. I tried to achieve a good shading and a lively result, as without
silicone you haven´t got the illusion of depth. Then I added a lot of layers of
Future and, after drying, drybrushed the wavetops and the wake. I was pretty
satisfied with the result.
Early on, I made the water
base. I had figured out it would be best doing this with no fiddly stuff
attached to the hull. After experimenting with silicone (in modeling!), I wanted
to give plaster a try, so I used a picture frame, masked it with Tamiya tape and
poured plaster into it. During setting, I placed the model and sculpted the
waves and the wake using a wooden coffee stirrer and toothpicks. That took some
time yet got ever better the more the plaster set. After setting, I did some
more carving and sculpting using a dental sculpting instrument. My first attempt
at painting the base using watercolours looked great but failed when I added
Future - the watercolour chipped in a grand style. I then redid the paintjob
using acrylics in green, white and blues from the hardware supermarket, and that
went great. I tried to achieve a good shading and a lively result, as without
silicone you haven´t got the illusion of depth. Then I added a lot of layers of
Future and, after drying, drybrushed the wavetops and the wake. I was pretty
satisfied with the result.
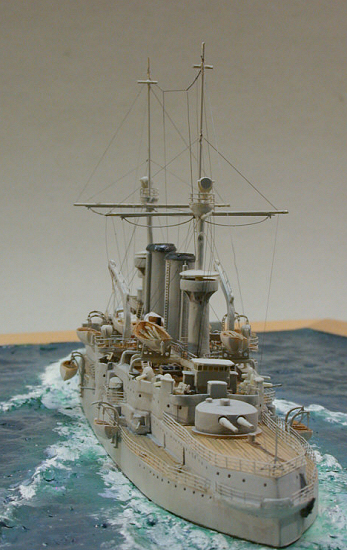
Then I could start assembling. I glued the upper deck with CA, keeping it in place with clamps. Small gaps were filled with Mr Surfacer and painted over. At this point I also worked on the other subassemblies such as bridges, charthouse, funnels, military masts and boats. For detailing, I used WEM´s very helpful PE set for the german-built russian cruiser Askold. Some additonal railings were taken from WEM´s 1:700 railing set.
I modified the kit as follows:
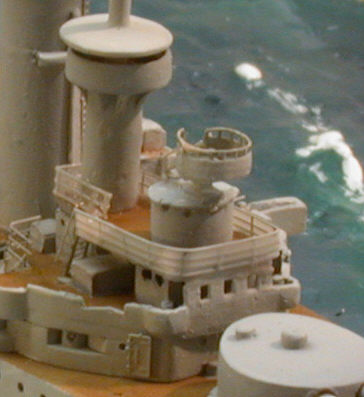 - The resin front bridge
windows and allthe windows of the rear bridge were sawed of and replaced by a
piece of PE railing, partly filled with Mr Surfacer to achieve sharp rectangular
windows
- The resin front bridge
windows and allthe windows of the rear bridge were sawed of and replaced by a
piece of PE railing, partly filled with Mr Surfacer to achieve sharp rectangular
windows
- The small round deck on the charthouse was taken from the Askold set that contains three of them, already with inclined ladder
- The splinter shield atop the charthouse was sawed off and replaced by PE railing, which was covered with white glue and painted grey to represent the canvas-covered original railing
- Smaller gun barrels were replaced by hypodermic tubing, the smallest guns were replaced by PE items
- Cast stairs,
ladders and funnel caps were 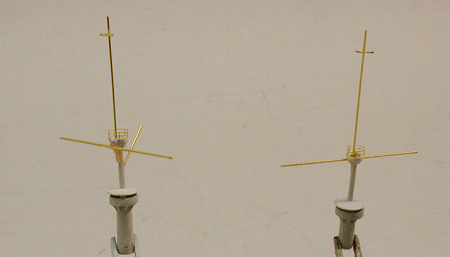 ground
off and replaced by PE
ground
off and replaced by PE
- Upper masts and yards were made from brass rod, the footropes again are Askold PE
- All bulleyes were drilled out a bit
- The lightening holes in the cranes were carefully drilled open, PE hooks and bracing were added
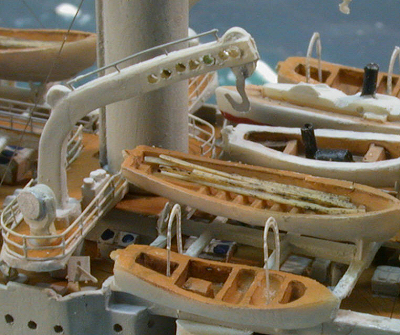 - The boats received oars made
from stetched brown sprue flattened at one end. The barge´s bulleyes were
drilled through
- The boats received oars made
from stetched brown sprue flattened at one end. The barge´s bulleyes were
drilled through
- I didn´t cover the stern walk, as pictures of ships at sea didn´t show it. Had I used, it, I would have made it from CA-infused paper.
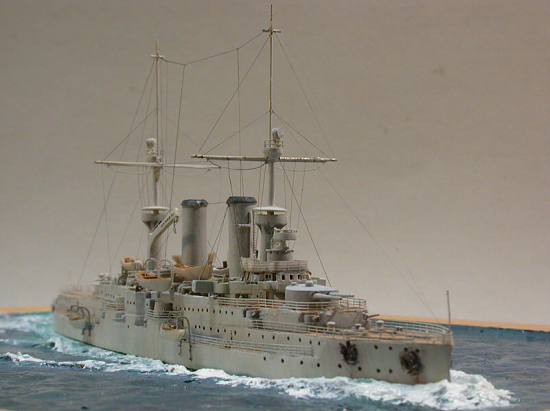
Finally everything could be assembled, and I did my weathering. Having a rather new ship at peacetime service, I did just a restrained weathering, trying to work out the shapes and angles and to make the overall grey scheme a bit more lively. Deck panel lines were highlighted with pencil lead, and the ship was washed gently with black watercolor. I softened the result using a glass fibre pen. Rust was only used around the anchors. A heavier wash was used on the boats to accentuate the contrast between the thwarts and the area between them.
After attaching the railings I revisited the model and did some touchups. A final flat coat sealed the model.
 My personal bugbear is
rigging. I used black stretched sprue, glued with styrene cement and tautened
with a heated dental waxing instrument. In spite of all caution, the masts
turned out to be so bendable still that any slightest touch tore apart all
previous lines. A situation that might have easily bordered to a tantrum. To me,
doing such work is like shaving a balloon using a chainsaw. Hence I gave up at
some point at about one third the original rigging. My deepest reverence to all
those who can master that art.
My personal bugbear is
rigging. I used black stretched sprue, glued with styrene cement and tautened
with a heated dental waxing instrument. In spite of all caution, the masts
turned out to be so bendable still that any slightest touch tore apart all
previous lines. A situation that might have easily bordered to a tantrum. To me,
doing such work is like shaving a balloon using a chainsaw. Hence I gave up at
some point at about one third the original rigging. My deepest reverence to all
those who can master that art.
In the meantime, rigging and modeling wizard Jim Baumann has given me the hint to use steel wire from wire brushes only, as it is so much more rigid than brass or ordinary steel wire, and I pass this hint to you.
Finally I took my pictures and thought about my conclusions from this project. I was surprised at how fast (a little under three weeks) I had completed the model, building a P-47 and completing a 1:400 battleship in between - and how relatively straightforward things had proceeded. I´ve lost my reservations towards resin now andam looking forward to the next project.
| CONCLUSIONS |
If I consider the priceof the kit, it´s pretty expensive, especially as it comes without PE or wire for the masts. And even more so, if you relate the price tag to the number of hours I spent building it (and was supposed to have fun with it - which I did). But let´s face the fact: Our hobby, when esoteric subjects in resin are considered, is the ultimate niche market, and I´d be surprised if the production run of such a kit were higher than a few hundred. And given the work it takes to make masters and mold the parts, especially in a country like mine, the price is appropriate.
Hence I´m glad I do have a nice model of one of the Kaiser´s ships of the line on my shelf now.
May 2006
If you would like your product reviewed fairly and fairly quickly, please contact the editor or see other details in the Note to Contributors.