Income Toy and Hobby USS New Jersey
| KIT #: | Guess so |
| PRICE: | $ a few bob here or there |
| DECALS: | perhaps |
| REVIEWER: | Frank Spahr |
| NOTES: | It's motorized!! |
| HISTORY |
The USS New Jersey is a big boat that had large guns. (Historical background courtesy of your editor who has been on big boats, including this one.)
| THE KIT |
It is plastic and contains many barely detailed parts. See Frank's earlier article for more info.
| CONSTRUCTION |
You only get by a kit like that in a very special way, as the actress told the vicar. I received mine as a present from a modeling pal I´ll just refer to as „Tomcat“, suggesting I might build this kit to good standards, maybe adding interiors to the helos and the like. Good one, Tomcat!
 I felt I couldn´t shrink away from the challenge so I decided
to build this kit anyway, and build it ASAP. Last week, not in a mood for
*serious* modeling and waiting to be able to start the 1:1 repaint of my living
room, I grabbed the kit on tuesday evening and just built it „as is“.
Corrections were mainly filling some of the most annoying sink marks, I
refrained from nearly everything else.
I felt I couldn´t shrink away from the challenge so I decided
to build this kit anyway, and build it ASAP. Last week, not in a mood for
*serious* modeling and waiting to be able to start the 1:1 repaint of my living
room, I grabbed the kit on tuesday evening and just built it „as is“.
Corrections were mainly filling some of the most annoying sink marks, I
refrained from nearly everything else.
I started with the complex machinery inside the model, and
it all went fine as per instructions. The metal strips were attached and bent as
required, the engine was mounted, the switch installed likewise .
I replaced the prop shaft with a piece of brass rod as the plastic part was
really crude and not all that circular. The shaft box was filled with vaseline
and glued shut.
.
I replaced the prop shaft with a piece of brass rod as the plastic part was
really crude and not all that circular. The shaft box was filled with vaseline
and glued shut.
It was at this stage that I got my first glimpse of how tricky this build would be for kids. The plastic is pretty brittle and the sprue gates are rather large, so you have all the chances in the world of breaking many of the more delicate parts upon removing them from the sprue and cleaning them up. Not all that incentive for your average kid ...
The rudder was cleaned up and placed in its receptacle using the cut off piece of the silicone coupling hose. Now came the first engine test which yielded a satisfying result, although the serious amount of friction generated by the crude bearings reduces power output a lot. Now I could spray the lower hull an appropriate hull red. I opted against cleanup of the waterline seam as I felt that would painfully interfere with my karma. The single screw was cleaned up as far as I had a mind to (I was afraid of breaking it, too – apart from not being too keen on a longer cleanup work) and then glued to the shaft. It was painted some Humbrol brass shade.
 I also did what filling of sink marks I had in mind that
evening, removed most larger pieces from their sprues and glued what
subassemblies I could find.
I also did what filling of sink marks I had in mind that
evening, removed most larger pieces from their sprues and glued what
subassemblies I could find.
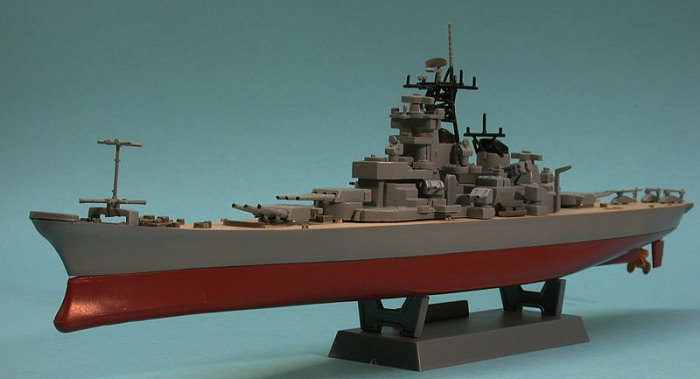
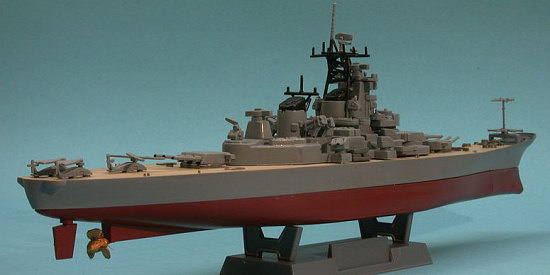
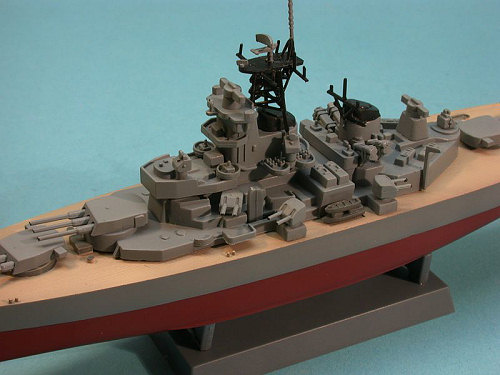
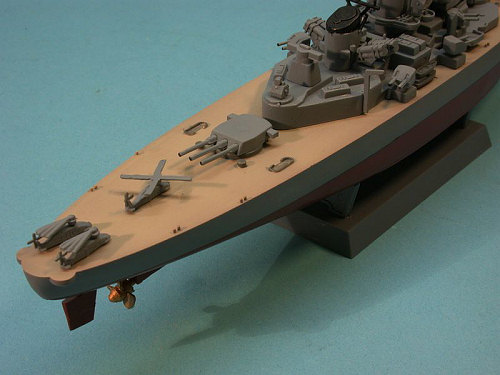
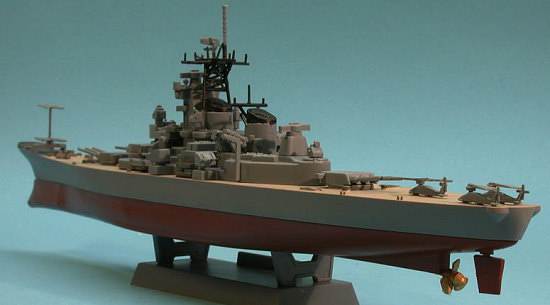
The upper hull was cleaned up, the deck was sprayed several shades of tan to resemble a well-scrubbed (or should I say „holy-stoned“?) teak deck, the hull was sprayed some appropriate light grey shade. The deck insert was sprayed a darker grey and glued in place.
The next morning before work, it was cleanup time, using nail polish remover plus some files and sandpaper. In the afternoon (which was my afternoon off and nothing I could do about the home improvement) I mercilessly glued all the remaining pieces of the model together. The mast pieces and the oversize-yet-brittle-and-fiddly antenna assemblies were special pièces de resistance, ones that would have sent your average 8-year-old skyrocketing. I managed to break just some of them yet shied away from cleaning them up in earnest. A rebuild from steel wire would be far more rewarding than attempting to clean them up. The instructions were pretty vague in how to assemble the lattice mast and so it was a matter of trial and error.
I might have added some resemblance of bridge windows using 1:700 PE ladder stock but opted against that for like karma-related reasons. Now the model looks as bland as designed ...
 After some hours I was able to spray the entire superstructure
plus the turrets and helos light grey. I hardly thought about the prospect of
adding different shades of paint to the various decks, as my karma started
itching most notably.
After some hours I was able to spray the entire superstructure
plus the turrets and helos light grey. I hardly thought about the prospect of
adding different shades of paint to the various decks, as my karma started
itching most notably.
The turrets had to be glued to the upper hull before mating it to the lower hull due to how they are attached, so I added them after some drying time.
Now came the moment of mating the two hull halves; using liberal amounts of glue and allowing some time before actually mating them plus using two screw clamps, it was done, leaving a gap around the bow and doubtful watertight integrity of the vessel.
During drying time, the funnels (or should I say the „chumnegs“ as in the instructions?) were hand painted black around the tops using Xtracrylix night black. After adding the superstructure, the entire ship was sprayed a final coat of Xtracrylix satin coat.
The first trial runs revealed a pretty slim freeboard, a neglegible effect of the rudder plus a notable list to port. As the model is slated for a one way trip on a hitherto undetermined inland water, these shortcomings will not endanger its mission – I´ll keep you posted on the model´s final disposition!
| CONCLUSIONS |
 There´s no project without something to learn in its course.
This time I realized how tricky seemingly simple kid´s toys may be and how
deterring they may work on kids you´d want to enter the hobby. Moreover, having
built a slightly later and having seen some more recent Trumpeter releases, it´s
amazing how far those Chinese manufacturers have come over the course of a few
years.
There´s no project without something to learn in its course.
This time I realized how tricky seemingly simple kid´s toys may be and how
deterring they may work on kids you´d want to enter the hobby. Moreover, having
built a slightly later and having seen some more recent Trumpeter releases, it´s
amazing how far those Chinese manufacturers have come over the course of a few
years.
For a total of six or seven hours of building time, this was fun and a good pastime on a rainy Wednesday with nothing much else going on – and I DID BUILD THE KIT!
April 2007
Copyright ModelingMadness.com
If you would like your product reviewed fairly and fairly quickly, please contact the editor or see other details in the Note to Contributors.