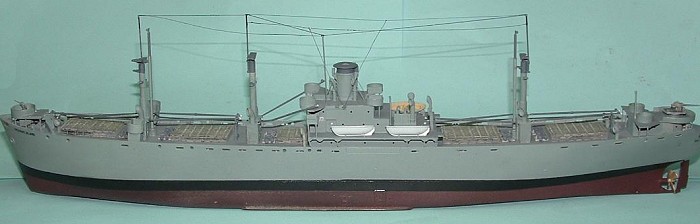
Trumpeter 1/350 Liberty Ship
| KIT: | Trumpeter 1/350 Liberty Ship |
| KIT #: | 05301 |
| PRICE: | $45.95 MSRP |
| DECALS: | One option |
| REVIEWER: | Bruno Schielzeth |
| NOTES: | Despite the minor errors in the kit, it goes together fairly well and certainly looks like a Liberty ship. After market PE will be required to make a true WWII Liberty ship out of it however. Overall I would give Trumpeter a B+ for a model of the present day Jeremiah O'Brien, and a C for a WWII Liberty Ship. A few more parts and a little more research would have created a great model. As it is, they did a good job, just not perfect. |
| HISTORY |
When war broke out in Europe in late 1939 Germany tried to cut England off from her much needed supplies by using its deadly U-boats and aircraft to sink merchant ships trying to reach England.
President Roosevelt called for an Emergency Fleet Program in the United States to build merchant ships at an unheard of pace. The design for a standardized merchant ship was based on a late 1890's British cargo ship design with a flat bottomed hull, and deep cargo holds. The new design, designated EC2 (Emergency ship, Cargo, size 2) could be mass produced easily and cheaply by at least a dozen shipyards in the US.
The first of these new ships was launched on September 27, 1941. It was named the SS Patrick Henry after one of the signers of the Declaration of Independence and Revolutionary War hero. He made the famous statement "Give me liberty, or give me death." From then on the EC2 ships became known as Liberty Ships.
The Liberty ships were named for the signers of the Declaration of Independence, Revolutionary War heroes, famous politicians, scientists, artists, explorers, and any number of other people. If an organization could raise the $2 million dollars needed to build a Liberty ship they could pick the name. One Liberty ship was named the S.S. U.S.O., another the S.S. Stage Door Canteen!
 The Liberty ships were a little over
441 feet long and 57 feet wide. Draft varied from 21 feet in the earlier
versions to 28 feet in the later versions. They were powered by a 3
cylinder steam engine rated at 2,500 horsepower, and could hold a speed of
11 knots with a full load of over 10,000 tons. They had five cargo holds,
three forward and two aft of the center mounted engine room and deck house.
Weapons varied but generally consisted of a single 3", 4", or 5" gun
forward and aft, and at least eight 20mm anti-aircraft guns mounted on the
deck house, mid-ships, and on the aft deck house.
The Liberty ships were a little over
441 feet long and 57 feet wide. Draft varied from 21 feet in the earlier
versions to 28 feet in the later versions. They were powered by a 3
cylinder steam engine rated at 2,500 horsepower, and could hold a speed of
11 knots with a full load of over 10,000 tons. They had five cargo holds,
three forward and two aft of the center mounted engine room and deck house.
Weapons varied but generally consisted of a single 3", 4", or 5" gun
forward and aft, and at least eight 20mm anti-aircraft guns mounted on the
deck house, mid-ships, and on the aft deck house.
The ships were of welded construction using steel plates to build up the sub-assemblies. By 1944 the average time to build a Liberty ship was down to 42 days! One ship was built in a record breaking publicity stunt in 4 days! Between 1941 and 1945 2,751 Liberty ships were built, making them the single largest class of ships in the world.
The Liberty ship was designed to make one crossing of the Atlantic Ocean. After that they were considered expendable. They were expected to have no more than a five year lifespan. Several ships broke in two during fierce Atlantic storms, probably due to poor welds, but many more showed just how tough these 'disposable' ships really were. Approximately 200 Liberty ships were sunk by enemy action, the weather, or hull failure during WWII. Most Liberty ships that survived the war sailed the world for another 25 years and formed the backbone of the modern merchant shipping lines.
The S.S. Richard Bland, named after a signer of the Declaration of Independence, was Liberty ship #28. Built in the Bethlehem-Fairfield Shipyards of Baltimore, Maryland, her maiden voyage was from the port of Philadelphia on May 1, 1942. And what a voyage it would be!
Bland joined her convoy at Halifax, Nova Scotia on May 14 and all 42 ships sailed eastward at 11 knots. On May 24 Bland and nine other ships separated from the convoy to sail to Iceland to join a convoy to Murmansk, Russia. They reached their assembly point and then sat at anchor for a month waiting for high command to release the convoy. The north Atlantic was a dangerous place and convoys to Murmansk lost many ships en route and high command had doubts as to the value of the convoys to Russia considering the losses in men, supplies, and ships.
 On June 27 the SS Richard Bland
finally sailed with convoy PQ17. Almost at once she ran into trouble. Thick
fog caused her to hit some heavy ice, staving in her fore peak. She then
ran aground on rocks and holed the hull under #1 hold. The hull was patched
with collision mats and she made her way to Reykjavik for temporary
repairs. She limped to Loch Ewe, Scotland where the hold was emptied and
her hull repaired. She finally reached Murmansk with her cargo on December
27, 1942.
On June 27 the SS Richard Bland
finally sailed with convoy PQ17. Almost at once she ran into trouble. Thick
fog caused her to hit some heavy ice, staving in her fore peak. She then
ran aground on rocks and holed the hull under #1 hold. The hull was patched
with collision mats and she made her way to Reykjavik for temporary
repairs. She limped to Loch Ewe, Scotland where the hold was emptied and
her hull repaired. She finally reached Murmansk with her cargo on December
27, 1942.
On March 1, 1943 convoy JW51A left Murmansk. On March 5, at 0927, a torpedo struck Bland but failed to sink her. Rapid repairs allowed her to rejoin the convoy just in time to fight off an attack by a dozen He-111s. Four bombs just barely missed the Bland but caused no serious damage.
On the night of March 7 a heavy gale with 40 knot winds struck the luckless Bland and she lost the bridge steering gear. Emergency steering from the aft platform had to be used. The storm continued for several more days and the Bland lost the convoy.
By March 10 the weather improved a little to intermittent snow squalls, poor visibility, and heavy seas. Lookouts reported a periscope astern moments before a torpedo stuck the #4 hold. Before the stern gun could fire on the sub it disappeared into the snow, just as a second torpedo barely missed the stern.
Expecting another attack within minutes, the captain ordered "Abandon Ship!" and two life boats were lowered on the windward side and brought around to the leeward side to pick up the crew. However, the heavy seas and high winds drove both boats, and the eight men in them, into the snow squalls.
There were still 63 men aboard the Bland and not enough boats for them all. The captain said that he would remain aboard the SS Bland with any crewmen that cared to remain and radio the escort ships from the convoy for help. He stated "I don't think she'll sink unless they put another torpedo into us". A few minutes later, as the overloaded lifeboats drifted clear of the Bland, another torpedo stuck the Bland under the deck house.
 Three torpedoes, ice, and rocks
finally proved to be too much for her and the Bland broke in half just
forward of the deck house. The stern portion sank quickly, but the bow
section remained afloat. The already overloaded life boats tried to rescue
as many men as they could from the violent, cold seas but many crewmen were
lost to the freezing North Atlantic.
Three torpedoes, ice, and rocks
finally proved to be too much for her and the Bland broke in half just
forward of the deck house. The stern portion sank quickly, but the bow
section remained afloat. The already overloaded life boats tried to rescue
as many men as they could from the violent, cold seas but many crewmen were
lost to the freezing North Atlantic.
The next morning the two lifeboats with the 8 men in them, and one lifeboat with 27 men in it were recovered by the British destroyer HMS Impulsive. The other lifeboat with the captain on board was never found. A salvage trawler secured the bow section of the Bland and towed it back to the USA.
U-255 was credited with sinking the Bland, but her bow section and 35 of the 71 men on board her made it back to the USA. The voyage of the SS Richard Bland was only one of many unusual tales of the tough and rugged 'expendable' Liberty ship, and her story inspired me to build a model of her.
| THE KIT |
Read Scott's excellent preview to see what you get in the sturdy box.
Trumpeter used the museum ship Jeremiah O'Brien docked in San Fransisco as their reference. Since there are only two operational Liberty ships left afloat today, the other being the John W. Brown in Baltimore, Maryland, they didn't have much choice. As such, it is a very good model of the present day O'Brien, but not a very accurate model of a real WWII Liberty ship. There have been a number of changes to the O'Brien since she was built and Trumpeter seems to have modeled them all.
The list of errors isn't all that big, but they make building a true WWII era ship a little more difficult. There are also a few inaccuracies introduced strictly by Trumpeter. None of these make the kit any less attractive, but some should be corrected by the modeler for a more accurate model.
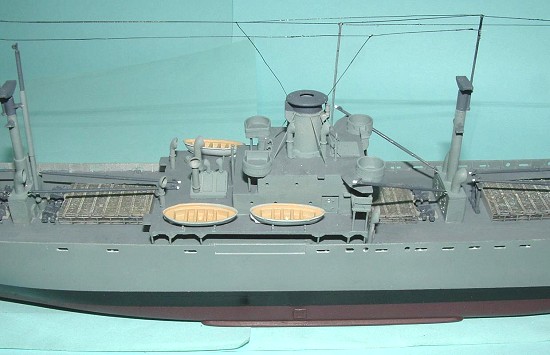
 The errors in the kit, not in any
real order, include a round smoke stack. The real one is oval in
cross-section. The opening in the top is also about twice as big as it
should be.
The errors in the kit, not in any
real order, include a round smoke stack. The real one is oval in
cross-section. The opening in the top is also about twice as big as it
should be.
The present day O'Brien has two different styles of large life rafts, a rectangular one and a rounded one. Each is correct but they should match. Perhaps a swap meet is needed so everyone can get four of the same style?
The kit follows the O'Brien in another area. Both main guns are 5" guns, at least according to their description. The bow is a 5"/38 and the aft one is a 5"/50 caliber. The early Liberty ships, like the O'Brien and the Bland, usually had a 3"/50 caliber gun in the bow position. However, the bow gun looks like a 3"/50, so it's not that big of a deal. Face it, in this scale 2" is not very noticeable.
The upper decks of the main deck house have watertight doors. Only the lower deck had them, the upper decks used wooden doors not unlike a normal house door. These can be ignored or corrected with the PE sets.
The rudder is a single piece but it should be a split 'contra-guide' rudder. The kit prop is a high speed prop used on the Victory ships and is much too broad in the blade area. The lower rudder support is far too thin and delicate and is flared into the hull wrong. The shape should be more curved as it joins the keel and stern post.
The water intakes for the engines are
too large and located on the wrong sides of the hull. The starboard side
should have a single small intake and the port side should have both a
small and a large intake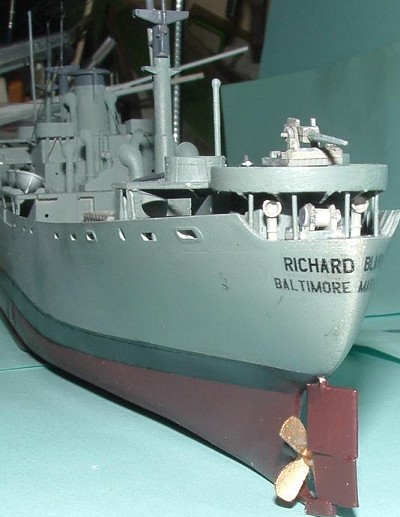 .
.
The bilge keels are about an inch short of the proper length. They should extend both fore and aft of the kit position by about ½ inch. This can be corrected with the PE set, or new bilge keels can be added with styrene if desired.
The overheads for the flying bridge, and the flying bridge wings themselves are too wide by about 25%, and the shape of the overheads is slightly wrong. This is easily corrected with some minor surgery.
The cargo boom bases appear to be too tall. Sanding them down to just above the molded in watertight doors might improve their looks. I didn't bother to correct this.
There are also some errors in the shape of the cutouts in the main deck house, and the aft deck house, but they are minor. Some of these errors can be ignored by all but the most die-hard builder.
I'm sure I missed a many more minor errors, but these are the ones I found in my research.
Completely missing from the kit are the weather bridge on the upper deck forward of the smoke stack, although the decking for it is there, and the emergency steering shack on the aft gun deck house. Trumpeter also didn't include 'ready ammo' boxes for any of the deck guns! A strange omission of some very visible detail!
Despite the previous list of errors, the kit is beautiful! No model is 100% accurate and the Trumpeter Liberty ship is no different.
The use of the Tom's Modelworks set #3546, Gold Medal Models Photo Etched sheet #350-31, or the L'Arsenal #KC 350 02 kit made specifically for the Trumpeter Liberty ship are highly recommended as they correct most of the flaws in the kit and add a substantial amount of missing detail. The contents of each set is slightly different, but all are excellent and highly recommended for a more accurate model.
| CONSTRUCTION |
Out of necessity, this build is going to be incomplete because I don't have the after market PE set in hand yet. However, this review is about the Trumpeter kit, not the PE set, so hopefully no one will mind.
There is no need to spend any time cleaning up flash on the kit; there isn't any! The worst problem you will find is a faint mold seam on some parts that needs to be scraped or sanded down.
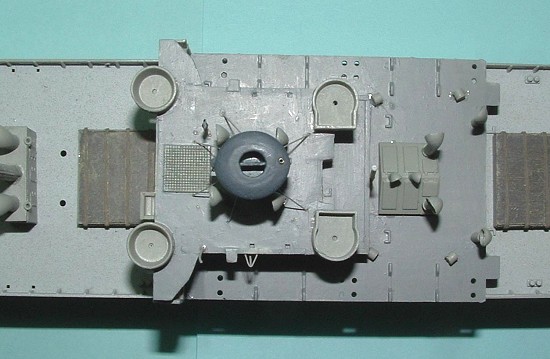
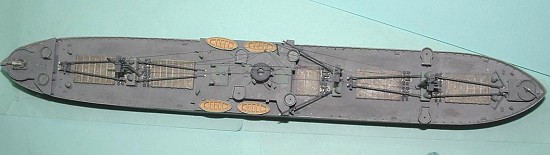
![]() Do not follow the kit assembly
instructions! Attempting to assemble the hull after the rest of the ship is
together will lead to disaster! Care must be taken to match the two pieces,
as they both have some warping you have to deal with. It might be a good
idea to spread the hull with styrene braces to get a good match because
filling and sanding the curved hull is a treat you shouldn't have to deal
with! (I mention this after I failed to do so on my build. Learn from my
mistakes people.) Proper hull assembly is probably the most difficult part
of the build. If care is taken the match will be good, but it takes some
work. Things would be a lot easier without the molded in upper deck in the
center of the hull. It would also have been nice if the seams between the
deck sections were under the deck house. Oh well, you have to work with
what you have in front of you.
Do not follow the kit assembly
instructions! Attempting to assemble the hull after the rest of the ship is
together will lead to disaster! Care must be taken to match the two pieces,
as they both have some warping you have to deal with. It might be a good
idea to spread the hull with styrene braces to get a good match because
filling and sanding the curved hull is a treat you shouldn't have to deal
with! (I mention this after I failed to do so on my build. Learn from my
mistakes people.) Proper hull assembly is probably the most difficult part
of the build. If care is taken the match will be good, but it takes some
work. Things would be a lot easier without the molded in upper deck in the
center of the hull. It would also have been nice if the seams between the
deck sections were under the deck house. Oh well, you have to work with
what you have in front of you.
The two pieces for the upper deck are
just a butt joint to the molded in center portion, so I added thick styrene
to the underside of the center deck to make a solid glue area. The separate
fore and aft decks have the sprue attachment points and several ejector pin
marks on the gluing surface that need careful trimming and sanding if you
want to get a clean joint to
 the hull. In fact, the entire kit is covered
with ejector pin marks. Thankfully Trumpeter engineered most of them to be
on the underside of the parts, but some need to be filled as they will be
noticeable on the finished model. The underside of the deck houses look
like a teenager with a very bad case of acne!
the hull. In fact, the entire kit is covered
with ejector pin marks. Thankfully Trumpeter engineered most of them to be
on the underside of the parts, but some need to be filled as they will be
noticeable on the finished model. The underside of the deck houses look
like a teenager with a very bad case of acne!
With the basic hull completed I sanded off the incorrect water intakes and filled the holes. I then cut two small squares and one larger square of .010 styrene, drilled a hole in the middle of each, and then used my tapered square file to slowly open up the centers. I glued these to the hull and sanded them down to taper the edges a little.
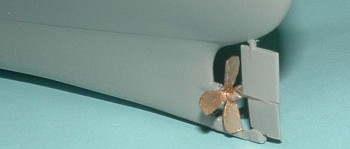 I carved a new lower rudder support
from a thick piece of sprue and then filed it to shape once it was glued to
the keel. Using a picture of the real O'Brien in dry dock as a reference I
was able to reshape the kit prop into something a little more correct. The
kit rudder will look OK if you cut it apart slightly below the half way
point on the rudder and set the lower portion for a slight right turn.
I carved a new lower rudder support
from a thick piece of sprue and then filed it to shape once it was glued to
the keel. Using a picture of the real O'Brien in dry dock as a reference I
was able to reshape the kit prop into something a little more correct. The
kit rudder will look OK if you cut it apart slightly below the half way
point on the rudder and set the lower portion for a slight right turn.
An application of Squadron White Putty and some light sanding and the hull was sprayed with Tamiya Light Sea Gray for its first color coat. That was followed by another fill and sand, and another, and another!
I began work on the upper decks with
the main deck house after spraying the parts with more Tamiya Light Sea
Gray. Assembly was per the instructions. Very narrow strips of Bare Metal
Foil were put down on all the 20 mm gun tubs to represent the steel banding
that held the composite armor in place. The armor on the front of the
bridge and the 20mm gun tubs was a mixture of tar and granite chips. Cheap
and effective, just like the Liberty ships themselves! The armor on the
front of the bridge was held on with steel disks and long bolts. The kit
makes them look more like those giant steel studs used in castle gates! A
quick sanding reduced them to an more realistic height, which should be
almost flush with the armor. I noticed after I had the lower deck assembled
that the portholes at the front were wrong. The portholes on the
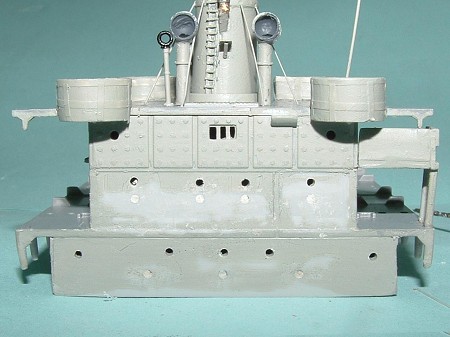 second
deck were wrong too! There are supposed to be 5 portholes on the lower deck
, not three. The three on the kit are spaced incorrectly and are also too
low on the bulkhead.
second
deck were wrong too! There are supposed to be 5 portholes on the lower deck
, not three. The three on the kit are spaced incorrectly and are also too
low on the bulkhead.
Fixing them was easy. I glued styrene rod into the original portholes and then I drilled new portholes in the proper locations. The four portholes on the second deck were in the correct places, but they were too low. I filled them the same way and new portholes were drilled slightly above the original locations. The port holes were not a big error, and could be ignored, but somehow they bothered me so I fixed them.
 The width of the flying bridge wings
were corrected by just cutting off the short back wall of the wing along
with the deck under it. Just run a sharp knife blade down the inside of the
wall and snap off the back wall. The back of the wing had open railings so
the PE railing set, when I get it, will fill it in nicely. The wing
overhead was corrected by just cutting off an angled piece from the back
edge. Done properly it will produce an overhead the same width as the
modified flying wings and have the proper double angle.
The width of the flying bridge wings
were corrected by just cutting off the short back wall of the wing along
with the deck under it. Just run a sharp knife blade down the inside of the
wall and snap off the back wall. The back of the wing had open railings so
the PE railing set, when I get it, will fill it in nicely. The wing
overhead was corrected by just cutting off an angled piece from the back
edge. Done properly it will produce an overhead the same width as the
modified flying wings and have the proper double angle.
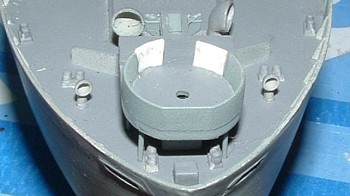
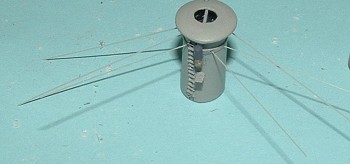 The smoke stack can be fixed with a
quick sanding of the two parts with a coarse sanding stick to get a
reasonable oval stack. It isn't totally accurate, but it's much closer to
looking right. I glued a divider into the stack and then cut a small disk
out of styrene, drilled a smaller hole in the center and then glued it into
the kit opening . The modified stack looks good to me, and didn't require
more than 20 minutes to do. The stays are stretched sprue glued into small
holes drilled into the stack band and the deck. Be careful, the stays are
not evenly spaced on the stack! The forward ones on each side are forward
of the mid line of the stack and anchor forward of the stack. The aft ones
are well back towards the center of the stack.
The smoke stack can be fixed with a
quick sanding of the two parts with a coarse sanding stick to get a
reasonable oval stack. It isn't totally accurate, but it's much closer to
looking right. I glued a divider into the stack and then cut a small disk
out of styrene, drilled a smaller hole in the center and then glued it into
the kit opening . The modified stack looks good to me, and didn't require
more than 20 minutes to do. The stays are stretched sprue glued into small
holes drilled into the stack band and the deck. Be careful, the stays are
not evenly spaced on the stack! The forward ones on each side are forward
of the mid line of the stack and anchor forward of the stack. The aft ones
are well back towards the center of the stack.
I added a steam whistle from rod sanded to shape and the small ledge just below it was made from a tiny piece of the brass screening I use for air intakes on my airplanes. I drilled a small hole at the rear edge of the stack cap and inserting a short piece of brass tube for the steam vent.
The rest of the deck house was assembled per the kit instructions. I did not use the kit ladders, railings, or lifeboat davits as I plan to use PE parts. I filled the holes for the kit davits with .030 rod and sanded them down. I also shaved off all the mounting lugs for the inclinded ladders It should also be noted that standard procedure on a ship under way is to have at least one lifeboat swung out on its davits, unless heavy seas were encountered.
I painted all the decks with Polly Scale Dark Sea Gray Acrylic and then touched up my goofs. (Yes, I have them. All of us do, but some of us won't admit it.)
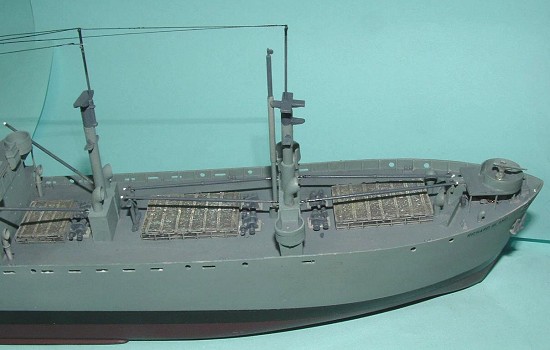
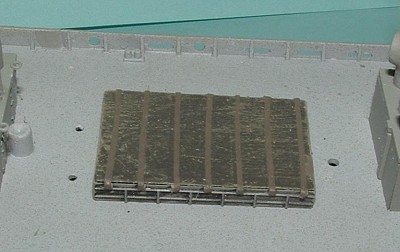 The hold covers also require some
attention. All five covers were heavy canvas over wooden beams. The canvas
was held down with wide, heavy canvas straps secured to the side rails. The
kit parts show objects on them that would be foot thick beams instead of
straps!
The hold covers also require some
attention. All five covers were heavy canvas over wooden beams. The canvas
was held down with wide, heavy canvas straps secured to the side rails. The
kit parts show objects on them that would be foot thick beams instead of
straps!
The kit parts were sanded down to remove the 'beams' and then lightly covered with a light coat of liquid cement like Testor's Model Cement. I let the cement dry completely. The cement gave the pieces a very nice scale cloth texture. I then painted the covers with Tamiya Acrylic Dark Khaki and dry brushed them with Polly Scale Light Desert Tan Acrylic and a light grayish/yellow mix I made.
The sides of the holds were painted Tamiya Light Sea Gray and then heavily washed with a dark sludge to give them some depth. New straps were added from thin strips of masking tape and painted a light khaki. They were placed on the covers being sure to match them to the molded in tensioners on the side pieces.
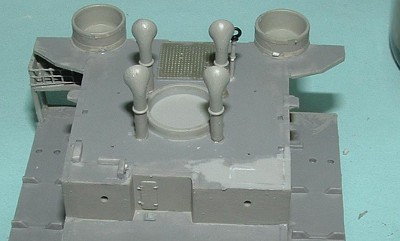
Mounting the hoist masts proved to be
a pain. Trumpeter didn't key the masts in any way, so getting them straight
and true required constant attention to keep them from shifting until the
glue set. A more positive mounting system would have been
 nice. In the end
I think I got them pretty close to straight, but a molded in key way would
have made life a lot easier on the modeler. It might work better if you
build up the masts with parts D-1 through D-3. The side platforms will aid
in lining up the masts to the bases, otherwise you have no reference to get
them square to the hull.
nice. In the end
I think I got them pretty close to straight, but a molded in key way would
have made life a lot easier on the modeler. It might work better if you
build up the masts with parts D-1 through D-3. The side platforms will aid
in lining up the masts to the bases, otherwise you have no reference to get
them square to the hull.
Any of the PE kits mentioned earlier will add a lot of the detail to the area around the masts. The base houses for the hoists had winches and other items on or near them that the PE sets supply, but Trumpeter didn't include, so all the boom arms have to stay loose until the PE is put on. Be careful when you cut the booms free from the sprue, they are very fragile! I only broke one, but it came off in three pieces. The boom arms were usually lowered and secured into brackets while the ship was at sea, so deploying them as Trumpeter shows them would be incorrect unless the ship was in port. However, a heavily loaded Liberty ship would have cargo lashed to the hold covers and to the deck, making the proper storage of the booms impossible. The choice of securing the booms depends on how you plan to build your model.I added a brass rod antenna to #1 cargo mast and replaced the antenna masts on #2 and #3 cargo masts with brass rod in preparation for the rigging that was coming.
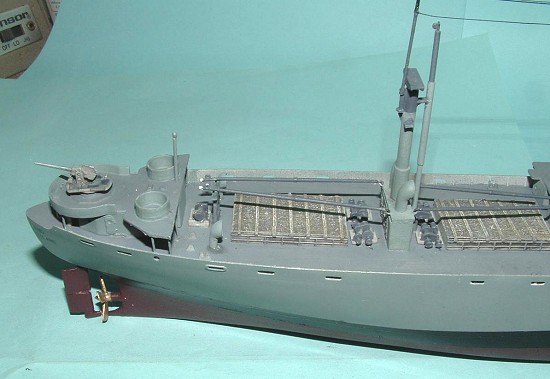
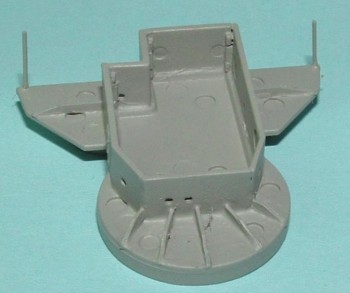
I modified the aft deck house a
little. There were several different designs of the deck house, but the one
in the kit is fairly accurate for an early Liberty ship like my S.S.
Richard Bland. I added thin styrene supports under the 5" gun deck and
added .020 support rods to the outer edges of the 20mm gun tub wings and
the aft end of the 5" mount. The free floating gun decks
 just looked wrong
to me. After I added these details I stumbled across a picture of the aft
gun house on the Net and found out I was right! I love it when guessing and
artistic license proves correct! I also modified the forward gun splinter
shield by extending them with sheet styrene until there was just a small
opening for the gun crews. The O'Brien probably had the shields cut back to
allow visitors easier access to the gun.
just looked wrong
to me. After I added these details I stumbled across a picture of the aft
gun house on the Net and found out I was right! I love it when guessing and
artistic license proves correct! I also modified the forward gun splinter
shield by extending them with sheet styrene until there was just a small
opening for the gun crews. The O'Brien probably had the shields cut back to
allow visitors easier access to the gun.
On a side note, all the ventilators on the ship are freely rotating units and generally should face into the wind, so there is no need to follow the kit's instructions as to positioning them. The ventilators should also have screens over them, but the thought of cutting out dozens of tiny screens seemed like too much work to me. The PE sets give you the support frames for the screens, but not the screens themselves, so I suppose I will have to add them at some point.
| COLORS & MARKINGS |
The S.S. Richard Bland, like most Liberty Ships, was gray and gray. Light gray on all vertical surfaces and dark gray on all horizontal surfaces. The hull and deck houses were painted using my worn Aztek 470 airbrush with Tamiya Light Sea Gray and the decks were painted Tamiya Dark Sea Gray. The tops of the masts and the smoke stack above the stay ring were painted in Tamiya Gunship Gray, as this seems to have fairly typical on Liberty ships. I was unable to find a single picture of the S.S. Bland anywhere on the Net, so I can't say my colors are 100% accurate. In fact, most pictures out there are of converted Liberty ships from after WWII. The ship yard name and Richard Bland were printed on my computer using Testor's clear decal film and placed per the instructions.
| CONCLUSIONS |
This is my first ship model in a very long time, but I enjoyed it. The list price of the kit, and the PE set needed to properly portray a WWII Liberty Ship, is still only $65-$75, making it a very good deal for such an impressive model. A very respectable model can be built with a little surgery and nothing extra as long as the modeler is creative and isn't going for 100% accuracy. The ship really begs for a nice resin kit that includes life rafts, life preserver rings, new main guns, and ready ammo boxes for the guns. L'Arsenal can supply most of these as separate parts, but not the ammo boxes. A comprehensive resin update set for the Liberty ship would be a real hot seller. HINT HINT!!!
July 2005
| REFERENCES |
Compiled from John Gorley Bunker, Liberty Ships: The Ugly Ducklings of World War II (Annapolis, Maryland: Naval Institute Press, 1972); Harry Butowsky, "SS Jeremiah O'Brien" (San Francisco County, California) National Register of Historic Places Inventory - Nomination Form (Washington, D.C.: Department of the Interior, National Park Service, 1985); James P. Delgado, "Lane Victory" (Los Angeles County, California) National Historic Landmark Nomination Form (Washington D.C.: Department of the Interior, National Park Service, 1990); Curtis P. Junker, revised by Peter E. Kurtze, "SS John W. Brown" (Baltimore City, Maryland) National Register of Historic Places Registration Form (Washington, D.C.: Department of the Interior, National Park Service, 1996); Samuel Eliot Morison, History of the United States Naval Operations in World War II. Vol. 1, The Battle of the Atlantic, September 1939-May 1943 (Boston: Little, Brown and Company, 1950); and L.W. Sawyer and W.H. Mitchell, The Liberty Ships: The History of the 'Emergency' Type Cargo Ships Constructed in the United States During World War II (Cambridge, Maryland: Cornell Maritime Press, 1970).
Web site for the S.S. Jeremiah O'Brien
http://www.ssjeremiahobrien.org/normandy-book.html
Detail Parts sources
Photo etched brass details;
http://www.tomsmodelworks.com/
http://www.steelnavy.com/Arsenal.htm
1/350th scale vehicles; http://www.steelnavy.com/LST.htm
If you would like your product reviewed fairly and quickly, please contact me or see other details in the Note to Contributors.