Revell 1/144 USS Fletcher
|
KIT #: |
05091 |
|
PRICE: |
$125.00 MSRP |
|
DECALS: |
Two options |
|
REVIEWER: |
Len
Roberto |
|
NOTES: |
BMK brass barrels used and Gold
Medal Models PE railing |

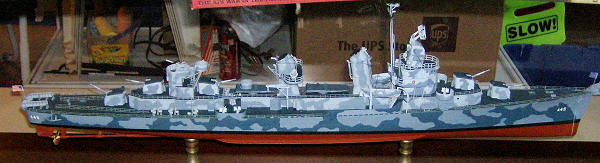
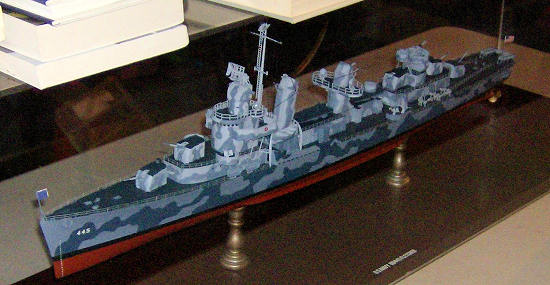
The USS Fletcher DD-445
(1942-1969) was the lead ship of the most famous class of destroyers in the
history of the United States Navy. Named after Medal of Honor winner Frank
Friday Fletcher, the sleek hull of a Fletcher-class destroyer slicing through
the sea with a bone in her teeth is one of the most recognizable images of the
Pacific War. Baptized in the fires of the vicious night battles around
Guadalcanal in November 1942, she earned
her first nickname, Lucky 13. Fletcher
served with honor for the remainder
of the War making a name for herself independent of her status as First in
Class. Whether it was the monotony of patrol
 duty, a flank speed night battle
slugging it out with enemy destroyers, or a pitched battle with shore batteries,
Fletcher took her licks and returned to the enemy more than she got. Even when
death and destruction visited her on Valentine’s Day 1945 she remained on
station for several weeks continuing to perform her duties until properly
relieved thus earning her next nickname, The Fighting Fletcher.
duty, a flank speed night battle
slugging it out with enemy destroyers, or a pitched battle with shore batteries,
Fletcher took her licks and returned to the enemy more than she got. Even when
death and destruction visited her on Valentine’s Day 1945 she remained on
station for several weeks continuing to perform her duties until properly
relieved thus earning her next nickname, The Fighting Fletcher.
After World War Two Fletcher was retired to the
inactive fleet. Recommissioned in October 1949 as DDE-445, Fletcher was one of
the first American destroyers on the scene after hostilities broke out in
Korea
the following summer. Once again her familiar and comforting profile graced the
war torn waters of the Western Pacific. Home-ported in
Hawaii she remained a frequent
visitor to the Orient and the South Pacific long after fighting ceased. The
silent but very real Cold War next occupied much of Fletcher’s time as she
continued to show the flag throughout the Pacific
Ocean. Later redesignated as DD-445 she soon found
herself fighting in Vietnam
where again she served with distinction doing a myriad of tasks ranging from
carrier escort duty to gunfire support for our troops ashore.
 Revell of Germany announced this
kit about a year ago and it was originally supposed to be a postwar German
configuration.
Thankfully, they decided to
initially release the WWII lead ship of the class, with more versions to follow
I’m sure.
Revell of Germany announced this
kit about a year ago and it was originally supposed to be a postwar German
configuration.
Thankfully, they decided to
initially release the WWII lead ship of the class, with more versions to follow
I’m sure.
The kit has 2 hull halves, 3
main deck pieces and markings for DD-445 Fletcher and DD-451 Chevalier.
Decals are also supplied for the
black waterline boot stripe-
a nice touch even thought most will
elect to mask and paint as I did.
Searchlights come with clear
plastic lenses.
Rigging thread is supplied to replicate railings (more
on this later.)
Plastic railings are also
supplied for superstructure
(more on this later too…)
At a
cost around $90.00-
this model measures out to 32
inches in hull length-
quite a lot of plastic.
I shudder to think what the price
would be if this model was in a Trumpeter box.
Out
of the box you have a very nice model -
but the aftermarket is gearing up
for this kit
(Nautilus models released a
beautiful PE set already) and conversion , etc are sure to come soon.
Looking over the kit, I decided a few
things right away:
-
 I would build full hull and mount on pedastals for a clean, no
weathering look.
I would build full hull and mount on pedastals for a clean, no
weathering look.
-
I would do the Fletcher-
lead ship with quite an interesting battle history.
The 1942 camo would also be my choice.
-
I would have to replace the plastic stanchions and thread for
rigging.
I know my limitations and there would be no way I could physically
rig all those stanchions without destroying the model in the process.
-
I would look for alternatives for the black thread for rigging as
well.
-
I would replace the plastic anchor chain with real chain.
-
I would get some brass barrels (BMK) for the 5 inch and the twin
40mm Bofors.
With
something this big, it helps to plan out the build and I did this by writing
down a list.
I went way out of sequence with the
very well done instruction booklet and here is a summary:
-
First portion of build was to assemble hull and install the decks.
Everything fit wonderfully.
I wanted to get this main part together and painted
-
then mount on a base from which to put the rest of the model onto without
handling the big model.
-
Paint sequence:
-
spray hull red oxide primer and mask off. ($1.12 at walmart)
-
spray flat black boot stripe and mask off. ($1.12 at walmart)
-
prime the rest of the hull and decks.
-
next up was the Ocean Grey hull sides-
then cover the hull with masking tape
-
carefully pencil and then cut out the blotches to be painted Navy
Blue-
when dry mask off entire hull again.
-
finally-
spray decks weather deck blue.
 I used 2 wooden candlestick
holders and drilled up through my base into the hull.
This provided a very sturdy model
to work on.
Last step was to cover the wood
base with Saran wrap to protect from glue and paint drops…then it was on to the
sub assemblies.
I used 2 wooden candlestick
holders and drilled up through my base into the hull.
This provided a very sturdy model
to work on.
Last step was to cover the wood
base with Saran wrap to protect from glue and paint drops…then it was on to the
sub assemblies.
Overall,
the model fits amazingly well for such large pieces.
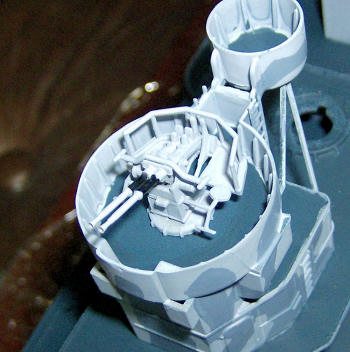
I built the gun turrets and easily
installed the excellent BMK brass barrels for the main guns and the twin 40 mm
Bofors.
Deckhouses were also well
done and I dryfitted them on the model and glued them off the model with
continuous checks to make sure they would fit down on the deck easily.
Each
sub-assembly was painted before gluing to the hull.
This seemed to work quite well.
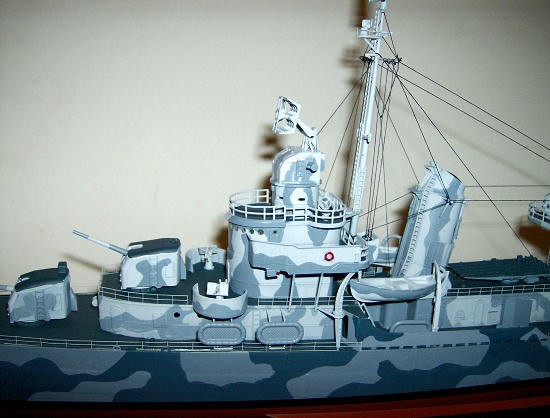
RAILINGS AND STANCHIONS….
The
Nautilus set of PE looked great but I could not spend another $90 and it looked
like some of it would be over my head and I would just make a mess of it.
I checked Gold Medal Models who I
use most of the time and bought a set of 2 bar railing in 1/200 scale…I could
like with the underscale look but actually I think they look better than I
expected.
These were installed easily around
the ship replacing the kit stanchions.
Building
progressed very well-
about 30 minutes a night average.
The next hurdle was rigging.
I had some fine steel wire that
would have been perfect except that I could not get it to straighten properly
and I did not want the slightest kinks or bends.
I decided to use the thread and run
it through beeswax as I do for sailing ships.
The
directions call for some phantom attachment points on the deck and stack so I
decided to use some leftover plastic eyebolts from a sailing ship.
RIGGING:
The
steel wire did not work out-
too easily kinked and it was
impossible to smooth out and straighten.
So I used the black thread and ran
it through beeswax like on a sailing ship model.
The beeswax coats the thread and
prevents little fuzzies from ruining the look.
 All paints were acrylic
Model Master marine line and some spray cans from Walmart.
All paints were acrylic
Model Master marine line and some spray cans from Walmart.
Red Oxide-
lower hull
Flat black-
boot stripe
Ocean Grey upper hull with Navy Blue splotch pattern
Weather Deck blue all horizontal surfaces
Haze Grey with Ocean Grey splotch pattern above the
deck level
Flat Black stack tops
Light Ghost Grey for the depth charges
Really
a fun build with no problems at all in construction.
The biggest problem is where to put
the thing.
A really skilled and dedicated
builder can make something breathtaking out of this model.
There is a lot of room for
enhancement.
At a price shockingly low, this is
one to savor.
 http://ussfletcher.org/
http://www.navsource.org/archives/05/445.htm
http://en.wikipedia.org
Len Roberto
April 2009If you would like your product reviewed fairly and quickly, please
contact
me or see other details in the
Note to
Contributors.
Back to the Main Page
Back to the Review
Index Page