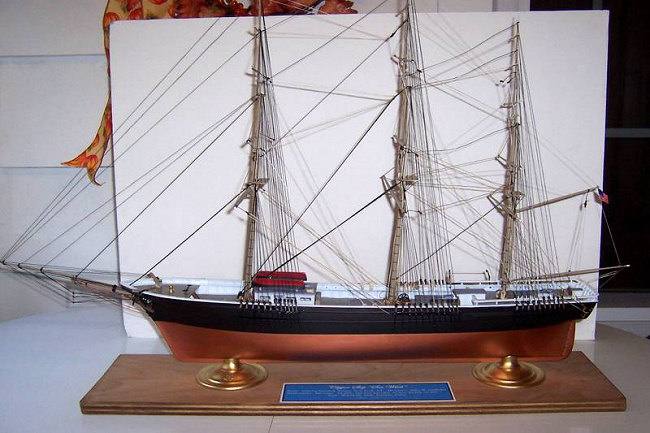
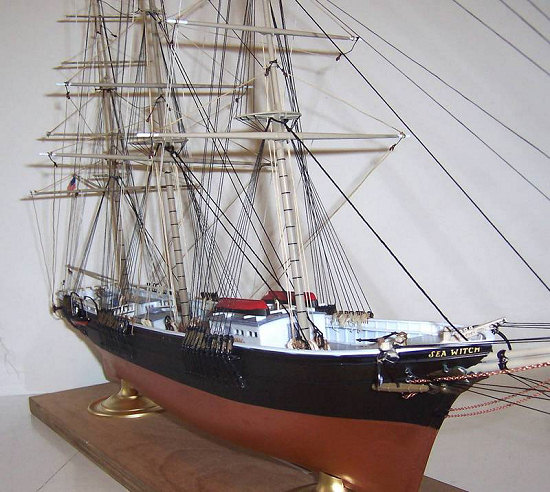
Lindberg 1/96 Clipper Ship 'Sea Witch'
| KIT: | Lindberg 1/96 Clipper Ship 'Sea Witch' |
| KIT #: | 813 |
| PRICE: | $75.00 MSRP |
| DECALS: | Flags and nameplates |
| REVIEWER: | Len Roberto Jr |
| NOTES: |
| HISTORY |
One of the first true clipper ships-- built in 1846 by Smith & Dimon, New York, to the design of John W. Griffiths. Dimensions 170'3"×33'11"×19' and tonnage 907 tons. The figurehead was a Chinese dragon with an open mouth and a partly coiled tail. The hull was painted black with a contrasting sheerline strip at deck level and the spars were all bright work.
1846
Launched at the shipyard of Smith & Dimon, New York, for Howland & Aspinwall, New York. Captain Robert H. Waterman late of the same owner's New Orleans packet Natchez.
1846 December 23
Sailed from New York to Hong Kong in 104 days.
1847 July 25
Arrived at New York, 82 days from Whampoa, or 62 days from Anjer.
1847 November 17
 Arrived at Hong Kong, 105 days from
New York.
Arrived at Hong Kong, 105 days from
New York.
1847 December 29 -- March 15
Left Whampoa for New York where she arrived after 77 days, which was the fastest passage on record.
1848
Sailed from New York to Valparaiso in 69 days, during which passage she sailed 10.568 miles at an average speed of 6 2/5 knots.
1848
Sailed from Callao to Hong Kong in 52 days.
1849 March 25
Arrived at New York, 79 days from Whampoa at an average of 7½ knots.
1849
Sailed from New York to Hong Kong in 118 days under command of Captain George W. Fraser.
1850 March 7
Arrived at New York in 85 days from Whampoa.
1850 April 14 -- July 25
Sailed from New York to San Francisco in 101 days after four days at Valparaiso.
1850
Sailed from San Francisco to Hong Kong in 46 days.
1851 March 15
Sailed from Whampoa for New York where she arrived after 102 days.
1851 August 1 -- November 20
Sailed from New York to San Francisco in 11 days.
1852 August 22 - December 9
Sailed from New York to San Francisco in 109 days.
 1853
1853
Sailed from San Francisco to Shanghai in 41 days.
1853 March 11
Sailed from Woosung for New York where she arrived after 106 days.
1853 August 9 - December 9
Sailed from New York to Hong Kong in 122 days after a slow passage. Off the Cape of Horn the foremast was struck by lightning and the royal and topgallant spars were shivered.
1855 April 5
Left New York for Hong Kong, but put into Rio de Janeiro with the dead body of Captain Fraser who had been murdered by the first mate. Captain Lang was put in command.
1855 December 1
Sailed from Amoy with 500 coolies for Havana.
1856 March 28
Wrecked on a reef 12 miles off Havana.
| THE KIT |
I am not really sure of the origin of this kit. When I saw it advertised in a recent Model Expo catalog as a re-release, I was intrigued. Sailing ship models are few and far between so I searched ebay and found an old limited edition release from years ago and snapped it up.
What you get is a nicely molded kit. It comes with anchor chain, plastic sails, some crew figures, some rigging line of poor quality, decals for the bow and stern “Sea Witch” and a US flag, cotter pins (which can be replaced with brass eyebolts), and very well done directions. Kit also supplies to round keel stands for support.
| CONSTRUCTION |
I started with the hull pieces- they went together very nicely with the help of many clamps. Before going any further, I sanded down keel then sprayed copper for the bottom. Masked off and then used flat black for the rest of the hull. Masked that off up to the rail and sprayed the top rail and inner bulwarks white.
 Next step was to find a nice piece
of wood. I sprayed the keel stands gold, then lined up on the wood where the
stands would go. Inside the hull, there are clearly marked holes for you to
drill down through the stands and into a base, which is what I did.
Next step was to find a nice piece
of wood. I sprayed the keel stands gold, then lined up on the wood where the
stands would go. Inside the hull, there are clearly marked holes for you to
drill down through the stands and into a base, which is what I did.
This allows you to easily work on the model without touching it and is a sturdy platform to work on.
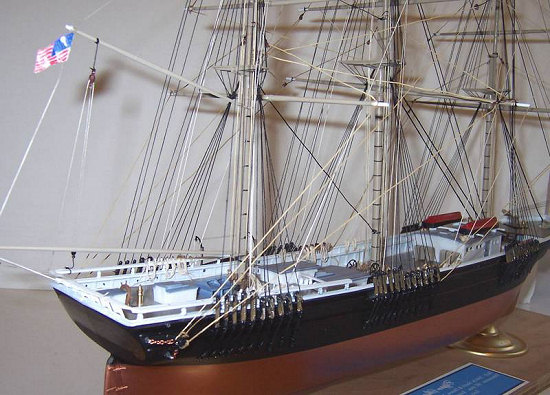
The deck is 3 pieces and here I tried something new. I had a sample can of acrylic stain from Cabot’s. I wanted a paled grey color so I tried it- not knowing if it would even adhere to plastic. It did and while a little too dark - it was passable. The deck pieces were inserted and despite a usual area of difficulty in the past- these were trouble-free.
The rest of the model assembled easily- there was very little flash to contend with and the model is really rather simple and not a ton of parts to deal with. Painting deck furniture as I went, the deck was populated rather quickly.
The instructions were quite good- with diagrams as well as clear language descriptions of what to do next. In some cases I followed closely to make sure I had the pins and chain in the bow properly set up.
Masts were also not a problem and assembled easily.
| COLORS & MARKINGS |
Deckhouses were painted a bluish purple- without any photos and with paintings not helping much either; I just followed the box top example.
Boats were red bottom and black topsides.
Masts/ spars were beige with white tips on the yards. I used a black Sharpie for the iron mast rings.
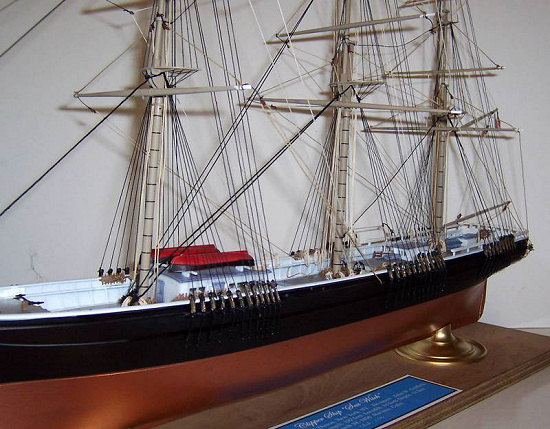
| RIGGING |
Most of the time, the line you get in kits is not very good (except for the old Revell releases- the big Cutty Sark and Constitution early releases had superb line)
 I have quite a box built up but it
is best to get some good line from Model Expo. You need a few diameters in
black and tan.
I have quite a box built up but it
is best to get some good line from Model Expo. You need a few diameters in
black and tan.
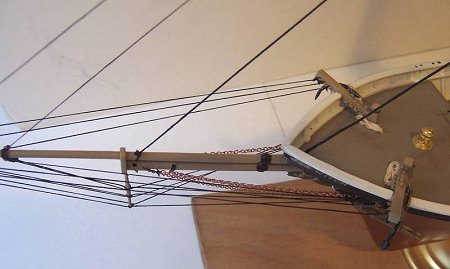
I start with jib bowsprit rigging. In this case it was not too complicated and instructions made it easy to follow.
Here is where the instructions failed. There is no way to illustrate all the rigging in a ship this complex in just one diagram. It needs to be split into each section like the old Revell instructions. Therefore, it was very hard to discern some of these lines- so I used the old Revell Cutty Sark diagrams and also used my own experience to rig the rest of the ship. I’m sure it is not totally correct but- I did what looked right.
Next in order are the fore stays- the lines running down the middle of the ship in black used to support the masts. Next I rigged the shrouds and here I fumbled. I tried to rig the ratlines but I gave up- it was throwing off the shrouds and I just did not have the drive and patience to do these- some day I will but for now- I just left them off.
Backstays were next.
Moving on I then used tan lines for the lifts using plastic blocks and sending them down to the mast rails. Thicker for the main yards, thinner line for the upper yards.
Next I did the braces- these are used to swing the yards around to catch the wind.
At this point I realized I had forgotten (or consciously neglected) to do the footropes. I did these on my Cutty Sark with wire and found that to be another long tedious process. So my model is missing footropes and ratlines.
Rope Coils: I really wanted to try and make these. The first method I tried was a miserable failure. I tried wrapping a length around a brush handle, then tried to lightly CA glue it…disaster. Then I went to a book sale and found SHIP MODELING STEM TO STERN- Eureka!! There it was- how to make rope coils!
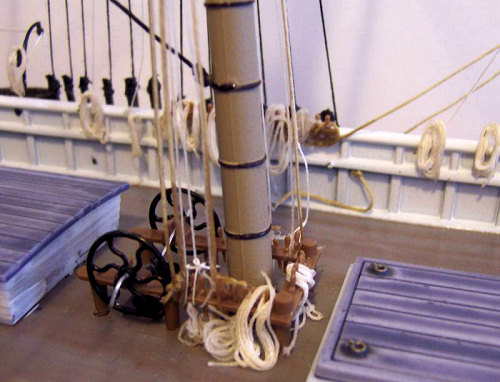 Here it is: you use toothpicks or
nails on a board or in my case a Styrofoam block. Space them out then wrap tie
and wrap a length around them. Then you use Elmer’s white glue mixed with
water- mix up and brush it on the line. It soaks in and dries very slowly so
after about 5 minutes, you can lift the coils off and place them where you want
them. Since they are a little sticky, they stay where you want them but I added
a little more of the glue mixture to keep them in place. To make the coils that
hang off the belaying pins, you can do the same method but place 1 toothpick on
the edge then another on the side of the block so you coil the line at a
45-degree angle. This works well when you are hanging a coil off a pin.
Straight coils work good for flat deck surfaces. So I may have neglected 2 steps
but I learned a new skill for future projects. We always keep striving for that
unattainable perfect model right?
Here it is: you use toothpicks or
nails on a board or in my case a Styrofoam block. Space them out then wrap tie
and wrap a length around them. Then you use Elmer’s white glue mixed with
water- mix up and brush it on the line. It soaks in and dries very slowly so
after about 5 minutes, you can lift the coils off and place them where you want
them. Since they are a little sticky, they stay where you want them but I added
a little more of the glue mixture to keep them in place. To make the coils that
hang off the belaying pins, you can do the same method but place 1 toothpick on
the edge then another on the side of the block so you coil the line at a
45-degree angle. This works well when you are hanging a coil off a pin.
Straight coils work good for flat deck surfaces. So I may have neglected 2 steps
but I learned a new skill for future projects. We always keep striving for that
unattainable perfect model right?
I created a color plate to attach to the wood base and then sprayed a clear coat.
Done.
| CONCLUSIONS |
I love clipper ships and large-scale plastic kits are scarce. This one is a good choice- not to hard to build and paint and rigging just takes patience. The re-release is not cheap at around $75.00 but it will give you hours of modeling.
| REFERENCES |
 http://www.bruzelius.info/nautica/Ships/Clippers/Sea_Witch(1846).html
January 2008
If you would like your product reviewed fairly and quickly, please contact me or see other details in the Note to Contributors.