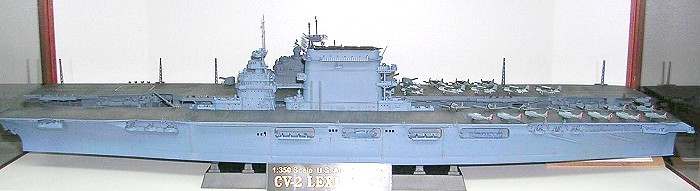
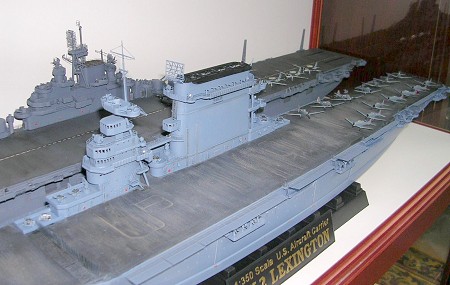
| KIT: | Trumpeter 1/350 USS Lexington (1942) |
| KIT #: | 5608 |
| PRICE: | $129.95 MSRP |
| DECALS: | airwing |
| REVIEWER: | Len Roberto |
| NOTES: | Gold Medal P.E. Set used |
| HISTORY |
USS Lexington, a
33,000-ton aircraft carrier, was converted while under construction from
the battle cruiser of the same name. Built at Quincy, Massachusetts, and
commissioned in December 1927, Lexington was one of the U.S. Navy's
first two aircraft carriers that were large and fast enough to be capable
of serious fleet operations. During the late 1920s, through
 the 1930s and
into the early 1940s, she took an active part in the development of carrier
techniques, fleet doctrine and in the operational training of a generation
of Naval Aviators.
the 1930s and
into the early 1940s, she took an active part in the development of carrier
techniques, fleet doctrine and in the operational training of a generation
of Naval Aviators.
Lexington was in the Pacific when Japan attacked Pearl Harbor and took part in the U.S. Navy's first wartime operation, the abortive attempt in December 1941 to relieve Wake Island. In February and March 1942, she raided Japanese positions in the southwestern Pacific, and then returned to Pearl Harbor for a brief overhaul and removal of her eight-inch guns.
In early May, Lexington
returned to the South Pacific in time to join USS
Yorktown
(CV-5) in successfully countering the Japanese offensive in the
Coral Sea. On 7 and 8 May 1942
her planes helped sink the small Japanese aircraft carrier
Shoho and participated in
attacks on the large carriers
Shokaku and
Zuikaku. In turn, however,
she was the target of Japanese carrier planes and received two torpedo and
three bomb hits. Though initial damage control efforts appeared to be
successful, she was racked by gasoline explosions in the early afternoon of
8 May. When the fires raged out of control, Lexington was abandoned
by her crew and scuttled, the first U.S. aircraft carrier to be
 lost in World War II.
| THE KIT |
Trumpeter continues its 1/350 scale releases in fine fashion here- it’s clear they are getting better with each naval release. Here is a preview .
Annoyingly however, they continue to shortchange modelers by only including a handful of aircraft requiring more cash for extra sets if you want to load your deck.
The model represents the ship at the time of her loss in May 1942. The ship went through numerous alterations so if you want to model her in pre-war guise- it will take extensive modifications and I believe there are some sets forthcoming to accomplish this.
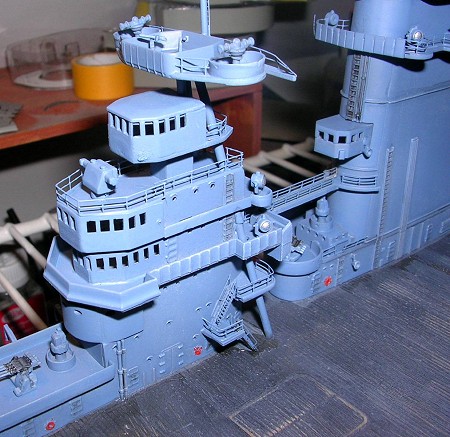
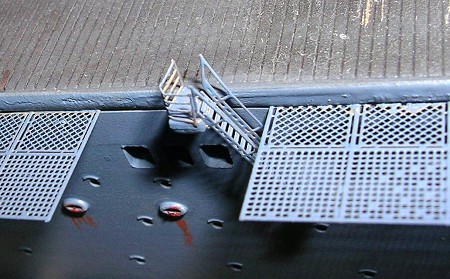
GOLD MEDAL MODELS photoetch set: this set is superb as usual and replaces kit parts like: all safety netting, ladders, railing, radars, boat details, aircraft props, etc…
| CONSTRUCTION |
Instructions have you build the model in conventional fashion: details added to one piece hull like sponsons and armament, then flight deck in 3 pieces is detailed and installed, followed by island and stack, then the airwing. I decided on waterline option and attached the hull to the waterline plate as my very first step. I learned the hard way to not do this step later in the process as the instructions call for.
I followed the instructions mostly but I leave off all the antiaircraft guns and searchlights, etc until later on. Also, you need to use the GMM instructions in tandem with kit’s to identify where and when to replace the kit parts with PE.
PROBLEM AREAS:
 1.
Bow sponsons on each side were
difficult to line up- my result was that one side sticks out a bit too
far. They should be level with the main hull and should not stick out
beyond forward flight deck.
1.
Bow sponsons on each side were
difficult to line up- my result was that one side sticks out a bit too
far. They should be level with the main hull and should not stick out
beyond forward flight deck.
2. The deck is in 3 pieces. I decided to attach PE netting before attaching to hull. After snipping off the plastic netting, sanding and attaching the PE nets- I attached to deck but had trouble with stern piece. There was a gap that was not too hard to fill and smaller gaps where the deck sits atop the rear framing. Probably my fault but just a warning to check this repeatedly before glue.
Most of the model went together quite well beyond the 2 bumps above. The GMM set adds so much to the look of the model. I am not skilled enough to use all the parts but here is what I did use if you want to use these not so difficult parts:
1.
All netting replaced- easier
than most because no bending or shaping was needed and you can CA glue them
to bottom of deck pieces for strong bond.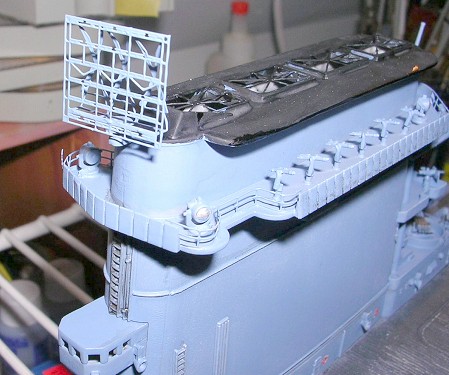
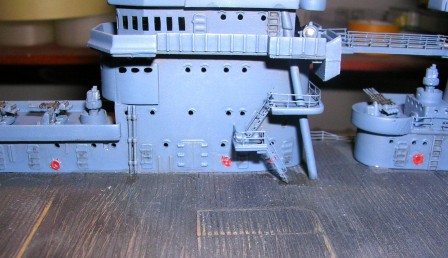
2. All ladders around deck and island- easily bent with tweezers and they look fantastic. Remember to use small railing PE at ladder platforms!
3. CXAM radar atop the stack looks great- just 2 pieces with some bending of the support.
4. Stack grill caps- cut out with exacto and the PE parts lay right over the outer frame. Don’t forget to paint inside the visible stack- I used black.
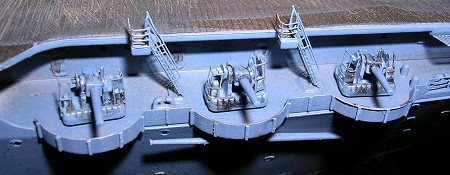
5. Railing- lots of railing but not too hard, as most are right angles. Adding railing to island was trickier but it adds great detail to this area.
6. Aircraft props
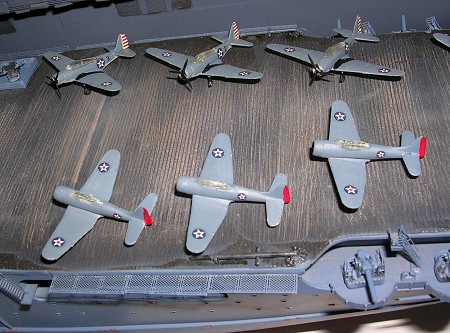
The most annoying part of these carrier kits is the aircraft. Mercifully, the SBD’s don’t have any wingfolds but still- 10 pieces per plane drives me insane. At this period, Lexington carried TBD Devastators, F4F Wildcats with Non-folding wings (they have the option for folding but don’t use them here), and SBD Dauntlesses.
| COLORS & MARKINGS |
It seems like every
ship has some form of controversy over what scheme or color to use. What
is known is this: Lexington returned to Pearl Harbor for extensive work in
April 1942. Before this she was confirmed in MS11 which is 5-S Sea Blue,
which is a paler blue than the later 5-N Navy Blue and it did not hold up
well in sun and salt air. Many people think she was repainted in Navy Blue
at Pearl even though the change to Navy Blue was not official until June
1942…so I decided to stay
 with Sea Blue. This is a rare instance because
the model depicts the ship basically for a period of 1 month. You can’t
build the ship out of box for any time before April 1942 because her 8-inch
guns were removed along with other changes. So Sea Blue could be wrong but
who can tell with absolute certainty?
with Sea Blue. This is a rare instance because
the model depicts the ship basically for a period of 1 month. You can’t
build the ship out of box for any time before April 1942 because her 8-inch
guns were removed along with other changes. So Sea Blue could be wrong but
who can tell with absolute certainty?
I use the Testor’s Acrylic line of Marine paints, which I bought years ago. They had direct US Navy colors and I used 5-S Sea blue. Not sure they are made any longer but they airbrush very well with just plain water as thinner. I drybrushed a grey all over to highlight and hopefully show wear around the ship. Also mixed a batch of grayish brown wash to flow into cracks and crevices- I am still learning this so I don’t know whether it looks OK or not…
FLIGHT DECK:
Tried something new
here which I carried over from my sailing ship models. I sprayed the 3
pieces of the deck in shades of tan,
 sand, and earth. Then once the deck
was attached- I hand painted 20-B Deck Blue. When dry- I went at it with
various sandpaper grits. The result I like a lot and you can see that the
“wood” color shows through. All the pics I reviewed for carrier decks show
heavy wear and the deck stain would not hold up letting the wood show
clearly in high traffic areas like the landing portion of the deck. I
think it came out quite nice.
sand, and earth. Then once the deck
was attached- I hand painted 20-B Deck Blue. When dry- I went at it with
various sandpaper grits. The result I like a lot and you can see that the
“wood” color shows through. All the pics I reviewed for carrier decks show
heavy wear and the deck stain would not hold up letting the wood show
clearly in high traffic areas like the landing portion of the deck. I
think it came out quite nice.
AIRCRAFT:
Neutral grey undersides with Intermediate Blue topsides. A dash of interior green shows through the clear canopies.
Island, stack and main hull were all painted separately with airbrush. After all was dry, island and stack were attached to deck and more ladders added down to flight deck. There were no ship decals to add- only for the aircraft. I built as many planes as I could before frustration set in and lightly tacked them to the deck with CA glue. A few more weathering passes with grey, silver for the searchlight lenses, black for the stack top and a wash over the AAA guns and I was done.
| CONCLUSIONS |
 I know have Lexington
in my case next to Intrepid and Hornet as well…quite an impressive fleet.
I love these kits despite the annoying parts like the aircraft and the high
prices- they are still worth it in terms of the time spent in research and
construction. North Carolina is next as soon as GMM gets their PE set out!
I know have Lexington
in my case next to Intrepid and Hornet as well…quite an impressive fleet.
I love these kits despite the annoying parts like the aircraft and the high
prices- they are still worth it in terms of the time spent in research and
construction. North Carolina is next as soon as GMM gets their PE set out!
July 2005
| REFERENCES |
http://www.history.navy.mil/photos/sh-usn/usnsh-l/cv2.htm
http://www.navsource.org/archives/02/02.htm
If you would like your product reviewed fairly and quickly by a site that has around 300,000 visitors a month, please contact me or see other details in the Note to Contributors.