
Hasegawa 1/700 Sinking Merchantman
| KIT #: | 44126 |
| PRICE: | $6.95 |
| DECALS: | None |
| REVIEWER: | Tim Reynaga |
| NOTES: | Part of a 1/700 U-boat set |
| HISTORY |
Submariners sometimes say, "There are only two types of ships: submarines and targets." The crews of the USS England (6 sub kills), HMS Hesperus (5 sub kills) and others might give them an argument, but a sinking surface ship remains the dominant image in most people's minds of the submarine/surface vessel encounter.
Nowhere in history was that confrontation more intense than the Battle of the Atlantic during the Second World War. In the only campaign that lasted from the first day of the war to the last, Allied merchant convoys and German U-Boats fought it out across the vast reaches of the Atlantic for nearly six years. By the time the U-Boats were ultimately defeated, over 5,000 merchant vessels had been sunk and more than 30,000 Allied merchant seamen had lost their lives, a loss rate (1 in 26) higher than suffered by any of the U.S. armed services.
| THE KIT |
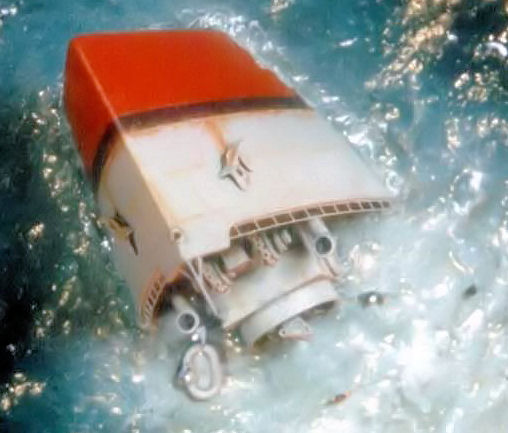
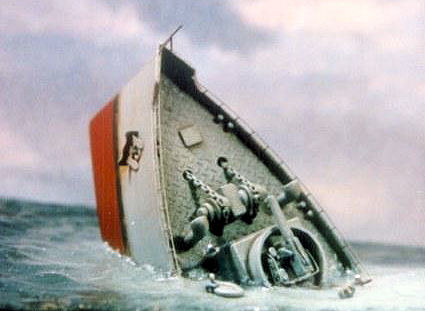
I've always been fascinated by submarines, and over the years have modeled a good number of them. One of my favorite sub kits is Hasegawa's 1/700 scale U-Boats set, first sold in 1975. Probably because those tiny submarines didn’t really fill the box, Hasegawa also included parts for the upended bow and stern of a sinking merchantman. The thirteen parts are crisply molded with good surface detail which includes finely scribed deck wood planking, non-slip surfaces, and even a representation of vertical wood paneling on the bulkheads of the aft section. I especially liked the nicely done ventilator cowls, sharply defined mooring bitts, and the thin, stepped masts. The parts fit together well into an unusual and compelling display to pose next to the submarines.
| CONSTRUCTION |
I had
enjoyed building the submarines…now it was time for a target! Both the bow and
stern sections of the defunct merchantman were nicely executed by Hasegawa, but
the very small 2"X2" walnut base I planned to use would allow only one
 piece. I
had some aftermarket photoetch anchors and chains I wanted to try out, so I
decided to use the bow section. Hasegawa had depicted the vessel going down
evenly with no list and at a fairly gentle angle. The ship looked like she was
definitely going under, but the whole thing looked a little too calm and
orderly. I wanted the scene to look really nasty, so to heighten the
drama I cut some of the hull away to increase the upward angle and heeled it
over a bit. Unfortunately, this meant discarding the kit mast and boom assembly
which would now be under water, but the change did make the scene look more
dangerous. It also fit better on that tiny base.
piece. I
had some aftermarket photoetch anchors and chains I wanted to try out, so I
decided to use the bow section. Hasegawa had depicted the vessel going down
evenly with no list and at a fairly gentle angle. The ship looked like she was
definitely going under, but the whole thing looked a little too calm and
orderly. I wanted the scene to look really nasty, so to heighten the
drama I cut some of the hull away to increase the upward angle and heeled it
over a bit. Unfortunately, this meant discarding the kit mast and boom assembly
which would now be under water, but the change did make the scene look more
dangerous. It also fit better on that tiny base.
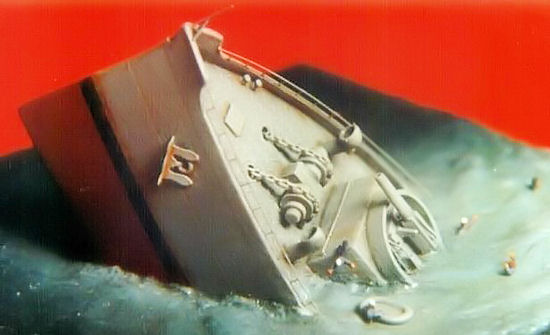
Next came detailing the ship. The little model was nicely detailed right out of the box, but there was room for improvement. While it doesn’t appear that the kit designers intended to depict any particular class of ship, there are fittings common to all ships which should definitely have been there. An obvious omission on the kit was the lack of any ground tackle. No anchor, cable, hawse pipes or windlass were provided. The first thing to do was to remove a large box molded in immediately forward the deckhouse where the new windlass was to be. A poorly executed molded in hose reel also had to go, with the blank spot covered with a hatch cut from .010 sheet plastic.
Scratchuilding the complex looking windlass assembly was actually very simple. The basis was a rectangular box cut from plastic scrap glued to the middle of the deck in front of the deckhouse. The windlass arms were built up using a discs made using a Waldron Model Products Sub-Miniature punch and die set. By alternating the sizes and thicknesses of these discs, a simple but intricate looking structure built up very quickly. Each side consists of seven discs. The only thing to watch here was to make sure the grooves on the arms which accommodate the anchor cables lined up with the holes in the deck. These holes, which Hasegawa intended as locators for the vent cowls, would now serve as hawse pipe openings. Corresponding holes drilled behind the windlass came next so the anchor chains could disappear into an unseen chain locker below. I had originally intended to use anchor chains from the photoetch anchors set, but instead used chains from a Skywave accessory set. These parts came flat molded to a polystyrene plastic carrier and were a bear to remove. They were even worse to work with once free. Tiny and delicate, they broke into minuscule pieces as I tried to bend them around the curved windlass arms. Maneuvering them into position and attaching them to the windlass was frustration itself. I used up a lot of chain, many of the minute pieces flying off and burying themselves irretrievably in my carpet. Once securely attached, though, these chains did look more three-dimensional than did those flat photoetch things.
The next addition was the gun. A common weapon on armed merchant vessels during the Second World War, the 5" gun atop the deckhouse was borrowed from a Tamiya 1/700 scale Enterprise kit. The only changes were to drill out the muzzle and to add some photoetched railing. The completed assembly doesn't look too bad, but the barrel seems a little chubby in this small scale; if I were to do it again I would probably replace it with stretched sprue or wire. The gun tub was made from a disc cut out with a standard hole punch, the splinter shield being a strip of .010 sheet plastic wrapped around and cemented to the disc.
Other
topside details added before painting included a photoetch door on the side of
the deckhouse and a life raft borrowed from the Enterprise. The kit
provided ventilators, the faces of which were opened up with a small burr, were
installed in their new positions abaft the windlass. The bitts molded to the
deck were improved with tops made from tiny .018 inch diameter discs cut using
that wonderful Waldron punch set.
Unfortunately, the kit did not come with anchors for the hull sides. The bow upended out of the water made these fittings highly visible, so it was worth spending extra time on them. First, the hull sides needed a couple of holes for the hawse pipe openings from which the anchors would protrude. On real ships these openings have thick metal collars to prevent the the heavy anchors from chafing the surrounding sheet metal. These collars were simulated by wrapping suitable diameter copper wire around one of the Waldron punches and cutting them off, forming tiny metal doughnuts. One side of each was sanded flat, then cemented over the hawse holes and faired in with paint. The anchors themselves, very delicate in this small scale, were installed only during final assembly.
Another small improvement to the hull was the addition of a bullnose at the forepeak. Virtually all ships have this fitting, which is used to pass lines through for mooring or towing. Relatively inconspicuous, it is a detail almost always omitted on small scale models. Its unusual visibility in this vignette, though, made it worthwhile to include. It was constructed much like the hawse pipes, but with the chafing collar partially countersunk into the drilled out opening.
The next step was to sculpt the sea. This was made from drywall spackle applied in a smooth layer, a little higher on two diagonal corners of the base to depict a slight swell. After the paste was about half dry I gently pressed the bow into the still soft but no longer liquid surface to leave an impression. After allowing it to dry completely I added some more little dabs of spackle to impart an irregular texture to the surface. Then I removed the hull and allowed the ocean to dry rock-hard.
| COLORS & MARKINGS |
Painting the ship was basic. It got a coat of Testors Dark Ghost Gray (FS 36320), which is a pretty good match for haze gray. After this had thoroughly cured I masked a series of parallel stripes and gave it another coat. The result was alternating panels of subtly raised surfaces simulating metal plating. The underwater hull red lead and boot topping went over this. When these base colors were dry the ship was weathered with lightened gray along with Testors Military Brown enamel to simulate rust.
Painting the sea was also simple, with a base coat of Floquil Navy Blue with Haze Gray mixed in around the ship to depict the froth caused by air escaping from compartments below. (I suppose I should have added some bunker oil as well, but it would have concealed the tiny sailors struggling in the water…maybe the ship was running nearly empty…) The sea got a couple of coats of Future floor polish after it was dry to give it a high gloss. While the final coat was still wet I placed the ship on the sea, bonding it securely to the base as well as hiding the seam between the model and the ocean.
| FINAL CONSTRUCTION |
 The
more delicate details came after painting was completed. The safety railing was
from Gold Medal Models 700-23 “Gold Plus Ultra-Fine” railing photoetch set.
Made from .003 inch instead of the customary .005 inch thick brass, these parts
have to be seen to be believed. Less than paper thin, GMM ultra-fine rails are
in my opinion the best scale photoetch parts available for small scale ships.
The .003 inch brass makes for parts a mere 2.1 scale inches thick in 1/700!
Their delicacy makes them a little tricky to handle, but the results are worth
it. After the rails and photoetch anchors were installed, the ship was
completed with the addition of a tiny wire jackstaff.
The
more delicate details came after painting was completed. The safety railing was
from Gold Medal Models 700-23 “Gold Plus Ultra-Fine” railing photoetch set.
Made from .003 inch instead of the customary .005 inch thick brass, these parts
have to be seen to be believed. Less than paper thin, GMM ultra-fine rails are
in my opinion the best scale photoetch parts available for small scale ships.
The .003 inch brass makes for parts a mere 2.1 scale inches thick in 1/700!
Their delicacy makes them a little tricky to handle, but the results are worth
it. After the rails and photoetch anchors were installed, the ship was
completed with the addition of a tiny wire jackstaff.
I had the most fun adding the final component: the crew. I like to include figures on my ship models as they add interest and are great for providing a sense of scale. Many modelers don't like them because flat parts (I used 1/700 scale photoetched brass Naval Figures from GMM) can make for unrealistically stiff, Gumby-like sailors. This is a valid criticism, so I bent the arms, legs, and torsos a little to make them look more natural and glopped the paint on thick to make them more three-dimensional. They were then attached to the base with tiny dabs of Future. They aren't perfect, but I figured sailors jumping from sinking ships, scrambling onto rafts or swimming for their lives could not fail to add tension to a diorama!
| CONCLUSIONS |
The finished scene with ship, sea, crew measured a mere 2 X 2 inches. I liked the result, but wondered if it was too small for people to even see it. I was reassured later at a model show when I saw a woman leaning over it and overheard her say to her companion, "Honey, look at these little guys. They're really screwed!" What higher praise can a modeler ask?
| REFERENCES |
Hitler's U-Boat War: The Hunted 1942-1945 Clay Blair, New York: Random House, 1998.
The Second World War John Keegan, New York: Penguin Books, 1989.
March 2008
Copyright ModelingMadness.com
If you would like your product reviewed fairly and fairly quickly, please contact the editor or see other details in the Note to Contributors.