Airfix 1/600 HMS Ajax
| KIT #: | 03204 |
| PRICE: | £5.99 |
| DECALS: | None |
| REVIEWER: | Steven S. Pietrobon |
| NOTES: | White Ensign P.E., custom decals |
| HISTORY |
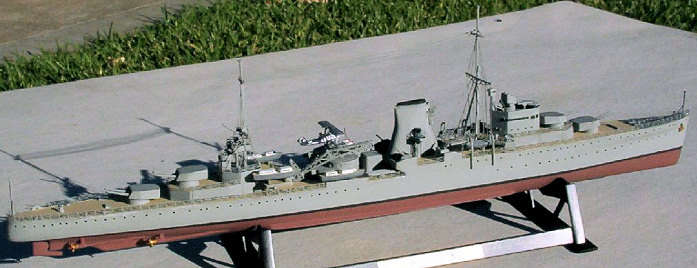
HMS Ajax was a WWII Leander Class cruiser. She was launched on 1 March 1934 with a main armanent of eight 6" (152 mm) guns in four turrets. HMS Ajax was initially fitted with four single 4" (102 mm) and three quad 0.5" (12.7 mm) anti-aircraft guns, as well as carrying an Hawker Osprey observation aircraft. She also carried eight 21" (533 mm) torpedo tubes. In 1937, the single 4" guns were replaced with dual 4" guns and the Osprey replaced by a Fairey Seafox. On 13 December 1939 in the South Atlantic, along with HMS Exeter and HMS Achilles, she took part in the Battle of the River Plate against the Graf Spee. This resulted in the Graf Spee being scuttled off Montevideo, Uruguay. HMS Ajax was refitted several times during WWII, the largest change being the removal of the catapult and changes to the anti-aircraft armanent. She arrived in Newport on 18 November 1949 to be broken up.
| THE KIT |
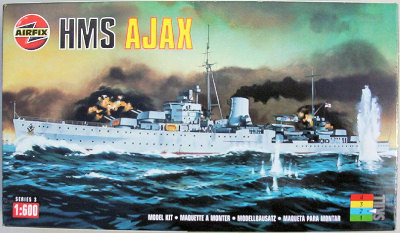 The Airfix kit of HMS Ajax was first issued in 1965 and is still in the Airfix
catalogue. The kit depicts the ship as she was in the Battle of the River Plate.
This was my first ship kit that I built in my youth in the 1970's. Back then, I
built the model without any paint. I got this kit from KingKit, http://www.kingkit.co.uk/kingkit/search1.php
as my local model shop did not have them in stock. Like all Airfix ship models,
the model only gives the option of a full hull, which is how I like my ship
models.
The Airfix kit of HMS Ajax was first issued in 1965 and is still in the Airfix
catalogue. The kit depicts the ship as she was in the Battle of the River Plate.
This was my first ship kit that I built in my youth in the 1970's. Back then, I
built the model without any paint. I got this kit from KingKit, http://www.kingkit.co.uk/kingkit/search1.php
as my local model shop did not have them in stock. Like all Airfix ship models,
the model only gives the option of a full hull, which is how I like my ship
models.
Unfortunately, one of the four propeller screws was missing. A quick email to
Rita at the Airfix spare parts department, had the missing part on my doorstep
in a couple of weeks, free of charge. Apparently, Rita handled 10,000 requests
per year! She went into retirement when Airfix were forced into administration
in August 2006. Hopefully Hornby, the new owners of
 Airfix, will continue this
service. The parts are moulded in the standard soft grey plastic, which are
gentle to the old moulds and make correcting any imperfections a little easier.
There were some sink marks on the turrets and funnel, but other than that, the
parts were fairly clean. There was very little flash.
Airfix, will continue this
service. The parts are moulded in the standard soft grey plastic, which are
gentle to the old moulds and make correcting any imperfections a little easier.
There were some sink marks on the turrets and funnel, but other than that, the
parts were fairly clean. There was very little flash.
I also bought the White Ensign Models photo-etch detail set. Along with the
standard handrails and hatches, you also get parts for the Seafox, catapult,
crane, quad 0.5" machine guns, and other detail parts. I always thought that my
first ship models looked bare without handrails and I wondered back in the 1970s
how this could be done. Thanks to the wonders of photoetch, we now have an
ability to recreate this detail. I think it makes a huge difference to how the
finished model looks.
| CONSTRUCTION |
The hulls went together very well, with almost no putty being required. The kit
allows the turrets to rotate, but they are just popped on, with nothing to stop
them falling off. After attaching the turret, I pinned a small circular piece of
plastic card to the bottom of the
 turrets. I also did the same to the 4"
anti-aircraft guns. The tops of the turrets had fairly large sink marks which
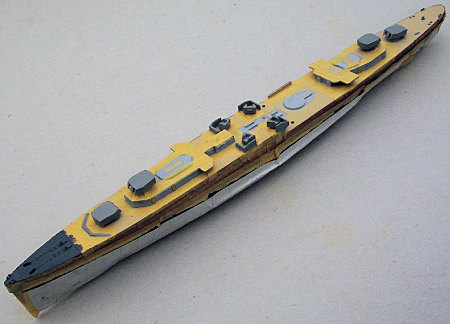
needed to be filled in. Before doing this though, I sprayed the fore and aft
decks with H71 Satin Oak.
turrets. I also did the same to the 4"
anti-aircraft guns. The tops of the turrets had fairly large sink marks which
needed to be filled in. Before doing this though, I sprayed the fore and aft
decks with H71 Satin Oak.
The fore and aft decks were then glued on, the edges filled and sanded, and then
resprayed with satin oak. Some PE doors were added and the walls and deck
details painted H64 Matt Light Grey. The foredeck was painted H27 Sea Grey.
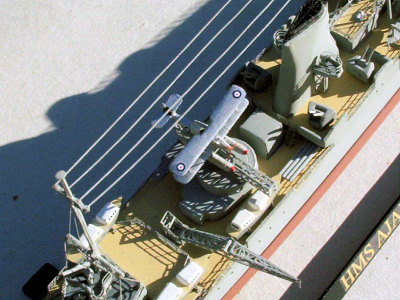
While all this was happening, I was building the bridge, funnel, catapult,
Seafox, crane, quad 0.5" guns, foremast and aft mast. These all used various
bits of PE. You can go mad building the quad 0.5" guns, as they each consist of
seven very tiny pieces! It makes me wonder how the 1/700 ship builders manage.
The PE makes a huge difference to the crane, catapult and Seafox. I added a
short piece of plastic rod to the base of the crane, so that it could move up
and down. For the funnel, I added lengths of plastic rod to the front, to make
it look a bit more accurate. The WEM instructions have the girders under the
funnel searchlights going out, whereas the photos I have seen have the girders
going towards the funnel. I did not use the PE parts for the accommodation
ladder, as I did not find any photos of HMS Ajax using this.
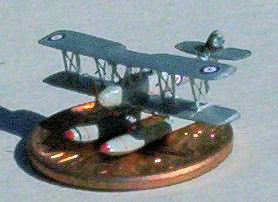 The WEM instructions state that the Seafox at the Battle of the River Plate had
Dark Sea Grey/Dark Slate Grey over Sky camouflage. However, there is a photo
http://img225.imageshack.us/img225/5142/ajaxseafoxdec39nx1.jpg of HMS
Ajax's Seafox apparently taken around the time of the battle, showing the Seafox
in doped aluminium, with the front part of the tail black. Here are two closeup
photos of K8582
http://img137.imageshack.us/img137/8994/seafox10403do4.jpg which was
carried by HMS Ajax. The tail of the Seafox had the HMS Ajax crest.
http://img137.imageshack.us/img137/3073/hmsajax2crestle4.gif The
engine was painted H129 US Gull Grey to represent Cerrux Grey. I measured the
Seafox in the kit where I found it to be about 1/530 scale, about 13% larger
than what it should be. Using my ALPS printer, I made decals for the Seafox,
including the serials and crest! The decals also include windows for the
motorboats. You can download these decals from here.
http://www.sworld.com.au/steven/models/ajax/seafox.zip
The WEM instructions state that the Seafox at the Battle of the River Plate had
Dark Sea Grey/Dark Slate Grey over Sky camouflage. However, there is a photo
http://img225.imageshack.us/img225/5142/ajaxseafoxdec39nx1.jpg of HMS
Ajax's Seafox apparently taken around the time of the battle, showing the Seafox
in doped aluminium, with the front part of the tail black. Here are two closeup
photos of K8582
http://img137.imageshack.us/img137/8994/seafox10403do4.jpg which was
carried by HMS Ajax. The tail of the Seafox had the HMS Ajax crest.
http://img137.imageshack.us/img137/3073/hmsajax2crestle4.gif The
engine was painted H129 US Gull Grey to represent Cerrux Grey. I measured the
Seafox in the kit where I found it to be about 1/530 scale, about 13% larger
than what it should be. Using my ALPS printer, I made decals for the Seafox,
including the serials and crest! The decals also include windows for the
motorboats. You can download these decals from here.
http://www.sworld.com.au/steven/models/ajax/seafox.zip
The top decks were then all masked up for the top of the hull to be spray
painted with H64. The portholes were then painted H21 Gloss Black using a 20/0
brush. I couldn't be bothered drilling all the portholes and filling with clear
drying white glue. This looked pretty good and was easy to do. The top of the
hull was masked and the bottom of the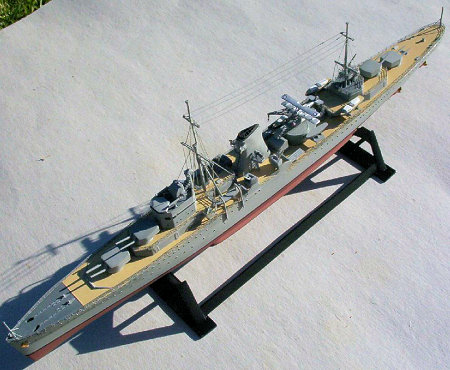 hull sprayed H70 Brick Red. The bottom
hull was masked, leaving 1 mm space for the boot topping, which was brush
painted with H33 Matt Black. The boot topping was then masked, so that I could
handle the ship while fitting the rest of the parts.
hull sprayed H70 Brick Red. The bottom
hull was masked, leaving 1 mm space for the boot topping, which was brush
painted with H33 Matt Black. The boot topping was then masked, so that I could
handle the ship while fitting the rest of the parts.
The deck masking was removed, which was followed by super-gluing the handrails.
This was sometimes a tricky operation, as the handrails are fairly delicate and
can be easily bent. The major assemblies were then glued in place. These were
the bridge, funnel, fore and aft mast. Next step was rigging. I used Aeroclub
stretch thread
http://www.aeroclub-models.com/p.html?n=1&c=ART003 which worked a
treat. It didn't work so well between the masts, as they were pulled towards
each other. I cut off the thread, and stuck very thin rod in its place.
The rest of the small parts, like the quad 0.5" guns, flag masts, catapult,
Seafox, and crane were added. The hull masking was removed and the PE anchors
and propellers glued in. These parts were painted H54 Brass, and not H55 Bronze
as shown in the instructions. The model then sat while I waited for 1 mm sheet
to arrive in order to complete the stand. Two strips of 1 mm thick, 6 mm wide,
and 122 mm long sheet were added between the stands. This was sprayed H85 Satin
Black and a gold ALPS printed "HMS AJAX 1939" decal added to one of the strips.
This simple modification allows for a much more stable stand where you can
display the ship name and not have the stand glued to the ship.
| CONCLUSIONS |
This was my first ship in a long time which was great fun to build. Once you get over the many tiny pieces, you can build a very detailed model, where there is always something to do. Despite all the small pieces, I found the kit to be fairly easy to build.
| REFERENCES |
 I used various photos and plans of HMS Ajax that I found on the net or were sent
to me. You can find links to these photos at the Airfix Tribute Forum.
http://airfixtributeforum.myfastforum.org/ftopic3375.php
I used various photos and plans of HMS Ajax that I found on the net or were sent
to me. You can find links to these photos at the Airfix Tribute Forum.
http://airfixtributeforum.myfastforum.org/ftopic3375.php
All the best, Steven.
December 2006
Copyright ModelingMadness.com.
If you would like your product reviewed fairly and fairly quickly, please contact the editor or see other details in the Note to Contributors.