Revell 1/1200 RMS Titanic
| KIT #: | 05804 |
| PRICE: | AU$5.00 |
| DECALS: | one option |
| REVIEWER: | George Oh |
| NOTES: |
WARNING – contains over-scaled parts.
Fated to be bisected immediately after assembly, and sunk. |
| HISTORY |
The White Star line was an ocean liner company that ferried paying passengers
across the North Atlantic Ocean in the early 1900s.
Naturally, they competed with other companies to have the largest ship/s,
the most luxurious ship/s and the fastest crossing.
The RMS Titanic was the latest of their three liners (the others were the
Britannic and the Olympic) that entered that race.
However, on her first voyage, she scraped her starboard bilge against an
iceberg, stopped, and sank by the bow less than three hours after the collision.
Although Titanic was carrying more lifeboats than was deemed necessary by
law, 1,541 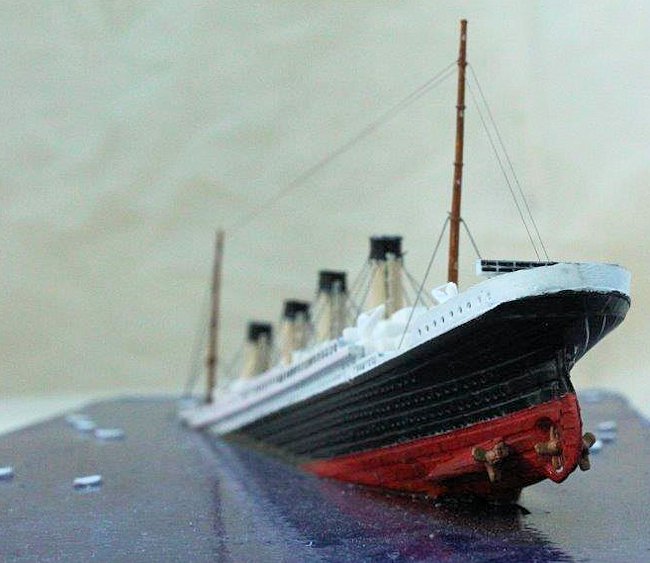 passengers and crew died as there were insufficient lifeboats to
accommodate them all.
In those
days, the lifeboats were supposed to be used to carry passengers to nearby
rescue ships, and return for another load.
passengers and crew died as there were insufficient lifeboats to
accommodate them all.
In those
days, the lifeboats were supposed to be used to carry passengers to nearby
rescue ships, and return for another load.
Her sinking nearly bankrupted the White Star Line, till they were saved by a
Government condition placed on the rival Cunard Line (for a loan to build the
RMS Queen Mary), that Cunard accept a merger with White Star.
But the sinking of Titanic also caused laws to be altered so that all
ships carried sufficient lifeboats for all aboard, and ensured the universal
acceptance of SOS as a distress signal.
Right here in MM, you can see some terrific ship models set on brilliantly-replicated scale seas. One of my personally-assigned challenges is to do a credible seascape of my own. So, when I saw this model on sale for a song, I grabbed it because I could use it to execute an unusual idea I had mulling around in the back of my mind for a few years. The key to my idea was that, on that fateful night, Titanic was speeding along on a very calm sea.
| THE KIT |
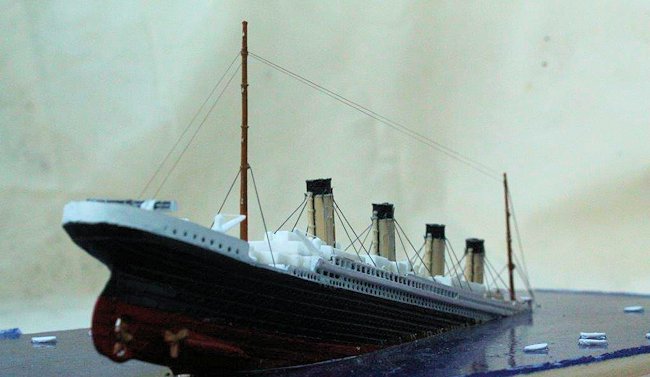
The kit came with a one-piece hull moulded in black plastic.
The other pieces were moulded in soft white plastic.
For its scale, the detail was pretty good.
Moulding included deck planking, doors and scuppers (aka, portholes).
Due to the limits of the dies and the plastic-moulding process, many of
the details and add-on parts are overly-large. Remember – ‘acceptable’ is a
relative term.
| COLORS & MARKINGS |
 Unusually, I didn’t start this build in the cockpit.
Instead, I masked-off a middle band around the black hull and sprayed it
with Citadel Miniatures (CM) skull white, then CM blood red below the band (Yes
– the hull is raw black plastic – so sue me!!).
At the same time, I was working on swabbing the decks with a tiny brush
and CM’s zandri dust – a light brown paint.
This was a long task with numerous revisits.
Any paint that got onto a vertical surface was quickly scratched-off with
a knife blade.
Yes – I AM using the
colour of the raw white plastic (so sue me!!), though I did use some white paint
to retouch a few details – either applied with that tiny brush or by
dry-brushing.
Also at the same
time, I painted the four funnels CM bubonic brown in-lieu of the signature buff
of the White Star Line, with (CM chaos) black tops.
Later, they got a black wash to highlight their recesses.
To be truthful, I mucked it up, but succeeded on the second (or third?)
attempt.
Both the black and the
buff detail areas received the same paint n’ scrape process.
Unusually, I didn’t start this build in the cockpit.
Instead, I masked-off a middle band around the black hull and sprayed it
with Citadel Miniatures (CM) skull white, then CM blood red below the band (Yes
– the hull is raw black plastic – so sue me!!).
At the same time, I was working on swabbing the decks with a tiny brush
and CM’s zandri dust – a light brown paint.
This was a long task with numerous revisits.
Any paint that got onto a vertical surface was quickly scratched-off with
a knife blade.
Yes – I AM using the
colour of the raw white plastic (so sue me!!), though I did use some white paint
to retouch a few details – either applied with that tiny brush or by
dry-brushing.
Also at the same
time, I painted the four funnels CM bubonic brown in-lieu of the signature buff
of the White Star Line, with (CM chaos) black tops.
Later, they got a black wash to highlight their recesses.
To be truthful, I mucked it up, but succeeded on the second (or third?)
attempt.
Both the black and the
buff detail areas received the same paint n’ scrape process.
| CONSTRUCTION |
Dunno why, but there were four thick (= over-scaled) bars that each held four
lifeboats, and their over-scaled davits.
I scribed-off the boats, snipped-off the davits, dumped the way-huge
bars, and filled-in the locating holes in the decks that would have positioned
the bars.
 The decks came in five pieces – forward foc’sle, stern poop-deck and three
layers in-between.
And that’s the
sequence that I attached them to the hull.
The foc’sle and poop had to be pushed hard, laterally, into their
positions while they dried (dry-fitting told me this), and the sides of the hull
had to be clamped onto the lowest centre deck section (ditto).
Other deck levels also needed some clamping in parts to ensure good solid
joins, as did some of the funnels.
The decks came in five pieces – forward foc’sle, stern poop-deck and three
layers in-between.
And that’s the
sequence that I attached them to the hull.
The foc’sle and poop had to be pushed hard, laterally, into their
positions while they dried (dry-fitting told me this), and the sides of the hull
had to be clamped onto the lowest centre deck section (ditto).
Other deck levels also needed some clamping in parts to ensure good solid
joins, as did some of the funnels.
I left-off the gold cheat-line as it was over-scaled, and the flags, because I’d
attach them later.
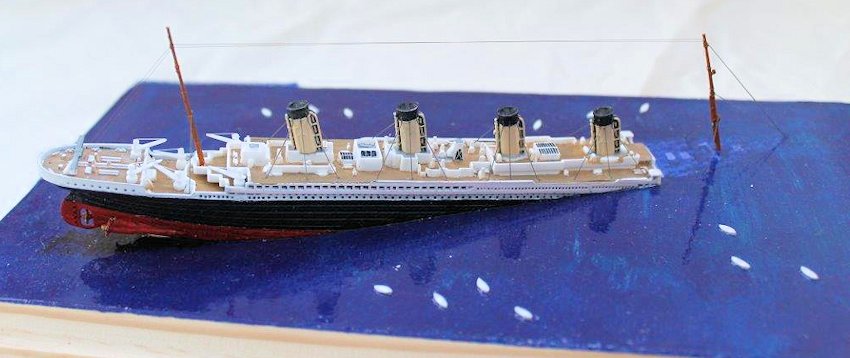
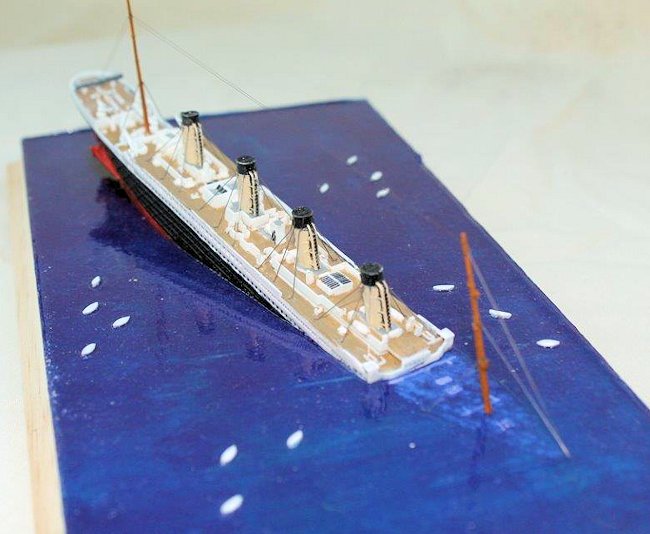
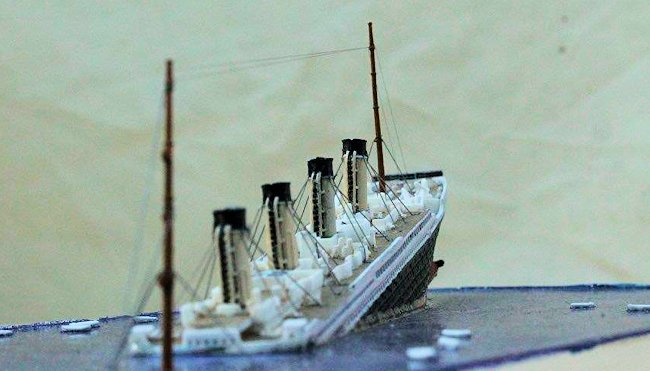
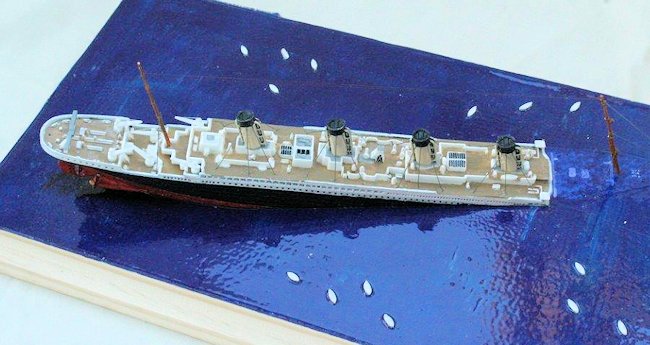
Now came the point-of-no-return for my unusual idea.
I wanted to depict Titanic some 20 minutes before she disappeared into
the sea.
At this point in time
(according to eye-witness reports), she was still in one piece, the water was
lapping at the floor of the bridge, and her rudder was clear of the water.
To replicate this stage, I used masking
tape to draw a line along the sides of the hull from the base of the bridge to
the bottom of the rudder post, and after taking a deep breath, I began to cut
(and wondered why the heck I spent so much time getting the forward well deck
and foc’sle so neat!!) with a razor saw.
Here, I was assisted by the five bulkheads that were cast as part of the
hull, because they held the upper works together and kept the hull from
collapsing.
But cutting through
those bulkheads was a real pain.
The new waterline of the upper remaining piece (@ 2/5ths of the whole model) was
refined by scrubbing it on a sheet of sandpaper laid flat on a table.
 approaching tidal wave / tsunami proportions.
My project was rescued by a fellow modeller who gave me a ½-bottle of
Liquitex Professional – a honey-like, slightly-milky liquid that flowed slowly
to level itself before it slowly cured to a clear, glossy, rubbery finish (many
thanks, Brett R).
approaching tidal wave / tsunami proportions.
My project was rescued by a fellow modeller who gave me a ½-bottle of
Liquitex Professional – a honey-like, slightly-milky liquid that flowed slowly
to level itself before it slowly cured to a clear, glossy, rubbery finish (many
thanks, Brett R).
For a base, I selected a short piece of scrap pine board which I painted with a
very-dark CM storm blue (still a bit too light for a midnight sea, I reckon).
After positioning the required portion of my Titanic, I painted the
portions of the notional underwater foc’scle with CM ultramarine blue (for the
deck) and white (for the fittings).
The secret was to use a series of dots with a reducing size and density of them
as I progressed from the waterline to the bow.
And under where the raised stern would be, I repeated the process with a
dark grey to replicate the shadow cast by the hull.
I dunno if this latter works.
A low dam of masking tape was run around the perimeter of the base to
retain the Liquitex.
After positioning the model, I took a deep breath and poured the Liquitex around
the base.
As the Liquitex flowed
and levelled, I lifted the model in regions so that stuff flowed under it.
While it was still wet, I wriggled the model so that it was flatly in
contact with the base.
One of these
two actions marginally shifted the line of the ship slightly away from the
painted/underwater portions of the bow – Rats!!
Any bubbles I saw in the Liquitex were lifted out (as a precaution), then
I put it away to cure – only to pull it out 3 minutes later to position the 19
lifeboats (I lost one) in the still-wet Liquitex.
Next morning, when I dared to peek at it, I was pleasantly surprised with
the finished product.
OK – it ‘aint
perfect, but it IS my first go.
The
Liquitex holds the hull firmly onto the surface of the board.
You will notice that there are still two lifeboats on her (abaft the forward
funnel).
These are the two
collapsible boats that floated off (one in a capsized orientation) as Titanic
sank further.
Historical accuracy,
you know!
| FINAL CONSTRUCTION |
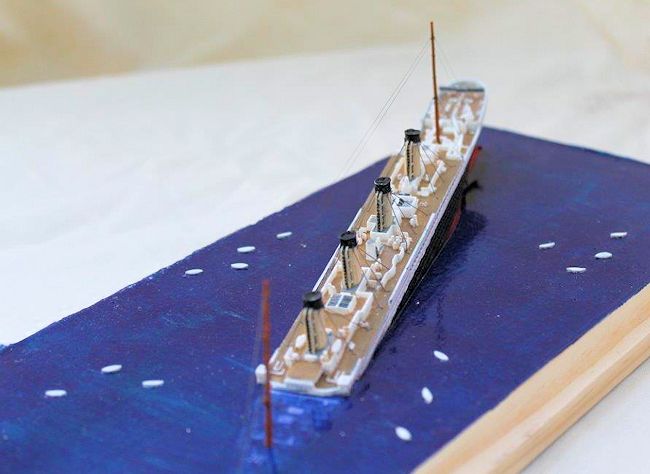
Now I went silly for no good reason - I decided to rig her (a little).
In this, I used Mark Hiott’s review of a 350-scale Titanic (here in MM)
for information.
My BIG mistake was
that I should have rigged her earlier so that I could drill through the deck/s
to provide a neater, more-solid attachment for the rigging.
Heavy (I
 didn’t have any fine) black
EZ-Line, anchored with tiny dots of superglue, was my medium of choice.
Initially, I did six
stays per
funnel (not twelve), then went back to construction.
Those 32 over-scaled boat davits were reduced by sanding.
But they were still WAAAaaaay oversized, so I left them off.
The over-scaled cranes were modified by cutting-off the parts that
represented the cables, and scraping at the jibs.
The cables were replaced by some white fine EZ-Line before the cranes
were positioned into their sockets.
Then I tackled the main event.
didn’t have any fine) black
EZ-Line, anchored with tiny dots of superglue, was my medium of choice.
Initially, I did six
stays per
funnel (not twelve), then went back to construction.
Those 32 over-scaled boat davits were reduced by sanding.
But they were still WAAAaaaay oversized, so I left them off.
The over-scaled cranes were modified by cutting-off the parts that
represented the cables, and scraping at the jibs.
The cables were replaced by some white fine EZ-Line before the cranes
were positioned into their sockets.
Then I tackled the main event.
After fitting the stern mast, the important forward mast was positioned.
Normally, it would go into the foc’sle (which I’d cut away).
Instead, it was shortened (a little) and positioned into a socket drilled
into the board, at the correct distance in front of the bridge, and at a correct
angle to keep it parallel(ish) to the rear mast.
Both masts were rigged with some stays - only two laterals and two
in-lines to avoid a cluttered look.
The distinctive wire runs connecting the mast tops was constructed from a strand
of my fine daughter’s fine long hair (to avoid the slight stress that EZ-Line
would have exerted on the masts).
It is supposed to be ladder-like with a series of bars to keep the two cables
separate, but I declined to recreate this for neatness reasons (less CAN be
more, you know).
Instead, I
declared this model completed.
But,
on the night before I displayed this model publicly, I woke with a start when I
realised that I’d made a major error*.
Can you see it?
| CONCLUSIONS |
I’ve seen some very fine models of the RMS Titanic secured alongside, sailing
proudly, side-swiping (or about to side-swipe) the iceberg, and even a couple
depicting her as she is today – broken in two, surrounded by the debris of her
death, and shrouded by detritus in the depths of the sea.
But I wanted to depict her performing her most famous episode in life –
and death.
Why? - because I’ve
never seen her modelled in this way.
Yes – modelling water IS challenging, and I admit that I cheated by
selecting a calm sea.
 All challenges are there to be overcome, so I’ll have a crack at more active
water (later, after some Dutch courage).
This model is easy to build, but lacks some accuracy and finesse due to
its scale.
So, despite the need to
clamp some parts to overcome a sloppy fit, I can recommend it to any model
builder who can overlook its short-comings.
And to anyone who doesn’t have the shelf space for a larger-scaled model.
All challenges are there to be overcome, so I’ll have a crack at more active
water (later, after some Dutch courage).
This model is easy to build, but lacks some accuracy and finesse due to
its scale.
So, despite the need to
clamp some parts to overcome a sloppy fit, I can recommend it to any model
builder who can overlook its short-comings.
And to anyone who doesn’t have the shelf space for a larger-scaled model.
I thoroughly enjoyed this build and challenge, and I am hoping that I’ve
developed enough skill (and confidence) to tackle a larger ship and to depict a
more dynamic level of water. Wish me
luck………..
PS – Having successfully completed this, my first water project and having
become cocky about it, and as I’m too cheap to discard in-tact model bits, I
casually cut-off the intact portion of the bow (and unceremoniously binned the
rest), scratch-built a new forward mast from a wooden tooth pick, and put it on
its own smaller base.
But this
time, I tried to replicate some of the vast amount of escaping air that
accompanies the violent sinking of a ship.
I did this smaller base in much the same way as the main event described
above.
Additionally, into this
smaller base, I embedded roundish objects of varying sizes (seeds stolen from my
daughter’s cockatiel’s feeder and some small beads) before pouring the Liquitex.
Next day, I removed a few of the roundish objects to replicate bursting air
bubbles, and stippled-on some white to mimic the smaller bubbles under the
water’s surface.
And I also rigged
the mast, as before.
You might
notice that this bow portion is cut/positioned leaning a little off to the
left/portside – just for dynamics, you know!!
The
mistake on the main model is that the two forward stays on the forward mast
should have separate anchor points on the surface of the water, because they
share the same attachment point on the bow which is now well BELOW the surface
of the water.
| REFERENCES |
Just the instructions, the boxart, paintings from the book “Titanic” by Leo
Marriott, and Mark Hiott’s kit review.
June 2015
Thanks to If you would like your product reviewed fairly and
fairly quickly, please
contact
the editor
or see other details in the
Note to
Contributors.