Heller 1/350 Santa Maria
|
KIT #: |
79705 |
|
PRICE: |
AUD$8.00 |
|
DECALS: |
None |
|
REVIEWER: |
George Oh |
|
NOTES: |
Possibly ex-Airfix |
The Spanish carrack (or nao), the
Santa Maria will be remembered in
history as the flagship of Christopher Columbus when he made his epic voyage
(with the
smaller
caravel-type
ships Santa Clara, remembered as
La
Niña
("The Child"),
and La
Pinta ("The
Painted")
from Spain to Haiti, and was
credited with discovering ‘the New World’.
 The
Santa María was built in
Castro-Urdiales,
Cantabria, in
Spain's north-east and was named La
Santa María de la Inmaculada Concepción - Spanish for The Holy
Mary of the Immaculate Conception. It
seems the ship was known to her sailors as Marigalante, Spanish for "Gallant
Maria". There are no exact
details of her dimensions, but she was believed to be about 17.7-19.0m/58-62’
long (without bow-sprit), 5.5m/18’ wide (beam) and displaced 100 tons.
The Santa María had a single deck (which I don’t believe – there
musta be another one below), three
masts and 4 x 90mm bombards for defence.
The
Santa María was built in
Castro-Urdiales,
Cantabria, in
Spain's north-east and was named La
Santa María de la Inmaculada Concepción - Spanish for The Holy
Mary of the Immaculate Conception. It
seems the ship was known to her sailors as Marigalante, Spanish for "Gallant
Maria". There are no exact
details of her dimensions, but she was believed to be about 17.7-19.0m/58-62’
long (without bow-sprit), 5.5m/18’ wide (beam) and displaced 100 tons.
The Santa María had a single deck (which I don’t believe – there
musta be another one below), three
masts and 4 x 90mm bombards for defence.
Columbus set sail
from
Palos de la Frontera on 3 August 1492.
The Santa María was the slowest of the three, but she handled the
Atlantic seas well. On Christmas Eve,
the crew of the Santa María was having a party.
But, as the individuals succumbed to the festivities and sleep, it was
left to the last man standing (a cabin boy) to steer the ship.
Unfortunately, the Santa María ran aground off the present-day
site of
Cap-Haïtien,
Haiti. Realizing that the
ship was beyond repair, Columbus ordered his men to strip the timbers from it.
They were used to build a settlement which he christened
La Navidad (Christmas – Columbus musta had a smashing sense of
humour) – with the approval of the native
cacique,
Guacanagari - north of the current-day town of
Limonade. Here, he left
39 men (including that cabin boy?), promising to return to collect them.
He did. The (presumed)
anchor of the Santa María now resides in the Musée du Panthéon National
Haitien (MUPANAH), in Port-au-Prince, Haiti.
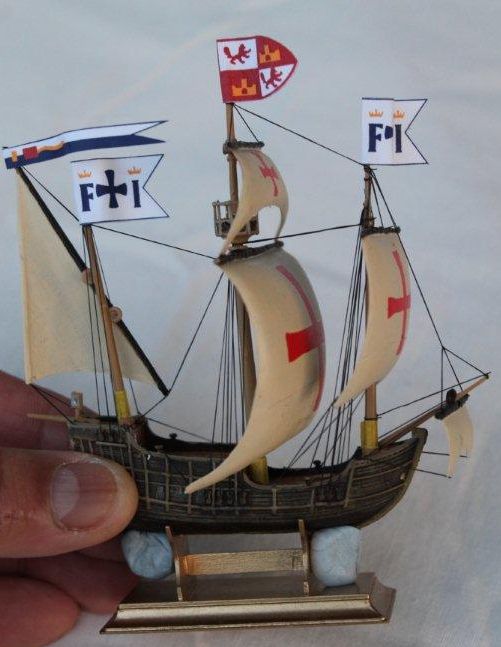
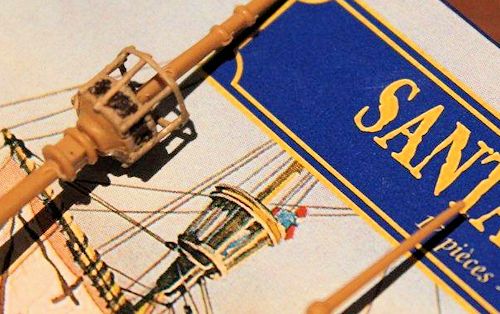
There are only 17 parts in this
kit – 1 x deck, 2 x hull, 3 x masts, 4 x sails and 3 x other bits, plus a
4-piece stand, all moulded in a soft mustard yellow plastic.
This appears to be a 40+ year-old former Airfix kit,
 without
the decals for the large crosses on the sails.
It includes a small sheet printed with Spanish flags.
Some of the parts (eg, the deck) still show remarkably petit raised
detail, while other parts show some mould-slippage (eg, the masts).
The hull pieces are well-detailed for their size though the sails are
overly-thick. Vacform parts might
be the solution here.
without
the decals for the large crosses on the sails.
It includes a small sheet printed with Spanish flags.
Some of the parts (eg, the deck) still show remarkably petit raised
detail, while other parts show some mould-slippage (eg, the masts).
The hull pieces are well-detailed for their size though the sails are
overly-thick. Vacform parts might
be the solution here.
In 2013, my son was in 4th
Grade and was studying Ferdinand Magellan. He
sought from me, a model of a ship that Magellan might have used in his voyages
of discovery, but all I had was the Santa
Maria. But, as it is a
square-rigger, and has Spanish markings, he reckoned that it’d do – IF he can
have it next week. Fortunately,
with the low parts-count, it MIGHT be possible – IF I work on it (and nothing
else) every night.
|
CONSTRUCTION AND PAINTING |
On the first night, I separated the parts
from the sprues and cleaned then up.
Using Citadel Miniature paints, I painted, then masked (with really-thin
strips of tape), random planks in the deck (multiple times) for a more casual
appearance. I used various shades
of brown from a very-dark mournfang brown to a very-light commando khaki.
Middle-of-the-road snakebite leather brown was the main colour.
The hull parts and yardarms (the sideways bits above the sails) were
painted rhinox hide - a dark brown, and the
 ails were
painted their first coats of bleached bone.
I also assembled the stand - the fit was tight - and sprayed it gold.
ails were
painted their first coats of bleached bone.
I also assembled the stand - the fit was tight - and sprayed it gold.
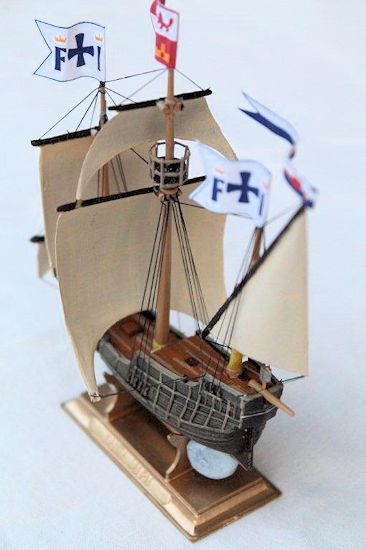
On night 2, I brushed the deck
details with contrasting browns and dry-brushed the hull with commando khaki.
Between more coats on the sail, I trapped the deck between the hull
halves. Again, the fit was pretty
good. And after comparing the
moulded-on crews-nest with that depicted on the boxart, I decided to modify it
to suit. Eight lengths of wire were
superglued into razorsaw cuts around the crows nest, trimmed to length, then
their tops were connected by a thin strip of tape.
The boxart indicated some sort of wrapping (rope?) around the base of the
masts (the three sticking-up bits), so I replicated them with tape and glued the
unpainted masts (OK – so I’m lazy), bow-sprit (a pointed stick extending
forward) and the stern-sprit (is there such a word?) in-place.
Fit of the masts was sloppy.
While the masts are on the centre line, the
 sprits ‘aint
- but who am I to argue with history?
This is when I took a few happy snaps.
sprits ‘aint
- but who am I to argue with history?
This is when I took a few happy snaps.
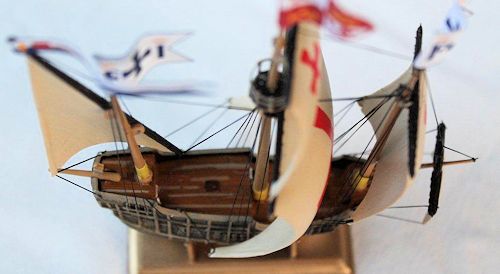
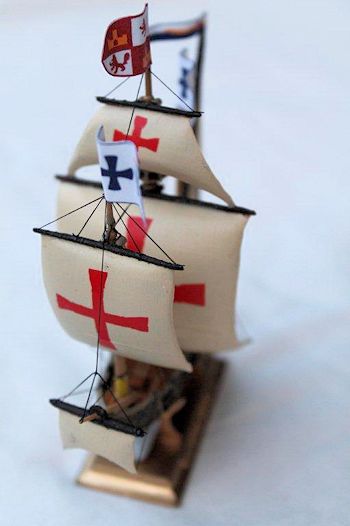
On night 3, I cut and trimmed
strips from a solid red decal sheet to create the required 30mm, 20mm and 10mm
Spanish crosses on the sails - this was time-consuming.
Supplying decals for this sort of thing would have made the job a snap.
At the same time, a few features caught my eye.
There were three walls on the decks.
Some doors are indicated in them in the box-art, so I resolved to add
them. This was easier than I
initially imagined – especially when I decided to use small pieces of paper.
It was tempting to put then in the centre of the wall, but there’s a mast
directly behind it. I would have
liked to do the windows of the captain’s cabin across the transom at the stern
(back-end of the ship), and a ship’s helm too but size, time and commitment beat
me.
On night 3 (& 4), all of the
parts were ready for final assembly.
But, as nobody accuses me of 100% sanity, I decided that she needed a
little rigging. My rigging ‘aint
neat and probably not accurate, but it is there.
Didn’t these little ships used to come with the ratlines (the A-shaped
rope ladders up to the yardarms) pre-made in black?
I did them with fine black EZ-Line (it’s elastic and so will stay tight)
but left-o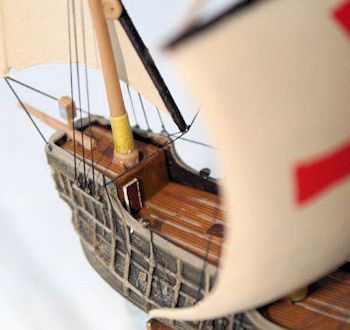 ff
the horizontal connecting bits because I don’t reckon I coulda got it looking
neat. This also took a lot of time.
Pre-formed or PE ratlines woulda’ been easier (but $$$?).
Heck – I’ve also seen ratlines printed (in black ink) onto clear plastic
film (but it was waaaaaay too glossy).
ff
the horizontal connecting bits because I don’t reckon I coulda got it looking
neat. This also took a lot of time.
Pre-formed or PE ratlines woulda’ been easier (but $$$?).
Heck – I’ve also seen ratlines printed (in black ink) onto clear plastic
film (but it was waaaaaay too glossy).
On the last night, all of the
yardarms and their sails were attached to the masts – a 2-minute job.
Then, even more rigging was attached – anywhere that seemed logical, and
with quite a few sideways glances at the boxart.
I also attached the paper flags (pointing forwards – wind, you know).
Finally, the model was tacked to the base, and the name of one of
Magellan’s ships (the Trinidad, a
110-ton carrack) was printed on a card and attached to the base.
Another one can be declared finished.
After drilling-out the fairleads, I would have liked to build and add the
anchors, and a capstan.
 This was
supposed to be a short simple project for me, but the additions suggest that the
objective was a competition – not a small class display in the local primary
school. Perhaps it WILL go into a
competition – after I add those things that I’d like to add.
This is a small kit that my son could have easily thrown together by
himself - if he wasn’t busy with his own research, and if he wanted to build it
OOB and/or not paint it.
This was
supposed to be a short simple project for me, but the additions suggest that the
objective was a competition – not a small class display in the local primary
school. Perhaps it WILL go into a
competition – after I add those things that I’d like to add.
This is a small kit that my son could have easily thrown together by
himself - if he wasn’t busy with his own research, and if he wanted to build it
OOB and/or not paint it.
In all, the hull (without the
sticking-out bits) of the model measures 72mm/@ 3” long.
The box reckons that it is 1/350-scale, but considering the hull of the
original was supposed to be 17.7-19.0m, she scales out to @ 1/245-263-scale.
This’d make a figure @ 7mm tall. If
she was 1/350 –scale, the model would be @ 50mm/2” long.
Just the instructions the boxart and info
from Wikipedia.
Trinidad,
a 110-ton carrack
August 2013
If you would like your product reviewed fairly and fairly quickly, please
contact
the editor or see other details in the
Note to
Contributors.
Back to the Main Page
Back to the Review
Index Page