
Hasegawa 1/350 HIJMS Nagato (1941)
| KIT #: | Z24 |
| PRICE: | $230.00 MSRP |
| DECALS: | One option |
| REVIEWER: | Drew Nix |
| NOTES: | Intricate model with over 800 parts. |
| HISTORY |
During World War I the Imperial Japanese Navy (IJN)
realized that in order to become a world power it was going to have to
upgrade its fleet. This led to the so-called “8-8” Program whereby the IJN
planned to build 8 fast battleships of the super dreadnought variety and 8
battle cruisers. It was hoped that this would put
 The
first of the battleships in the “8-8” plan was laid down at the Kure Naval
Yard on
The
first of the battleships in the “8-8” plan was laid down at the Kure Naval
Yard on
When war broke out, the
Nagato was the flagship of the
Combined Fleet. While
Nagato was
on hand for most of the major Japanese fleet actions of the Second World
War, she only fired her guns at opposing ships once. She was one of Admiral
Kurita’s Center Force that attacked the U.S. Fleet off of
She met her end at Bikini Atoll in 1946 as part of the
| THE KIT |
 Hasegawa’s
kit of the Nagato came as
somewhat of a surprise when it was announced.
It was later
determined that it was one of the so-called “lucky” ships of the IJN that
Hasegawa had started doing. The kit comes in at least two versions, one with
all of the accompanying photo-etch parts and one without. This review is of
the one without.
Hasegawa’s
kit of the Nagato came as
somewhat of a surprise when it was announced.
It was later
determined that it was one of the so-called “lucky” ships of the IJN that
Hasegawa had started doing. The kit comes in at least two versions, one with
all of the accompanying photo-etch parts and one without. This review is of
the one without.
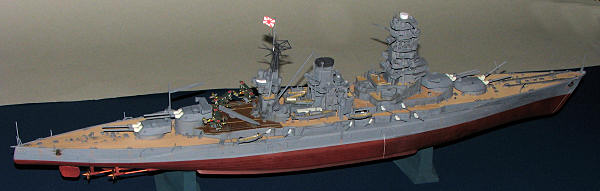
The kit comes in a sturdy box that is at least three feet long by one foot wide. The box is also very tall being at least one foot in height. The box art shows Nagato stately steaming in a moderate sea.
 Upon
opening the box one is greeted by no less than 33 plastic sprue trees, two
metal anchor chains, and 6 sprues of polyurethane caps. The total number of
parts has to be well over 1000, with about 150 or so being “extra” parts.
The molding is superb with details abounding both molded into the parts and
as separate parts. The large decal sheet also has many extra decals in case
the modeler messes up some. A nice touch by Hasegawa! One also gets a set of
“sticker” type flag decals in case he wants to use them instead of the
decals. Parts are also included for a later version of
Nagato that I’m sure is in Hasegawa’s realm of future releases.
Upon
opening the box one is greeted by no less than 33 plastic sprue trees, two
metal anchor chains, and 6 sprues of polyurethane caps. The total number of
parts has to be well over 1000, with about 150 or so being “extra” parts.
The molding is superb with details abounding both molded into the parts and
as separate parts. The large decal sheet also has many extra decals in case
the modeler messes up some. A nice touch by Hasegawa! One also gets a set of
“sticker” type flag decals in case he wants to use them instead of the
decals. Parts are also included for a later version of
Nagato that I’m sure is in Hasegawa’s realm of future releases.
The 24 page instruction booklet is among the best laid out and thought out instructions I’ve ever seen. I only caught Hasegawa in one mistake which will be noted later. There is also a correction sheet concerning the painting of the bridge top and the mainmast. Nice touch! Color call outs are all for the now almost impossible to get Gunze Sangyo line of paints. I used the excellent Tamiya acrylics instead for the majority of the painting.
A real challenge awaits the builder!
| CONSTRUCTION |
The construction begins with assembling the hull. In
many kits the hull comes already molded in one piece. Not the
Nagato. Its hull is in two
pieces. Normally this would present the problem of flexing along the
longitudinal axis of the kit later on in construction. Hasegawa has solved
the flexing problem rather neatly by using 14 bulkheads to keep the hull
aligned and rigid. Bulkhead G12 is assembled with the part having rudder
holes in place. The upper bow pieces are separate probably because they were
different on the later
Nagato.
The fit of the two bow pieces are good to each other but poor to the rest of
the hull.
I recommend that you glue the bow pieces to the separate hull halves and
then glue the hull halves together. The resultant seam
 was
almost invisible, an early indicator of the overall fit of this
state-of-the-art kit. The overall hull is painted Kure Arsenal Gray by
Tamiya mixed 50/50 with Tamiya’s thinner before running it through a Badger
150 airbrush at between 12 and 15 psi. I don’t recommend that you try to
hand paint with Tamiya acrylics except for minor touchups.
was
almost invisible, an early indicator of the overall fit of this
state-of-the-art kit. The overall hull is painted Kure Arsenal Gray by
Tamiya mixed 50/50 with Tamiya’s thinner before running it through a Badger
150 airbrush at between 12 and 15 psi. I don’t recommend that you try to
hand paint with Tamiya acrylics except for minor touchups.
The area below the waterline on IJN ships was painted an anti-corrosion dark red. Mixing Tamiya Hull Red and Flat Red in a 1:3 ratio will give one the proper color, IMO. The rear deck is also assembled and glued to the completed hull during this step. Take special note of the “drill here” indicators on the instruction sheet to insure being able to add various pieces to the deck and hull later in the construction sequence. The wooden areas of all of the decks were first sprayed with Tamiya Deck color. After that had dried (overnight), small strips of Tamiya masking tape were cut to a 1mm width. These were further cut into ½ to 1 inch strips and placed along various individual planks in a random pattern. Make sure that the strips align with the individual planks or you will get a very unreal pattern of deck fading later on. Next Tamiya German Armor Red-Brown was mixed with the Deck color in a ratio of 1:9 and sprayed on the decks. After this had dried, more tape was cut and applied, again in as random a pattern as I could. Next came more German Red-Brown mixed in with the Deck color this time at a darker ratio of 2:8. When the small strips of masking tape are removed you see…a mess. Don’t worry. Take the original Deck color, thin it way down, and apply it to the decks in a light misting action. Do this until you are satisfied with the results.
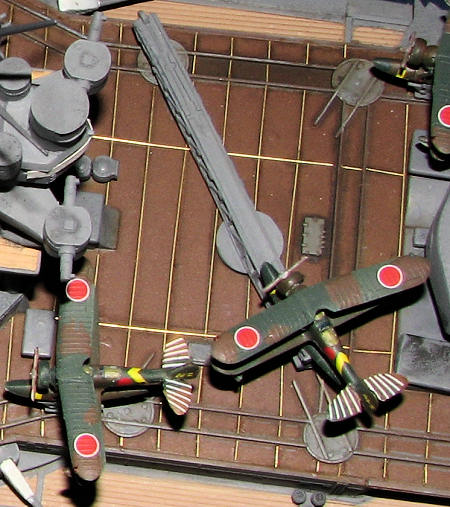
The aircraft flight deck is next. Pay attention here.
The Japanese liked to use linoleum on these deck areas as well as the main
decks of their cruisers and destroyers. Tamiya makes a Linoleum color that
looks quite realistic. If you can’t find this color, any red-brown color,
like German Armor Red-Brown, will work. This deck along with the bow deck
and the center deck are glued to
 the
hull next. Hasegawa has cleverly included a raised area between each of
these decks to eliminate any ugly, hard-to-fill seams between each deck.
the
hull next. Hasegawa has cleverly included a raised area between each of
these decks to eliminate any ugly, hard-to-fill seams between each deck.
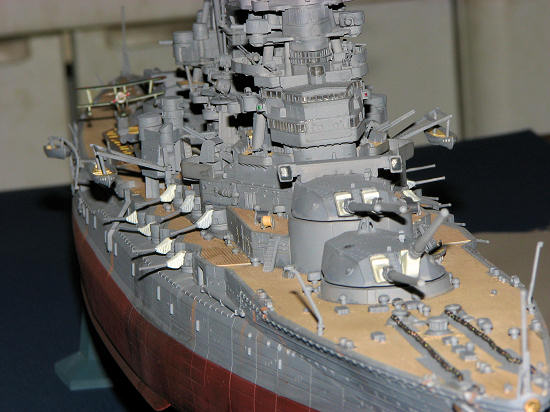
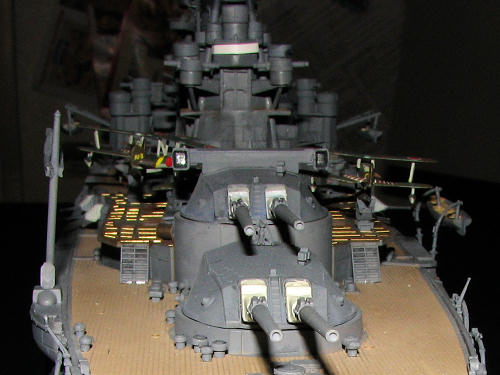
The next items to be added are the propulsion gear and rudders. The rudders are pressed into poly caps in the holes designed for them in the stern’s underside. They are supposed to be positional; why I don’t know. The main gun turrets and aircraft handling gear are also built in this step. The aircraft catapult comes as seven pieces with enough detail so as to make any aftermarket replacement almost superfluous.
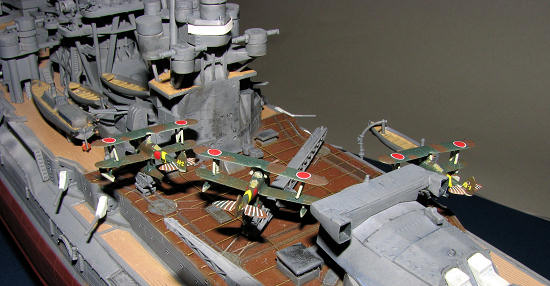
The many boats and three aircraft are next. Each boat has a separate rudder. Many of the larger craft even have the propellers for the boats! With ten separate boats to assemble and paint, this step takes longer than one might think. At this period in its life the Nagato carried three E8N Type 95 (Allied recognition code name Dave) reconnaissance aircraft. These are models in themselves. Each comes with a left side 1 ¼ fuselage half and a ¾ right fuselage half. Again I don’t know why Hasegawa chose to break the fuselages down in this manner. Each plane also comes with an engine cowling with a representation of a radial engine front, a bottom wing, the main float and associated struts, a top wing and the two “N”-shaped wing struts, a propeller, cabane struts, the two horizontal tailplanes and the two wing floats. So each aircraft has 17 pieces in its composition. I found the seam left by the funky fuselage assembly hard to erase. The aircraft had a three-tone camouflage scheme in 1941. Each aircraft also has 12 decals to put into place! Each decal scheme is for one of the three individual aircraft.
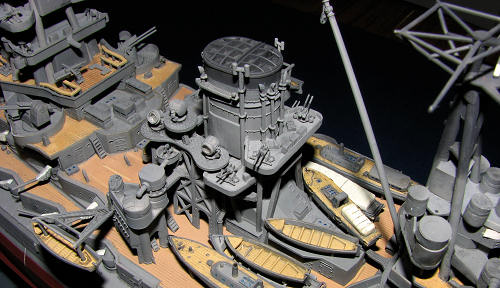
The stack assembly and its surrounding accoutrements are completed in the next step. Each individual steam pipe that surrounded the funnel had to be removed from the sprue tree, cleaned up, and carefully glued in place making sure that it faced the right way.
 The
deck for “B” turret is separate. It was painted and the myriad bollards,
vents, wire reels, etc. added. After assembly and painting, this deck and
the funnel assembly were added to the hull. The fit of the turret deck to
the hull was not as good as one would hope. I find that white glue put into
the resultant seam(s) and then wiped with a wet cotton swab can save one a
lot of puttying. It also prevents loss of detail from the sanding of the
seam(s).
The
deck for “B” turret is separate. It was painted and the myriad bollards,
vents, wire reels, etc. added. After assembly and painting, this deck and
the funnel assembly were added to the hull. The fit of the turret deck to
the hull was not as good as one would hope. I find that white glue put into
the resultant seam(s) and then wiped with a wet cotton swab can save one a
lot of puttying. It also prevents loss of detail from the sanding of the
seam(s).
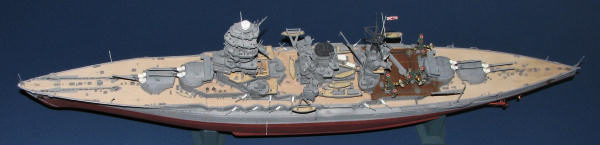
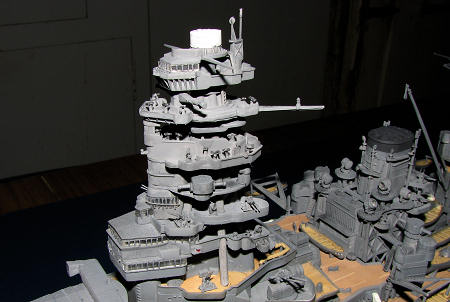
Probably the most recognizable feature of Japanese capital ships was their massive pagoda bridges/masts. The Nagato is no exception. The bridge on the Hasegawa kit is built almost like the prototype, one layer at a time. This took 16 separate steps to accomplish. On each level there were a myriad of small parts from ammunition lockers to binocular stands to add. The Japanese had not developed radar yet for their ships so they were very dependent on the eyes of their lookouts to spot the enemy before he could spot them. Thus the many binocular stands on the bridge, the highest portion of the ship.
The searchlight platforms are next. Hasegawa has molded these to look very intricate when in reality they are relatively simple structures. The spotlight lens are separate clear pieces that I recommend waiting until after all painting is done before attaching.
Bits are added to the bow next. This is followed by more deck paraphernalia in the next two steps. Here is where I caught Hasegawa in their only instructional mistake. When these steps are completed, one notices that there are two empty holes unaccounted for in the instructions. Looking at the drawings of this area in the later part of the instruction sheet one sees these two holes filled with bollards. Easily remedied; there are enough extra bollards on the sprue trees to fill these two holes.
 When
all of the bits have been added the pagoda bridge is ready to mate with the
deck. Again the fit was good but not perfect. White glue and the cotton swab
technique mentioned earlier saved a lot of filling and sanding.
When
all of the bits have been added the pagoda bridge is ready to mate with the
deck. Again the fit was good but not perfect. White glue and the cotton swab
technique mentioned earlier saved a lot of filling and sanding.
The rear bridge, while not as intricate as the main bridge, still took 9 steps to complete. The mainmast is a thing of beauty in the way Hasegawa has molded it. From this point forward it is just a matter of adding more fiddly bits and bringing all of the subassemblies together. I tried to build the Nagato as straight out of the box as possible but I found that in a few areas I had to add a few more details. The linoleum aircraft handling deck had brass strips to hold the linoleum down. I tried a wide variety of techniques to paint the brass strips. None were successful. Finally a person on a naval modeling website suggested using thin brass wire. I was able to locate a .008” diameter wire made by Detail Associates. Over a period of a few modeling sessions this wire was measured, cut to various lengths, then carefully glued in place over the raised portion of the linoleum that was supposed to represent the brass strips. At first, I used super glue. Later I experimented with using Future floor polish. Both methods worked but in the future (get it?), I think I’ll use Future
| COLORS & MARKINGS |
 Some
people like to have their ship models all pristine. I don’t. The decals were
applied using a technique explained to me by master aircraft modeler Darren
Roberts. This worked quite well. Next, the whole ship was given a wash of
Windsor & Newton Lamp Black oil paint thinned mightily with a turpentine
substitute. The linoleum/brass wire aircraft handling deck was given a
similar wash of Windsor & Newton Raw Umber.
Some
people like to have their ship models all pristine. I don’t. The decals were
applied using a technique explained to me by master aircraft modeler Darren
Roberts. This worked quite well. Next, the whole ship was given a wash of
Windsor & Newton Lamp Black oil paint thinned mightily with a turpentine
substitute. The linoleum/brass wire aircraft handling deck was given a
similar wash of Windsor & Newton Raw Umber.
The whole ship was next matte coated using Testors Dullcote in the bottle thinned 50/50 with Testors Model Master Metallizer Thinner. A nice matte coat resulted. Further weathering was accomplished using pastel chalks. TV chalks (a wide variety of grays between white and black) were used to show paint fading and wear and tear on the model. Various earth tone pastels were mixed to replicate the rusty area of the hull made where seawater had spilled down the side. Finally, after 835 plastic pieces and numerous pieces of brass wire, etc., the model was finished.
| CONCLUSIONS |
This was a review model so I tried to build it as much straight out of the box as possible. This means I didn’t add any aftermarket photo-etched brass. It would certainly have spiffed up an already excellent model kit. I also chose not to rig the model except for the line holding the national flag. This model took almost exactly a year to complete from the time Scott gave it to me until he came to my house to photograph the completed model. All in all it was a fun build and definitely a learning experience. As you might imagine this kit is definitely not recommended to the beginner modeler or as one’s first attempt at a ship model or even as one’s first 1/350 scale model. It is, however, highly recommended to the experienced ship modeler. At $200+ MSRP, it is a decision each person will have to make as to whether he can afford it or not. If you’ve got the green, go for it! A special thanks to Scott (Da Boss) for giving me the opportunity to do this project. His abiding patience with me, a notoriously slow builder, is also much appreciated. (While Drew kindly comments on my patience, the truth is that homicide would have delayed completion even more.....Ed)
| REFERENCES |
 Hewson,
Robert, The World War II Warship
Guide, Chartwell Books, Inc.,
Hewson,
Robert, The World War II Warship
Guide, Chartwell Books, Inc.,
Stille, Mark, Imperial Japanese Navy Battleships 1941-1945, Osprey Publishing Ltd., Oxford, UK (2008)
Various,
Jane’s
All the World’s Fighting Ships of World War II, Jane’s Publishing
Company, London, UK (1989)
Watts, A.J. and B.G. Gordon, The Imperial Japanese Navy, Doubleday & Company, Inc., Garden City, NY (1971)
December 2008
If you would like your product reviewed fairly and fairly quickly, please contact the editor or see other details in the Note to Contributors.