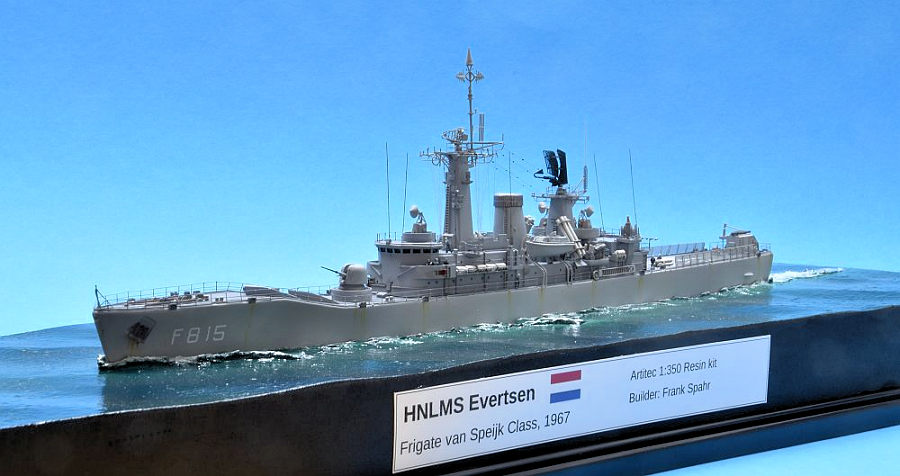
Artitec 1/350 HNLMS Evertsen
| KIT #: | 55.117 |
| PRICE: | 110.00 euros |
| DECALS: | Dry Transfers for all ships in class |
| REVIEWER: | Frank Spahr |
| NOTES: | Currently available from Naval Models as Kit # 350-07 |
| HISTORY |
The Dutch Van Speijk Class of Guided Missile Frigates comprised six vessels, commissioned between 1967 and 1968. They were intended to fulfill the Dutch Navy´s NATO commitments, especially in the ASW role. The ships were based on the contemporary British Leander class, but had predominantly Dutch sensors. They were built in the Netherlands.
 In the second half of
the 1970s, the ships received a thorough mid-life modernization. Outwardly,
the British twin 4.5 inch gun turret was replaced by a 3 inch Otobreda gun.
The main radar arrays were updated. Two quadruple Harpoon launchers were
installed on the aft superstructure. The stern „Limbo“ ASW launcher was
removed, its well plated over, thus enlarging the helo deck. Moving the VDS
array to a location inside the hull freed yet more space and enabled the
vessels to operate a Lynx instead of the original Wasp helo. Two triple
Mk.32 torpedo launchers were installed right abaft the hangar. Inside, the
ship´s Combat Management System was updated and the power plant also
modernized, with a view to crew reduction. The reduced complement improved
habitability.
In the second half of
the 1970s, the ships received a thorough mid-life modernization. Outwardly,
the British twin 4.5 inch gun turret was replaced by a 3 inch Otobreda gun.
The main radar arrays were updated. Two quadruple Harpoon launchers were
installed on the aft superstructure. The stern „Limbo“ ASW launcher was
removed, its well plated over, thus enlarging the helo deck. Moving the VDS
array to a location inside the hull freed yet more space and enabled the
vessels to operate a Lynx instead of the original Wasp helo. Two triple
Mk.32 torpedo launchers were installed right abaft the hangar. Inside, the
ship´s Combat Management System was updated and the power plant also
modernized, with a view to crew reduction. The reduced complement improved
habitability.
In this configuration, the vessels served until they were sold to Indonesia between 1986 and 1989. They have been modernized again in Indonesian service, with diesel powerplants replacing the steam turbines as well as updated sensors, missiles and a new helicopter. Since 2017, the class is being phased out from the Indonesian Navy. Its replacement is a modern frigate class built in the Netherlands.
| THE KIT |
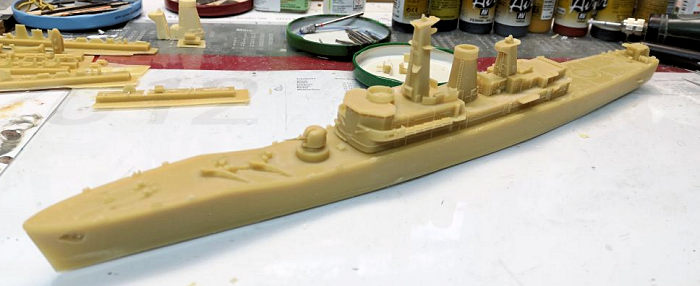
 I bought this kit from a
vendor at the Euro Scale Modeling 2013 at Nieuwegein, for a reduced price. I
don´t remember whether the kit was missing a lower hull part or whether some
enterprising soul had already laboriously and cleanly removed it. The resin
parts are quite neat, there are no questionable white metal parts, the kit PE is
on the thick and sturdy side, and contains no railings. The kit instructions are
comprehensive and mostly useful. Colour callouts refer to Humbrol paints. Apart
from some dryfitting and occasional musing, the kit collected dust over the next
few years. Until I decided to build it. So I bought a RN railing set from
Atlantic Models, plus a machined brass barrel for the 3 in gun from Master via
Atlantic Models. I couldn´t get the Atlantic PE set comprising helo deck
netting, but found some spares in the WEM PE set for the Airfix Illustrious kit.
I also ordered Atlantic Models´ railing stanchions to see whether I could use
them for making some railing sections.
I bought this kit from a
vendor at the Euro Scale Modeling 2013 at Nieuwegein, for a reduced price. I
don´t remember whether the kit was missing a lower hull part or whether some
enterprising soul had already laboriously and cleanly removed it. The resin
parts are quite neat, there are no questionable white metal parts, the kit PE is
on the thick and sturdy side, and contains no railings. The kit instructions are
comprehensive and mostly useful. Colour callouts refer to Humbrol paints. Apart
from some dryfitting and occasional musing, the kit collected dust over the next
few years. Until I decided to build it. So I bought a RN railing set from
Atlantic Models, plus a machined brass barrel for the 3 in gun from Master via
Atlantic Models. I couldn´t get the Atlantic PE set comprising helo deck
netting, but found some spares in the WEM PE set for the Airfix Illustrious kit.
I also ordered Atlantic Models´ railing stanchions to see whether I could use
them for making some railing sections.
| CONSTRUCTION |
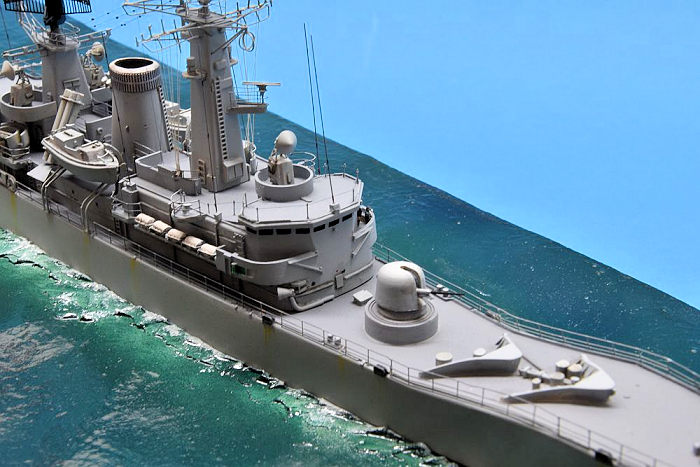
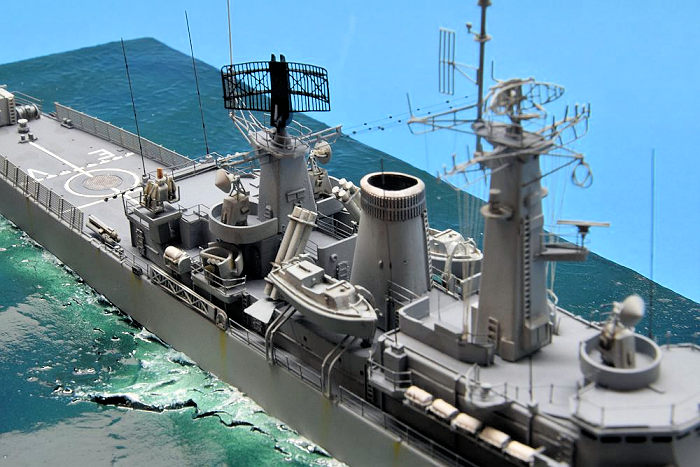
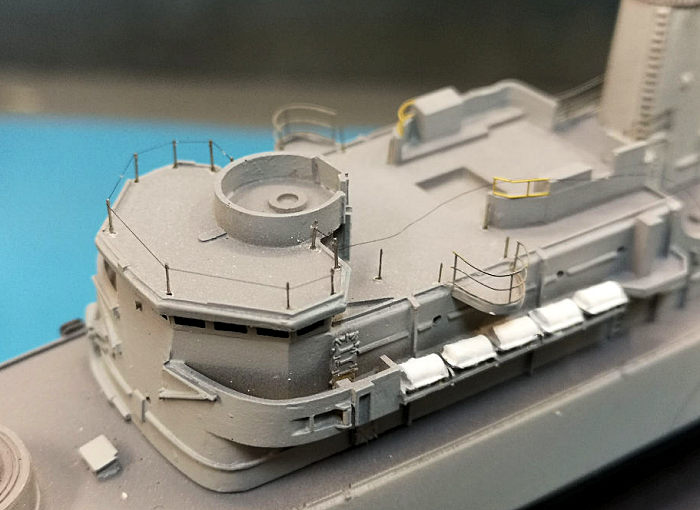
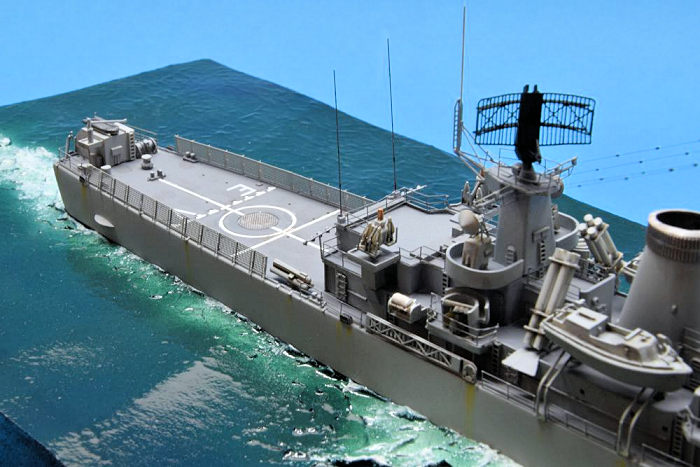
I had just completed the very iffy and demanding Orange Hobby 1:700 HMS Hermes kit and felt I could do with something less ethereal and delicate for a change. I wasn´t disappointed. The parts needed only limited cleanup and generally fit well. I started by cleaning up the main components and then preparing the subassemblies, as in directors, radars, masts, gun and missile launchers. The main radar array needed some annealing before bending it into shape, and I added enforcing wires to the yardarms. More to the radar array later. Some generic railings were added to the mast platforms. After losing a part for the fore masttop array, I replaced it with unneeded parts from the Atlantic Models HMS Cleopatra kit. I digressed from the kit instructions in building the Harpoon launchers. The instructions want you to build both launchers from styrene rods and PE and then saw the rods apart in the middle to make two. I rather chopped the rods to the correct length for one launcher and then assembled them both individually.
The brass barrel visibly improved the look of the gun, I also added a PE handwheel to the turret door. All in all, this stage seemed to progress very fast and hassle-free.
 I also prepared the base
early on in my usual method and was quite happy with the fit of the model in the
end. I opted for a greenish hue of the sea, and a very calm sea state with the
vessel traveling at moderate speed.
I also prepared the base
early on in my usual method and was quite happy with the fit of the model in the
end. I opted for a greenish hue of the sea, and a very calm sea state with the
vessel traveling at moderate speed.
Quite soon I was able to start priming the parts, using my favorite Stynylrez primer. The helo deck engravings were enhanced a bit prior to painting, and the anchor pipes carefuly drilled out a bit.
The helo deck was primed in white and the markings then masked with kip 308 tape. I then primed the rest of the hull, using the grey primer which was also used for the shade of the decks. The boot topping was primed in black and masked, and the upper hull and superstructure vertical areas then sprayed Vallejo ModelAir Pale Grey Blue. Some more masking and backing and forthing followed, but it all went quite neatly and civilized. The bridge windows were painted dark blue.
The hull numbers and deck markings are provided as dry transfers and were added at this stage for ease of application. They were then covered with a layer of matt varnish for protection.
Painting done, I was soon able to start adding the superstructure blocks to the hull. I needed ample amounts of CA glue and firm pressure to ensure a secure bond.
That done, I started adding my prepared subassemblies, working strictly from the centre to the periphery to minimize collateral damage. I soon came to the point where I gave the Atlantic Models railing stanchions a try. These are very finely etched from steel and come in several versions for the different railing styles. The stanchions need to be cemented into fine holes drilled into the deck and have notches where railing bars/wires are to be attached. So the idea is drill the requisite holes, glue the stanchions into them and then rig the railings using either very fine wire or Caenis. It basically does work, but is quite demanding and depends on very good magnifiers and lighting. I soon discarded any plans of using the material for longer stretches of railings, and only used them for the light security railings atop the wheelhouse and abaft it.
 I then kept adding my
subassemblies and generic railing sections until the superstructure was
complete, with both the bow and the stern still completely free from details. I
then also added the limited rigging, using tan UNI thread for the signal
halyards and Caenis for the antenna wires. Isolators were hinted at with drops
of white glue. The HF rod antennas found on virtually any NATO vessel were added
from .2 mm wire. The normal complement is five, vessels with flag function have
seven. I opted for seven.
I then kept adding my
subassemblies and generic railing sections until the superstructure was
complete, with both the bow and the stern still completely free from details. I
then also added the limited rigging, using tan UNI thread for the signal
halyards and Caenis for the antenna wires. Isolators were hinted at with drops
of white glue. The HF rod antennas found on virtually any NATO vessel were added
from .2 mm wire. The normal complement is five, vessels with flag function have
seven. I opted for seven.
Now I was able to continue with the railings aside the superstructure, using Atlantic Models stock. Having added those and the accommodation ladders, I tackled the helo deck netting. After looking at photos of British Leanders, I added some PE bracing to the outboard side and then sprayed the netting in a slightly different grey from the rest of the vessel. Having added the helo deck netting, I continued with the small stern superstructure housing the VDS and the surrounding railings, plus the flagstaff.
Now came everything ahead of the bridge, with some bending and piecing together of PE railings where the deck´s sheer begins and ends. Having handpainted the railings in two shades, the prepared gun turret was aded to the model, plus the jackstaff.
The final parts to be added were the resin anchors, after the hull was moderately weathered where rust streaking was to be expected. The superstructure only received a slight dark wash and no rust.
Finally, the model received the flat coat of absolution and was attached to the base with acrylic gel.
| CONCLUSIONS |
This was a neat and hassle-free project and I like the different look compared to a British Leander. I would recommend this kit.
 It is not available from
Artitec any more, but Naval Models has taken over the masters and offers the kit
now. Upon inquiring, they told me that it is basically the same kit with some
minor tweaks: Some resin sprues have been changed slightly with a view to easier
part removal, the PE fret is the same but thinner now, and the markings now come
as waterslide decals from Fantasy Printshop.
It is not available from
Artitec any more, but Naval Models has taken over the masters and offers the kit
now. Upon inquiring, they told me that it is basically the same kit with some
minor tweaks: Some resin sprues have been changed slightly with a view to easier
part removal, the PE fret is the same but thinner now, and the markings now come
as waterslide decals from Fantasy Printshop.
Coincidentally the knowledgeable people at Naval Models also informed me that I had inadvertently glued the main radar array upside down. They offered me replacement parts to correct this mistake. Soon after, I received two sections of PE fret with their version of the LW-02 radar, which is finer and more detailed than the Artitec parts. Despite also having received instructive photos, I managed to correctly shape the array and glue it to its supports, but again the wrong way round. Don´t ask. With some suppressed colourful language in my head and bated breath, I again removed the array from the mast, the curved part from its supports, re-glued it, re-sprayed it, and re-attached it to the mast.
But now it looks as it should – thanks for the help, Maarten.
| REFERENCES |
https://en.wikipedia.org/wiki/Van_Speijk-class_frigate
https://www.scalemates.com/kits/naval-models-350-07-van-speijk-klasse--1088274
Frank Spahr
11 October 2021
Copyright ModelingMadness.com. All rights reserved. No reproduction in part or in whole without express permission.
If you would like your product reviewed fairly and fairly quickly, please contact the editor or see other details in the Note to Contributors.