Doggy Industries 1/700 HNLMS De Ruyter
| KIT #: | MDW056 |
| PRICE: | $100.00 |
| DECALS: | small sheet that includes flags |
| REVIEWER: | Marcello Rosa |
| NOTES: |
| HISTORY |
 The two
light cruisers of the De Zeven Provinciën-class had a long and troubled
period of development. The subject of this article, De Ruyter, was laid down
in 1939, and was captured under construction by the German invaders.
Although the Kriegsmarine had plans to complete her World War II came to an
end with little to show in terms of a functioning ship, in great part thanks
to deliberate delaying tactics by the shipyard workers. This gave the Royal
Netherlands Navy a chance to reconsider the design in light of lessons
learned during the war. Thus, when De Ruyter
and her sister De Zeven Provinciën
emerged in the early 1950s they were very different from the 1939 plans. In
my humble opinion, the Dutch naval designers also did a fantastic job in
getting their looks right.
The two
light cruisers of the De Zeven Provinciën-class had a long and troubled
period of development. The subject of this article, De Ruyter, was laid down
in 1939, and was captured under construction by the German invaders.
Although the Kriegsmarine had plans to complete her World War II came to an
end with little to show in terms of a functioning ship, in great part thanks
to deliberate delaying tactics by the shipyard workers. This gave the Royal
Netherlands Navy a chance to reconsider the design in light of lessons
learned during the war. Thus, when De Ruyter
and her sister De Zeven Provinciën
emerged in the early 1950s they were very different from the 1939 plans. In
my humble opinion, the Dutch naval designers also did a fantastic job in
getting their looks right.
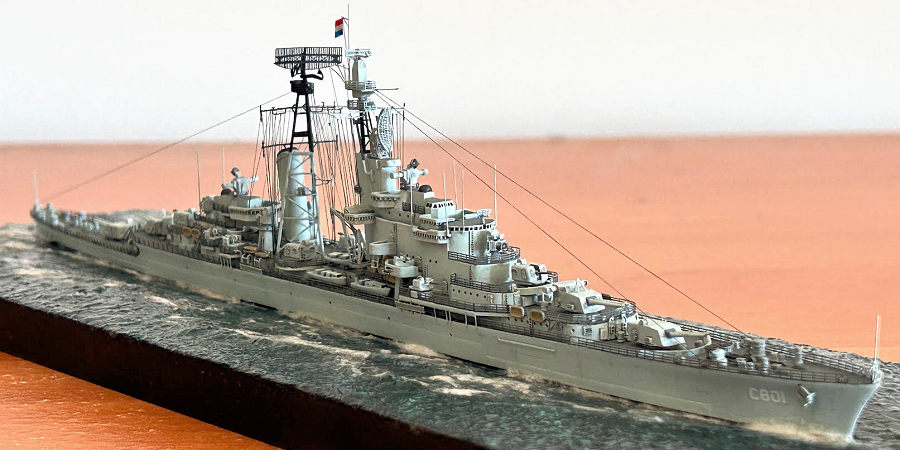
De Ruyter served Her Netherlands Majesty’s Navy between 1953 and 1972. She was later sold to Peru, where she served until 2017 as the fleet’s flagship Almirante Grau, undergoing several cycles of modernisation. She held the distinction of being the last all-gun cruiser in service (although towards the end of the career she was fitted with Otomat SSMs).
| THE KIT |
 The
kit represents De Ruyter at the start of her career, in the mid 1950s, and
is made by Doggy Industries, defined in their Facebook page as “a small
workshop operated by Liu and his friends in part time”. Don’t let this
modest self-assessment fool you: this is a serious kit. In addition to the
resin parts, it comes with 3 extensive frets of photoetch parts, metal
barrels for the main guns, and decals for pennant numbers and flags. I did
not need anything other than paint, glue and rigging line.
The
kit represents De Ruyter at the start of her career, in the mid 1950s, and
is made by Doggy Industries, defined in their Facebook page as “a small
workshop operated by Liu and his friends in part time”. Don’t let this
modest self-assessment fool you: this is a serious kit. In addition to the
resin parts, it comes with 3 extensive frets of photoetch parts, metal
barrels for the main guns, and decals for pennant numbers and flags. I did
not need anything other than paint, glue and rigging line.
The photoetch is excellent. The detail is fine, yet the metal is easy to cut with a standard scalpel blade, and to work with. Every single door and hatch is represented as a separate part, and can be modelled open or closed. Every single vent is there. Every section of railing is individually numbered, has clear bend marks, and fits precisely where it is meant to go. Insofar as I could determine from the photos available online, every detail represented is accurate. You also get an impressive amount of spares, which was very reassuring for someone who is always losing small stuff, and enough extra railing for another ship.
| CONSTRUCTION |
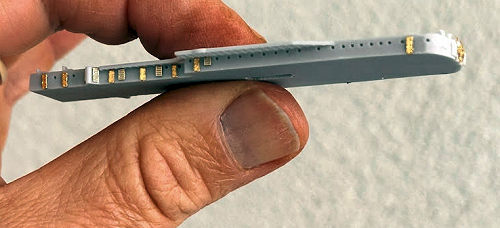 My
construction started with sanding the hull to make the surface a bit
smoother, and to tone down the armoured belt (which, as in most 1/700 kits,
appeared overscale). At this stage you can also remove the resin boat
cradles, which are too thick and can later be substituted with photoetch
parts. Following application of a few layers of Mr. Surfacer 1000, the hull
was ready to be painted. I then treated each level of superstructure and
funnel as a separate sub-assembly, each being lightly sanded before
application of the endless number of photoetch doors, hatches, vents and
ladders, and priming. This strategy made easier to mask when necessary, for
example to paint horizontal versus vertical surfaces in different greys (see
below). Complicated parts made primarily of photoetch, or combinations of
photoetch and resin (e.g. armament, cranes, and masts) were also built and
painted separately, and kept safe in a box until the final assembly stage.
My
construction started with sanding the hull to make the surface a bit
smoother, and to tone down the armoured belt (which, as in most 1/700 kits,
appeared overscale). At this stage you can also remove the resin boat
cradles, which are too thick and can later be substituted with photoetch
parts. Following application of a few layers of Mr. Surfacer 1000, the hull
was ready to be painted. I then treated each level of superstructure and
funnel as a separate sub-assembly, each being lightly sanded before
application of the endless number of photoetch doors, hatches, vents and
ladders, and priming. This strategy made easier to mask when necessary, for
example to paint horizontal versus vertical surfaces in different greys (see
below). Complicated parts made primarily of photoetch, or combinations of
photoetch and resin (e.g. armament, cranes, and masts) were also built and
painted separately, and kept safe in a box until the final assembly stage.
The next major job was to add the many tiny resin and photoetch parts that ornament the deck and other horizontal surfaces, before joining the superstructure levels and funnels. Here is where I found my only real difficulty, with the second level of the aft superstructure being warped, but resisting all my attempts to re-shape using hot water. Supergluing while applying strong clamping partially solved the problem, but the result was still not optimal. Fortunately, this was an isolated problem, and the fit was quite good everywhere else.
 Then
it was a matter of adding things from the centre towards the periphery, and from
the bottom up. For example, cranes and boats first, then primary and secondary
guns, then fire control radars. This was followed by the railing (again, from
inside to the outside) and things attached to the hull (anchors, propeller
guards). It was then time to face the inevitable and apply those pesky whip
antennas and masts. The whip antennas were hard to get aligned, because there is
no clear place to attach. It is more a case of apply a tiny drop of
cyanoacrylate and hold until they don't fall. To ensure alignment of the masts
they were first positioned held only by white glue (Micro Krystal Klear), and
only then secured more firmly with cyanoacrylate. Rigging was done with Uschi
elastic thread (0.03 mm).
Then
it was a matter of adding things from the centre towards the periphery, and from
the bottom up. For example, cranes and boats first, then primary and secondary
guns, then fire control radars. This was followed by the railing (again, from
inside to the outside) and things attached to the hull (anchors, propeller
guards). It was then time to face the inevitable and apply those pesky whip
antennas and masts. The whip antennas were hard to get aligned, because there is
no clear place to attach. It is more a case of apply a tiny drop of
cyanoacrylate and hold until they don't fall. To ensure alignment of the masts
they were first positioned held only by white glue (Micro Krystal Klear), and
only then secured more firmly with cyanoacrylate. Rigging was done with Uschi
elastic thread (0.03 mm).
With the model completed, the only remaining step was to add a sea base, using a standard technique (if you are interested visit this link.
| COLORS & MARKINGS |
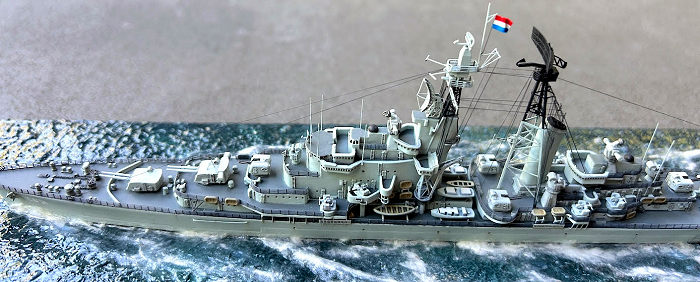
 I could not
find accurate records of the appropriate paints used by the Dutch Navy in the
1950's. The few colour images that made to this day suggest a very light grey
with some blueish tint for the vertical surfaces, and dark greenish grey for
horizontal surfaces. To make things more complicated, none of the images I found
was from above. Therefore, some guesswork was required. In the end, I felt that
it was reasonable to use airbrushed SMS Light Admiralty Grey (PL169) for the
hull and vertical surfaces. This could be touched up when necessary with a
paintbrush using AK Air 3rd generation ADC Grey, the difference between them
being imperceptible. For horizontal surfaces, the choice was airbrushed Mr.
Color 36 (grey green). Everything was sealed with airbrushed SMS clear gloss
(PL09) before applying decals, and then a mix 50:50 of PL09 and SMS flat clear
(PL10) when fully completed (including rigging).
I could not
find accurate records of the appropriate paints used by the Dutch Navy in the
1950's. The few colour images that made to this day suggest a very light grey
with some blueish tint for the vertical surfaces, and dark greenish grey for
horizontal surfaces. To make things more complicated, none of the images I found
was from above. Therefore, some guesswork was required. In the end, I felt that
it was reasonable to use airbrushed SMS Light Admiralty Grey (PL169) for the
hull and vertical surfaces. This could be touched up when necessary with a
paintbrush using AK Air 3rd generation ADC Grey, the difference between them
being imperceptible. For horizontal surfaces, the choice was airbrushed Mr.
Color 36 (grey green). Everything was sealed with airbrushed SMS clear gloss
(PL09) before applying decals, and then a mix 50:50 of PL09 and SMS flat clear
(PL10) when fully completed (including rigging).
| CONCLUSIONS |
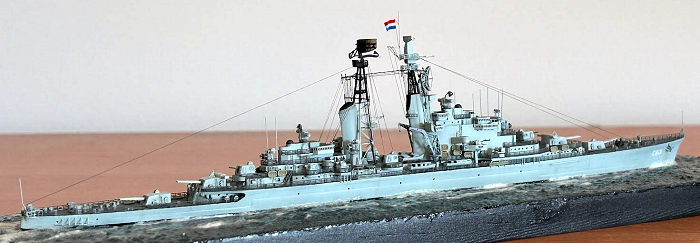
To me the highlight of this kit is the photoetch set, which is impressive in terms of precision, ease of use, and availability of spares. The resin parts, while competently done, could do with some extra refinement.
This was a challenging, yet enjoyable build. We are lucky to live in a time when you can get high quality kits of less famous ships like this one and build them essentially out of the box with minimal fuss. Like all 1/700 resin kits, this is best tackled if you have some modelling experience under your belt. If you would like to see more pictures or ask questions please visit my modelling web site (www.marcellorosa.com).
| REFERENCES |
In addition to the photos provided with the kit instructions I referred to google image search to get closer views of items such as turrets, range finders and radars.
25 February 2025
Back to the Previews Index Page
Back to the Previews Index Page