
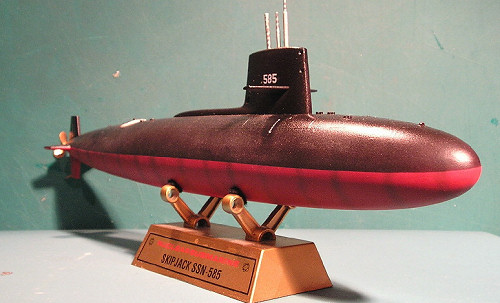
Revell AG 1/200 USS Skipjack
| KIT #: | 05065-0389 |
| PRICE: | $8.00 |
| DECALS: | One option |
| REVIEWER: | Peter L'Heureux |
| NOTES: |
| HISTORY |
The United States Navy’s SSN Skipjack brought a number of firsts to the new nuclear submarine fleet. It was the first nuclear powered attack submarine, mating the Westinghouse S5W nuclear reactor, with a 20 year core life. It was also the first nuclear submarine with a single drive shaft. The Skipjack mated these capabilities with the hull shape of the earlier Albacore class of diesel powered submarines, that being an elongated teardrop. The bow planes were moved to the sail to greatly reduce the flow noise at the bow-mounted sonar. Her performance closely matched the Soviet Victor class of attack subs.
 Skipjack was launched in
1958, and commissioned the following year. What is interesting is her paint
scheme from her commissioning date until she was struck from the Navy lists in
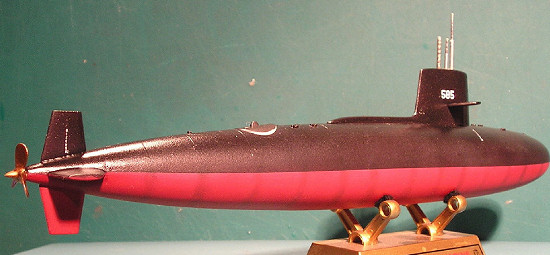
1993. Beginning with a black upper hull, and anti-fouling red lower hull, on
her bi-yearly refits she had the AF red paint applied to her lower hull (after
barnacle blasting, of course) until the mid to late 1980s, when a
sonar-absorbing rubberized black paint was applied overall. Also, wearing her
big numeral designation above the sail gave way to a much smaller number below
the sail planes, so that it would be hard to spot by Soviet spy satellites. I
have depicted her wearing her two-color paint scheme she wore for the first half
of her commissioned life.
Skipjack was launched in
1958, and commissioned the following year. What is interesting is her paint
scheme from her commissioning date until she was struck from the Navy lists in
1993. Beginning with a black upper hull, and anti-fouling red lower hull, on
her bi-yearly refits she had the AF red paint applied to her lower hull (after
barnacle blasting, of course) until the mid to late 1980s, when a
sonar-absorbing rubberized black paint was applied overall. Also, wearing her
big numeral designation above the sail gave way to a much smaller number below
the sail planes, so that it would be hard to spot by Soviet spy satellites. I
have depicted her wearing her two-color paint scheme she wore for the first half
of her commissioned life.
This model is dedicated to those service people who gave so much of themselves to the “silent service” during the period of the Cold War, especially those with the unenviable and tedious task of shadowing Soviet nuclear “boomers” throughout this period. Thanks for keeping us safe.
| THE KIT |
 Even though the instructions
provided with the kit are copyrighted 2001, this looks to be a reissue of an
earlier 1980s era kit. The modeler is presented with a single sprue of medium
soft grey plastic in Revell’s end-opening box, unbagged. This is a kit having
few parts--- an upper and lower hull, sail planes, the reactor core to go in its
partitioned reactor room, which may be displayed open, periscope and antennae,
and stern planes. That’s it! The sprue attachment points tend to be on the
heavy side, so care must be taken when separating parts from the sprue as not to
mar the plastic parts. Detail on the hull parts consists of raised panel lines
along with points for docking hawser lines. Instructions consist of eight steps
printed on plain paper in booklet form, and were simplicity itself to follow. On
to the build!
Even though the instructions
provided with the kit are copyrighted 2001, this looks to be a reissue of an
earlier 1980s era kit. The modeler is presented with a single sprue of medium
soft grey plastic in Revell’s end-opening box, unbagged. This is a kit having
few parts--- an upper and lower hull, sail planes, the reactor core to go in its
partitioned reactor room, which may be displayed open, periscope and antennae,
and stern planes. That’s it! The sprue attachment points tend to be on the
heavy side, so care must be taken when separating parts from the sprue as not to
mar the plastic parts. Detail on the hull parts consists of raised panel lines
along with points for docking hawser lines. Instructions consist of eight steps
printed on plain paper in booklet form, and were simplicity itself to follow. On
to the build!
| CONSTRUCTION |
After cleaning all parts with
dishwashing detergent and rinsing with warm water to remove the mold release
agents, the parts were removed carefully from the one main sprue. I followed
the instructions to the letter, step by step. What I really should have paid
attention to was the fit of the upper and lower hulls. I didn’t dry fit first,
but went right ahead and glued them together after installing the reactor core.
Big mistake, as fit was poor, to say the least. It reduced me to literally
hours of filling and sanding, over
 and over, to try to get rid of the gigundo
seam line.
and over, to try to get rid of the gigundo
seam line.
Seems no matter what I did, I couldn’t make that darned line disappear, but I tried as best I could, using increasingly finer grades of sanding cloths from MicroMark. When I thought I had gone as far as humanly possible, I proceeded with the remaining construction, gluing the sail halves together, which fitted fairly well….. no filler required. I glued this to the upper hull using model cement. The sail planes and stern planes followed, and construction was pretty much completed, then I glued the display stand together. All was allowed to dry thoroughly for a day, then washed again with dishwashing detergent and warm water to remove all the sanding debris from the model. I dried it with paper towels and used a hair dryer to get it completely dry, especially in the reactor core opening. This had previously been painted flat white with blue water intake lines, yellow steam lines, and green waste water lines. On to the paint shop.
| COLORS & MARKINGS |
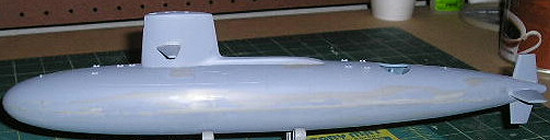
I primed the entire model
along with the display stand with MM grey primer, and noticed I wasn’t finished
in the filling and sanding department of the hull seam line, so I had to give
that more attention. See what happens when you don’t pay attention to basic
modeling procedures? Once I was satisfied, I shot more primer on the m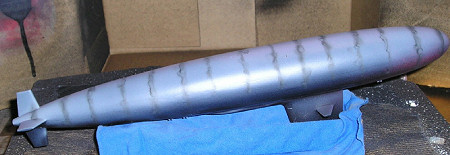 odel,
then proceeded to scribe the panel lines back that I had removed with my sanding
and filling efforts. I used a Squadron scribing tool for this. Setting my
Badger double-action airbrush to 10 psi, I preshaded the panel lines with flat
black, diluted to a 50:50 mix of paint and thinner.
odel,
then proceeded to scribe the panel lines back that I had removed with my sanding
and filling efforts. I used a Squadron scribing tool for this. Setting my
Badger double-action airbrush to 10 psi, I preshaded the panel lines with flat
black, diluted to a 50:50 mix of paint and thinner.
I then proceeded to mix the lower hull color by using Testors Flat Red along with MM Military Brown to get what I believed to be the proper color for the hull, and was subtle in filling this color in between the panel lines in order for the preshading to show through. I then carefully masked the lower hull using a combination of Tamiya and 3M Blue tape, and proceeded to airbrush the upper hull using a combination of Testors flat black, MM Sea Blue, and a drop of MM Steel paints. Once this was thoroughly dry, I sprayed two coats of straight Future to prep for the kit decals. These decals went on with no trouble and snuggled down smartly under applications of MicroSet and Solvaset. I was careful, however, to dilute the Solvaset with water so as not to pulverize the decals. All went well. Incidentally, for modelers on a budget like me, Microset is nothing more than acetic acid, found in white vinegar. A grocery store purchase of white vinegar will yield enough for many models. Solvaset is nothing more than isopropyl alcohol, so a trip to your local discount drug store will give you more than what you need. (uh, your editor thinks these solutions are a bit more complex than that! Ed) Two final coats of Future to seal the decals, and I was basically done.
| FINAL CONSTRUCTION |
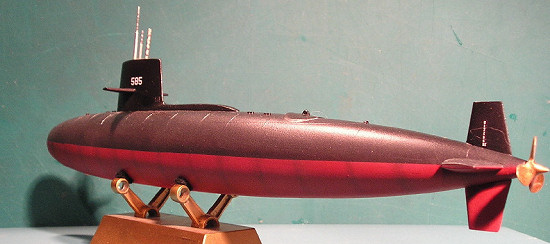
 All
that was left was the display stand, the prop, and the periscope and antennae.
I painted the latter parts in silver and MM Medium grey, with dark grey mottling
according to reference pictures. The prop I painted with Testors Brass over
primer. The display base was painted with spray can gold enamel, given a coat
of Future, and the name decal was applied and sealed with Future. I glued
little squares of felt to the arms of the stand in order not to mar the finish
of the sub model. The model was now complete.
All
that was left was the display stand, the prop, and the periscope and antennae.
I painted the latter parts in silver and MM Medium grey, with dark grey mottling
according to reference pictures. The prop I painted with Testors Brass over
primer. The display base was painted with spray can gold enamel, given a coat
of Future, and the name decal was applied and sealed with Future. I glued
little squares of felt to the arms of the stand in order not to mar the finish
of the sub model. The model was now complete.
| CONCLUSIONS |
This was an easy kit to assemble, my construction blooper notwithstanding. The only drawback was the poor fit of upper and lower hulls, but that is easily rectified by dry fitting first and taking the proper modeling precautions to “get it right”. A fun weekend project that I can heartily recommend to all modelers. Of course, the superdetailers can go to town with photoetch from your favorite suppliers. Could make a great diorama.
| REFERENCES |
1) www.fas.org/nuke/guide/usa/slbm/ssbn
2) Kind assistance rendered by a former submariner aboard SSBN Casimer Pulaski, Don Murphy. Thanks for all your pointers and advice, Don! Anchors aweigh!
March 2006
If you would like your product reviewed fairly and quickly by a site that has over 300,000 visitors a month, please contact me or see other details in the Note to Contributors.