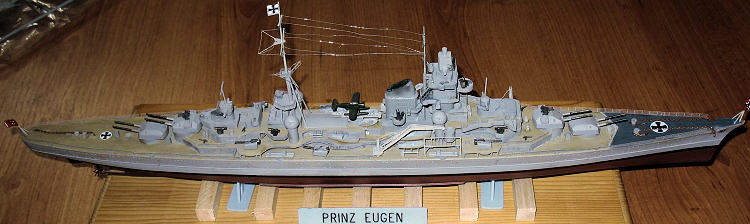
Heller 1/400 RMS Prinz Eugen
| KIT #: | 81803 |
| PRICE: | $70.00 CDN |
| DECALS: | One option |
| REVIEWER: | Dan Lee |
| NOTES: | Photo etch added. |
| HISTORY |
What makes a ship’s reputation? Sometimes it is just circumstances, entropy, fate or plain dumb luck that makes a ship lucky or cursed. Certain ships seem to attract all sorts of bad things like icebergs, kamikazes or torpedoes. And there are other ships which could go thru a curtain of steel and high explosive and emerge without scratching the paint.
In reality, luck is really in the eye of the beholder. Sometimes luck is just a matter of surviving and then the Prinz Eugen, the only major Nazi Germany warship to serve thru out World War Two and survive intact, was the luckiest of them all.
The Prinz Eugen was an 18,000 ton “super” heavy cruiser laid down at the Krupp Kiel shipyards in 1936 and launched in 1938, but not commissioned till August 1940. She did not start out lucky as she was hit twice by British bombs prior to commissioning in July 1940 as the Battle of Britain warmed up.
During the odd Soviet/Nazi Germany non aggression pact days the Prinz was nearly sold to Stalin’s Navy, but was retained after some sober second thought. She spent most of 1940 and early 1941 training her crew. Just a month before she went on her first combat cruise, the Prinz Eugen was unlucky again as she hit a British mine during a training exercise.
In May 1941, the newly repaired
Prinz Eugen sailed with the Bismark on a commerce raiding mission into the North
Sea only to be chased by the entire Royal Navy’s Home Fleet in a battle that
would be immortalized in song, word and film. On May 24, the battlecruiser HMS
Hood and battleship HMS Prince of Wales engaged the Bismark and Prinz Eugen in
what would be called the Battle of the Denmark Strait (which was the first
combat for all of the participants involved.)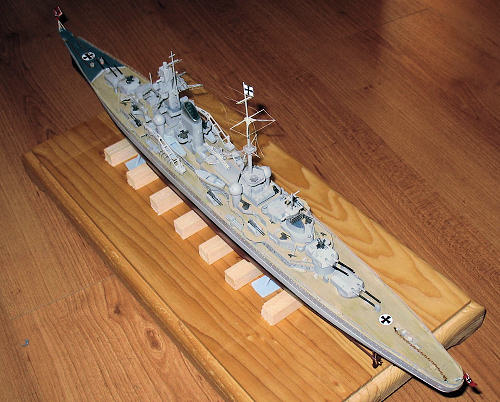
As most of us know, the Battle of the Denmark Strait proved to be fatal for the HMS Hood which blew up due to a cordite fire caused by a shell from the Bismark. After the Hood blew up, the two German ships concentrated their fire on the Prince of Wales and damaged her enough to disengage from the fight. The battle was not one sided as the Bismark took what appeared to be a minor hit from the Prince of Wales that caused one of her fuel bunkers to leak. It was decided that the Prinz Eugen would act as a decoy to try and draw off the Brits from the Bismark. The decoy didn’t work well as seen in the exciting conclusion of the 1961 movie “Sink the Bismark”.
The Prinz Eugen found herself trapped in the French Port of Brest till February of 1942 when the German Navy ordered the Prinz Eugen and the battlecruisers Scharnhorst and Gneisenau to return to Germany in the famed Channel Dash. The German ships returned to Germany despite the best efforts of the British. They did not return intact as the Scharnhorst and Gneisenau were damaged by mines and the Prinz Eugen was damaged by a submarine torpedo.
The Prinz Eugen would not see major action till she was assigned to the Baltic Fleet as part of the Second Task Force in June of 1944. Instead of offensive action, the Second Task Force was tasked to provide long range artillery support for the retreating German Armies of the Eastern Front. It was during this time that the Soviets launched their major land offensive which would destroy Army Group Centre and signaled the beginning of the end for the Germans on the Eastern Front.
There were no naval battles at this point in the war as the Soviet Navy was more of a danger to itself than the Germans. Instead, most of the combat centered on fire support missions, artillery duels with Soviet guns and defending against Soviet air attacks. Despite the lack of naval action, the combat was very intense.
At the end of the war, the Prinz Eugen surrendered to the British and was transferred to the US Navy for study in December of 1945. In 1946, she was sent to Bikini Atoll where she was used as a nuclear target and sunk in December 1946.
Most of the information came from http://www.prinzeugen.com/PGHistory.htm
The Prinz Eugen was my first naval build in over 18 years and it would be my first ever “contract” build model. My friend had purchased the kit some 3 years earlier to build it as gift for his father. My friend soon discovered that he had neither the time nor the inclination to build the ship and asked me to build it for him as we had beers at our local hangout. I guess it was a combination of the beer in the system, my desire build something different than aircraft and his offer of an expensive steak dinner with several good German Beers that caused me to accept.
As my ship building skills were non existent and out of date, I spent several days researching on the net reading over the various ship reviews, FAQs, histories of the Prinz Eugen and queried MM’s local ship experten, Len Roberto, with various questions regarding the Heller kit.
More Historical Background
 This model of the Prinz Eugen was
built form my friend’s father, Jakob, who was assigned to the Prinz Eugen as a
17 year old AA gunner/plank owner and served aboard her thru the entire war.
This model of the Prinz Eugen was
built form my friend’s father, Jakob, who was assigned to the Prinz Eugen as a
17 year old AA gunner/plank owner and served aboard her thru the entire war.
Like many veterans, he didn’t speak too much about his war experiences (and I don’t blame him.) Only some several decades after the events happened did he speak about them to his friends and family. From what I was told 2nd hand by his family is that he witnessed the destruction of the Hood, survived the Channel Dash, watched his gun captain die from a cannon shell that came thru the gun sight opening of the gun shield and knows he helped shoot down a couple of Russian planes.
My friend’s father is now 83 and in the winter of his life. Originally, this to be built for his birthday in May, but I missed that deadline when I lost a month of weekends thanks to problems at work. Then I missed Father’s Day thanks to headaches doing the deck fittings.
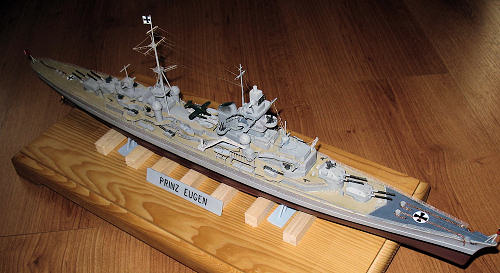
I finally finished it during the last week of June and handed it to my friend on Canada Day, July 1, 2006, some 6 months and 160-180 hours of work put into it.
| THE KIT |
The Prinz Eugen Heller 1/400 kit is the only large scale model of the Prinz Eugen that I know of. It consists of some 160 parts, a decal sheet and two lengths of jewelry chain for the anchors. From what I understand, Heller has discontinued it.
| CONSTRUCTION |
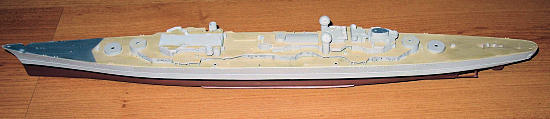 I started the hull off first. The
two hull pieces and braces went together, but there was a lot of flash and gaps
to be filled and sanded down. Afterwards, I spent several days drilling out the
port holes on the sides of the hull. It was certainly a dull task, but it
improved the look of the ship as the molded in port holes don’t look so good.
I started the hull off first. The
two hull pieces and braces went together, but there was a lot of flash and gaps
to be filled and sanded down. Afterwards, I spent several days drilling out the
port holes on the sides of the hull. It was certainly a dull task, but it
improved the look of the ship as the molded in port holes don’t look so good.
The deck went down next. This is where I ran into some poor fit and gap issues. I did not want to rescribe the deck so using super glue to act as gap filler was out of the question. I ended up using Mr Surfacer 500 and 1000 to fill in the gaps and Q-Tips soaked with Mr Thinner to remove the excess all around where the deck meets the hull.
| COLORS & MARKINGS |
I airbrushed Tamiya XF-19 Sky Grey (which is close enough to Kriegsmarine Battleship Grey) first. I’ve noticed that many ship builders would spray down the deck first, but I opted to do the grey parts first primarily because I didn’t want to mask down the deck to do the grey parts. I masked off the grey parts which used a lot less masking tape before I painted the deck.
The deck was sprayed with Tamiya
Buff. I don’t really like the color of Tamiya Deck Tan and prefer the more
yellowish Buff. I’m not a real color nazi (yet) so I went with what I felt
looked best. To give the deck a more wood feel, I mixed up several different
subtle shades of Buff (made from mixing red, yellow, white, and grey into the
Buff) and hand painted them. I also made a small
 template from plastic card
that I taped over the deck in various places and airbrushed Deck Tan and USAF
Tan. The best to way to do the deck is to make most of the color variations
very subtle and not over do the contrasting colors. It is so easy to type up,
but the reality was that it took me almost a month to paint the various portions
of the deck to my satisfaction.
template from plastic card
that I taped over the deck in various places and airbrushed Deck Tan and USAF
Tan. The best to way to do the deck is to make most of the color variations
very subtle and not over do the contrasting colors. It is so easy to type up,
but the reality was that it took me almost a month to paint the various portions
of the deck to my satisfaction.
The foredeck was painted with Acryl German Blue Grey as stated in the instructions.
I then masked off the upper portions of the hull and painted the bottom of the hull using Testors’ Marine Acryl Kriegsmarine Red. I needed several really thin coats to get the color I wanted.
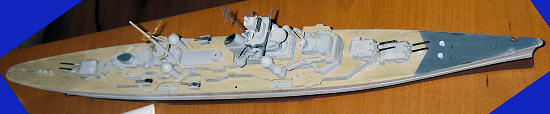
The painting on the Heller box shows the Prinz Eugen with the blue grey and off white bands in a dazzle pattern. Fortunately, I discovered that this pattern was removed just before the Prinz Eugen sailed off with the Bismark. For once being lazy meant being accurate! It was my intent to paint the Prinz Eugen as it arrived at the French Port of Brest.
Construction 2nd Phase (March-April 2006)
Meanwhile I started on building the superstructure and the gun turrets. I had made the conscious decision to use photo etch to make the ship look better. I noticed that real warship decks were cluttered to varying degrees and that is not captured well on ship models. I picked up the White Ensign photo etch set for the Prinz Eugen and Hipper.
I replaced the molded on hatches and
port holes of the superstructure parts with photo etched pieces. One of the
drawbacks to the White Ensign Prinz Eugen class photo etch was not enough
portholes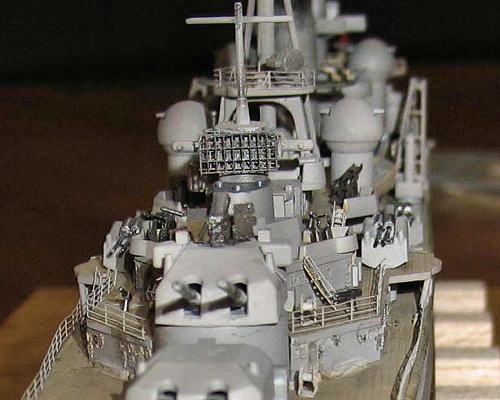 . After some desperate hunting on the web and forums, I found that
White Ensign Kriegsmarine portholes and hatches set. By the time I was done, I
had replaced all the portholes and hatches. Tedious? YES! Necessary? Yes!
. After some desperate hunting on the web and forums, I found that
White Ensign Kriegsmarine portholes and hatches set. By the time I was done, I
had replaced all the portholes and hatches. Tedious? YES! Necessary? Yes!
I started on the superstructure parts and added photo etch where appropriate. The most difficult part of the superstructure was the funnel as it had the worst fit of all the parts in the entire kit.
Painting 2nd Phase (March-April 2006)
The superstructure decks were painted the same way as I described how I did the main deck.
The sides of the superstructure were painted XF-19 Grey. When the paint was dry, I ran a really thin dark watercolor wash over the photo etdh parts to bring out the detail and sealed them with Gunze Flat Coat.
Once the superstructure pieces were assembled, I turned to painting them using XF-19 Grey and Testor’s Marine Acryl Kriegsmarine Blue Grey. The superstructure assembly highlighted the weaknesses in the instructions which highlighted paint callouts in the weirdest places. I did spray a couple of the areas before I realized that this was stupid and stopped. I ended up repainting the affected areas.
Construction 3rd Phase (Late April 2006)
I glued the upper deck levels together and glued them to the main deck. The Heller parts don’t have the greatest fit in the world (which Len Roberto warned me about) so I took my time with each layer of the decks to the hull. Tamiya extra thin glue proved its worth as I ran a thin bead along the glue surfaces and squeezed the parts together.
The superstructure pieces were installed the same way. It looked like I was going to be on schedule. That was till I ran into the twin schedule killing buzzsaws of work and PITA nature of photo etch.
| FINAL CONSTRUCTION |
 The Heller made deck rails and anti
aircraft guns were to say the least, awful which is a major reason why I forked
out dough for the White Ensign set.
The Heller made deck rails and anti
aircraft guns were to say the least, awful which is a major reason why I forked
out dough for the White Ensign set.
I discovered that I really do not like the photo etched anti-aircraft guns even though they looked much better than the original kit parts. I was supremely frustrated and cross eyed after spending many hours trying to move delicate pieces of photo etch together so that they would give an appearance of being a 20mm or 37mm AA gun. It also did not help that the CA glue I used did not grab well to the metal and I had to rebuild the guns numerous times when the parts fell off. I used the kit single barrel 20mm guns as I finally had enough and stayed away from the uber detailed photo etch AA guns.
The rest of the small bits (including cranes, lifeboats and the AR-196 float plane) were done in the same state of frustration.
The main guns were easy to assemble as I drilled out the gun barrels and added to the detail by sanding off the molded on ladders and put photo etch ladders on instead. I sprayed the turrets gray and hand painted the gun barrels steel.
The construction dragged on and on as I had to deal with all the tiny bits, but the photo etch railings proved to be the least of my problems.
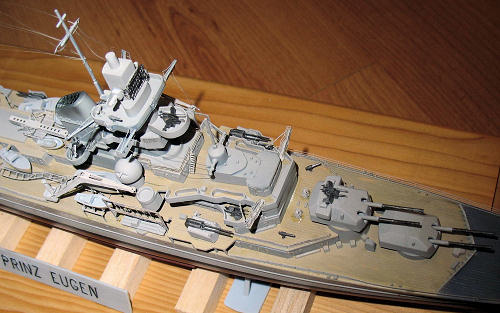
My major disappointment with the
build is with the radio aerials. I tried several ways of doing it, but the only
one that was sort of successful was thin aluminum wire. However, I had problems
with the wire kinking and it was not as straight as I wanted it be (as you can
see in the photos.) I did what I could, but I wish it had turned out better
than it did.
I bought a precut maple plaque for the display. I was originally going to mount the ship on brass bushings, but the fragile nature of the two piece hull prevented that (ending with the frantic repairing of a poorly drilled hole.) Instead I used the two piece kit stand with various cuts of balsa glued to the plaque.
Decals
Heller provides a decal sheet of over sized and out of register decals including the flags. I threw out most of the sheet and only used the flags, aircraft identifier and Prinz Eugen’s coat of arms decals. If you do get your hands on this kit, please use another decal sheet as this one is just awful. As you can probably notice in the photos, the flags aren’t aligned properly because they stuck together and there was nothing I could easily do to pry them apart without ripping them apart.
| CONCLUSIONS |
The ship was wrought with headaches with the various photo etch details, the poorly done radio aerials, flags and the one month delay. There were numerous times that I wondered if I was an idiot for taking this contract.
The day after I brought it over, I received a call from my friend who said his father got very emotional and was very pleased when he received the Prinz Eugen from his family at dinner.
In the end, despite my problems with the kit, my friend’s father’s reaction made the build worth all the headaches.
August 2006
If you would like your product reviewed fairly and quickly, please contact me or see other details in the Note to Contributors.