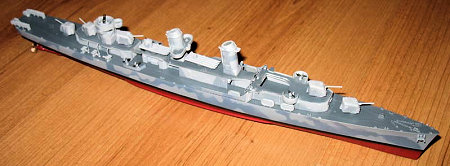
Tamiya 1/350 USS Fletcher
| KIT: | Tamiya 1/350 USS Fletcher |
| KIT #: | 78012 |
| PRICE: | $36.00 MSRP |
| DECALS: | Four options |
| REVIEWER: | Dan Lee |
| NOTES: | Eduard photo etch set used |
| HISTORY |
The Battle: “Odd ships fire to starboard. Even ships fire to port.”
The night of November 13, 1942 saw one of the fiercest night actions in naval history. Five cruisers and eight destroyers from two US Navy task forces, under the overall command of Rear Admiral Daniel Callahan (with R Adm Norman Scott attached), were ordered to defend the island of Guadalcanal aka Cactus at all costs. The reason for this was US Navy code breakers found out that the Imperial Japanese Navy sent a task force of 13 destroyers, one light cruiser and two battleships to bombard Henderson Field in an attempt to destroy the Cactus Air Force located on Henderson Field. The bombardment was planned as a night action due to the fact that the Cactus Air Force (consisting of the 1st Marine Air Wing with some Navy and Army squadrons based on Guadalcanal) had a nasty habit of sinking any Japanese ship within the range of its aircraft during the daytime.
There was some controversy over who should have had command of the task force due to the fact that Daniel Callahan commanded a desk for two years and had no combat experience. He was only given the slot because he was the senior admiral (by a few weeks) over Norman Scott, who, unlike Callahan, had (successful) combat experience against the Japanese and was familiar with the capabilities of his ships.
Unfortunately, this inexperience showed up when Callahan organized his task force formation by placing his best radar equipped ships (the light cruiser Helena and destroyer Fletcher) and his most experienced destroyer captain (captain of the Aaron Ward) to the rear of his line formation. Despite the theoretical advantages of radar, the US Navy had a hard time fighting the Japanese at night. The major reason for this was the Imperial Japanese Navy was the best trained Navy at night naval gunnery and had superb night optics. These proved to be more reliable compared to the US Navy’s temperamental SC series radars which equipped the majority of Callahan’s ships with the exceptions being the (much more reliable) SG radar equipped Helena and Fletcher.
Any Japanese numerical and firepower advantage was offset by the mistakes of the Japanese task force commander, Admiral Abe. He had assumed that he would be making the bombardment unopposed (his battleships were initially equipped with HE shells and not AP ones) and had spread out his ships in an inverted V formation which was only used in good daylight and weather conditions.
 That night, the Americans spotted
the Japanese first, for a change, and turned north to meet them in an attempt to
cross the Japanese formation’s T. This maneuver failed as intended due to the
sudden appearance of bad weather which caused both formations to stumble into
each other.
That night, the Americans spotted
the Japanese first, for a change, and turned north to meet them in an attempt to
cross the Japanese formation’s T. This maneuver failed as intended due to the
sudden appearance of bad weather which caused both formations to stumble into
each other.
The destroyer Cushing confirmed the contacts were Japanese and asked the San Francisco for permission to open fire, but Callahan refused because he was unsure of where his ships were. By the time Callahan finally ordered his ships to fire, the Americans were within point blank range of Abe’s battleships.
This began a savage wild melee unseen since the days of sail. Callahan’s lead destroyer division engaged the battleship Hiei, light cruiser Nagara and several destroyers with gunfire and torpedoes at point blank range. Witnesses state that the USS Laffey got so close to the Hiei that the Japanese battleship could not depress her 14 inch battery down enough to fire back while the Laffey fired everything she had at the battleship including her 40mm and 20mm AA guns to deadly effect—a 20mm burst killed Abe’s Chief of Staff.
Despite inflicting some damage to the Hiei, the lead destroyer division was basically wiped out. The destroyers Cushing and Laffey were sunk during the fierce fight while the Sterret and the O’Bannon were damaged (the Sterret was battered to a barely floating wreck) and disengaged from the battle.
Callahan’s cruisers engaged next. The first in line was the USS Atlanta which was a light cruiser designed to be a floating AA battery (her main battery was 16 5 inch DP guns) and not intended to be used in ship to ship combat. She was shattered by numerous Japanese shell hits, but was fatally damaged by several 8 inch salvos from the San Francisco during the confusion. These 8 inch shells killed Rear Admiral Norman Scott (who was awarded the Medal of Honor for this battle and his actions at the earlier battle of Cape Esperance.)
The USS San Francisco exchanged fire with the Hiei and got the worst of it as she was pounded with several 14 inch and 6 inch hits on her superstructure. Those hits killed Admiral Callahan, most of his staff and the San Francisco’s senior officers (including Medal of Honor (Pearl Harbor) winner Cassin Young), leaving the communications officer in charge of the ship. Four Medals of Honor were given to her crew, two posthumously. One went to Admiral Callahan and the other three were earned saving the San Francisco: Boatswain’s Mate Reinhard Keppler (posthumous), communications officer Bruce McCandless and damage control officer Herb Schonland. The San Francisco steamed out of control for till control was moved to auxiliary control.
The heavy cruiser Portland was hit in the rudder by a Long Lance torpedo that caused her to steam in a circle. Even with limited maneuverability, she still engaged the Hiei with her main battery.
Both the light cruisers Juneau (the
sister ship of the Atlanta) and Helena were damaged. The J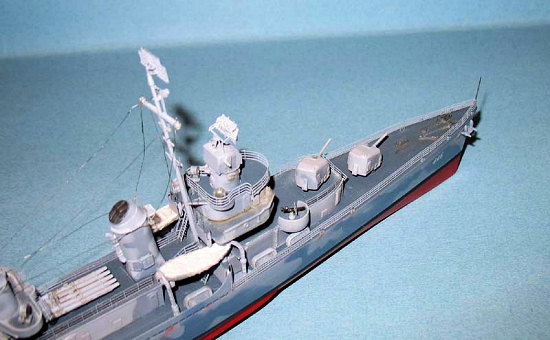 uneau
was crippled by a torpedo hit and the Helena (who proved to be a somewhat
unwilling participant) took some minor shell damage.
uneau
was crippled by a torpedo hit and the Helena (who proved to be a somewhat
unwilling participant) took some minor shell damage.
The trailing destroyer division fought just as fiercely as the lead division. The lead destroyer, the Barton, took two Long Lance torpedo hits and blew up while the next ship in line, the Monssen, opened fired and was destroyed after taking some 40 shell hits. The Aaron Ward fought till she was battered to a wreck and disengaged from the fight. The last ship in the line, Fletcher, continued the fight despite the odds. Some say that she fired the torpedoes which immobilized the Hiei, causing Abe to lose his nerve and order the remaining Japanese ships to retreat back up the Slot.
The Japanese lost only one destroyer outright in the battle, but left behind two crippled destroyers and the immobilized battleship Hiei in Iron Bottom Sound while the Americans lost the Atlanta and four destroyers with four cruisers and three destroyers were damaged and only the USS Fletcher emerged from battle undamaged. Her crew, sailors being a deeply superstitious bunch, gave her the nickname “Lucky 13.” The 13 came from a combination of her pennant number 445 (4+4+5) and the fact she was the 13th ship in the line on the 13th day of the month (how’s that for numerology!)
The day of November 14th proved costly for both sides as the night of November 13th did. The Japanese lost the crippled destroyer Yudachi (destroyed by gunfire from the Portland) and the battleship Hiei which sank from the bombs and torpedoes of Enterprise’s Air Group 10 and the Cactus Air Force—she was the first Japanese BB lost in WW2. The retreating survivors of Callahan’s task force watched the light cruiser Juneau (and the five Sullivan brothers) blow up from a Japanese submarine fired torpedo hit. The Cactus Air Force also took a major loss when they lost USMC Colonel (and ace) “Indian” Joe Bauer (who recently became the Cactus Air Force Fighter Commander and Medal of Honor winner) during a strafing attack on a Japanese destroyer at the end of the day.
 Despite the heavy losses and tactical
blunders, the US Navy won strategically because they stopped the Japanese goal
of bombarding Guadalcanal and Henderson Field (the most important piece of real
estate in the South Pacific in 1942.) This defeat would prove costly to the
Japanese a couple of days later as the largely untouched aircraft of Henderson
field destroyed most of a large Japanese troop convoy carrying a division of
troops trying to reinforce/resupply the starving Japanese forces at
Guadalcanal. Yamamoto was so furious when he learned of the battle that he all
but kicked Abe into forced retirement.
Despite the heavy losses and tactical
blunders, the US Navy won strategically because they stopped the Japanese goal
of bombarding Guadalcanal and Henderson Field (the most important piece of real
estate in the South Pacific in 1942.) This defeat would prove costly to the
Japanese a couple of days later as the largely untouched aircraft of Henderson
field destroyed most of a large Japanese troop convoy carrying a division of
troops trying to reinforce/resupply the starving Japanese forces at
Guadalcanal. Yamamoto was so furious when he learned of the battle that he all
but kicked Abe into forced retirement.
There has been some controversy due to Callahan’s tactical mistakes. Some recent books have tried to salvage Callahan’s reputation, right or wrong. Personally, I think that Callahan’s mistakes compounded an already tough tactical situation, but any role in this the naval close quarters gun fight was small because he and his staff died so early in the battle. Unfortunately, I’ve read some internet commentary on this battle from some folks who firmly believe in the “leaders-can-do-no-wrong” meme and credit this bloody victory to Callahan while conveniently ignoring the fact that the Nov 13/14 battle of Guadalcanal was won by the surface sailors who fought so fiercely and paid so dearly to stop the bombardment of Henderson Field (as stated by notable historians such as Thomas Miller and Samuel Morrison.)
The Class
The Fletcher class was the largest destroyer class ever built for the US Navy, consisting of a total of 175 destroyers. This class was the first US destroyer design to reflect some of the WW2 combat realities and exceed the tonnage limitations set down by the defunct Washington Naval Treaty.
Designed in 1940 and first launched in May 1942, the Fletchers were roughly 2100 tons empty (2900 with full displacement), carried a standard compliment of 330 officers and men with a top speed of 36 knots. Their main battery was five single 5 inch/38 caliber DP gun turrets, ten 21inch torpedo tubes, depth charges and several 40mm and 20mm AA guns and equipped with various surface and air search radars, and sonar.
The Fletchers proved their worth time and time again in battle. The most shining example was the pivotal moment of the Battle of Leyte Gulf in October 1944, where three Fletcher class destroyers and a pair of Destroyer Escorts defended Taffy 3, a squadron of escort carriers, and the Samar beachhead from the Imperial Japanese Navy’s Main Battle Fleet (including the world’s largest battleship, Yamato.) The price of victory was high as the escort carrier Gambier Bay, two Fletcher class DDs (the Hoel and Johnston) and a DE (the Samuel Roberts) were sunk.
During the battle of Okinawa, the Kamikazes proved to be a dangerous threat to the carriers, transports and battleships. In response, many destroyers (among them Fletchers) were tasked as radar pickets (a more PR friendly term than Kamikaze lure) off Okinawa. It would be understatement to say that destroyer crews paid a price for the “honor” of being a radar picket (which might explain why the more cynical crews put up signs that said “Carriers This Wayà.”)
By the end of the war, nineteen Fletchers were sunk in battle while six others were scrapped due to heavy battle damage.
The Ship
 The USS Fletcher DD445 participated
in the many of the savage naval battles and fire support missions up and down
the Solomon Island chain after the first naval battle of Guadalcanal (even
sinking a submarine) and lived up to her nickname by not taking a hit due to
enemy fire.
The USS Fletcher DD445 participated
in the many of the savage naval battles and fire support missions up and down
the Solomon Island chain after the first naval battle of Guadalcanal (even
sinking a submarine) and lived up to her nickname by not taking a hit due to
enemy fire.
After the Solomon campaign ended, the Fletcher was assigned to shore bombardment duties during invasion of Tarawa and escorted Halsey’s carrier groups during some of their air raids on the Marshall Islands. In January 1944, she was assigned to the 7th Fleet aka MacArthur’s Navy where she provided bombardment and escort for the ‘gator Navy.
Lucky 13 remained lucky till Feb 1945 when she fought a Japanese shore battery (actually a captured American shore gun) and took a 6 inch shell hit in the bow. She remained with the 7th Fleet till May 1945 when she sent back for refit for the upcoming invasion of Japan during which time, her nickname evolved from Lucky 13 to Fighting Fletcher.
After the war, the Fletcher was decommissioned and kept in mothballs till 1949 when she was modified to be an ASW destroyer escort. It was in this capacity that she served until 1969 when she was decommissioned for the last time. Unfortunately, she was too far modernized to be a museum ship and was sold to a Taiwanese salvager for scrap in 1972.
| THE KIT |
Tamiya released the 1/350 scale USS Fletcher in 1996. It continued Tamiya’s tradition of well engineered and manufactured ship kits. It was unusual for a model ship as destroyers aka tin cans aka little boys rarely get made as injection mold kits compared to aircraft carriers and battleships.
The parts are free of flash (with the exception of mold lines) and come in Tamiya’s hard dark grey plastic. Also included is a decal sheet including the flags (to be blunt, paper flags would work better even though they are out of scale.)
| CONSTRUCTION |
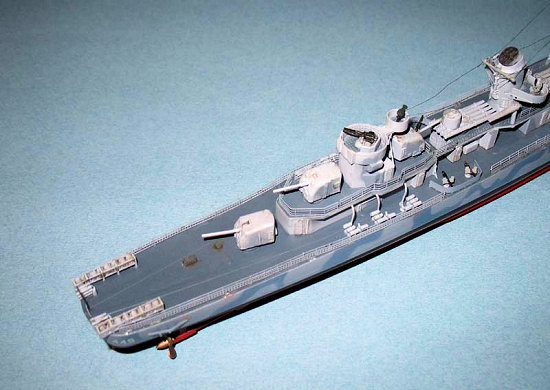
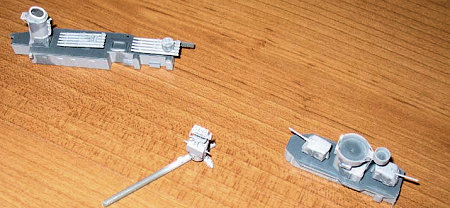
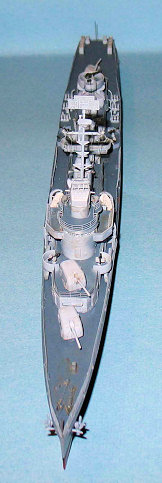
In my limited experience, ship kits require one to assemble and paint the sub assemblies before final assembly. In that process, I started off with the armament. Tamiya supplies six 5 inch turrets (3 per gate) which helped me as I screwed up one of the guns and used the spare. I cut off the plastic gun barrels and replaced them with cut same lengths (using a Dremel cutting disk) of Mini Mecha steel tubing to improve the look. I drilled out the mantels and glued each barrel with a drop of CA glue. The remaining plastic parts were glued together and I ended up having to fill and sand the turret sidewalls as there were small, but noticeable gaps. I bought the Eduard PE set for this model and they really do improve the look of the parts especially the deck fittings, railing and radars. I removed attached the various hatches and ladders to the turrets with slow setting CA glue. I have to admit that this took a while as the hatches were rather small and a slight breeze would send the part to the floor.
The torpedo tubes were next. I decided not to use all the torpedo tube PE with the exception of the hatches and ladders as I did not think it was worth the effort required.
 Once done, I turned my attention to
the hull which was the easiest part of construction. I took the deck and glued
it to the hull and then used some Mr Surfacer to fill in any tiny gaps with the
excess removed with lacquer thinner. The rudder and propeller shafts were glued
on to aid in painting and the props themselves would be added later.
Once done, I turned my attention to
the hull which was the easiest part of construction. I took the deck and glued
it to the hull and then used some Mr Surfacer to fill in any tiny gaps with the
excess removed with lacquer thinner. The rudder and propeller shafts were glued
on to aid in painting and the props themselves would be added later.
The mid ships and aft superstructure was a little more problematic because there was some sanding and filling that needed to be done, especially when the port piece met the starboard piece. However, it was nothing too tough and the volume of swear words was pretty low. FYI, all 5 inch guns and torpedo tubes are mounted using poly caps. The watertight doors and ladders were replaced with PE ones (attached with a tiny drop of CA glue.)
The lower bridge superstructure was
a little more difficult as I replaced the plastic shields
 that are located just aft of
the bridge tower (I don’t know what you call those bits) with the PE parts.
It took some careful cutting and adjustment to get things aligned. Even
then I had to fiddle with it when I attached it to the hull. This is the
one area where I kind of regretted using PE.
that are located just aft of
the bridge tower (I don’t know what you call those bits) with the PE parts.
It took some careful cutting and adjustment to get things aligned. Even
then I had to fiddle with it when I attached it to the hull. This is the
one area where I kind of regretted using PE.
I took the time to drill out the bridge portholes and nearly messed things up by not watching my alignment. It took some time to correct my mistakes.
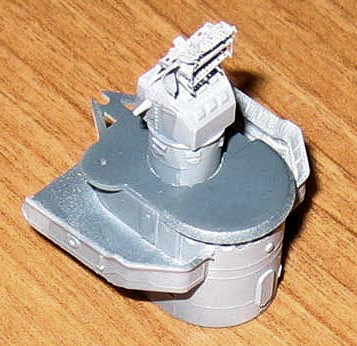
I turned my attention to the fire control director/radar which is mounted on top of the bridge. The plastic portion was simple to do. The Eduard PE fret includes all the pieces for open or closed ports and hatches for the FC director. I opted for the easier and less crazy route and closed everything up (which would not be the case in the steamy South Pacific.) The FC radar took some bending and folding, but it wasn’t anything out of the ordinary if you are experienced with PE. It was glued together with CA glue and white glue. The difference between the plastic part and the PE parts is considerable and worth the extra effort.
The funnels were actually the trickiest part of construction as careful filling and sanding were required so as not to remove the detail. Also, the searchlight deck on the aft funnel included some PE bracing which drove me nuts as I had a habit of breaking them off when I picked it up.
With construction of the major sub assemblies done, it was time to paint it.
| COLORS & MARKINGS |
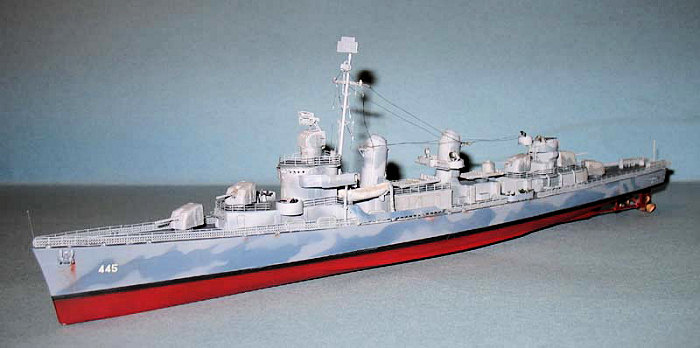
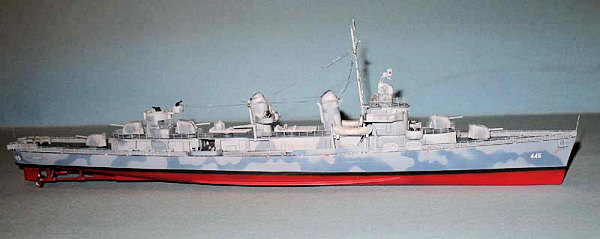
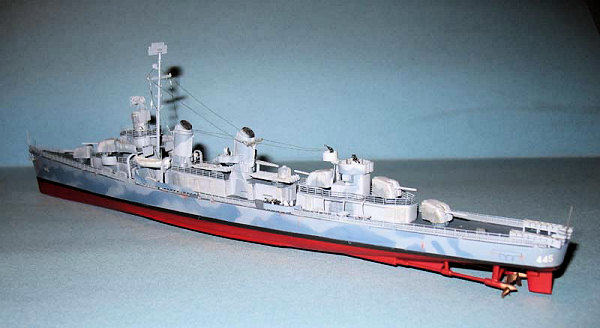
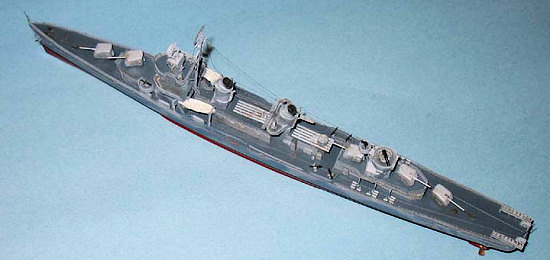
I decided to use the paint scheme from the box. It seems to me that Tamiya has had a habit of not explaining the historical significance of the model’s markings. In this case, the box scheme for this model is what the USS Fletcher wore during those desperate days of the Guadalcanal Campaign.
I knew that painting this model would not be easy due to the complexity of the paint scheme. I decided to be smart and spray on the basic paint scheme first:
Hull topside—Ocean Grey
Hull bottom—US Hull Red
Deck—US Deck Blue
Superstructure—US Haze Grey
 I sprayed the deck and topside hull
first because it did not require any masking, just some careful spraying. At
this point, I though that the paint job would be less difficult than I thought.
Well the universe has a habit of kicking me in the head when I start thinking
like that. I masked off the hull with a combination of Tamiya and 3M Blue and
sprayed on the US Hull Red which is much brighter than the Tamiya Hull Red.
When I pulled off the tape, I was annoyed to discover much of my work was peeled
off. I nearly halted the project right there, but I remembered I had a
solution. I took some regular masking tape and pressed it all over the hull to
remove any loosened paint (and there was a lot.) I then washed the model, took
it to the garage and sprayed on Tamiya Fine White Primer on all the sub
assemblies including the upper works and gun turrets. I normally don’t prime my
models (I find it for the most part unnecessary and I’m lazy), but I wasn’t
going to take any more chances with the fragile nature of MM Acryl. In my
experience, when I’ve had the odd paint lifting problem some Tamiya primer fixes
it for good.
I sprayed the deck and topside hull
first because it did not require any masking, just some careful spraying. At
this point, I though that the paint job would be less difficult than I thought.
Well the universe has a habit of kicking me in the head when I start thinking
like that. I masked off the hull with a combination of Tamiya and 3M Blue and
sprayed on the US Hull Red which is much brighter than the Tamiya Hull Red.
When I pulled off the tape, I was annoyed to discover much of my work was peeled
off. I nearly halted the project right there, but I remembered I had a
solution. I took some regular masking tape and pressed it all over the hull to
remove any loosened paint (and there was a lot.) I then washed the model, took
it to the garage and sprayed on Tamiya Fine White Primer on all the sub
assemblies including the upper works and gun turrets. I normally don’t prime my
models (I find it for the most part unnecessary and I’m lazy), but I wasn’t
going to take any more chances with the fragile nature of MM Acryl. In my
experience, when I’ve had the odd paint lifting problem some Tamiya primer fixes
it for good.
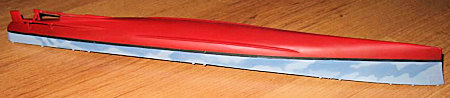
After some light sanding with polishing pads for some of the more grainy areas, I painted all over again. The model was masked several times as the hull and decks were painted with Deck Blue, the upper hull with Ocean Grey and the lower hull with US Hull Red. The demarcation line was painted using Gunze Flat Black. This time the paint did not peel off.
 The upper works and gun turrets were
sprayed with Haze Grey and then set aside till I could figure out how to paint
the topside camo pattern. I came up with the brilliant plan to brush paint it
and started doing some of the superstructure. This was okay till I realized
that the Ocean Grey was darker on the superstructure than it was on the hull
(probably due to minute leftover quantities of other paint on the brush.) This
meant so much for plan A (again.)
The upper works and gun turrets were
sprayed with Haze Grey and then set aside till I could figure out how to paint
the topside camo pattern. I came up with the brilliant plan to brush paint it
and started doing some of the superstructure. This was okay till I realized
that the Ocean Grey was darker on the superstructure than it was on the hull
(probably due to minute leftover quantities of other paint on the brush.) This
meant so much for plan A (again.)
I set the kit aside for a while to think about Plan B and decided to use an airbrush and masks for the Sea Blue on the side of the hull. I made a photo copy of the paint instructions and cut out masks. I secured them with Tamiya Tape and blobs of Blue Tack. I decided to use a soft mask instead of a hard one because it was easier to manage. I sprayed on slight lightened (for the scale effect) Gunze Non Specular Sea Blue on the hull. The paint edges were not sharp, but I could live with that. In my fantasy world, the sea blue would be worn around the edges due to the harsh South Pacific climate although I suspect that in reality the US Navy maintained the paint scheme.
For the upper works, I went with a combination of Plan A and Plan B which involved a mix of carefully brush painting and spraying with Ocean Grey. I did not want to mask such a difficult surface and used the brush to get the pattern and sprayed with the airbrush at low pressure and well thinned paint to make the colors the same as the hull. Yes, the paint edges aren’t as sharp as they should be, but I can live with it.
All the deck and hull fittings were painted Haze Grey or Ocean Grey depending on where they were located on the ship.
The only decals were the hull numbers. I did not use a gloss coat and simply used Solvaset to get the decals to snuggle to the hull.
| FINAL CONSTRUCTION |
 I have found for me that the best
approach to build a ship is to treat it like you would make a layer cake. Each
layer must be completely assembled before moving on to the next one. For
obvious reasons, I started with the first deck of the superstructure which
proved to be painless. I used white glue to fill any noticeable gaps between
the superstructure and the deck. I went with white glue instead of Mr Surfacer
because I did not want to redo the paint job. Unless you look at it real close
(basically close enough to get your eyes poked out by the gun barrels) then you
might be able to notice it.
I have found for me that the best
approach to build a ship is to treat it like you would make a layer cake. Each
layer must be completely assembled before moving on to the next one. For
obvious reasons, I started with the first deck of the superstructure which
proved to be painless. I used white glue to fill any noticeable gaps between
the superstructure and the deck. I went with white glue instead of Mr Surfacer
because I did not want to redo the paint job. Unless you look at it real close
(basically close enough to get your eyes poked out by the gun barrels) then you
might be able to notice it.
The funnels were next. Make sure that you get the funnel alignment correct or you will have one funny looking ship. I found out the hard way (big surprise) with the aft funnel as the search light deck was off angle and I had to remount it a couple of times before I got it right.
Once the main superstructure was done, I inserted the main guns and torpedo tubes into place (they use poly caps to hold them in.)
I worked on the AA guns and depth charges. This took longer than expected as I lost one of the depth charge racks and did not find it till two weeks later buried in another model box. The parts were painted Haze Grey and the guns were painted with gunmetal (although flat black probably could have worked just as well.) I added the PE gun shields to the 20mm guns and like the FC radar, the PE dramatically improved the look. All the bits were glued in using Tamiya thin liquid glue.
I followed the Eduard instruction to modify the mainmast with PE. This proves the worth of getting a PE set as the main mast looks so much better with PE than without. I glued the mainmast in place and then glued the bridge in place.
Now with all the major assemblies on, the remaining deck fittings were added such as the lifeboats and crane.
The next step was to glue the PE railings to the Fletcher using white glue. I learned the hard way in an earlier build that CA glue that it is not the best choice. White glue is a lot more forgiving and can be removed easily with a moistened fingertip or Q-tip. Plus it is flexible enough to deal with the contraction/expansion of PE due to temperature unlike CA glue. In my experience attaching the railings is more tedious than painful. It just involves careful bending and lots of patience. It took me a couple of weeks to complete the railing.
Finally, I wanted to do the radio aerials. I used the box art as my placement guide as both the Tamiya and Eduard instructions don’t have any details.
I’ve said this many times, but I am not very good with radio aerials, but it does not stop me from trying (hopefully, I’ll figure it out.) I began by cutting a piece of brass wire (same length as the largest spar) and added four lengths of very thin aluminum wire (with equal distance between them) that have a loop at one end. A tiny drop of white glue held each of the lengths in place and I let it dry before gluing (CA glue) this to the main mast and painting it with Haze Grey. The wires were then attached to the bridge, cut and brush painted with thinned Tamiya NATO Black.
 The trickier part was the making the
radio wires between the funnels. I cut another piece of brass wire and glued
two lengths of aluminum wire it in the same fashion as the mast wire. I super
glued it to the fore funnel and then wrapped the lengths around the spar of the
aft funnel. They were held in place with white glue and trimmed to fit. I had
to adjust it several times to get it to “stretch” out and look (sort of)
straight.
The trickier part was the making the
radio wires between the funnels. I cut another piece of brass wire and glued
two lengths of aluminum wire it in the same fashion as the mast wire. I super
glued it to the fore funnel and then wrapped the lengths around the spar of the
aft funnel. They were held in place with white glue and trimmed to fit. I had
to adjust it several times to get it to “stretch” out and look (sort of)
straight.
The remaining aerials were done in a similar fashion. There are only so many times one can write cut wire, loop at one end, glue, straighten, glue, trim and paint black.
I used some white glue to attach pre cut pieces of toilet paper to the top of the Fletcher’s boats to represent the canvas covers. I ended up breaking the flag masts for the Fletcher so I used cut lengths of painted brass wire instead and opted not to use the flag decals.
The final touches done to the model involved a very light water color wash with some areas done with Mig Red Earth powder to represent rust for weathering. I used a flat coat to hide all the glue marks, seal the decals and weather and I was finally done this model.
| CONCLUSIONS |
I enjoyed building the Tamiya Fletcher and reading the history on this oft neglected (in the model community) subject. Obviously there are many things that can be improved (as with all my models) but I have not become that skilled of a modeler and this is as good as it is going to get.
As a child, I loved building the battlewagons and carriers (mostly for their play value), but as a taller balder child I find myself drawn to building these unsung “tin cans.” I have to admit that I’m looking forward to the 1/350 Trumpeter San Francisco cruiser release next year.
I recommend this kit as a starter kit for anyone who has an interest and desire in building 1/350 scale ships, but not done so. The kit is free of vices and has the bonus of being small enough to fit on any display shelf unlike 1/350 BBs and CVs.
January 2008
If you would like your product reviewed fairly and quickly, please contact me or see other details in the Note to Contributors.