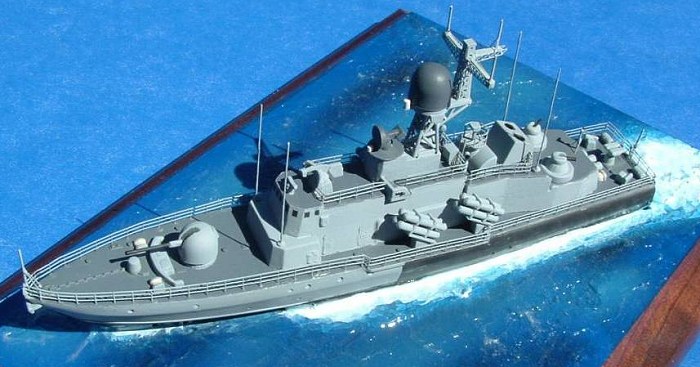
Mirage 1/400 Projekt 1241.8 Missile Corvette
|
KIT # |
40422 |
|
PRICE: |
$9.98 |
|
DECALS: |
See review |
|
REVIEWER: |
Charles Landrum |
|
NOTES: |
|
HISTORY |
The Projekt 1241.8 corvette (referring to the design project number of the shipyard) was yet another attempt by the Russian Arms industry to take cold war era platforms and update them for export sale in a bid to stay solvent in a changing Russian economy. In the west the missile corvettes built on this hull form were given the NATO designation TARANTUL; the TARANTUL has primarily been an export hull. The US Navy was even a brief operator of the TARANTUL. The ex-HINDENSEE of the German Democratic Republic was given to the US after the unification of Germany (She is now a museum ship in Fall River, MA). The latest variant of the TARANTUL series, the Projekt 1241.8 offered updated electronics and a battery of sixteen SS-N-25 anti-ship missiles (NATO nickname “Switchblade”). Despite these upgrades, the only buyer has been the Indian Navy.
|
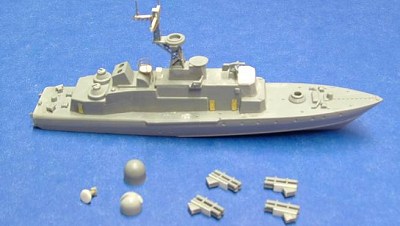
THE KIT |
 Research is
hard to come by on this particular vessel, although a lot of information
is available on the earlier variants. The only detailed pictures
available on the web are those released by the Indian Navy. Since I would
rather build an operational ship, I chose to build this kit as an Indian
Naval Ship, the INS PRALAYA (K91) which was Laid Down - 02 May
1998, Launched - 14 Dec 2000, and commissioned - 18 Dec 2002. She was
built at the Goa Ship Yard from plating and a CKD (Completely Knocked
Down) kit supplied by the Russians. There are
differences between the prototype and the Indian version, so I had to
deviate from the kit and make several configuration changes to the model
to make an accurate replica.
Research is
hard to come by on this particular vessel, although a lot of information
is available on the earlier variants. The only detailed pictures
available on the web are those released by the Indian Navy. Since I would
rather build an operational ship, I chose to build this kit as an Indian
Naval Ship, the INS PRALAYA (K91) which was Laid Down - 02 May
1998, Launched - 14 Dec 2000, and commissioned - 18 Dec 2002. She was
built at the Goa Ship Yard from plating and a CKD (Completely Knocked
Down) kit supplied by the Russians. There are
differences between the prototype and the Indian version, so I had to
deviate from the kit and make several configuration changes to the model
to make an accurate replica.
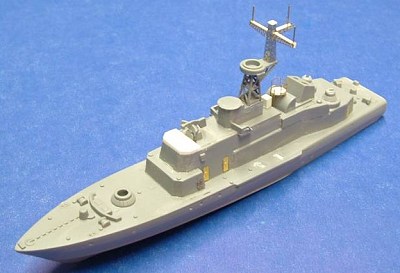
Mirage’s offering is a typical low-pressure injection molded kit. The detail is good and pretty crisp, but the plastic is softer and has a slightly rougher finish. As near as I can tell, Mirage provides parts for every variant of the TARANTUL in this kit, but only provides instructions specific to the 1241.8, so you will end up with a lot of spares for other projects. The kit does not come with any photo-etch (PE), nor do I know of an available dedicated set. So be prepared to buy a generic set or dip into your spares.
|
CONSTRUCTION |
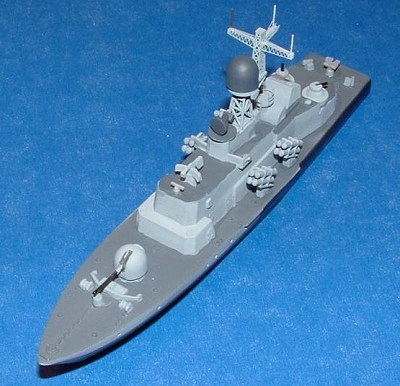
I started the model as a full-hulled vessel. This is the only option provided in the kit. It was a quick build up to put the two hull halves together, add the main deck and the major superstructure components. I found the softer plastic easy to glue with liquid cement (I prefer Ambroid pro-weld). However, the plastic easily gouged when worked with a file, sandpaper or a knife, and so I spent a lot of time actually correcting my own ham-handedness.
 As I built up the
deckhouse, I noticed a few things I needed to correct to make an accurate
Indian Navy version. First the top of the bridge should be raised above
the adjacent deck (at least in this variant) and so I cut a piece of
.04inch strip of styrene to give this area the proper height. I also
removed unwanted ECM platforms and reworked the forward radar platform
just aft of the bridge. I also added a manual director platform just aft
of the mast. The platform was made but punching a .010inch disk with a
commercial paper hole punch.
As I built up the
deckhouse, I noticed a few things I needed to correct to make an accurate
Indian Navy version. First the top of the bridge should be raised above
the adjacent deck (at least in this variant) and so I cut a piece of
.04inch strip of styrene to give this area the proper height. I also
removed unwanted ECM platforms and reworked the forward radar platform
just aft of the bridge. I also added a manual director platform just aft
of the mast. The platform was made but punching a .010inch disk with a
commercial paper hole punch.
As this point I decided that I wanted to waterline the ship and built it underway to match one of the reference photos. There is no guide for waterlining the model other than the recessed waterline. However, I couldn’t just cut along the at-rest waterline. These vessels, like many cabin cruisers, tend to plane at high speeds with a noticeable squat aft. So to depict the vessel at higher speeds I needed a new waterline. Trying to cut down the hull with a razor saw and still achieving a straight waterline seemed too hard. Since it is a small model, I chose to sand down the hull with 150 grit sandpaper laid on a hard Formica tabletop. Being careful to hold the model upright, I slowly sanded away most of the lower hull. The technique worked well and gave me straight operational waterline.
PRALAYA is COGAG, combined gas turbines. She cruises at lower speed on small gas turbines, the outlet of which is below the missile tubes at the waterline (which is why the hull is black at this point, to hide the exhaust stains). At higher speeds larger gas turbines are engaged, which exhaust via two large doors in the transom. On the kit these are molded close. I chose to open them. I did so by nearly slicing them off using a new Xacto blade. Here the soft plastic was an advantage. I worked toward the hinge and was able to “peel” way the door, bending open on the hinge line. I then drilled open the exhaust port.
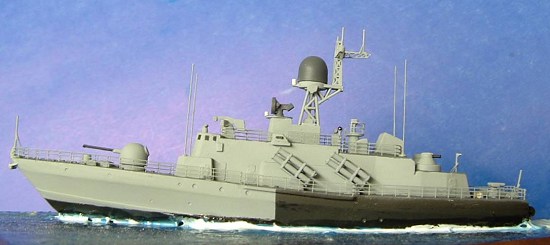
 Next came the mast.
The mast on PRALAYA
is noticeably different than the prototype ship, so I made major
modifications here. My model is close to replicating the appearance, but
not perfect. I used the kit’s base lattice assembly and center
wave-guide. The upper lattice mast aft of the radome, came from a 1/700
PE set by Gold Medal Miniatures (GMM). It is the lattice mast from a KNOX
Class frigate. The lattice yardarms came from the very ends of the aerial
spreaders from the GMM 1/350 PE ARIZONA set. Styrene and brass wire
finished the job.
Next came the mast.
The mast on PRALAYA
is noticeably different than the prototype ship, so I made major
modifications here. My model is close to replicating the appearance, but
not perfect. I used the kit’s base lattice assembly and center
wave-guide. The upper lattice mast aft of the radome, came from a 1/700
PE set by Gold Medal Miniatures (GMM). It is the lattice mast from a KNOX
Class frigate. The lattice yardarms came from the very ends of the aerial
spreaders from the GMM 1/350 PE ARIZONA set. Styrene and brass wire
finished the job.
I then added smaller details to the model that I could paint in place. These included PE brass watertight doors, the two search radars and the decoy launchers on the fantail. The Indian variant carries the older ADMG 630 Gatling cannons. This is where Mirage’s approach to providing all of the parts for every variant in a single kit is helpful. I used the mounts provided but not called out in the instructions. I left the barrels off until later. I added spare railing and a ladder to the manual director platform aft. The stack I drilled out and inserted coffee stirring straws for the pipes.
 PRALAYA is formidably
armed for such a small vessel. Its anti-ship missiles are carried in four
quad launchers. Mirage would have you glue two quad tubes onto a base and
mount a base at each waist location. This might ease assembly but gives
you an unrealistic raised deck in that area. I thought of cutting off the
bases and gluing them to the deck, but each suffers from terrible
sinkholes. So I made new bases from thick styrene strip and attached the
missile tubes, with a mounting plate made from .010 styrene sandwiched in
between. PRALAYA
carries an Oto Melara unmanned 76mm gun vice the standard Russian manned
76mm. Unfortunately there is none provided in the kit, nor could I find
one. So I made the Oto Melara 76mm from scratch. I used the rounded end
of a 1/48 scale bomb as the basic shape. I sanded the dome a little
flatter and filed a groove for the barrel chase. I added a thin disk of
styrene shaved from a sprue for the bump out at the back of the housing
and added a barrel from styrene rod. Finally, The Indian variant uses a
different gun fire control director. I found one that was close in
appearance in my spares box and modified it accordingly. All of these
assemblies were left off for painting.
PRALAYA is formidably
armed for such a small vessel. Its anti-ship missiles are carried in four
quad launchers. Mirage would have you glue two quad tubes onto a base and
mount a base at each waist location. This might ease assembly but gives
you an unrealistic raised deck in that area. I thought of cutting off the
bases and gluing them to the deck, but each suffers from terrible
sinkholes. So I made new bases from thick styrene strip and attached the
missile tubes, with a mounting plate made from .010 styrene sandwiched in
between. PRALAYA
carries an Oto Melara unmanned 76mm gun vice the standard Russian manned
76mm. Unfortunately there is none provided in the kit, nor could I find
one. So I made the Oto Melara 76mm from scratch. I used the rounded end
of a 1/48 scale bomb as the basic shape. I sanded the dome a little
flatter and filed a groove for the barrel chase. I added a thin disk of
styrene shaved from a sprue for the bump out at the back of the housing
and added a barrel from styrene rod. Finally, The Indian variant uses a
different gun fire control director. I found one that was close in
appearance in my spares box and modified it accordingly. All of these
assemblies were left off for painting.
|
COLORS AND MARKINGS |
 The Indian Navy did
not follow standard Russian paint schemes for this class of ship. From
the photographs it looks closer to US Navy Haze Gray, so I airbrushed
Model Master Neutral Gray (FS 36270, the same number as Haze Gray). After
it dried I was dissatisfied with the color match, it was too brown. I
re-sprayed the ship with MM Light Ghost Gray (FS 36475) - this was the
color I was looking for. I also painted the gun and missile tubes. I
painted the large radome and gun fire control director MM Engine Gray.
After I allowed the paint to fully cure, I masked and sprayed the decks
MM Gunship Gray (FS 36118). Later I masked and sprayed the boot topping
and after hull flat black.
The Indian Navy did
not follow standard Russian paint schemes for this class of ship. From
the photographs it looks closer to US Navy Haze Gray, so I airbrushed
Model Master Neutral Gray (FS 36270, the same number as Haze Gray). After
it dried I was dissatisfied with the color match, it was too brown. I
re-sprayed the ship with MM Light Ghost Gray (FS 36475) - this was the
color I was looking for. I also painted the gun and missile tubes. I
painted the large radome and gun fire control director MM Engine Gray.
After I allowed the paint to fully cure, I masked and sprayed the decks
MM Gunship Gray (FS 36118). Later I masked and sprayed the boot topping
and after hull flat black.
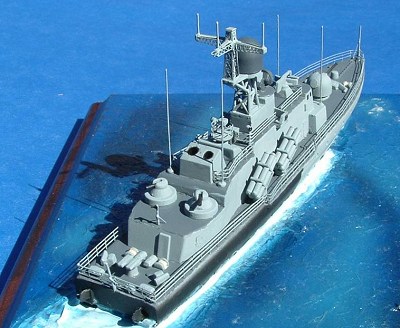
As for markings, the only marking PRALAYA carries is a hull number below the bridge. Not having the appropriate font or size letters and numbers, I have left the hull numbers off for now. The bridge windows were made by cutting small rectangles from a strip of black decal film.
|
FINAL CONSTRUCTION |
With the basic painting done it was time to add the armament and miscellaneous details. The whip antennas were made from straight brass wire, as were the flagstaff, jackstaff and stern light. I added signal lights made from fine wire and barrels cut from styrene rod. I also added the small Electronic Counter Measure (ECM) domes to the antenna platforms. I brush painted the details.
I then added the PE
railings. I sprayed them light ghost gray while they were still on the
fret. I use gap filling slow setting CA to attach the PE to the hull.
This CA is in a gel form and tends not to run everywhere and gives more
tack. The key to adding PE railing is patience, a steel rule to help keep
the railing plumb and even and a bottle of CA accelerator handy to
quickly tack one end of the railing down if it gives you fits. I apply
the accelerator w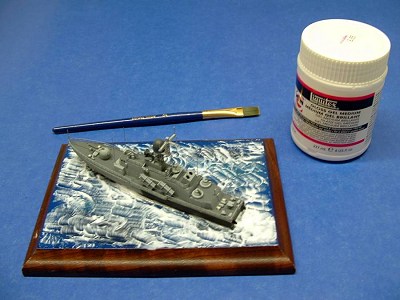 ith
an inexpensive draftsman’s inking tool. I used a paintbrush to touch-up
the railings as required.
ith
an inexpensive draftsman’s inking tool. I used a paintbrush to touch-up
the railings as required.
As a final measure I gave the ship a coat of flat finish using MM enamel flat lacquer. This helps give the model a more uniform appearance and removes the sheen left by CA. It will flatten the sheen of simulated glass, so you will have to go back and touch up these areas with gloss.
I chose to display the model underway at higher speed. I used an old plaque backing for the base. I started by painting the base with dark blue enamel. When it was dry, I added the illusion of depth by airbrushing black and lighter shades of blue. I attached the model with two-part epoxy. I then used acrylic gloss medium to create waves and turbulence. This took several coats to get sufficient relief along the hull and in the wake. I then used the base color of blue successively lightened with white, finishing with semi-gloss white in the wake, to add and blend in the wake and frothing along the hull.
|
CONCLUSIONS |
 I found this to be a
fun model to assemble. I went a bit overboard by converting the model,
but out-of-the-box this series of models is an accurate representation of
this class of vessel with lots of available variants to build. If you
haven’t built a ship model before, this would be a good kit to start
with. If you are an experienced ship modeler, this kit provides a good
basis for a lot of super-detailing. Just remember that the plastic is
softer, easier to shape but and more easily gouged. Highly recommended.
I found this to be a
fun model to assemble. I went a bit overboard by converting the model,
but out-of-the-box this series of models is an accurate representation of
this class of vessel with lots of available variants to build. If you
haven’t built a ship model before, this would be a good kit to start
with. If you are an experienced ship modeler, this kit provides a good
basis for a lot of super-detailing. Just remember that the plastic is
softer, easier to shape but and more easily gouged. Highly recommended.
|
REFERENCES |
http://www.bharat-rakshak.com/NAVY/Veer.html - Unofficial Indian Navy Site
US Naval Institute Combat Fleets of the World
Janes Fighting Ships
April 2004
Copyright ModelingMadness.com
If you would like your product reviewed fairly and fairly quickly, please contact the editor or see other details in the Note to Contributors.