Tamiya(?) 1/700 Yamato
| KIT #: | 31114 |
| PRICE: | $20.00 |
| DECALS: | One option |
| REVIEWER: | Joe Essid |
| NOTES: | Tiny parts but good fit. |
| HISTORY |
Why repeat the history of such a famous battleship? I give you instead my Bildungsroman (yay, I get to use that word) and my encounters along the way with the Yamato class.
First, a kid’s initiation: I became aware of the ship’s distinctive silhouette (from the top) in the early 1970s when playing Avalon Hill’s classic and still very playable Midway. It looked modern and badass. Yamato, accompanying the Midway invasion fleet, rarely sees any action in the game, but the statistics for the battleship impressed a young geek with its 18” main battery and, by 1942 standards, impressive AAA. I then began to read more about the ship.
The various 1/700 battlewagons from Japanese companies at Bob’s Hobby Center were out of my price-range as a kid; I made do with a couple of destroyers, some subs, and two of the Mogami-class cruisers. I still have them all.
In high school I saw Starblazers in syndication, better known around the world as Space Battleship Yamato. Likely inspired by that series, and to my everlasting shame, my 1/700 Musashi from Tamiya got dismantled for parts to build wargaming spaceships. About that time, I took the typical high-school detour from building kits into obsessing over cars and girlfriends, eschewing geeky hobbies until I embarked upon that apex form of geekdom, a PhD program. By then I had resumed model-building at a snail’s pace, including a 1/700 Shinano, the third ship of the class finished as a carrier and sunk on its maiden voyage.
The unmistakably Yamato-based carrier was new to me when Tamiya’s box-art caught my eye at an El Corte Ingles department store in Madrid. I was working in Spain in 1985 and 86; on a meagre teaching salary the Tamiya kit cost a lot. That said, it was fun to build and it reconnected me with the hobby. It also survived shipping home across the Atlantic with only its top mast broken. Then at the famous Rastro flea market, I picked up a Ballantine reprint in Spanish, Richard Humble’s La Float Alta Mar Japonesa. The book simultaneously improved my Spanish reading skills while finally showing how futile a gesture and waste of scarce resources the Yamato class proved, “as obsolete as the Dodo in the age of the modern, carrier-borne strike aircraft” (94).
These ships, a planned class of four vessels, may have done very well in a decisive surface action that Japan planned for early in the war against the American Pacific Fleet, before carrier warfare made such a showdown highly improbable. On the other hand, even the dodos called battleships evolved during the Great Pacific War; had Halsey’s fast battleships with radar met their Japanese nemeses off Leyte in 1944, the outcome for Yamato would have been the same as off Okinawa a year later.
Yet the Admiralty thought otherwise; Humble notes that “Incredible though it was in the light of all the emphatic lessons which had | been taught since Pearl Harbor, battleship mania was still rife in the Japanese Admiralty. There was still hope that somehow, some day, an American fleet would be lured to its doom beneath the crushing power of the big gun” (117). The Japanese seemed have forgotten that the US Pacific Fleet had big guns too, and as in the later actions in the Solomons, American radar would have vanquished the more primitive units that Japan fielded, while the weight of 16” shells that the Americans could have tossed would have doomed the Japanese battleline.
 My reading
about the Yamato
class has never ceased, partly because of the ship’s lines and its mystique. To
quote from the Wikipedia entry, “Historically,
the word ‘Yamato’ was used as a poetic name for Japan; thus, her name became a
metaphor for the end of the Empire of Japan.”
To my eyes as a kid and today, it looks sleeker than its faster US rivals like
Wisconsin,
which I’ve boarded as she’s docked down the road from me in Norfolk. The
Iowa-class
ships are likely the finest fast battleships every constructed, but I’ve a thing
for pagoda-style superstructure, having built the hybrid carrier-battleship
Ise
when I was not hunkered down in the graduate stacks at Indiana University.
My reading
about the Yamato
class has never ceased, partly because of the ship’s lines and its mystique. To
quote from the Wikipedia entry, “Historically,
the word ‘Yamato’ was used as a poetic name for Japan; thus, her name became a
metaphor for the end of the Empire of Japan.”
To my eyes as a kid and today, it looks sleeker than its faster US rivals like
Wisconsin,
which I’ve boarded as she’s docked down the road from me in Norfolk. The
Iowa-class
ships are likely the finest fast battleships every constructed, but I’ve a thing
for pagoda-style superstructure, having built the hybrid carrier-battleship
Ise
when I was not hunkered down in the graduate stacks at Indiana University.
During my half-century cruise with the Yamato class, along the way I learned that I needed to 1) Repaint Shinano correctly, which will be the subject of a future review, 2) Build another Musashi and 3) Build a Yamato. The story of need #3 begins there.
| THE KIT |
I had misgivings, in my 60s and with less-than-perfect eyesight, about returning to 1/700 scale. I’d labored a decade ago over a Dragon USS Pennsylvania, a very nice but fiddly kit. I’m better with PE parts now, but it was a struggle, one that convinced me that it must have been the eyes of youth that made those Waterline-series ships of the 1970s relatively easy.
With trepidation and a magnifying glass, I scored a Yamato for $20 with shipping via eBay. When it arrived, I had to look in the box, and I found to my surprise a straightforward model with far fewer pieces than the Dragon kit. Molded in medium gray on several sprues, with a set of small decals and a waterline hull, Yamato looked as easy as I recalled.
This kit emphasizes a 1944 refit, but all the parts are present to build up a 1942 Yamato if one wishes and knows the ship. The seaplanes are far better than the ones I recall from the 1970s, and there are other tiny details to show that my kit is the retooled one released in 1998. Maybe that accounted for the good price; Scalemates shows a reissue with detail-up parts in 2009.
The big battlewagon did not stay in the stash long.
| CONSTRUCTION |
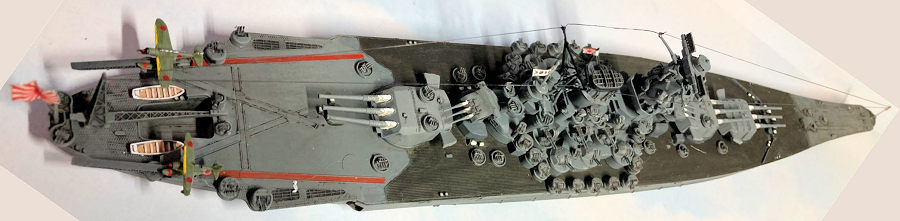
I planned to show Yamato late-war but just before her death-ride to Okinawa. I wanted ship’s boats and aircraft present and not the ugly and rather desperate sandbags piled around the triple-machinegun installations on deck and atop two of the turrets.
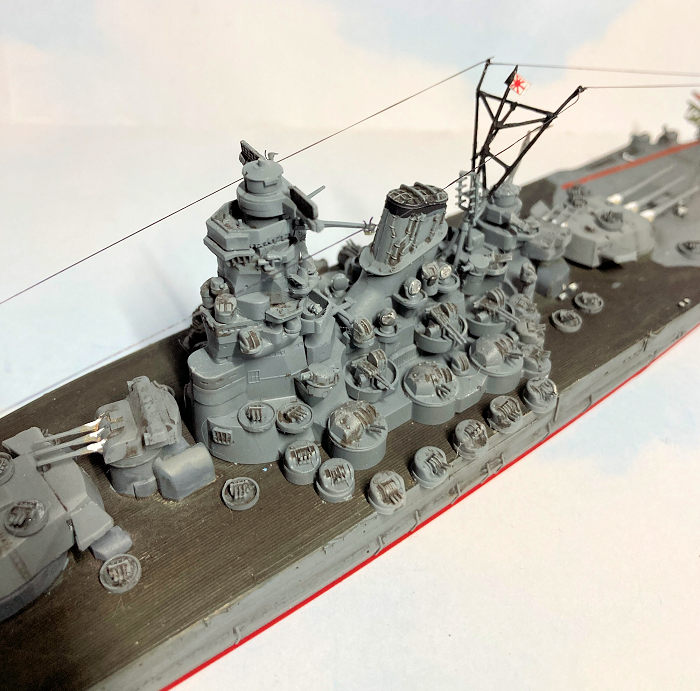
I began with the impressive superstructure, which presents no problems if, to quote Tom Cleaver, one actually takes the time to perform the radical act of following the instructions.
Tom, I failed.
Luckily, mine were minor gaffs. The kit has several types of mounts for the heavier AA armament, so take note carefully of part numbers. Tamiya has parts that look nearly identical but are not; some fit specially on the superstructure and others fit on the sides of the hull. Of course I messed this up, but as I’d used CA and not plastic cement, the switch was painless.
 Tamiya’s
plastic does not “fall together,” but my kit had no flash and once I cleaned up
any remaining tabs from the sprues, everything fit as well as it had on my
Musashi
so long ago. I broke one small part but made a replacement as I worked my way
aft from the place where the superstructure would go at the end. As I got to the
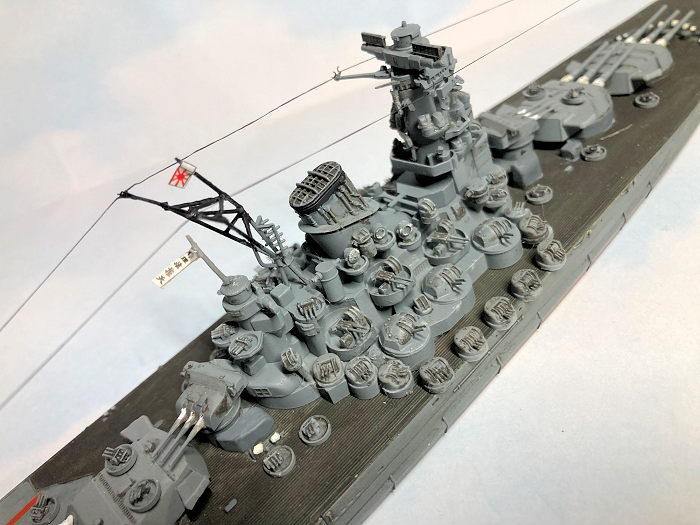
stern, I put down AA guns and other deck gear and gave them pin washes of Flory
Dark Dirt to make the uniformly gray kit pop.
Tamiya’s
plastic does not “fall together,” but my kit had no flash and once I cleaned up
any remaining tabs from the sprues, everything fit as well as it had on my
Musashi
so long ago. I broke one small part but made a replacement as I worked my way
aft from the place where the superstructure would go at the end. As I got to the
stern, I put down AA guns and other deck gear and gave them pin washes of Flory
Dark Dirt to make the uniformly gray kit pop.
It’s essential to take one’s time and work in good light. Otherwise, a tiny part can go flying and land somewhere far downrange. While the kit has some extras, the supply is not infinite. I lost 3 sets of barrels for the high-angle triple guns, so I had to fabricate replacements, ironically, from quad 40mm AA batteries for an Essex-class carrier that had been included on sprues in Dragon’s Pennsylvania kit.
Too late in the build I read how another shipbuilder sticks tiny pieces on a sprue or in need of trimming to masking tape. This brilliant idea saved me further losses from flying parts. I still broke both the bow and stern flagpoles. New ones came from stretched sprue.
The fiddly steps involved the masts behind the pagoda, and I worked on them quite a lot to get them level and solidly attached. One L-shaped small piece vanished, and I fabricated a replacement from stretched sprue bent while still warm. Later that MIA piece turned up mysteriously on the modeling bench. The seaplanes were tough, especially the Pete. These tiny aircraft look great, but the Pete’s wingtip floats were nearly invisible to me. I took them off the sprues after sticking them to masking tape. With some patience I got one stuck down. The other tiny float vanished in the air, but I had an extra.
The kit gives the option of posing up to four aircraft. I chose to have two ready to go on the catapults and called it done.
| COLORS & MARKINGS |
As I’ve often read here, paint a ship before building, unlike with an aircraft. I sprayed everything except the water-line red bottom hull with a rattle-can of Tamiya Kure Gray.
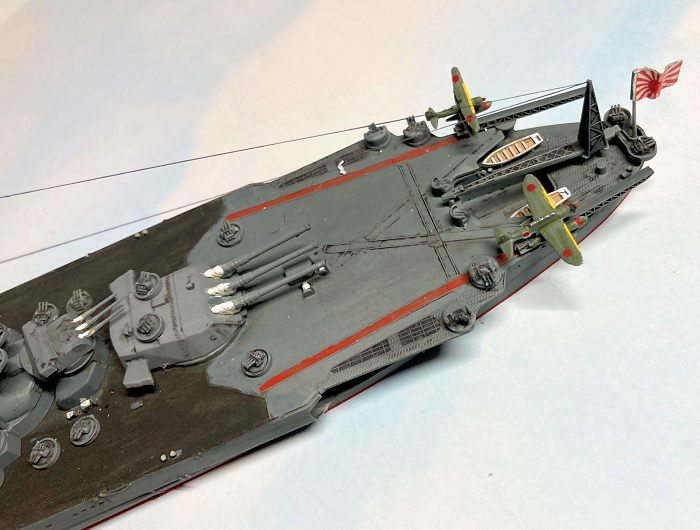
My second mistake was also easily mended. I masked the “metal” portions of the deck before I began adding guns and other accessories, then brushed on Tamiya Deck Tan. That shade would still be wrong for a 1942 build, as hikoki cypress used for the ship’s deck seasons to a grayish brown. In April 1945, however, the ship’s deck got stained with a dark concoction that included soot from the funnel.
This change made the ship less visible from the air, and to my eye, a much more sinister- looking warship. After contemplating scraping soot out of our woodstove, I turned to Flory Dark Dirt Wash, brushing on several coats. Flory’s washes are easily removed if one overdoes it. The process took a while, but that gave me time to add washes to the superstructure the remaining deck, except a brick-red stripe on either side of the flight deck, laid down with a small flat brush and an art-store red oxide acrylic thinned with water.
 The deck,
when done, looks almost as dark as the late-war
Pennsylvania’s
blue-painted teak (my old man spoke in my head, from his Navy experience, “if it
ain’t moving, paint it). Putting the two vessels side-by-side shows a clear
difference.
The deck,
when done, looks almost as dark as the late-war
Pennsylvania’s
blue-painted teak (my old man spoke in my head, from his Navy experience, “if it
ain’t moving, paint it). Putting the two vessels side-by-side shows a clear
difference.
I then dry-brushed all the gray parts to make the detail pop. Then Tamiya Flat and some Artist’s Pencil in silver for the anchor-chains. I figured a ship as important as Yamato would not leave port with the chains rusty. While I was at it, I gave the Pennsylvania the same treatment plus a few touchups, as it has always looked too monochromatic to me.
For the ship’s boats, I painted them white with wooden decking, while monoplane and biplane got painted IJN green, decaled with tiny hinomaru, then positioned on the catapults. Then at last I attached the superstructure and gave it all one more coat of flat.
Some EZ-Line rigging (I only ran a few lines to add interest; Yamato had a LOT of rigging) and the few decals and flags included in the kit made everything complete. To get the flags to “wave” I mounted them with white glue on aluminum foil, then bent that to the shape I wanted. My thanks to the Yamato-builder of a 1/350 example (I’ve misplaced the reference) who wrote about that technique.
My photos reveal a few more areas to touch up, a benefit of shooting photos of a kit you think finished!
| CONCLUSIONS |
This build was a most satisfying trip down memory lane. I recommend the old Waterline series to anyone but beginners, as long as you follow the advice about small parts. An impressive fleet of warships will result, and for often these older kits can be had for reasonable money, a marked contrast to their relative cost for a kid in the 1970s.
A Tamiya Musashi from the 1998 retooling sits in the stash now, to be built in her mid-war appearance with the cypress decking showing its original color. I’m also feeling the need for a 1942-fit Yamato as well as a pair of Iowa-class ships to put beside a Tamiya USS Enterprise also my stash.
Now I only need a 1/700 Admiral Bull Halsey.
Editor's Note: I encourage article writers to let me know who makes the kit they are building as well as the scale. Most do, but sometimes this info is lacking. It is almost as if they haven't read the article requirements. I'm not The Great Karnak so help me out in this regard.
| REFERENCES |
https://en.wikipedia.org/wiki/Japanese_battleship_Yamato
Humble, R. The Japanese High-Seas Fleet. New York: Ballantine, 1973. Free and searchable online at https://archive.org/details/japanesehighseas0000rich
27 May 2025
Copyright ModelingMadness.com. All rights reserved. No reproduction in part or in whole without express permission.
If you would like your product reviewed fairly and fairly quickly, please contact the editor or see other details in the Note to Contributors.