MiniHobby 1/200 Type IXc U-boat 'U-511'
| KIT #: | ? |
| PRICE: | AUD$3.00 |
| DECALS: | None |
| REVIEWER: | Peter Hobbins |
| NOTES: | Includes stand and battery operated motor. |
| HISTORY |
While the far more numerous Type VII
U-boats played havoc with Allied shipping along the European coast and
around the British Isles, the larger Type IX boats ranged far wider and
created an enormous drain on the Allied war effort. These submarines sank
substantial amounts of Allied (and sometimes neutral) shipping off Africa,
the Americas and even Australia, plus the many sea lanes between them.
Perhaps even more significantly, the simple threat of these attacks
consumed huge 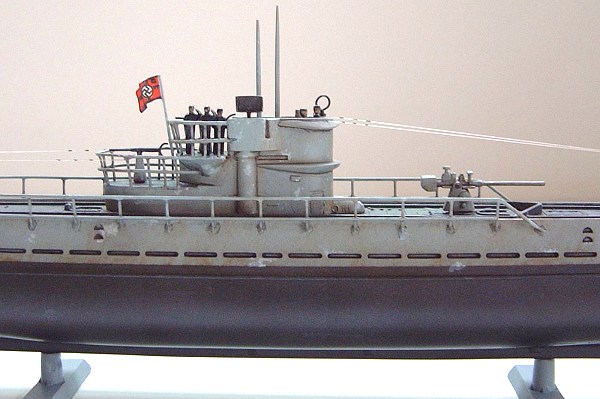 amounts of men and materiel in patrolling and protecting
convoys and coastlines. Even when the ‘mid-Atlantic gap’ had been closed
and the various Allied technical achievements such as radar, Asdic and the
capture of the Enigma machine had substantially reduced the likelihood of
successful attacks, the U-boat threat remained real right up until 1945 –
despite the fact that to embark on a patrol at that stage of the war was
tantamount to suicide for many crews.
amounts of men and materiel in patrolling and protecting
convoys and coastlines. Even when the ‘mid-Atlantic gap’ had been closed
and the various Allied technical achievements such as radar, Asdic and the
capture of the Enigma machine had substantially reduced the likelihood of
successful attacks, the U-boat threat remained real right up until 1945 –
despite the fact that to embark on a patrol at that stage of the war was
tantamount to suicide for many crews.
Although superseded at the end of the war by the revolutionary Type XXI boats, the Type IX was the main long-range submarine operated by the Kriegsmarine and as such made a massive contribution to the German war effort. Several Type IXs have been preserved, including the U-505 which was captured by the US Navy and now resides at the Museum of Science and Technology in Chicago. I was fortunate enough to visit U-505 prior to its recent closure for refurbishment; even a few minutes inside that very much land-bound survivor gives a frightening impression of what it must have been like to go out on patrol for months on end in what is little more than a ‘floating coffin’.
| THE KIT |
This model was one of those quirky eBay purchases that ended up costing me more than I thought; while the kit was only AUD$3 (I was the only bidder), the postage and handling from Singapore was an outrageous $12. It was a double pain because I bought two, and was charged the same postage and handling for each even though they were sent together! The lesson here: check the postage costs first on really cheap kits. Anyways, I bought the kit because I wanted a simple model to practice some submarine painting and weathering techniques on before moving to the Revell 1:72 Type VII, and this model served that purpose well.
 The kit is clearly not a new molding,
but as most of the box and instruction text was in Chinese (which I don’t
read) I couldn’t say much more than that about its heritage. I was
surprised at the overall quality of the shapes and molding of the parts,
including various options such as open/closed torpedo tubes and loading
hatches on the deck. Most of the plastic was a dark gray color but the
below-waterline hull section was molded in deep red. The surface detail of
many sections was commendable and relatively flash-free given the obvious
age of the molds, but smaller details like deck railing and guns were
generally overscale and simplistic. A nice touch was five little 1:200 crew
members! There were no decals and the instructions were on a flimsy
double-sided sheet of A4 paper, featuring adequate but not fantastic
diagrams. You probably won’t be surprised to learn that the kit came with a
small tube of glue, a crummy battery-powered motor to attach to the bottom
of the hull and an incredibly ugly stand. Despite the latter, I was
impressed overall by this cheap kit and it didn’t take me long to get
started on it.
The kit is clearly not a new molding,
but as most of the box and instruction text was in Chinese (which I don’t
read) I couldn’t say much more than that about its heritage. I was
surprised at the overall quality of the shapes and molding of the parts,
including various options such as open/closed torpedo tubes and loading
hatches on the deck. Most of the plastic was a dark gray color but the
below-waterline hull section was molded in deep red. The surface detail of
many sections was commendable and relatively flash-free given the obvious
age of the molds, but smaller details like deck railing and guns were
generally overscale and simplistic. A nice touch was five little 1:200 crew
members! There were no decals and the instructions were on a flimsy
double-sided sheet of A4 paper, featuring adequate but not fantastic
diagrams. You probably won’t be surprised to learn that the kit came with a
small tube of glue, a crummy battery-powered motor to attach to the bottom
of the hull and an incredibly ugly stand. Despite the latter, I was
impressed overall by this cheap kit and it didn’t take me long to get
started on it.
| CONSTRUCTION |
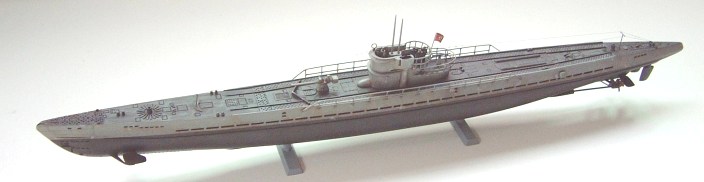
As with most submarine kits, construction was not too difficult. The hull was sensibly engineered so that the upper half was molded as one piece, to which the main deck section could be slotted in (with a little slicing and filling). This then connected to the bottom half at the waterline in a reasonably clean join, except around the rear end where I had to scrape and sand to smooth out the seam. A few sections of decking were tricky and I ended up using some filler in a few gaps, then drilling shallow holes in it to match the remainder of the deck plates. The kit’s v-shaped spray channel that sits forward of the main gun was useless so I made a replacement from plastic card. On the undersides, I had to carve off the motor attachment point from the keel, then add the various vanes and propellers, which were quite fiddly, delicate and not clearly explained in the instructions. I still think there is something wrong with the rudder attachments but can’t quite pick it.
 The conning tower was also problematic
as the pieces didn’t fit together too well, especially on the insides where
the seams are harder to fill. However, being small the process of fixing
this didn’t take too long. A more tiresome process was replacing the
horribly overscale railings on the conning tower and hull sides with some
slightly less overscale plastic rod. This is nowhere near accurate but
served my purposes and didn’t attract too many negative comments when the
model was finished. The main deck cannon is actually quite nicely detailed,
but the anti-aircraft guns certainly needed a bit of work to make them a
little more realistic. Finally, I used the solid radar array even though
this is clearly unrealistic, while the D/F loop is made from wire wrapped
around a paintbrush handle. Oh, I also had to scratchbuild an anchor as the
kit one looked like a rectangular blob of plastic.
The conning tower was also problematic
as the pieces didn’t fit together too well, especially on the insides where
the seams are harder to fill. However, being small the process of fixing
this didn’t take too long. A more tiresome process was replacing the
horribly overscale railings on the conning tower and hull sides with some
slightly less overscale plastic rod. This is nowhere near accurate but
served my purposes and didn’t attract too many negative comments when the
model was finished. The main deck cannon is actually quite nicely detailed,
but the anti-aircraft guns certainly needed a bit of work to make them a
little more realistic. Finally, I used the solid radar array even though
this is clearly unrealistic, while the D/F loop is made from wire wrapped
around a paintbrush handle. Oh, I also had to scratchbuild an anchor as the
kit one looked like a rectangular blob of plastic.
Despite the various gripes, this really wasn’t a hard kit to assemble. The plastic was easy enough to work with and most structures were robust enough to take a bit of carving, sanding and polishing.
| COLORS & MARKINGS |
I found it surprisingly difficult to
find much information on the colors and markings of Type IX U-boats. In the
end I relied a lot upon a very old booklet on the U-505 plus some of the
photos I had taken of it (while not exactly the same configuration as
“U-511” as this kit purports to be, the overall scheme appears similar).
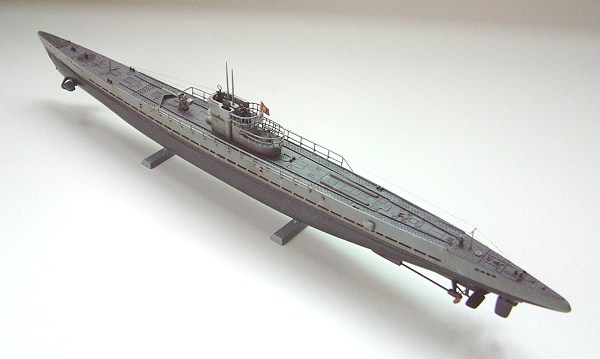
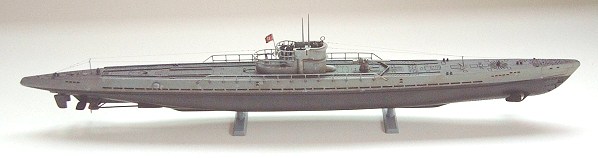
Therefore, I custom-mixed three shades of gray for the U-boat: the dark,
almost black lower surfaces; the pale blue-gray upper hull sides and
conning tower; and a mid-gray for the decking. I sprayed the blue-gray
first, then masked off the upper hull – tricky to get a straight line along
those curves – and sprayed the bottom next. With the masking still in
place, I then placed vertical strips of masking tape at regular intervals
along the lower hull and oversprayed in a lighter color, then moved them
and did it again, then did another run of vertical strips. The effect I was
seeking here was of a patchwork variation in panels (there are no engraved
lines) and it came out
 OK. I then took off the masking and brush-painted
the decking color (otherwise masking the railings, gun and conning tower
would have been a nightmare!). The propellers were also painted bronze at
this point, and a tiny shield decal from the spares box was placed on the
front of the conning tower (this may not have been accurate for U-511 but
similar shields were carried by many U-boats).
OK. I then took off the masking and brush-painted
the decking color (otherwise masking the railings, gun and conning tower
would have been a nightmare!). The propellers were also painted bronze at
this point, and a tiny shield decal from the spares box was placed on the
front of the conning tower (this may not have been accurate for U-511 but
similar shields were carried by many U-boats).
Then the fun really began: weathering. This is what I had built the model for. First, all of the deeper ‘holes’ in the structure – in the deck plating and the drain holes along the hull sides – were all detailed with black watercolor paint from a discount store. Some I had to do twice to give a decent impression of depth. Then I painted over the whole model with a thinned mix of burnt umber artist’s oil paint to bring out some of the panel lines. Using this oil paint, I also carefully built up little ‘rust streaks’ where the spray washed off the deck and where the drain holes would have seen the heaviest wear. I then went back and added chipping and ‘barnacles’ with thinned light gray paint at various areas of wear and tear – the locations were faithful to photos of U-505 at its capture but I underdid the effect rather than overdoing it. Those submarines really copped a beating after a few months on patrol!
This left the finishing touches of rigging with invisible mending thread (including insulators made with beads of superglue), the crew (individually painted so you could tell their front from their back!) and a paper Kriegsmarine ensign which hailed from the set that came with Revell’s ancient series of 1:720 ships. The same source provided a pair of simple stands that were painted a matching gray and attached to two holes drilled into the keel of the U-boat.
| CONCLUSIONS |
I am not normally a ship modeler, but I couldn’t resist the Revell 1:72 Type VII U-boat when it came out. However, to do it justice I felt I needed an opportunity to try out some ideas and techniques on a smaller (and cheaper!) model. This kit – while it may look dodgy from the boxing – was actually quite a fun little build and was even more enjoyable to paint and detail. Whether or not it is accurate to a Type IXc in general or to the U-511 in particular is not something I have checked closely. To me, the main thing was that it came out looking ‘right’ and left me much more confident about tackling the bigger-scale U-boat ‘properly’. Was it worth the $15 I ended up paying for it? If you count my enjoyment in making it, then yes, absolutely.
| REFERENCES |
The Story of the U-505. Chicago: Museum of Science and Technology (booklet).
Stern RC. Type VII U-boats. London: Brockhampton Press, 1998.
My own photographs of U-505 in Chicago (http://apma.org.au/reference/ships/uboatix/u505.html )
December 2004
Copyright ModelingMadness.com. All rights reserved.
If you would like your product reviewed fairly and fairly quickly, please contact the editor or see other details in the Note to Contributors.