| KIT #: | ? |
| PRICE: | $? |
| DECALS: | Name and railings. Paper flagsoptions |
| REVIEWER: | Mark Hiott |
| NOTES: | Molded on railings, good detail, waterline hull. Gold Medal Photoetch set used. |
| HISTORY |
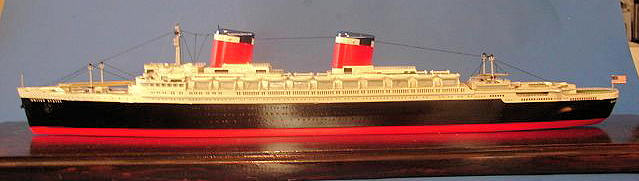
 The S.S. United States
(also known as "The Big U") was built in 1952 for the United States Lines. At
53,329 gross tons, she is the largest ocean liner to date built entirely in the
United States and still holds the record for the fastest westbound transatlantic
crossing. In 1952, on her maiden voyage as the new flagship of the United States
Lines, the S.S. United States captured the Blue Riband with the fastest
eastbound and westbound transatlantic crossings on record (11 July–15 July, 3
days, 12 hours, 12 minutes).
The S.S. United States
(also known as "The Big U") was built in 1952 for the United States Lines. At
53,329 gross tons, she is the largest ocean liner to date built entirely in the
United States and still holds the record for the fastest westbound transatlantic
crossing. In 1952, on her maiden voyage as the new flagship of the United States
Lines, the S.S. United States captured the Blue Riband with the fastest
eastbound and westbound transatlantic crossings on record (11 July–15 July, 3
days, 12 hours, 12 minutes).
The entry of the S.S. United States marked the first time in a century that a U.S.-flagged ship held the Blue Riband, surpassing European speed records which had stood for decades. The S.S. United States lost the eastbound record in 1990, but still holds the westbound record, and remains the fastest ocean liner to cross in either direction. The S.S. United States plied the transatlantic with passenger service until 1969, and she outlasted the demise of her original owners. The ship is currently docked in Philadelphia until a decision is made about her fate.
| THE KIT |
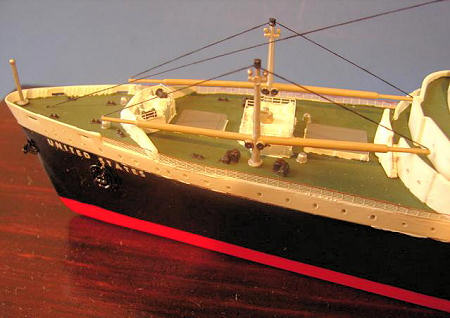
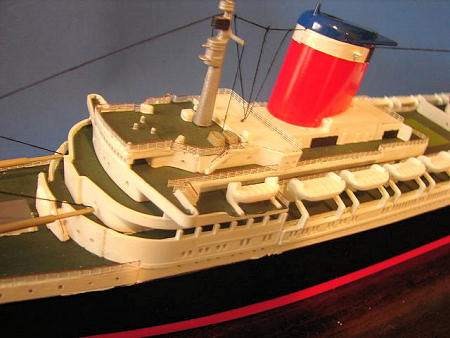
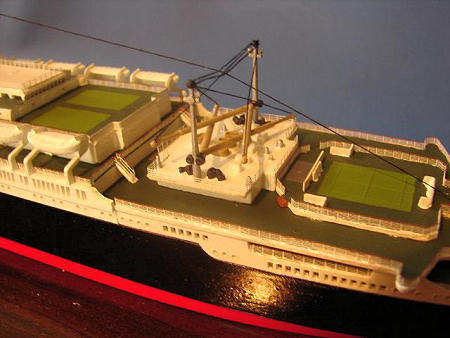
The parts come attached to several sprues and are molded in white. The hull is a water-line type and is one piece, molded in black. All the parts are rather heavy and most have flash on them. The decks have very fine raised lines where the tennis courts are located as well as what appears to be shuffleboard courts!
Instructions are typical Revell, with numbered, illustrated assembly steps. Decals are included for the ship name as well as a sheet of flags.
PHOTOETCH:
 The GMM 1/600 scale Merchant Ship Set provides all the railings,
stair railings and other misc. parts. This set can be used on many other liners
as well. I prefer to paint my ocean liner PE details before installing them.
Paint the entire fret white and allow it to dry overnight. I’m not going to go
into a detailed explanation on how to use these PE parts, as I am sure most of
you have used them at one time or another. I will try to point out things that
are particular to this ship.
The GMM 1/600 scale Merchant Ship Set provides all the railings,
stair railings and other misc. parts. This set can be used on many other liners
as well. I prefer to paint my ocean liner PE details before installing them.
Paint the entire fret white and allow it to dry overnight. I’m not going to go
into a detailed explanation on how to use these PE parts, as I am sure most of
you have used them at one time or another. I will try to point out things that
are particular to this ship.
Once you have removed the PE railing from the fret, measure the deck and bend the rail to shape. I have found that a set of Mechanical Dividers works well for this. Simply use the dividers to measure the deck area and the transfer this to the railing and bend. Test fit the railing several times during the process. After all the rails are in place, touch up any blemishes with a fine tipped brush. The rails are installed in the following manner:
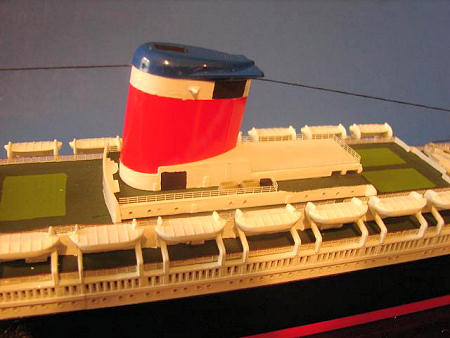
2 bar: Raised area around forward mast and roof of small cabin aft of breakwater3 bar: Part #17 Raised Sun Deck Aft, Part #18 Aft Sports Deck, Parts #22 and #23 fore and aft of funnels
5 bar: All other deck areas
Part #21has 5 bar forward of the bulkhead and 3 bars aft.
All 5 bar railings have a brown top rail.
| CONSTRUCTION |
 The first step is to prepare the model for a Gold Metal Models Photo
Etch set. This means removing
The first step is to prepare the model for a Gold Metal Models Photo
Etch set. This means removing
I have a wood working set that has a small shovel blade that works great for this. This is the best way to remove railing in tight places. Work carefully and try not to remove too much of the deck detail. Don’t worry about right at the deck edge, as the new rails will hide most of it. Pay close attention removing the rails between the lifeboat davits, I broke a couple during the process. Once all the railings are removed we are ready to proceed.
| COLORS & MARKINGS |
I would suggest painting all the decks before assembly. Some of them
can be built in sub-assemblies first. Paint them the appropriate color, then
mask off the decks and paint the superstructure white. All decks are painted
“deck green” except the following parts: the stack deckhouses # 22 and #23, they
are all white. The wheelhouse deck #21 is deck green forward of the bulkhead and
white aft of it. I never could find a color reference for “deck green” so I
ended up using MM Euro Dark Green FS 34092. It was the closest I could come.
More research may be needed, but
 with no good color photos to go on I decided
this was “close enough”.
with no good color photos to go on I decided
this was “close enough”.
Be aware that the funnels are marked “F’ and “A”, Fore and Aft. They are not interchangeable!
| CONCLUSION |
All and all this model is a very nice build, well molded and easy to build. While it looks very nice right out of the box, PE details go along way in improving the appearance. The model is accurate over all, but there are some inaccuracies. While the superstructure is ok, the hull is about 3mm too long. Also the fore deck breakwater is not the correct shape. The hull is also not quite correct in shape but I contribute this to Revells “box scale” for these ships. As I build most of my models OOB I did not correct any of the kits flaws.
If you like Ocean Liners as much as I do or just want a change of pace, then you will love this model.
I highly recommend it
| REFERENCES |
Wikipedia for the history
Photos off the web
May 2009
If you would like your product reviewed fairly and quickly, please contact me or see other details in the Note to Contributors.