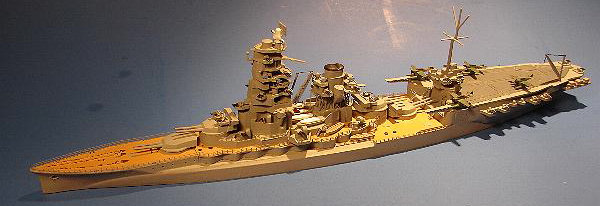
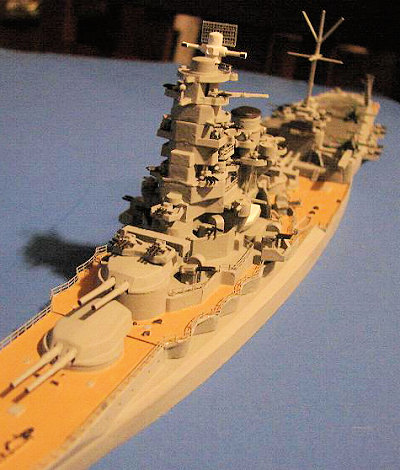
Hasegawa 1/700 Battleship Ise
| KIT #: | ? |
| PRICE: | $37.00 MSRP |
| DECALS: | None in my kit |
| REVIEWER: | Mark Hiott |
| NOTES: | Waterline kit, decent detail, some fiddly parts |
| HISTORY |
The ISE class battleships were laid down in 1915 and designed as modified FUSO class ships. The primary difference between the two was paired turrets for an increase in protection and fire control and a slightly longer ship
 After the Battle of Midway, they were
reconstructed into carrier-battleship hybrids. This was done by the placement of
a short flight deck over the aftermost turrets equipped with strong catapults to
launch planes into the air. However, no aircraft were ever recorded in use on
either ships and their conversion has been thought to be a ploy to fool Allied
forces. Both the
ISE
battleships were sunk in shallow water at Kure with less than
a month remaining in the war. The
HYUGA
was sunk on 24 July 1945 and the
ISE
was sunk four days later.
After the Battle of Midway, they were
reconstructed into carrier-battleship hybrids. This was done by the placement of
a short flight deck over the aftermost turrets equipped with strong catapults to
launch planes into the air. However, no aircraft were ever recorded in use on
either ships and their conversion has been thought to be a ploy to fool Allied
forces. Both the
ISE
battleships were sunk in shallow water at Kure with less than
a month remaining in the war. The
HYUGA
was sunk on 24 July 1945 and the
ISE
was sunk four days later.
| THE KIT |
The kit is typical Hasegawa and is similar to a Tamiya kit. The kit is nicely molded in light gray plastic and includes a waterline bottom molded in red. I suppose one could build it without painting as the colors are close to the real thing. A rather large and heavy weight is included for installing in the bottom prior to attaching it, but I have never really understood why they include this.
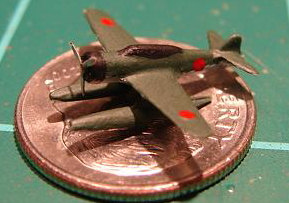
The model features a 1-piece waterline hull with the basic superstructure molded in. Mine had a slight warp in it, but nothing that was major. Six aircraft are included and are rather nicely molded. Canopy frames are barely visible, but would be difficult to paint.
Instructions are two single pages, with a short history and illustrated assembly steps.
| CONSTRUCTION |
No problems were encountered during my build and it was rather straightforward. I used Gold Medal Models “WW2 Japanese Battleship” P/E set. You can see a photo of the set here (http://www.goldmm.com/ships/gmsajnba.htm) on GMM’s website. The set includes more parts then you will need, but if you intend to build other IJN battleships, it will come in handy.
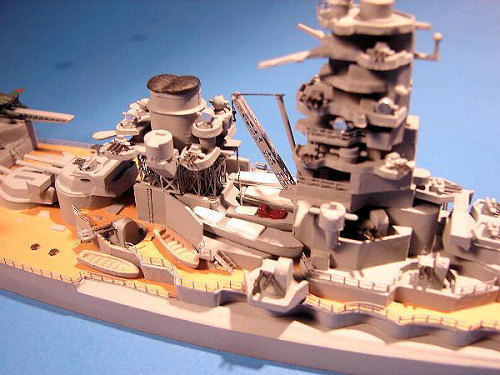
I find it easier to build parts of
ship kits off the main hull and then add them prior to final assembly. I started
with the “pagoda” 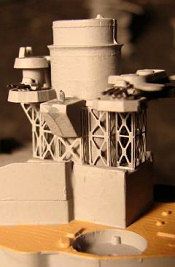 mast and after assembling the levels; I added rails where they
were most needed. The mast is quite a bit inaccurate, and it does not include
the prominent supports that all Japanese pagodas had. To fix this and the
various levels was a bit too much for me, so I left them as they were.
mast and after assembling the levels; I added rails where they
were most needed. The mast is quite a bit inaccurate, and it does not include
the prominent supports that all Japanese pagodas had. To fix this and the
various levels was a bit too much for me, so I left them as they were.
Next up was the funnel. Major
surgery is needed here in order to make use of the GMM set. The support girders
are molded onto the funnel and will need to be removed or a new funnel scratch
built. I chose to remove the molded on sections. I glued the funnel together and
carefully ground away the detail. I then added the p/e girders. A small shim was
need at the front and rear to bring it level, but that may have been
 my doing.
The stern is another area where you will have to remove portions of the molded on detail and then add the p/e parts. Again, following the instruction provided in the GMM set, I removed the molded on girders at the stern and installed the p/e ones. Be aware, they are left and right handed.
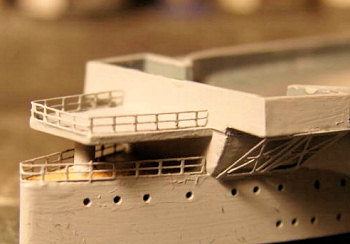
I then turned my attention to the
hull. The one omission by Hasegawa is the aft deck area near the flight deck.
There should be a built up area between the flight deck and the catapult towers.
I attempted to f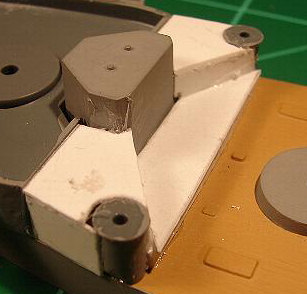 ix this, but I
still don’t think it is shaped correctly.
ix this, but I
still don’t think it is shaped correctly.
I used .020 plastic sheet and built up the area. Once everything was dry, Squadron putty was used to fill in the blanks. After I was finished, I drilled a few portholes in the hull sides.
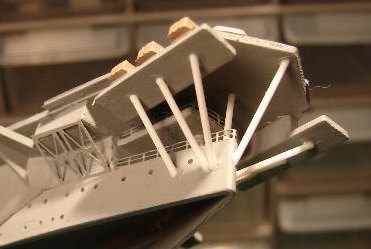
The flight deck was added next and supports were made from plastic rod to go beneath it at the stern. I simplified the supports, but think they give a good impression of the “busyness” of the area.
 After that was done I added the
various sub-assemblies to the hull and started final assembly. The searchlights,
quad mounts, ships boats and various other bits were added.
After that was done I added the
various sub-assemblies to the hull and started final assembly. The searchlights,
quad mounts, ships boats and various other bits were added.
THE P/E SET:
I want to touch on the GMM photo-etch set just a bit. I am of the belief that ship models NEED p/e. To me they look naked otherwise. The GMM set is very nice and the instructions give all the info needed to use it.
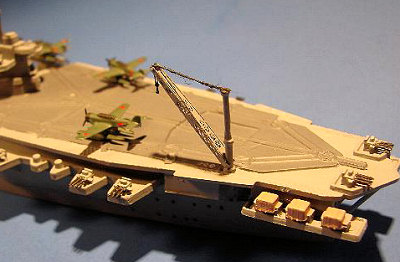
The p/e set includes just about everything you would need. However, there are a few odd things about it. Even though it is made to include the hybrid carriers, it does not include the seaplane crane. I used a crane for one of the other battleships in its place.
 On the subject of the seaplanes, the
set includes p/e props for all the planes but carts for only four of the six
planes. The props are nicely done and look great, but the carts have such small
wheels that there is not enough surface area to attach them. Cut the wheels off
the carts before folding them and they will stay in place much better.
On the subject of the seaplanes, the
set includes p/e props for all the planes but carts for only four of the six
planes. The props are nicely done and look great, but the carts have such small
wheels that there is not enough surface area to attach them. Cut the wheels off
the carts before folding them and they will stay in place much better.
GMM also includes upward curving rails for the bow. These are made to fit only one way, so make sure to note the forward sweep of the rails. Even though they fit well, I found them a bit of a trick to install.
| COLORS & MARKINGS |
 Simple; everything vertical is light
gray and the main deck is wood. At least that’s what the instructions say.
Simple; everything vertical is light
gray and the main deck is wood. At least that’s what the instructions say.
I brushed on MM acryl paints, but I think the gray may be too light. The flight deck was painted Gunship Gray and the seaplanes Dark Green. I painted the canopies black and added red markings. I think they should also have yellow wing leading edges, but my eyes aren’t that good.
| CONCLUSIONS |
Hasegawa has made a kit that ship builders will love. It has a few faults, but nothing that can’t be fixed. The aircraft and a few of the other small parts were a bit fiddly for my big ‘ol fingers, but I managed.
 The GMM set goes a long way in making
it look better and with a bit of work, it can be a contest winner.
The GMM set goes a long way in making
it look better and with a bit of work, it can be a contest winner.
Some folks will want to add the supports for the pagoda and the aft structure, but that will take some major work to get correct. I think it looks fine just the way it is.
| REFERENCES |
Photos off the net and a couple diagrams.
February 2008
Copyright ModelingMadness.com
If you would like your product reviewed fairly and fairly quickly, please contact the editor or see other details in the Note to Contributors.