Dragon 1/350 USS Buchanan
| KIT #: | DR1021 |
| PRICE: | $41.90 MSRP |
| DECALS: | Two options |
| REVIEWER: | Mark Hiott |
| NOTES: |
Early war configuration, 2 color schemes. Cyber Hobby add-on Photo-etch set used. *Ignore the gap between the upper and lower hull in the photos. It is not glued together. * |
| HISTORY |
I’ll just point you to Scott’s preview of this kit and dispense with my version.
| THE KIT |
I will say a few things here.
This is one of the finest 1/350 Destroyer kit I have ever seen! The molding is first rate; even the smallest parts have no flash or other imperfections. The amount of detail has got to be seen to be believed.
The instructions are laid out in 10 steps and include a very nice 4-view of the ship. One thing about the instructions I would like to point out; in some places they have you install multiple pieces of a certain part, but they only show you one piece installed. Pay close attention to the other part locations when you see this.
 One thing
of note; some of the sprues are marked 1/350 USN and others are marked 1/350
Benson Class. By reusing some of the 1/350 USN sprues helps keep costs down, but
does Dragon have a 1/350 Benson out, perhaps in the future? (None of the sprues
are marked 1/350 Buchanan, go figure)
One thing
of note; some of the sprues are marked 1/350 USN and others are marked 1/350
Benson Class. By reusing some of the 1/350 USN sprues helps keep costs down, but
does Dragon have a 1/350 Benson out, perhaps in the future? (None of the sprues
are marked 1/350 Buchanan, go figure)
Dragon also includes two p/e frets: one containing the w/t doors and the other everything else. The p/e is heavier then something from, say, Gold Medal Models or Tom’s, but is very well done. One stickler, to me anyway, is that it contains no search radar for the main mast. I would have left off the p/e doors and done the radar instead. Dragon gives you very nice plastic w/t doors and I would consider the radar more important. Also, they could have included a bit more vertical ladder. I had to search the parts bin to find the radar and a few extra lengths of ladder. Dragon also includes very nice formers for the life raft hangers and the anti-fouling guards. They take a bit of work, but they do make forming these parts much easier. They can also be kept for future builds.
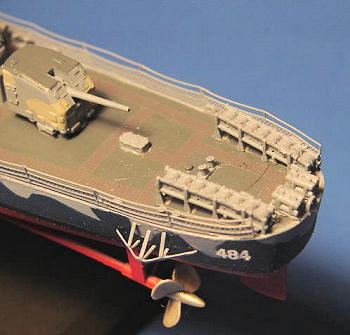
One thing to take note of is that the anti-fouling guards are left and right. They also have a top and bottom. Although the instructions don’t mention it, make sure that you get them installed correctly. (I think I have mine on the wrong sides… I think the “long” leg goes to the front)
The main deck is done in 2 pieces (fore and aft of the break) and is added to the one-piece upper hull.
| CONSTRUCTION |
(MA parts included with the
kit, MD parts are from the Cyber-Hobby set)
First I would suggest that you
look through the instructions and decide the order in which you should proceed.
I deviated from the instructions in that I completed the hull before adding the
superstructure. I believe that the model is just too fragile to completely
detail the subassemblies before installing them.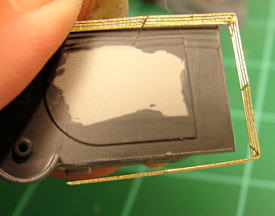
As normal for me, I started on
the superstructure assemblies first. They are all multi-piece and some of the
seams may require work. They all go together without much fuss and basic
assembly went rather quickly.
At some point during assembly,
you will want to add some of the p/e from the extra Cyber Hobby set. Parts #MD-2
and #MD-3 will need to be added before the bridge structure is assembled. I also
added part #MD-1 at this time, but you could also add this later. I should let
you know that parts #MD-2 and #MD-3 did not fit the way they are suppose to.
Part #MD-2 was too long and had to be sectioned to fit the opening. Part #MD-3
was not only to long, but it was also too wide. (See photo). I had to cut the
p/e at the corners and then trim it to fit. I found that parts MA-2 and MA-6
just too small to work with. The fact that I lost one to the dreaded Carpet
Monster didn’t help. All the superstructure parts were painted before being
added the main deck.
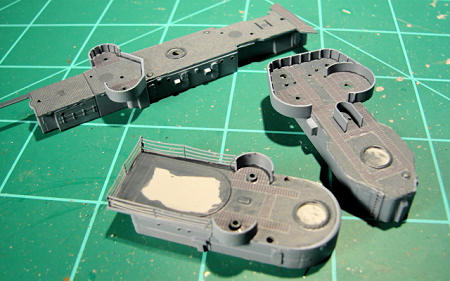 The main
deck was glued to the hull and the hull and deck were painted completely before
further assembly was done. In step 9, it calls for installation of 9 pieces of
K12. You will actually need 12 parts, 6 per side.
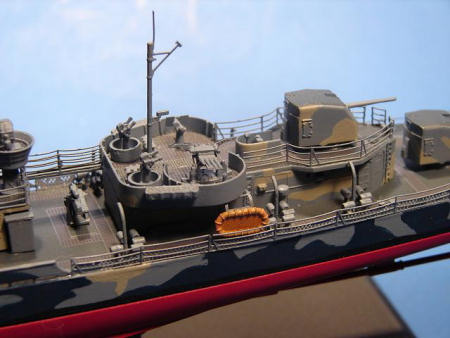
After finishing the basic various superstructure parts, I installed the aft
deckhouses on the main deck. Various details such as guns and deck details were
then added. I installed the p/e rails from the Cyber-Hobby set at this point.
Part #MD-13 is misidentified and part #MD-11 in not even mentioned, these parts
are the rails for the small walkway between the two aft deckhouses.
The main
deck was glued to the hull and the hull and deck were painted completely before
further assembly was done. In step 9, it calls for installation of 9 pieces of
K12. You will actually need 12 parts, 6 per side.
After finishing the basic various superstructure parts, I installed the aft
deckhouses on the main deck. Various details such as guns and deck details were
then added. I installed the p/e rails from the Cyber-Hobby set at this point.
Part #MD-13 is misidentified and part #MD-11 in not even mentioned, these parts
are the rails for the small walkway between the two aft deckhouses.
I installed the main deck
rails before adding the bridge structure. The
 main deck
rails do not have the “upsweep” built in to the main deck and they do not fit
properly. Considerable work is required to get them to conform to the deck and
as a result they have a slight outward bow. At this point, the ship aft of the
break is mostly finished.
main deck
rails do not have the “upsweep” built in to the main deck and they do not fit
properly. Considerable work is required to get them to conform to the deck and
as a result they have a slight outward bow. At this point, the ship aft of the
break is mostly finished.
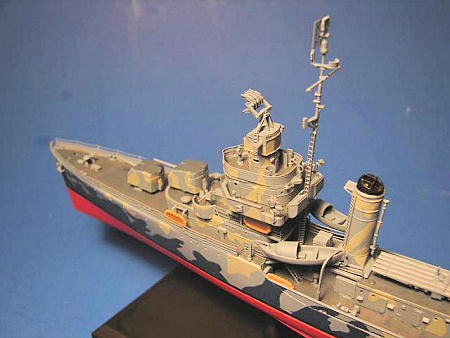
I next installed the main
bridge structure, main guns and gun control director. The last bits added were
the fore and aft masts. I “borrowed” a search radar set from the GMM set for the
Tamiya Fletcher and added it to the main mast.
Part MA25 is shown as one long ladder, but the p/e set includes two short pieces, neither of which is long enough to be installed at the strange angle shown in the instructions. The ladder should go straight up the mast and only one part MA25 is needed.
| COLORS & MARKINGS |
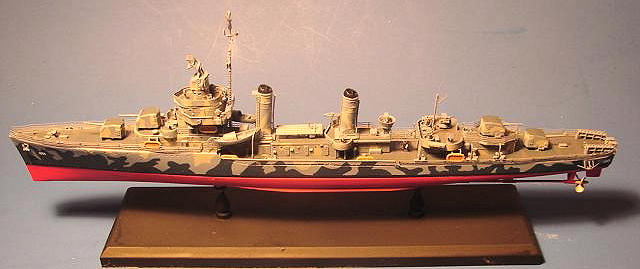
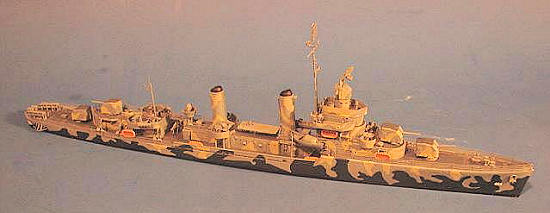
 I chose the
Measure 12/Mod scheme for my build. She wore this scheme until her repairs after
the November 42 action off
I chose the
Measure 12/Mod scheme for my build. She wore this scheme until her repairs after
the November 42 action off
The Measure 12/Mod consists of over all 5-O Ocean Gray, with splotches of 5-N Navy Blue and 5-H Haze Gray. All horizontal surfaces were painted 20-B Deck Blue. The instructions provide a very nice, full-size 4 view of the Measure 12/Mod scheme that comes in very handy. Gators Paint Masks makes a masking set to do this scheme, however, I have never seen one so I cannot comment on the quality.
I used acrylic paints applied with a brush. All the subassemblies were painted before installation and touchup was done as needed.
I cannot stress enough that if you choose this scheme,
you should finish the hull completely before proceeding with the rest. I believ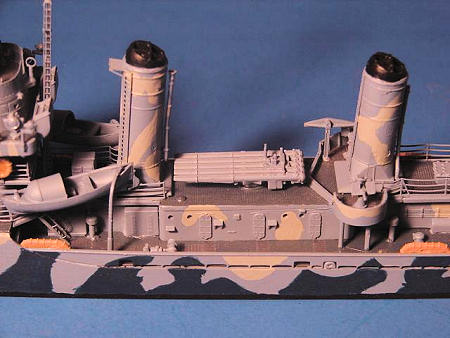 e
painting the camo would be impossible otherwise without damage to the model.
e
painting the camo would be impossible otherwise without damage to the model.
A nice touch is the anti-skid decals for the decks. I suggest anyone building this cut these decals into the smallest workable piece they can. I found that some of them are just too large to handle. Also note that at certain areas they go around fittings in the deck. I found several of the provided holes in the decals too small. I find that they don’t show up very well against the Deck Blue and lightning the Deck Blue may be an option.
I added the anti-skid decals BEFORE adding any details to the various decks and before adding the superstructure to the main decks. I believe it would be difficult to do so afterwards.
The only other decals needed are the ship numbers and
plimsoll markings. Dragon includes a flag sheet if you so choose to use it.
| CONCLUSIONS |
 A
very nice model right out of the box. I think someone who has a bit of ship
building experience should have no trouble, however, a person new to ships may
find some of the smaller parts daunting.
A
very nice model right out of the box. I think someone who has a bit of ship
building experience should have no trouble, however, a person new to ships may
find some of the smaller parts daunting.
The lack of p/e search radar is confusing. While director radar is included in the Cyber-Hobby set, search radar is not. To go to this effort and not include this very obvious detail is strange. I would have preferred Dragon include fewer p/e doors and added search radar instead.
Some of the smaller parts just too fiddly to use, I lost several parts during the process. This is in no way a fault of the kit, I just have big fingers.
I found the Cyber-Hobby set a disappointment. They obviously had access to the model and still some parts didn’t fit properly. While the set is well done, with good detail, I would prefer to wait and see what the various aftermarket companies come out with.
| REFERENCES |
www.shipcamouflage.com
Photos from the net
If you would like your product reviewed fairly and fairly quickly, please contact the editor or see other details in the Note to Contributors.