ICM 1/144 Type XXIII U-boat
| KIT #: | S.004 |
| PRICE: | 10 Euros |
| DECALS: | One option |
| REVIEWER: | Frank Spahr |
| NOTES: |
| HISTORY |
 I was landed with
this kit in a modeling friend´s surprise attack at a modeling show. In an
(ultimately doomed) attempt at stash thinning, he shoved the box into my hands
and uttered something in the lines of it´d sure be a nice subject for me and
he´d already built one of the type. Well, this was neither the first nor the
last kit from this source, and somehow I built most of them in the end – thank
you, Christian!
I was landed with
this kit in a modeling friend´s surprise attack at a modeling show. In an
(ultimately doomed) attempt at stash thinning, he shoved the box into my hands
and uttered something in the lines of it´d sure be a nice subject for me and
he´d already built one of the type. Well, this was neither the first nor the
last kit from this source, and somehow I built most of them in the end – thank
you, Christian!
More of less on a whim (and to procrastinate more intricate and demanding projects) I decided to begin the kit soon after the show, which was in October 2012. I had a convenient display box and chose to build the model as a scuttled submarine in the Baltic. Two of the scuttled Type XXIII were raised in the 1950ies and served in the new Federal German Navy, so it would be an in-between thing which looked quite interesting to me.
| THE KIT |
A preview of the kit is to be found here.
| CONSTRUCTION |
 Submarine kits tend
to have a low part count and are nice in-between projects, this kit is no
exception. I built the (nicely fitting) kit straight away and only added some
minor refinements. The limber holes were deepened using a heatened screwdriver,
a number of holes at the sail and the bow hydrophone array were drilled deeper,
and the step irons at the front of the sail replaced with spare PE. The fine
antennae were made from thin brass wire (0.2 mm).
Submarine kits tend
to have a low part count and are nice in-between projects, this kit is no
exception. I built the (nicely fitting) kit straight away and only added some
minor refinements. The limber holes were deepened using a heatened screwdriver,
a number of holes at the sail and the bow hydrophone array were drilled deeper,
and the step irons at the front of the sail replaced with spare PE. The fine
antennae were made from thin brass wire (0.2 mm).
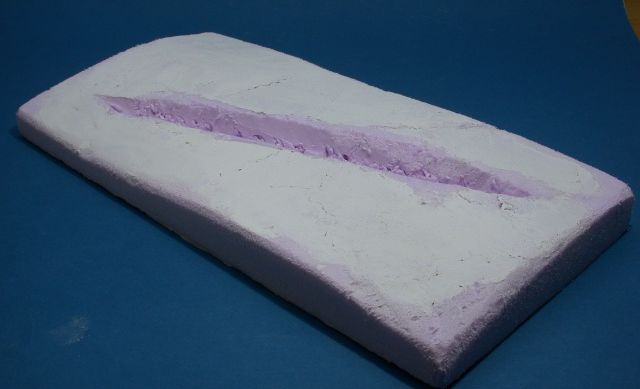
The base was
prepared while building the model. I used a piece of 40 mm foam board cut to
size for the display case. A slight incline of the base was produced using an
old breadknife and sanding paper. A cutout for the hull was also made using a
bread knife. Acrylic filler from the hardware store worked fine for puttying the
base.
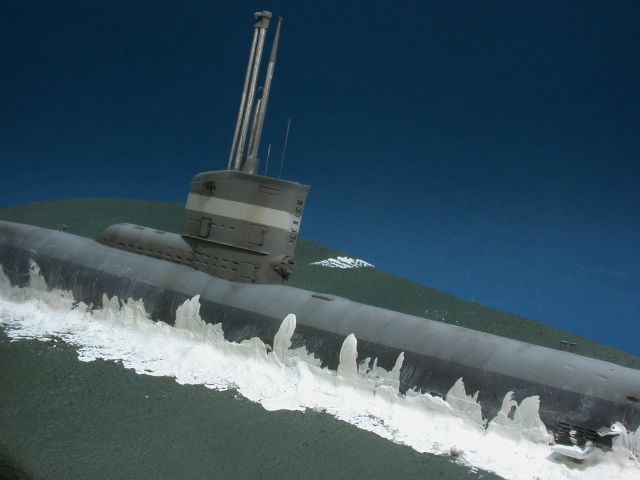
| COLORS & MARKINGS |
The model was primed using solvent-based
hardware store primer from a rattle can. The boat was then sprayed convenient
shades of Vallejo Acrylics after looking through the various reference sites.
The white stripe at the sail came in handy to add some
optical appeal. I did not try to depict any individual boat, though. The various
periscopes were painted steel, the screw bronze.
| THE DIORAMA |
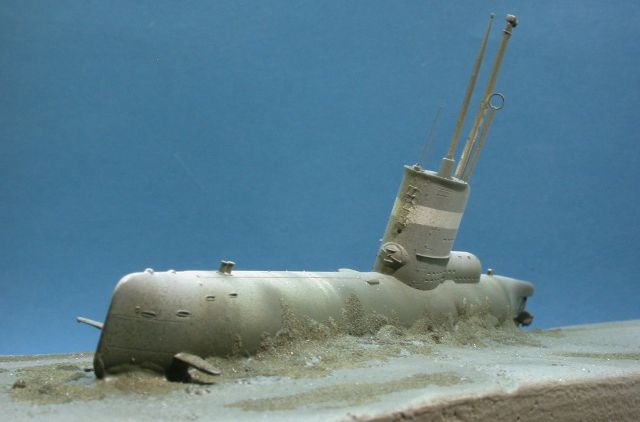
 Now came the fun
part, as in weathering the boat. I used various artist´s oil paints, both as
washes and filters. The base was at the time painted with greenish-grey wall
paint mixed with fine sand, aiming at a surface that hinted at a seabed, even
though being much too coarse. Sometimes you need to deceive the eye … I used a
large brush in a stippling motion.
Now came the fun
part, as in weathering the boat. I used various artist´s oil paints, both as
washes and filters. The base was at the time painted with greenish-grey wall
paint mixed with fine sand, aiming at a surface that hinted at a seabed, even
though being much too coarse. Sometimes you need to deceive the eye … I used a
large brush in a stippling motion.
That cured, I was able to add
the boat to the base. I used modeling plaster, also from the hardware store. It
came handy to close any gaps and simulate accumulated mud. After curing, this
was painted with the same mixture of paint and sand to blend things in. Further
blending and weathering was done by brushing and spraying of various acrylic
paints.
The seabed looked
much too plain, so I mixed fine sand with clear paint and added patches of the
mixture to add some structure. Looking at lots of photos divers had taken in the
Baltic gave me yet
 more ideas and colours and textures. I used pieces of foam
board, static grass and iceland moss to make rocks covered with marine growth,
and added them to the seabed. Finally, everything received a generous dusting of
greyish-brownish acrylic paint from the airbrush to hint at silt covering it
all.
more ideas and colours and textures. I used pieces of foam
board, static grass and iceland moss to make rocks covered with marine growth,
and added them to the seabed. Finally, everything received a generous dusting of
greyish-brownish acrylic paint from the airbrush to hint at silt covering it
all.
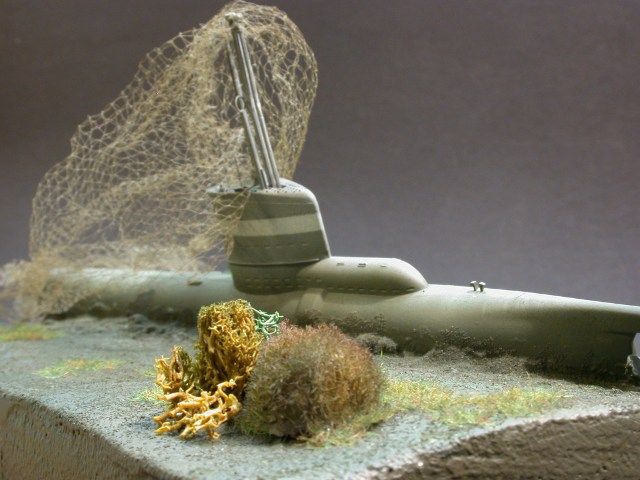
Something was still
missing, as the scene looked too static and dead. Well, it would have been in
reality, but what we do is create a sort of enhanced simulation of reality that
is meant to convey some sort of expression. Something was missing here. So I had
the idea of piece of fishing net fouled in the periscopes. That proved quite a
challenge, as it was pretty hard to find a suitable material. Fishing nets are
really fine, and the first three materials I sourced looked much too heavy and
dense. Again, they would have been quite proper, if you thought how fine a m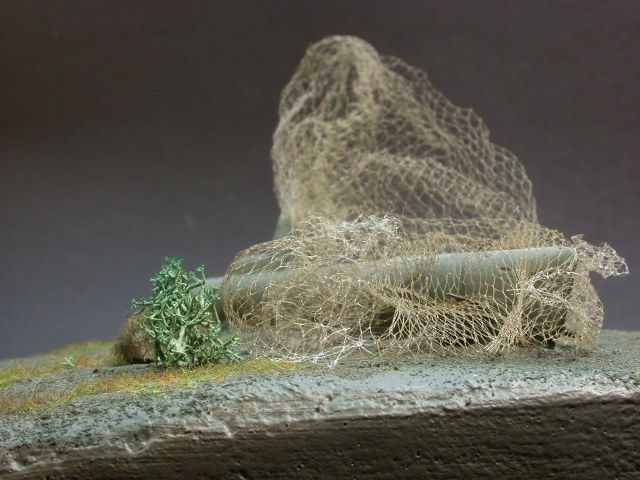 esh
would be needed for 1:144 scale fish of ordinary size, but still they looked
wrong. When I shopped for groceries one Saturday morning late in October, I
found a box of decorative pumpkins of weird shapes and shades, covered by some
very fine netting that turned out to be just the ticket. It was cut to size,
lightly sprayed in a muddy colour and fixed to the periscope, completing the
model.
esh
would be needed for 1:144 scale fish of ordinary size, but still they looked
wrong. When I shopped for groceries one Saturday morning late in October, I
found a box of decorative pumpkins of weird shapes and shades, covered by some
very fine netting that turned out to be just the ticket. It was cut to size,
lightly sprayed in a muddy colour and fixed to the periscope, completing the
model.
I was able to take
the model to Scale Model World in November, 2012, and had quite some chats about
it. One favourite criticism was that the periscopes were unbent and surely would
have been bent once the net was fouled in them and torn. I honestly had no idea
how much force a periscope would be able to take and how easily a net would
tear. So my (admittedly lame) excuse was that my net might just as easily have
been torn at some other obstacle, had come loose somehow and ultimately, gently,
softly, entirely non-violently had snuggled around my boat´s periscopes.
| CONCLUSIONS |