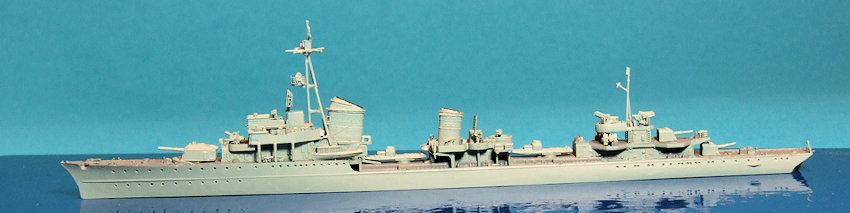
Dragon 1/700 German Destroyer Z-39
| KIT #: | ?7103 |
| PRICE: | $25.00 |
| DECALS: | Two options |
| REVIEWER: | Dale Rannals |
| NOTES: |
| HISTORY |
Large and
handsome, the German destroyer Z39 was laid down in 1940 and commissioned in
August, 1943. After being damaged by aircraft bombs in the Baltic in 1944,
Z39 was given a refit, which saw the removal of one 150mm turret and
upgraded the light AA fit. She did not see much action in the final year of
t he war,
but survived hostilities, and was given to the US Navy as a war prize. She
was renamed DD939, but the US Navy was unimpressed with her and sold her to
France for spare parts to keep other ex-German DD's going. She was
eventually scrapped in 1964.
he war,
but survived hostilities, and was given to the US Navy as a war prize. She
was renamed DD939, but the US Navy was unimpressed with her and sold her to
France for spare parts to keep other ex-German DD's going. She was
eventually scrapped in 1964.
Type 36A German destroyers were larger than most Allied destroyers and, more like a light cruiser, carried a heavier main armament of 5.9 inch guns instead of the usual 4- or 5-inch guns carried by their counterparts. However, in WW2 both this size and heavier armament was more of a liability than a virtue. The main weapons were not dual-purpose nor radar controlled and so were useless for anti-aircraft work. Being large at 2600 tons, their turning radius was larger than smaller destroyers, meaning they could not maneuver as effectively to dodge torpedoes or aircraft. They were also poor sea-boats and frequently were sent back to port when smaller Allied destroyers were still operational. The ships mounted five 5.9 inch guns for surface targets, a variety of 37mm and 20mm antiaircraft (AA) guns, and eight 21-inch torpedo tubes.
| THE KIT |
 Dragon's
Z39 contains
about 120
parts molded in light gray, a hull bottom molded in dark red, and a small PE
fret containing some very tiny pieces. Construction steps are outlined in
Dragon's usual black/blue style and are, for the most part, adequate. A nice
display stand is included for those who wish to build a full hull kit. Color
options are for Kriegsmarine service and also, as an interesting touch, for a US
post-war scheme.
Dragon's
Z39 contains
about 120
parts molded in light gray, a hull bottom molded in dark red, and a small PE
fret containing some very tiny pieces. Construction steps are outlined in
Dragon's usual black/blue style and are, for the most part, adequate. A nice
display stand is included for those who wish to build a full hull kit. Color
options are for Kriegsmarine service and also, as an interesting touch, for a US
post-war scheme.
The kit contains some incredibly small parts (1/700, after all) and, by comparison, some not-so-small attachment points, which makes getting some parts off the sprue tedious at best, and a disaster at worst. Take your time and be careful.
| CONSTRUCTION |
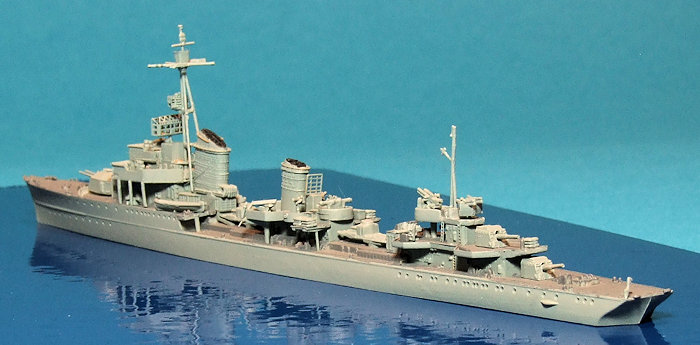
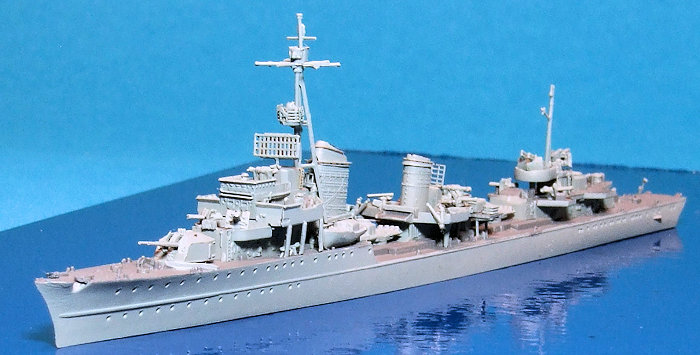
I decided for a
waterline version, but this was mostly because I am lazy. However, I should
point out that the included stand, for a full hull version, is a very nice dual
pedestal style and is nicer than most I’ve come across. I assembled the various
guns and cannons and torpedo mounts first. For most of the tiny air defense
guns, I left the bases on the sprue and attached the barrels and shields to it,
cutting the complete mount from the sprue when dry. This made it a bit easier
for me to handle. There is some pretty heavy detail of course …. for the scale,
molding an accurate machine gun barrel is expecting a lot. But on the other hand
som e of the
parts are just beautiful. The main gun turrets were a pleasure to just look at …
a great example of the detail possible with slide molding.
e of the
parts are just beautiful. The main gun turrets were a pleasure to just look at …
a great example of the detail possible with slide molding.
As I built up the superstructure sections, I did my best to try to not lose too much detail in getting the parts off the sprue and cleaning them up. As I mentioned, the sprue attachment points are rather too large for the size of some of the parts here. (and please don't get me wrong here … these are quite small attachment points, it's just that the parts themselves are so tiny.) Some of the problem was my ham-fistedness at times, but still, I have seen some incredibly tiny sprue connections in some kits (Bronco kits are amazing in this aspect.....) and they would come in handy for parts of this scale. I did okay for most of the parts, but I broke one of the masts whilst trying to get it off the sprue …. I replaced said piece with a section of brass rod.
The photo-etch parts do a nice job of enhancing the detail. Thankfully, they did not go overboard on the fret, and you can build the kit without the PE at all if you desire. I put most of the PE parts on … some were lost in transit to the model, unfortunately.....
| COLORS & MARKINGS |
 The
instructions call for a mixture of black and white to get the correct shade of
gray (RAL7001) but I opted to use Model Master British Medium Sea Gray for the
hull and Vallejo Neutral Grey 70.992 for the deck. Once complete, I did spray
the model with a flat base (Tamiya flat base mixed with Future) to dull down the
shiny spots from glue.
The
instructions call for a mixture of black and white to get the correct shade of
gray (RAL7001) but I opted to use Model Master British Medium Sea Gray for the
hull and Vallejo Neutral Grey 70.992 for the deck. Once complete, I did spray
the model with a flat base (Tamiya flat base mixed with Future) to dull down the
shiny spots from glue.
You tend to paint ship kits as you build assemblies up, then those are added to the hull. It's an interesting phenomenon (for me at least) with ship kits: you build and paint and add to the hull. It doesn't look like much and so you continue with each new assembly. At some magical point, all of a sudden you have a ship sitting in front of you. It's weird.
| CONCLUSIONS |
Its been a while since I worked on a kit of this scale, and realize that I need to work on my finesse with these small parts. Overall, though, this is a great kit of a very handsome destroyer. The detail is outstanding and is enhanced by the not-overly-done PE fret. If you are into small scale ships or just want to test the waters with something that won't break the bank, this one is highly recommended.
| REFERENCES |
kit instructions and the 'net.
February 2016
Copyright ModelingMadness.com
Thanks to www.dragonmodelsusa.com for the review kit.
If you would like your product reviewed fairly and fairly quickly, please contact the editor or see other details in the Note to Contributors.