| KIT #: | 5040 |
| PRICE: | ~$100.00 |
| DECALS: | One option |
| REVIEWER: | Scott Lyle |
| NOTES: |
| HISTORY |
 An iconic
ship like the Bismarck needs no introduction, but I came across a couple of
interesting facts while reading about it. First, the HMS Hood was the only ship
the Bismarck sank. I thought it might have sunk a couple of merchant ships
before that, but it did not. Second, the blow that ultimately doomed the
Bismarck was a torpedo from a Fairey Swordfish that jammed its rudder and
rendered the ship unable to steer. We all know battleships became sitting ducks
once naval aviation came of age, but I find it ironic that the Bismarck was one
of its earliest victims. Third, in its battle with the Hood it actually received
hits from the Hood’s mate, HMS Prince of Wales. One shell struck the bow and
passed cleanly through both sides of the ship. While the damage was contained,
the Bismarck took on some 2,000 tons of water, and this blow was what convinced
its commander to begin heading to France for repairs, setting in motion the
chase which would bring her to her doom.
An iconic
ship like the Bismarck needs no introduction, but I came across a couple of
interesting facts while reading about it. First, the HMS Hood was the only ship
the Bismarck sank. I thought it might have sunk a couple of merchant ships
before that, but it did not. Second, the blow that ultimately doomed the
Bismarck was a torpedo from a Fairey Swordfish that jammed its rudder and
rendered the ship unable to steer. We all know battleships became sitting ducks
once naval aviation came of age, but I find it ironic that the Bismarck was one
of its earliest victims. Third, in its battle with the Hood it actually received
hits from the Hood’s mate, HMS Prince of Wales. One shell struck the bow and
passed cleanly through both sides of the ship. While the damage was contained,
the Bismarck took on some 2,000 tons of water, and this blow was what convinced
its commander to begin heading to France for repairs, setting in motion the
chase which would bring her to her doom.
While the Bismarck was only in service for a couple of months, she was a truly massive and formidable battleship whose commerce raiding potential caused the Royal Navy great concern. The drama of her short life has made her one of the modeling world’s most enduring and popular subjects.
| THE KIT |
There are a few Bismarck kits in 1/350 scale on the market. Tamiya issued their kit sometime around 1980, and it remains high in accuracy and quality. Academy has since issued a kit that is considered to be somewhat of a clone of the Tamiya kit. Lindbergh’s Bismarck is considered, well, the least accurate of the lot. Around 2007 Revell produced an all-new 1/350 Bismarck, and all reviews I’ve read point to it being the leader of the pack in terms of accuracy and detail.
 Opening up
the big box you are greeted with a one piece main deck secured to a heavy
cardboard insert for protection. Right off the bat I was glad to see that –
filling wooden deck seams is painful. But where Revell giveth Revell taketh away
– there is no waterline option for the hull. For modelers like myself who like
to build waterline versions of their ships, I began warming up my Dremel.
Opening up
the big box you are greeted with a one piece main deck secured to a heavy
cardboard insert for protection. Right off the bat I was glad to see that –
filling wooden deck seams is painful. But where Revell giveth Revell taketh away
– there is no waterline option for the hull. For modelers like myself who like
to build waterline versions of their ships, I began warming up my Dremel.
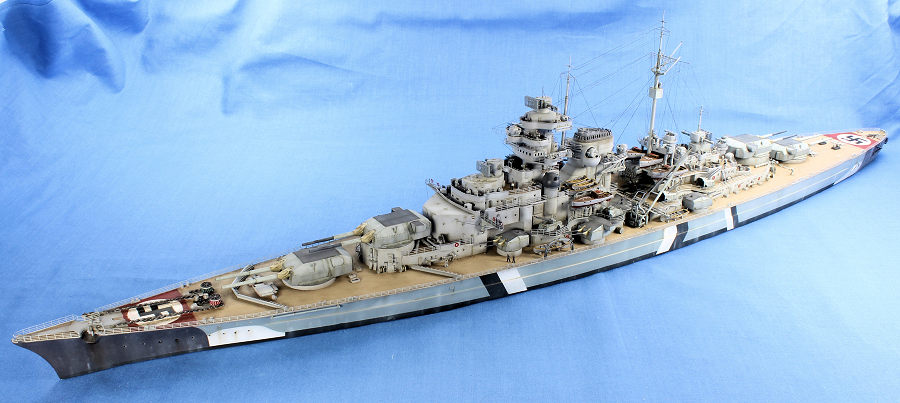
Underneath the protective cardboard there are thirteen big sprues of plastic, two of which are clear and contain searchlight lenses and small boat windscreens, a nice touch. A large sheet of decals provide hull waterline stripes, several types of flags, and the Bismarck’s famous black and white hull chevrons. A plastic display stand is provided as well. Revell has taken some grief in online reviews for providing injection molded hand railings in the kit. I must agree that while the intentions were good, the railings are too thick and are basically unusable. Most will throw them away and use photo etch. The instruction booklet is massive and its illustrations are somewhat busy, but they’ll do. A black and white painting guide is included, showing you how the ship was painted in the fall of 1940 and when it was sunk on May 27, 1941. I would have liked that painting guide to be in color, but it is very thorough and I used it throughout the build.
The color scheme I chose for this build depicts the ship with the black and white chevrons on the hull but not on the superstructure – a paint scheme she wore briefly before being painted all-gray off the coast of Norway before heading off into battle. I like the look of this scheme a lot, and it’s also a massive cop out – you get to see those stylish chevrons on the hull but don’t have to try and paint them on the superstructure with all of those decks and details getting in the way.
You can’t build a ship like this without photo etch, and as usual Eduard has the solution. I purchased sets 53035 and 53036, which provide all manner of tiny details to drive you absolutely insane (more on that below). I also opted for metal gun barrel sets from RB Model and Very Fire.
| CONSTRUCTION |
 The
first job was to convert the hull halves into waterline hull halves. This was
going to have to be done with my Dremel tool, but the first question was – where
to make the cut? The hull halves have tiny horizontal lines molded on them that
at first glance appear to be where the black waterline stripes would go, only
they look a little too high. Consulting the instructions (step 4 in particular)
revealed that the top of the hull red portion of the hull is 4-4.5mm below that
molded horizontal line. Allowing for the width of the Dremel’s cutting wheel, I
put a line of masking tape on the hull 6mm below that upper molded line. I then
fixed the hull half to my workbench by drilling holes in the part of the hull
that I was going to discard and then screwing it down firmly. Then holding the
Dremel against another piece of wood I clamped to my workbench to steady it, I
carefully began cutting. The process made a huge mess, spraying bits of plastic
everywhere, nor was my cut perfectly straight. It was “good enough” however, so
I repeated the process for the other hull half.
The
first job was to convert the hull halves into waterline hull halves. This was
going to have to be done with my Dremel tool, but the first question was – where
to make the cut? The hull halves have tiny horizontal lines molded on them that
at first glance appear to be where the black waterline stripes would go, only
they look a little too high. Consulting the instructions (step 4 in particular)
revealed that the top of the hull red portion of the hull is 4-4.5mm below that
molded horizontal line. Allowing for the width of the Dremel’s cutting wheel, I
put a line of masking tape on the hull 6mm below that upper molded line. I then
fixed the hull half to my workbench by drilling holes in the part of the hull
that I was going to discard and then screwing it down firmly. Then holding the
Dremel against another piece of wood I clamped to my workbench to steady it, I
carefully began cutting. The process made a huge mess, spraying bits of plastic
everywhere, nor was my cut perfectly straight. It was “good enough” however, so
I repeated the process for the other hull half.
I now had two long, flimsy hull halves. I removed all of the “swarf” from the cut edges and then glued the halves together. With no bottom or internal ribs the hull was far too flimsy. Luckily Revell does provide two cross braces to stiffen the hull walls, so I cut those down to “waterline” size and glued them in place. I then glued the one-piece deck onto the hull, which fit very nicely. Once it dried it really stiffened up the whole hull assembly. I had been toying with the idea of adding some flat plastic sheets on the bottom of the hull to act as a bottom plate, but after seeing how strong the assembly was with the deck in place, I scrapped that idea.
Before proceeding any further I
decided to paint the hull and main deck. I first sprayed on a coat of Tamiya’s
Light Gray Spray Primer to the hull and deck, and then pre-shaded the deck with
Tamiya XF-64 Red Brown. That was followed by some Tamiya XF-78 Wooden Deck Tan,
sprayed lightly and randomly to let the pre-shading show through. A wash of MIG
Productions Dark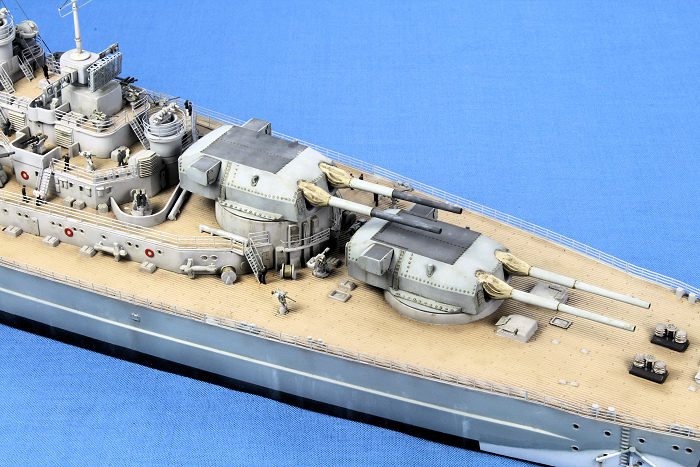 Brown was then applied to the whole deck, keeping it very thin so it wouldn’t
become overwhelming.
Brown was then applied to the whole deck, keeping it very thin so it wouldn’t
become overwhelming.
I then sprayed the waterline and hull chevron areas Tamiya XF-69 NATO Black. After masking those off I sprayed the other half of the hull chevrons as well as the false bow and stern waves Tamiya White. I then masked those areas off and sprayed the middle portions of the hull Testors Medium Gray (FS 35237) to replicate German RAL 7000. Masking that off, the bow and stern areas were sprayed some Testors Dunkelgrau RAL 7024. Some weathering was added in the form of some minor streaks and washes, keeping it subtle.
Moving to the deck I masked and sprayed a large white circle at each end for the large air recognition panels. Masking those circles off with Tamiya tape, I then sprayed the dark red bands. The kit doesn’t provide the large swastikas, so those were sourced from the Archer Fine Transfer set #35035. The transfers went on without a hitch, though I had to trim them carefully to fit over the steps of the forward “anchor ways”.
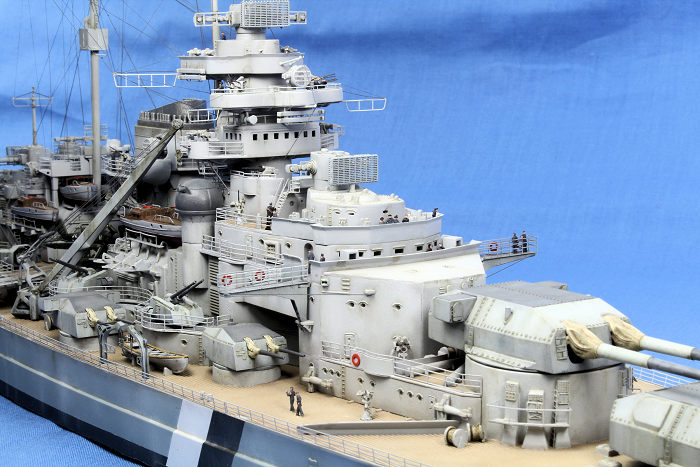
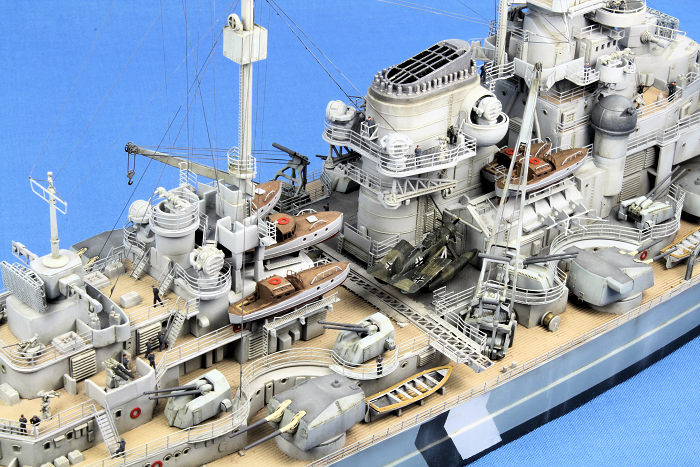
I next began adding photo etch parts to the deck, which basically consisted of details around the main turret bases and said anchor ways. I used the kit’s anchor chains, as their detail is quite good. The photo etch hand railings that encircle the main deck were left off until the end of the build, there was no way they’d survive if they were attached now.
I then began building the superstructure up from the main deck, following the same procedure of assembling the plastic parts, adding any relevant photo etch followed by painting, weathering, and finally attaching to the ship. All superstructure parts were painted Testors Light Ghost Gray, which is a reasonable match for RAL 7001. I applied some pin washes and streaks to these parts using AK Interactive’s “Grey Wash for Kriegsmarine Ships”.
Once I had the superstructure completed, I went back and began adding the PE handrails, working from the upper decks to the lower, figuring now they would have a fighting chance to survive. I still left them off of the “main” deck however – that would be one of the last steps in the build.
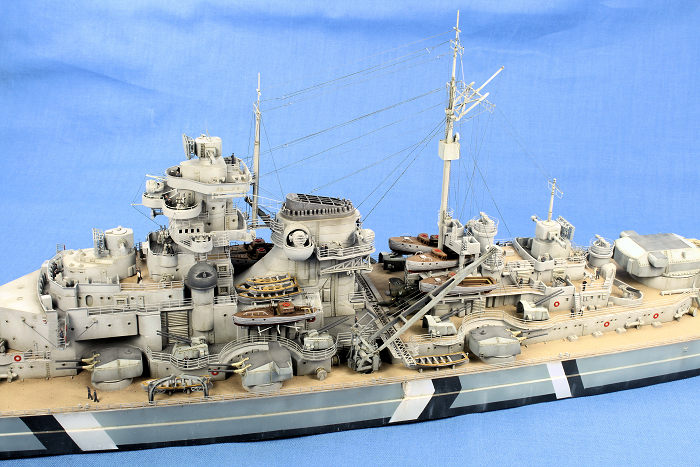
 So at this point the ship was
built, painted, and weathered, but was missing all of its life boats, cranes,
masts, rigging, and guns. Starting with the lifeboats, I began building and
painting them one by one. They are tiny little models in their own right, with
multiple parts and PE. Next I added the tiny 2cm flak guns on the upper works,
replacing the kit parts with the tiniest metal gun barrels I’ve ever seen. The
twin 3.7cm gun mounts were added next, and then I turned to the masts.
So at this point the ship was
built, painted, and weathered, but was missing all of its life boats, cranes,
masts, rigging, and guns. Starting with the lifeboats, I began building and
painting them one by one. They are tiny little models in their own right, with
multiple parts and PE. Next I added the tiny 2cm flak guns on the upper works,
replacing the kit parts with the tiniest metal gun barrels I’ve ever seen. The
twin 3.7cm gun mounts were added next, and then I turned to the masts.
I built the masts independently, adding as much rigging as I could before painting and adding them to the ship. Once they were glued in place the ship entered a new phase – it was now much harder to handle! Picking it up and moving it around now had to be done with a lot of care or else I would knock the delicate masts off, an act which would fill me with a Hulk-esque rage.
I used stretched sprue for the rigging. It is a tedious task, full of tiny drops of CA glue, trying to hold tiny things with tweezers, and trying not to knock other tiny things off in the process. I replicated the antennas that split into two using tiny wires and stretched sprue, a process that definitely challenged my patience.
 I tackled the
10.5 cm Flak guns next, adding PE and replacing the kit’s plastic gun barrels
with brass gun barrels in the process. The 5.9” gun turrets were then built, and
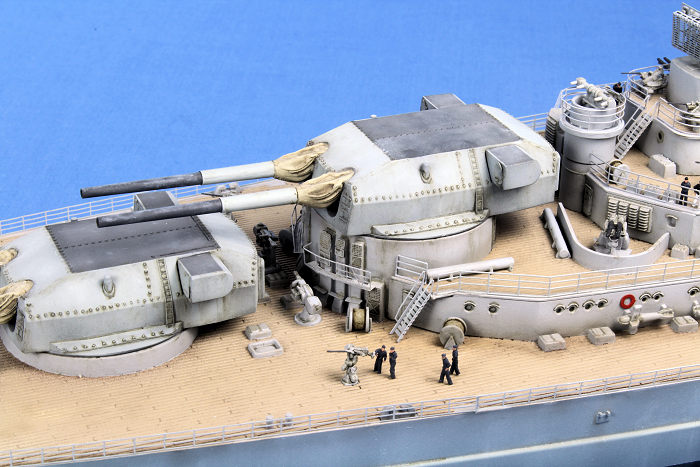
the model was at last starting to bristle with lots of guns. Figures sourced
from North Star Models were added next. I spent about a week painting about 75
of the tiny men, but once you add them to the ship it doesn’t feel like enough;
they soon get lost on all of the decks. I rigged the two large cranes with
elastic thread, then painted and weathered them and added them to the model.
I tackled the
10.5 cm Flak guns next, adding PE and replacing the kit’s plastic gun barrels
with brass gun barrels in the process. The 5.9” gun turrets were then built, and
the model was at last starting to bristle with lots of guns. Figures sourced
from North Star Models were added next. I spent about a week painting about 75
of the tiny men, but once you add them to the ship it doesn’t feel like enough;
they soon get lost on all of the decks. I rigged the two large cranes with
elastic thread, then painted and weathered them and added them to the model.
The kit gives you two of the Ar 196 floatplanes and includes parts to build them with the wings extended or folded. I built one of each and placed one outside the hanger and the other halfway in the hanger. The separate transparent greenhouses provided are a nice touch, and Revell cleverly includes the decals for the four aircraft that were carried by the Bismarck.
I was starting to see light at the end of the tunnel, with just the big gun turrets and main deck PE hand railings to go. For the gun turrets I purchased an aftermarket set from Very Fire that provided brass gun barrels and resin blast bags. It was a little tricky gluing the blast bags to the kit’s turrets, but with a little finagling and gap-filling CA glue I got them to work. I painted the turrets Tamiya XF-24 Dark Gray, then masked off the tops and painted the sides Testors Light Ghost Gray. After weathering they were added to the model.
The last step was to finally add the PE railings around the main deck using tiny drops of CA glue. After all, we can’t have anyone falling overboard.
| CONCLUSIONS |
I love big ship models, but they do test my patience. This one took me a good 8 months. Progress is measured in weeks instead of days. At one point I literally spent two weeks building and painting the tiny lifeboats. That being said, highly detailed ship models always look great, and a handsome ship like the Bismarck looks even better.
Revell’s Bismarck is a fine kit that presents no complications and builds into a fine replica of one of history’s most famous ships. I recommend it to anyone with the interest and patience to take on a long build! To see more of my models and build reviews, check out www.lylesmodels.com.
References
- Kagero, Super Drawings 3D #28, “The Battleship Bismarck”
- Osprey Publications, New Vanguard #71, “German Battleships 1939-45”
- Squadron/Signal Publications, Warships #23, “German Battleships of World War Two in Action”
- Wikipedia, the Online Encyclopedia
9 December 2022
Copyright ModelingMadness.com. All rights reserved. No reproduction in part or in whole without express permission.
If you would like your product reviewed fairly and fairly quickly, please contact the editor or see other details in the Note to Contributors.