AFV Club 1/350 U-boat type VIIC
| KIT #: | SE 73503 |
| PRICE: | Got mine for $16.00 |
| DECALS: | One option |
| REVIEWER: | Scott Lyle |
| NOTES: |
| HISTORY |
One of the most
notorious weapons systems employed by the Germans against the Allies during
World War II, the U-Boats wrought a wave of undersea terror against merchant
convoys in the 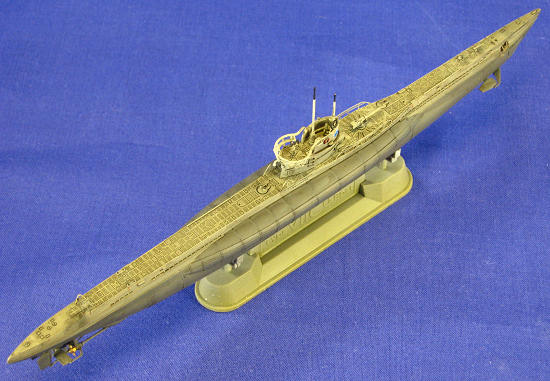 supply ships.
Winston Churchill famously said that “The only
thing that really frightened me during the war was the U-Boat peril”, and
statistics would bear him out.
While 783 U-Boats were sunk during the war, they
took with them 3,500 merchant supply ships and some Allied 175 warships.
It was not until mid-1943 that the Allies had built
up their surface and air patrol forces to the point where they could mount
unceasing patrols against the U-Boats and thus start to turn the tide against
them.
supply ships.
Winston Churchill famously said that “The only
thing that really frightened me during the war was the U-Boat peril”, and
statistics would bear him out.
While 783 U-Boats were sunk during the war, they
took with them 3,500 merchant supply ships and some Allied 175 warships.
It was not until mid-1943 that the Allies had built
up their surface and air patrol forces to the point where they could mount
unceasing patrols against the U-Boats and thus start to turn the tide against
them.
The Type VIIC U-Boat formed the backbone of Karl
Donitz’s submarine force throughout the war.
While numbers vary, some 601 of them were built
with 591 actually being commissioned.
When the war started 152 Type VIIC boats were on
order with construction taking place in thirteen different shipyards, and the
first Type VIIC was commissioned in June 1940.
The Type VIIC had many qualities; chief among them
was that it was large and rugged enough to handle the
I chose to model U-96, one of the most famous U-Boats of the war. U-96 achieved its fame not only through its success, but also because it was the subject of Das Boot, a book that became so popular it eventually spawned a miniseries and a hit movie in 1982. Its first commander, Heinrich Lehmann-Willenbrock, would go on to become the sixth highest scoring U-Boat ace in the Kriegsmarine during the war.
| THE KIT |
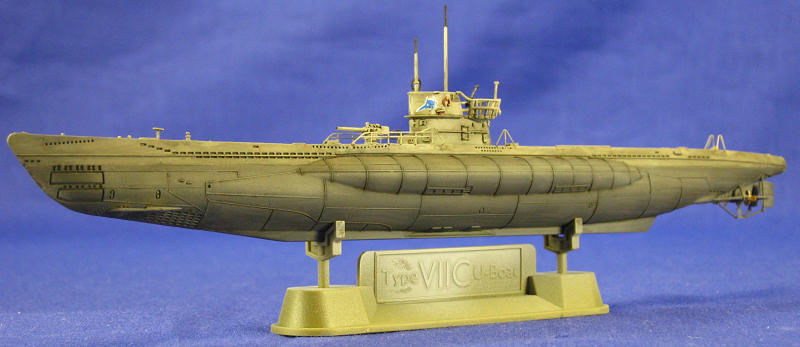
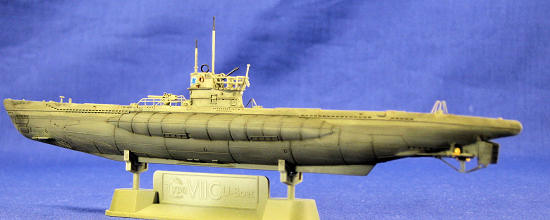 on of building the kit as a full model or a waterline model, and I
chose to build the full version.
on of building the kit as a full model or a waterline model, and I
chose to build the full version.
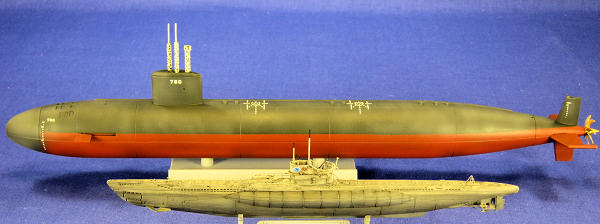
One thing that surprised me upon opening the box is how small the kit is, and thus how small a real U-Boat was. A few years ago I built a DML/Dragon 1/350 Los Angeles Class submarine model and in comparison it positively dwarfs the U-Boat (see image at the bottom of the page. Ed). That such a small vessel could wreak so much havoc is something worth pondering.
The quality of the molding is excellent, and
includes some of the thinnest and smallest parts I’ve seen in injection molded
plastic.
The hull parts are beautifully detailed, and the detail on
the decking is exquisite.
| CONSTRUCTION |
Construction
began with the upper pressure hull, which is then trapped between the halves of
the lower hull.
The deck goes on next, followed by the bow planes
and the 8.8cm deck gun.
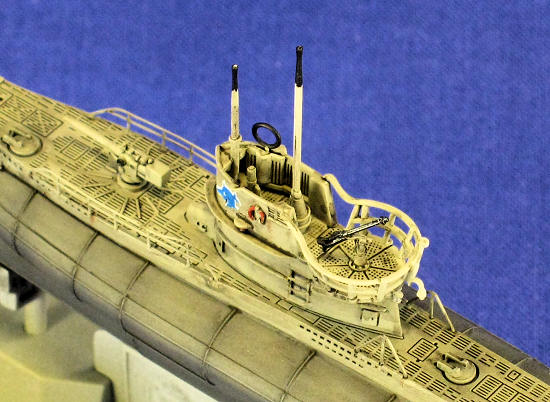
Assembling the conning tower was next, and it is
beautifully rendered.
The fineness of the various antennas and masts is
impressive, but also a bit difficult to work
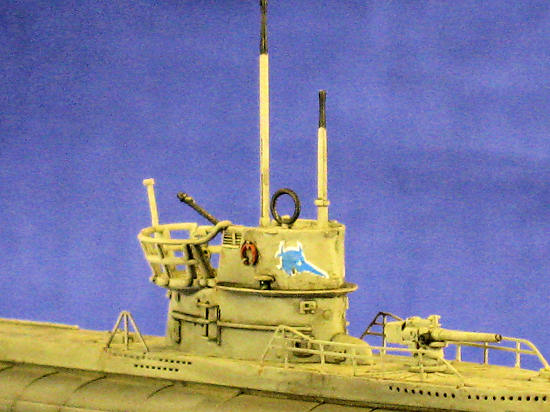 with because the parts are so
small.
A good pair of tweezers is a must.
with because the parts are so
small.
A good pair of tweezers is a must.
After the conning tower there were various small
parts to go onto the deck, followed by the propellers and rudders.
When it comes to the various railings that go on
the deck and conning tower
I left off the net cutter on the bow of the ship, as most U-Boats did away with those by the start of the war anyway. Unfortunately the kit’s photo etch antenna sections that run from the bow to the stern were designed to fit with the net cutter installed. I decided to take the lazy way out and leave them off. Here’s a side argument I used to rationalize my decision: let’s say the antenna cable in real life was one inch in diameter. In 1/350 scale that would be 0.003” thick, which one could argue is too small to realistically model. Now one could also argue that by that logic, no one should ever apply any rigging to surface ships in 1/350 scale. But here’s the thing – on larger surface ships the rigging is complementary and serves to add more detail. On this seven and a half inch long U-Boat the rigging would dominate and look out of place. Is it totally realistic to leave the antenna off? No. Is it totally realistic to include the antenna if the scale diameter is too thick? No. But we are modelers, and we have artistic license. Yes we strive for realism in our subjects, but we are also drawn in by what looks good to our eye. So we seek to find a balance between the two, and where that balance falls is up to each individual modeler. And yes, I’m stone cold sober as I write this, which may or may not be a good thing. Off to the spray booth.
| COLORS & MARKINGS |
After wiping the model down with Polly S Plastic Prep I sprayed a primer coat of Mr. Surfacer 1200 onto the sub and then checked all of the seams, as tiny as they were. I next pre-shaded some of the panel lines with Tamiya Flat Black XF-1, and then lightly sprayed some Testors Acrylic Gunship Gray (FS36118) on to the lower hull areas below the waterline, letting the pre-shading show through. That was masked off, and then I sprayed Tamiya XF20 Medium Gray lightly above the waterline.
 With only two tiny decals to apply, I didn’t apply
any Future to the model.
Of course the decals, the two famous “laughing
swordfish” that adorn the conning tower, fought me and wouldn’t settle down over
the detail on the tower, even with large amounts of Walthers Solvaset.
Luckily
With only two tiny decals to apply, I didn’t apply
any Future to the model.
Of course the decals, the two famous “laughing
swordfish” that adorn the conning tower, fought me and wouldn’t settle down over
the detail on the tower, even with large amounts of Walthers Solvaset.
Luckily
The last step was to build the display stand. I glued this together but left it unpainted as I plan to put the ship in a diorama with other 1/350 ships someday. For now it will have to sit in my display case with a rather bland looking stand.
| CONCLUSIONS |
After a string of some long, drawn-out models I was
looking for a “quick kill”, and this turned out to be just the thing.
The
| REFERENCES |
 -
Osprey Publications, “Wolfpack”,
Gordon Williamson
-
Osprey Publications, “Wolfpack”,
Gordon Williamson
-
Squadron/Signal Publications, Warships in Action
#1, “U-Boats in Action”
November 2010
If you would like your product reviewed fairly and quickly, please contact me or see other details in the Note to Contributors.