| KIT #: | S002 |
| PRICE: | $90.00 SRP |
| DECALS: | One option |
| REVIEWER: | Mark Hiott |
| NOTES: |
Tom's Modelworks p/e set
and BMK brass barrels used |
| HISTORY |
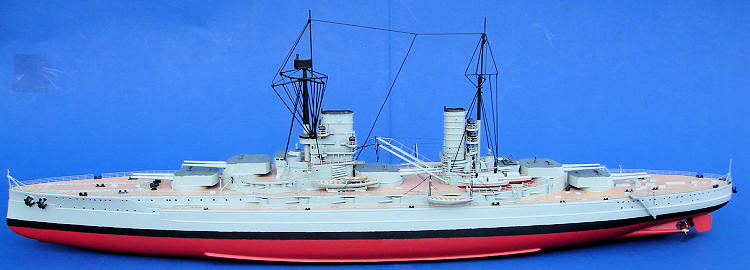
SMS Grosser
Kurfurst, the second of the four-ship Konig Class Battleships, was laid down in
October 1911 and launched on
Kurfurst
displaced 28,600 tons, a lenght of 575ft 6in, a beam of 96ft 9in and could steam
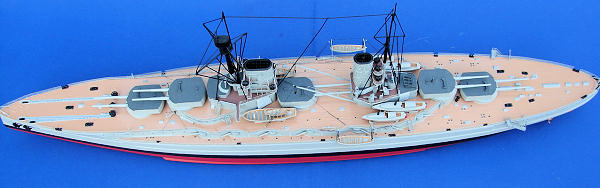
at a top speed of 21 knots (39 km/h; 24 mph). She was armed with ten 30.5cm
(12.0in) guns arranged in five twin turrets: two superfiring turrets each fore
and aft and one turret amidships between the two funnels. Her secondary armament
consisted of fourteen 15 cm (5.9 in) guns, six 8.8 cm (3.5 in) guns and five
50 cm (20in) underwater torpedo tubes, one in the bow and two on each beam.
The ship took
part in several combat operations early in the war: the raid on Yarmouth on 2–3
November 1914, the raid on Scarborough, Hartlepool and Whitby on 15–16 December.
Having missed the Battle of Dogger Bank in February 1915, she spent the rest of
the year taking part in several sorties into the North Sea and the Baltic Sea.
The Kurfurst went into drydock in Wilhelmshaven for periodic maintenance on 12
February 1916. Work lasted until 3 March; two days later the ship sailed for a
sweep into the Hoofden. The fleet conducted another sortie on 23 March to the
Amrun Bank, followed by another a month later to Horns Reef on 21–22 April.
None of these operation resulted
in contact with the British fleet.
 Grosser
Kurfurst was present during the fleet operation that resulted in the Battle of
Jutland which took place on 31 May and 1 June 1916. A narritive of the battle is
far to big for this write-up, but in the course of the battle, Kurfurst fired a
total of 135 shells from her main battery and 216 rounds from her 15 cm guns.
She was hit by eight large-caliber shells, which killed fifteen men and wounded
ten.
Grosser
Kurfurst was present during the fleet operation that resulted in the Battle of
Jutland which took place on 31 May and 1 June 1916. A narritive of the battle is
far to big for this write-up, but in the course of the battle, Kurfurst fired a
total of 135 shells from her main battery and 216 rounds from her 15 cm guns.
She was hit by eight large-caliber shells, which killed fifteen men and wounded
ten.
One of the
15-inch shells destroyed the No. 2 port-side 15 cm gun, and another struck the
main belt and burst on impact. Though it did not penetrate the belt, it forced
the plating in by as much as 13 in (33 cm) for a length of some 26 ft (7.9 m).
Damage control teams managed to temporarily stop the resulting flooding, after
approximately 800 t (790 LT; 880 ST) of water had entered the ship. The flooding
caused a list of 4°, though counter-flooding efforts reduced it to less than a
degree. As the battle continued, the flooding worsened, and by the time Grosser
Kurfurst reached Helgoland the following morning, an estimated 3,000 t
(3,000 LT; 3,300 ST) of water had entered the ship. More hits were sustained,
but these shells burst on impact and caused relatively minor damage.
After repairing the
damage, unit training with the
Kurfurst took
part in several further sorties, but none resulted in sea action. She did take
part in the bombardment of Russian coastal guns in Tagga Bay off Cape Ninnast.
Striking a mine, she sailed to Wilhelmshaven via Kiel, where repairs were
completed.
Grosser
Kurfurst and her three sisters were to have taken part in a final fleet action
at the end of October 1918, days before the Armistice was to take effect. The
bulk of the High Seas Fleet was to have sortied from their base in Wilhelmshaven
to engage the British Grand Fleet; Grand Admiral Scheer intended to inflict as
much damage as possible on the British navy, in order to retain a better
bargaining position for Germany, despite the expected casualties. However, many
of the war-weary sailors felt the operation would disrupt the peace process and
prolong the war. On the morning of 29 October 1918, the order was given to sail
from Wilhelmshaven the following day. Starting on the night of 29 October,
sailors on Thuringen and then on several other battleships mutinied. On the
31st, Scheer ordered the fleet dispersed; Grosser Kurfurst and the rest of
 Kiel. On 4
November, the ship's crew joined the general mutiny and hoisted the Red Flag of
the Socialists. The unrest ultimately forced Hipper and Scheer to cancel the
operation. When informed of the situation, the Kaiser stated, "I no longer have
a navy."
Kiel. On 4
November, the ship's crew joined the general mutiny and hoisted the Red Flag of
the Socialists. The unrest ultimately forced Hipper and Scheer to cancel the
operation. When informed of the situation, the Kaiser stated, "I no longer have
a navy."
Following the
capitulation of Germany in November 1918, most of the High Seas Fleet's ships,
under the command of Rear Admiral Ludwig von Reuter were interned in the British
naval base in Scapa Flow. The fleet remained in captivity during the
negotiations that ultimately produced the Versailles Treaty. Von Reuter believed
that the British intended to seize the German ships on 21 June 1919, which was
the deadline for Germany to have signed the peace treaty. Unaware that the
deadline had been extended to the 23rd, Reuter ordered the ships to be sunk at
the next opportunity. On the morning of 21 June, the British fleet left Scapa
Flow to conduct training maneuvers, and at 11:20 Reuter transmitted the order to
his ships.
Grosser Kurfurst sank at 13:30. Unlike her sisters, she was ultimately raised on 29 April 1938 and sold for scrapping in Rosyth.
| THE KIT |
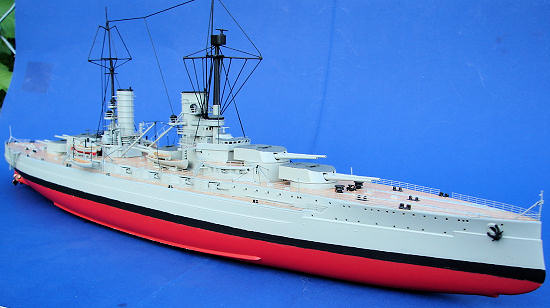
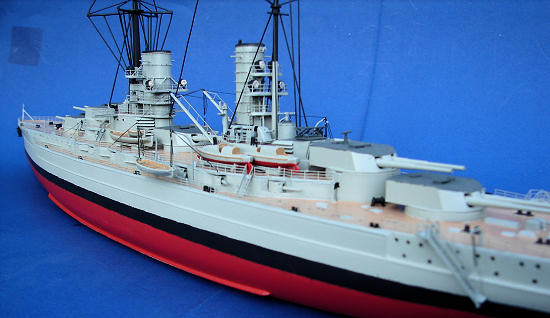
Molded in light gray plastic, the level of detail is amazing. The molding is
very fine, so fine in fact, that getting some of the smaller parts off the sprue
will be difficult. The hull is one piece, with separate fore deck and main
decks. The main deck casemate bulkheads are also separate. The amount of parts
is impressive, but that parts count also means that building the kit will be a
bit of a chore.
The
instructions are nicely done and are clear in the placement of most parts. They
include a 1/700 side view as well as full size 1/350 top and side view drawings.
I did notice a few errors in the instructions and I'll point these out as the
build progresses.
The decals are quite simple and consist of air recognition circles and various flags.
| CONSTRUCTION |
I
chose to skip around the instructions and build the main assemblies first. If
all the tiny parts are added to the hull in step 13, most of them are sure to
get broken in later steps. I started with the hull and decks. Test fitting the
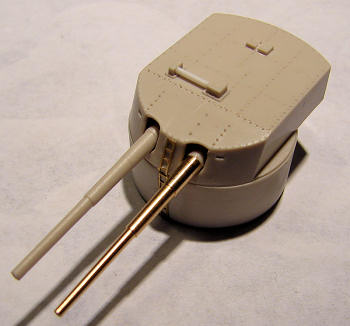
various parts, I discovered that
 the turret
rings are too small for the locations on the decks. The turret rings or the
locations will need to be modified to get a good fit. Even then, clamps were
needed to hold the turret rings in place while the glue dried. Because of this,
attach the turret rings before you attach the deck to the hull.
the turret
rings are too small for the locations on the decks. The turret rings or the
locations will need to be modified to get a good fit. Even then, clamps were
needed to hold the turret rings in place while the glue dried. Because of this,
attach the turret rings before you attach the deck to the hull.
Attaching the forward casemate bulkheads leaves a nice gap at the front end of
each side. Filler will be needed and careful sanding. Even then, one of the
seams popped open later in the build. The fit of the main deck to the hull is
quite nice and didn't require any filler. However, part B2, the foredeck, is too
long. I'm not sure if this is a result of my modifying turret D's mounting, but
it needed to be trimmed at the aft end where it meets turret ring D. If you
intend to mount the ship to a base, you will also need add the mountings before
the foredeck, as you will not be able to afterwards. Also, if you decide to do a
waterline model, consider adding some bracing to the inside of the hull.
In
step 13 and step23, you need to add louvers to the sides of the superstructure.
Some of the parts didn't have numbers on the sprues and the instructions don't
give you numbers for the Starboard side. They are Port and Starboard handed and
are very difficult to install correctly. In step 19, the foremast, part K6 does
not fit through the hole in part J42. Test fit K6 before painting. In step 29,
install part G32 before fitting part G36. If G36 is installed in the little
notch in G32, the ladder G24, will not fit. Part G36 must be installed a little
offset to allow the ladder to clear part G32.
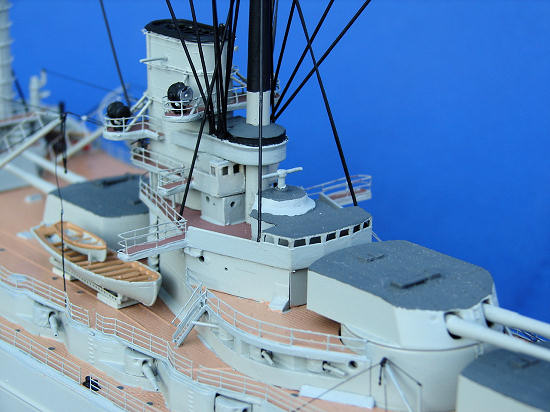
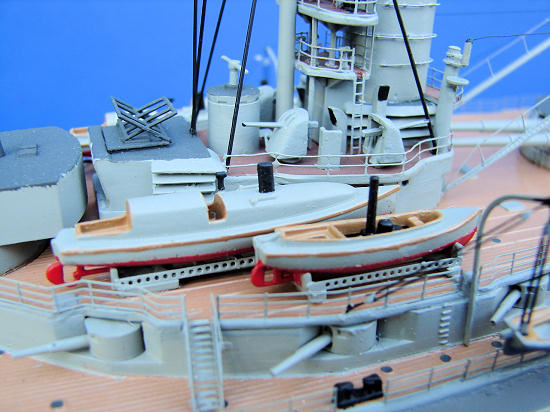
I
assembled the fore and aft deckhouses separately from the hull. I think it is
easier to finish these parts, and install the rigging, before adding them to the
decks. I replaced the kits masts and yardarms with brass rod as the kit parts
were too fragile. I added the aft deckhouse first, then installed the boats and
the boat cranes. I also rigged the boat cranes before adding the forward
deckhouse.
 PHOTOETCH:
A full set of BMK brass barrels were used. They are quite nice and not overly
expensive. All you do is cut off the kit barrels and install the brass ones. The
smaller secondary guns are so small that I question the value of using brass for
those, but the barrels are available separately.
PHOTOETCH:
A full set of BMK brass barrels were used. They are quite nice and not overly
expensive. All you do is cut off the kit barrels and install the brass ones. The
smaller secondary guns are so small that I question the value of using brass for
those, but the barrels are available separately.
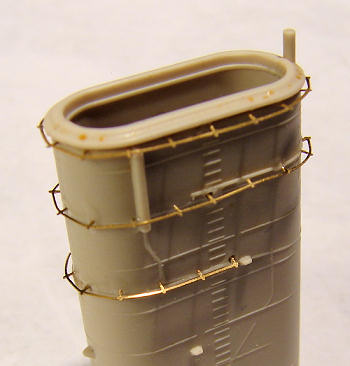
I
used Toms Modelworks Konig/Kurfurst p/e set for this build. This set includes
pre-sized rails for the decks. A
diagram shows you where to install each rail. While this is nice in certain
situations, I prefer bulk railings that I can cut to length. No extra 2-bar
railings are supplied,
 and I
don't know anyone who can do a whole ship and not mess up at least one section
of rail. If you do, you will have to scrounge to find replacement rails. Rails C
and K are too short. While there is some extra 3-bar rails to fix part C, you
will have to hope that the boats hide the problems with K. The only other
problem I noticed was that rail E does not have the cutouts for the forward set
of kit part G20. There is one of these chocks on each side of the bow. However,
the rails could be easily cut to remedy this oversight.
and I
don't know anyone who can do a whole ship and not mess up at least one section
of rail. If you do, you will have to scrounge to find replacement rails. Rails C
and K are too short. While there is some extra 3-bar rails to fix part C, you
will have to hope that the boats hide the problems with K. The only other
problem I noticed was that rail E does not have the cutouts for the forward set
of kit part G20. There is one of these chocks on each side of the bow. However,
the rails could be easily cut to remedy this oversight.
After the hull was assembled and painted, but before the superstructure was added, I installed all the deck rails. To install the rails later risks breaking things. If you opt to do the ship "pre Jutland", you will need to remove the molded on solid rails on parts J1, J12, (or parts J21, J41) and J34, on the fore deckhouse and parts K50, K51 and K52 on the aft deckhouse. If modifying parts J21 and J41, do not remove the sections around the extended bridge wings, as there are not enough railings for these.
| COLORS & MARKINGS |
 The model
was painted with Model Masters and Humbrol paints, MM
The model
was painted with Model Masters and Humbrol paints, MM
Rigging was done with .5mm "Stretch Magic" beading line. It can be found in most
craft stores and comes in clear or black. It was attached with CA glue and was
then tightened with a little heat. Care must be taken not to over tighten the
rigging. Now that I look at it, I think the .5mil may be a bit too big and .3mil
may be a better choice. Smaller rigging (boats, cranes and such) was done with
.005 nylon thread. All rigging was then painted flat black.
| FINAL CONSTRUCTION |
The
last bits added were the anchors, propellers, rudders and the boats on the
davits. These were rigged using some left over bits from a 1/350 Titanic set.
The instructions say to use wire and the Toms set doesn't include falls for the
boats.
| CONCLUSIONS |
 A very nice
model can be build OOB, but the p/e detail really sets this model off. The Toms
Modelworks set is beautifully etched and installed with little trouble. Some
parts of the kit are very fragile and care must be taken if damage is be
avoided. There are a few inaccuracies in the kit, most notable is the foremast
which is incorrect. I believe White Ensign makes a brass replacement mast, but I
have not seen one.
A very nice
model can be build OOB, but the p/e detail really sets this model off. The Toms
Modelworks set is beautifully etched and installed with little trouble. Some
parts of the kit are very fragile and care must be taken if damage is be
avoided. There are a few inaccuracies in the kit, most notable is the foremast
which is incorrect. I believe White Ensign makes a brass replacement mast, but I
have not seen one.
I
can't stress enough that, given it's size, it must be built in sections. There
is no other way to minimize the chance of damage. Treat it as a bunch of small
models brought together in the end to make a bigger one.
A
must have for any ship lover.
| REFERENCES |
Wikipedia
The
internet
Lots of books
July 2011
If you would like your product reviewed fairly and fairly quickly, please contact the editor or see other details in the Note to Contributors.