| KIT #: | K3569 |
| PRICE: | £51.00 plus VAT |
| DECALS: | None |
| REVIEWER: | Frank Spahr |
| NOTES: | Resin kit with Photo Etch and Brass Wire |
| HISTORY |
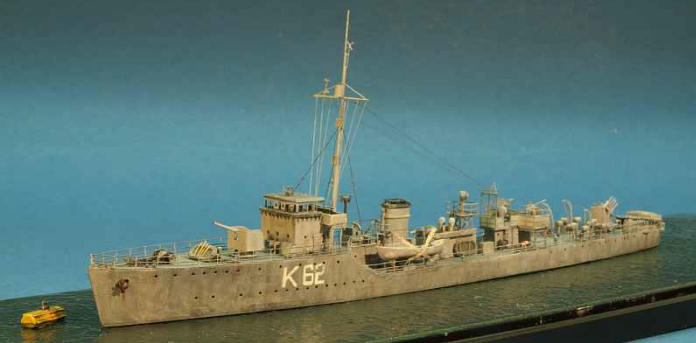
During the 1930s, Britain started her rearmament and prepared for the foreseeable war. An important issue were convoy escorts, as the convoy system had proved crucial in winning the last U-boat war. Amongst other projects, nine patrol sloops of the Kingfisher class were constructed in three groups. They were handsome vessels, looking like scaled-down destroyers, but soon proved to be unsuitable for mass production and for the convoy work needed in the next war. They lacked endurance and seaworthiness, their machineries were too complicated, and they lacked armament. Ultimately, they were used for coastal escort work, mostly on the East Coast, where they had to cope with German aircraft and E-boats. Wartime modifications centered on improving air defence and adding radar sets. Two were lost in the war, the others were sold or scrapped soon after.
| THE KIT |
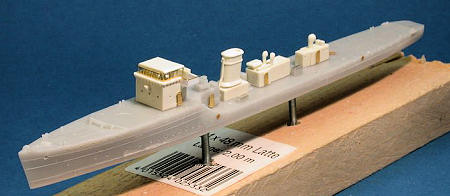
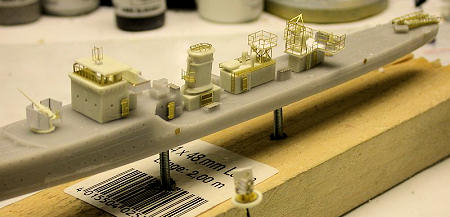
This resin kit by WEM of the HMS
Kittiwake, lead vessel of the second group of the sloops, contains resin and PE
parts plus brass wire to build either a full hull or a waterline model of one of
th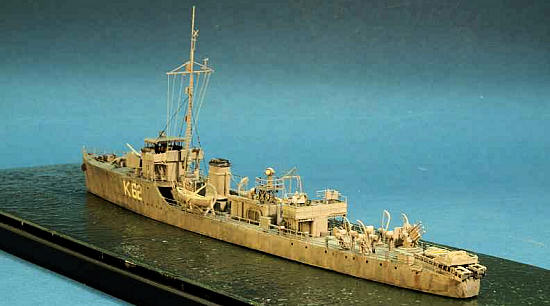 e
sloops. The instructions are to the usual high standard and refer to an article
by John Lambert in Military Modeling Annual for further references on this
rather obscure class of small warships. As usual with WEM, the PE is
outstanding; the resin parts are well done, too, and flawlessly cast in two
shades of resin. Apart from decals, the kit contains everything you need to
build a nice model of this class. There are some references to alternate parts
for early and late versions, for instance regarding the depth charge rails, so
the kit manufacturer cared about modifications already.
e
sloops. The instructions are to the usual high standard and refer to an article
by John Lambert in Military Modeling Annual for further references on this
rather obscure class of small warships. As usual with WEM, the PE is
outstanding; the resin parts are well done, too, and flawlessly cast in two
shades of resin. Apart from decals, the kit contains everything you need to
build a nice model of this class. There are some references to alternate parts
for early and late versions, for instance regarding the depth charge rails, so
the kit manufacturer cared about modifications already.
If you really are serious about details and accuracy, you will have to go some extra miles, a path not eased by the scarcity of reference available. Obviously a class of nine vessels built at different yards will have a goodly number of differences from the outset, and refits and modifications will complicate things yet more. I will not open this can of worms too wide, but the three groups in which the class was built differ in displacement and dimensions, so if anyone is really serious about his accuracy, even the hulls might need modifying. But not for me, I can assure you that.
| CONSTRUCTION |
 I
cooperated with some of my German Gamblers friends in a build-the-same-kit
manner on this project, each of us chosing one vessel of the class with a view
to sometime presenting them on a common base. I chose HMS Widgeon, as the
abovementioned John Lambert article contains some very helpful images of her
from 1942 in a very weathered finish. Having had to complete other projects
first, I was
I
cooperated with some of my German Gamblers friends in a build-the-same-kit
manner on this project, each of us chosing one vessel of the class with a view
to sometime presenting them on a common base. I chose HMS Widgeon, as the
abovementioned John Lambert article contains some very helpful images of her
from 1942 in a very weathered finish. Having had to complete other projects
first, I was 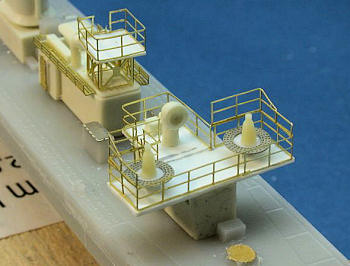
 Watertight
doors were added from the kit PE, whilst the covers of the ready ammunition
boxes were taken from the fine L´Arsénal detail set. The aft deckhouse needed
most modification; the deck was replaced by sheet styrene, and the two Oerlikons
mounts were taken again from L´Arsénal. The quad .5 in Vickers gun at the stern
was beefed up a bit using styrene rod and brass wire, as it looked too flat to
me as an all-PE item in this scale. A splinter shield was added as per reference
images. The main gun was retained as resin item; some PE details were added and
a splintershield from CA-infused paper. As usual with me, the mast was replaced
with tapered BMK brass for better stability; a mix of kit parts and some
additions was used to bring it close to my reference images. The DF loop on the
bridge roof was replaced by a smaller PE assembly late in the build.
Watertight
doors were added from the kit PE, whilst the covers of the ready ammunition
boxes were taken from the fine L´Arsénal detail set. The aft deckhouse needed
most modification; the deck was replaced by sheet styrene, and the two Oerlikons
mounts were taken again from L´Arsénal. The quad .5 in Vickers gun at the stern
was beefed up a bit using styrene rod and brass wire, as it looked too flat to
me as an all-PE item in this scale. A splinter shield was added as per reference
images. The main gun was retained as resin item; some PE details were added and
a splintershield from CA-infused paper. As usual with me, the mast was replaced
with tapered BMK brass for better stability; a mix of kit parts and some
additions was used to bring it close to my reference images. The DF loop on the
bridge roof was replaced by a smaller PE assembly late in the build.
| COLORS & MARKINGS |
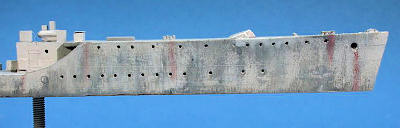 pplied
peacetime coat of paint in the dark Home Fleet Grey, which had been repainted
under war conditions with a lighter coat. Hence the vessel was sprayed in a
lighter grey, and then weathered. I started this process by sanding off paint
with a fibre glass pen, thus partially exposing the darker undercoat. Next came
many passes with various mixes of artist´s oils in varying shades of grey and
rust, applied in a drybrushing manner. The hull numbers were unavailable as
decals to me, so I made paint masks and sprayed them. They were weathered
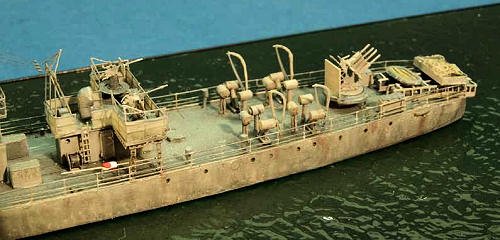
accordingly. The superstructure was treated far more mildly, as wear and tear
would be less up here and the area easier accessible to the crew for cleanup and
repaints. As always, it should be
noted that each weathering technique looks different in real life and in closeup
images, a bit like an actor will receive dramatically different makeup for the
stage or for a movie. We need to compromise here, as the models are primarily
made to be watched at home and at model shows, but also need to look reasonably
acceptable on the net.
pplied
peacetime coat of paint in the dark Home Fleet Grey, which had been repainted
under war conditions with a lighter coat. Hence the vessel was sprayed in a
lighter grey, and then weathered. I started this process by sanding off paint
with a fibre glass pen, thus partially exposing the darker undercoat. Next came
many passes with various mixes of artist´s oils in varying shades of grey and
rust, applied in a drybrushing manner. The hull numbers were unavailable as
decals to me, so I made paint masks and sprayed them. They were weathered
accordingly. The superstructure was treated far more mildly, as wear and tear
would be less up here and the area easier accessible to the crew for cleanup and
repaints. As always, it should be
noted that each weathering technique looks different in real life and in closeup
images, a bit like an actor will receive dramatically different makeup for the
stage or for a movie. We need to compromise here, as the models are primarily
made to be watched at home and at model shows, but also need to look reasonably
acceptable on the net.
| MORE CONSTRUCTION |

Finally, the mast was added, and the
model was rigged using 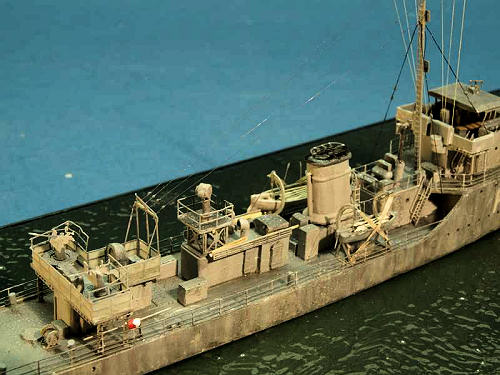 rest. Both
lines may be glued using
rest. Both
lines may be glued using
| CONCLUSIONS |
| REFERENCES |
British Destroyers and Frigates; the
Second World War and After,
Norman Friedman, Chatham Publishing,
ISBN
1-86176-137-6.
If you would like your product reviewed fairly and quickly, please contact me or see other details in the Note to Contributors.