Revell 1/142 North Sea Fishing Trawler
| HISTORY |
I can but recommend visiting the very informative
Wikipedia
site on the Ross Tiger for information on the ship, its
service and its history. Suffice it to say here that Grimsby used to be an
incredibly busy fishing port basing literally hundreds of trawlers. The largest
of them fished right into Arctic waters as far north as possible, while medium
sized vessels like the Ross cats fished in the region of the Faeroes and Norway.
All this is lost today, with the Grimsby fishing industry in decline after the
Cod Wars of the 1970s. Grimsby
 still has the well worth visiting National
Fishing Heritage Centre to which the Ross Tiger belongs. The ship is open for
guided tours conducted by former crew members that give a good insight into what
it meant to work on a trawler in those days.
still has the well worth visiting National
Fishing Heritage Centre to which the Ross Tiger belongs. The ship is open for
guided tours conducted by former crew members that give a good insight into what
it meant to work on a trawler in those days.
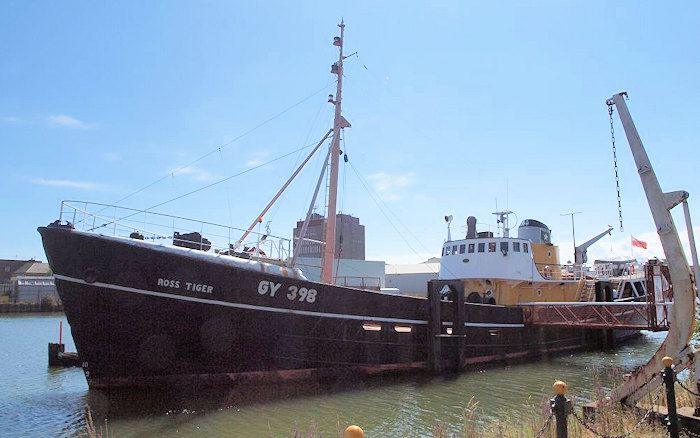
The Ross Tiger´s future, as with so many museum ships, is not too clear, and it may well be not around for too long due to mounting costs for its upkeep. I therefore suggest our UK readers and visitors to the UK to pay the museum and the trawler a visit. I did, and I did not regret it.
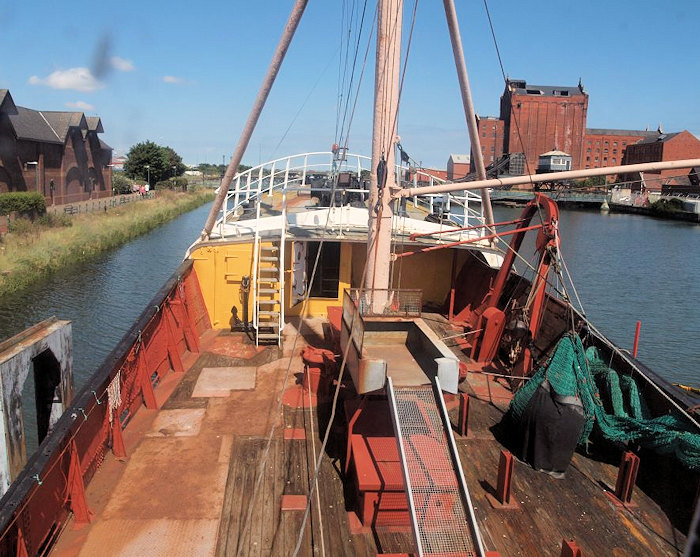
In fact I made sure I included the museum and the ship into our UK travel schedule after preparing the kit preview, in order to see the vessel which came closest to being the protoype of the trawler kit. We were guided aboard by former crew member John Vincent who did a great job in describing life and work aboard this small vessel: Fishing trips lasting two weeks and more in heavy weather, crowded berthing, gutting fish straight from the net on the open deck in wind and rain, the works.
| THE KIT |
This model kit in
1:142 scale was first produced by Revell in 1970 and marketed as
Russian Spy Fishing Trawler "Volga".
The Soviets then used fishing trawlers to shadow NATO ships and task groups and
gather intelligence. In 1972, the kit was re-issued with new decals as Fishing
Trawler "Kandahar", and in 1973 with new decals as the tr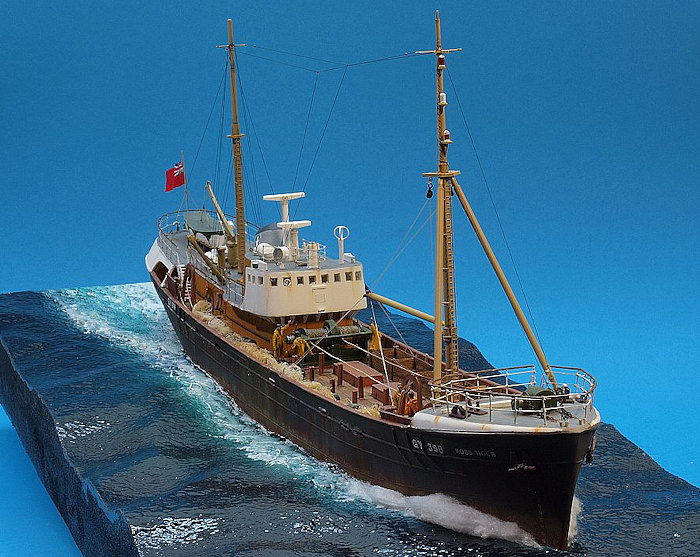 awler "Arctic
Huntress". 1979 and 1992 reboxings again made it a Russian Spy, whereas in 1998
it was labeled as the Northsea Fishing Trawler "Arctic Corsair". This is still
extant and a museum ship in Hull, Yorkshire, UK. The latest reboxing in 2015
renamed the ship to "Ross Jackal" and gave her homeport as Grimsby,
Lincolnshire, UK. Quite a history for a model kit - and thanks to the
Scalemates database for this overview.
awler "Arctic
Huntress". 1979 and 1992 reboxings again made it a Russian Spy, whereas in 1998
it was labeled as the Northsea Fishing Trawler "Arctic Corsair". This is still
extant and a museum ship in Hull, Yorkshire, UK. The latest reboxing in 2015
renamed the ship to "Ross Jackal" and gave her homeport as Grimsby,
Lincolnshire, UK. Quite a history for a model kit - and thanks to the
Scalemates database for this overview.
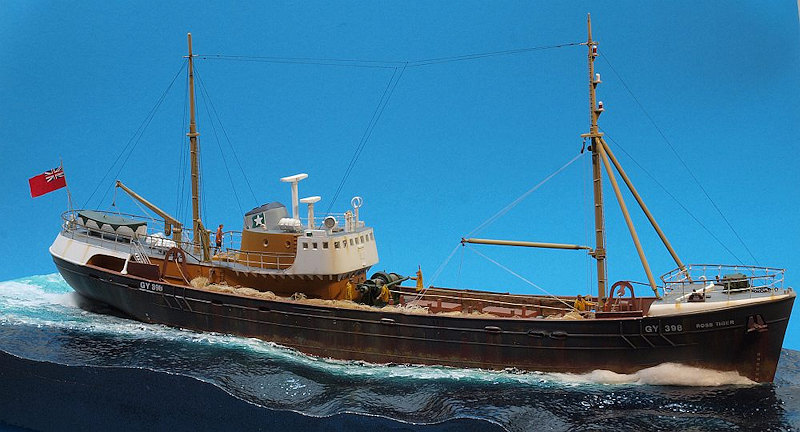
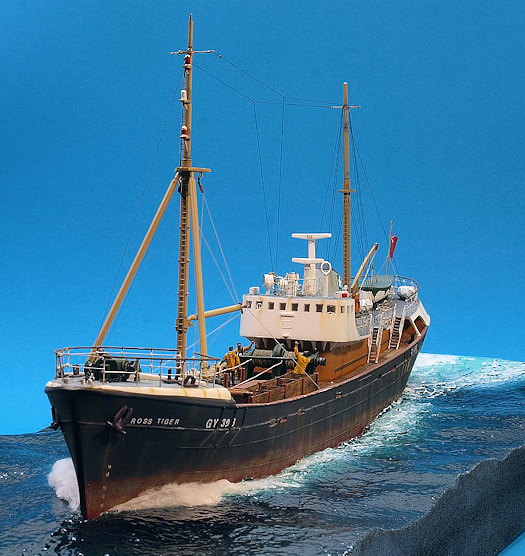
I had always wanted to build that kit but never got around to it until the latest re-issue when I got a review kit. Upon researching the possible origin and identity of this case of, um, multiple personalities, I found that Revell seems to have finally got the name quite right. The model looks very much like the still extant M/V "Ross Tiger" in Grimsby, one of the class of "Ross Cats" built in the late 1950s and early 1960s for the Ross fishing company. In fact, there were twelve of them, named after cats save the Ross Jackal and the Ross Zebra. Only the Jackal and the Tiger had a rounded stern (like the model), whereas the remaining vessels had a transom stern.
| CONSTRUCTION |
As in earlier builds of vintage kits, I tried to identify what to retain and what to replace and where to source the aftermarket items needed to do so. Obviously, you won´t find a dedicated PE set, let alone resin corrections for such a kit, so it was a matter of styrene stock, brass wire and tubing and what generic PE I could find and utilize. I like that approach.
 Looking through old and
current reference images I decided to retain the current layout of inclined
ladders to the quarterdeck but keep the more substantial main mast instead of
the current humble pole serving as an antenna spreader. I decided to open the
bridge windows, to replace the main net winch, and also to replace most of the
molded-on deck detail. The masts would have to be replaced with brass items for
stability to withstand the pull of the rigging, and also for a crisper look. The
plastic railing would also have to be replaced. The single anchor was anything
but credible, so was to be replaced by one I happened to have in stock, and I
assumed the vessel had two of them, so I had to make another one. The two radar
arrays were basically sound, but the direction finder could benefit from a
replacement. The two net booms were quite all right, but the two trawler net
doors and (obviously) the net were missing, so I needed that, too. Finally, the
main deck was supposed to be planked with wood, but the raised detail provided
was anything but credible. All in all, this was a bit of work.
Looking through old and
current reference images I decided to retain the current layout of inclined
ladders to the quarterdeck but keep the more substantial main mast instead of
the current humble pole serving as an antenna spreader. I decided to open the
bridge windows, to replace the main net winch, and also to replace most of the
molded-on deck detail. The masts would have to be replaced with brass items for
stability to withstand the pull of the rigging, and also for a crisper look. The
plastic railing would also have to be replaced. The single anchor was anything
but credible, so was to be replaced by one I happened to have in stock, and I
assumed the vessel had two of them, so I had to make another one. The two radar
arrays were basically sound, but the direction finder could benefit from a
replacement. The two net booms were quite all right, but the two trawler net
doors and (obviously) the net were missing, so I needed that, too. Finally, the
main deck was supposed to be planked with wood, but the raised detail provided
was anything but credible. All in all, this was a bit of work.
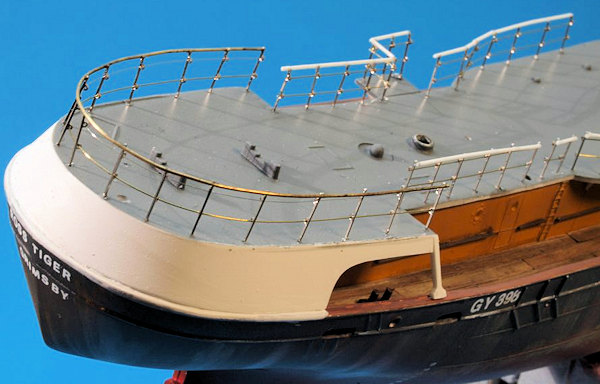
I started by assembling the hull, using the hottest glue I had for extra stability. The distinctive hull strakes near the net booms were augmented using thin steel wire, and the scuppers were opened and brought to the correct number by melting them into the hull with a heated screwdriver. That also ensured a realistic raised surround for the scuppers. The same method was used for the openings of the hawsepipes on the forecastle.
What raised detail I wanted to replace on the main deck was removed. The numerous bridge windows were cut out using a fine saw. Additional scuttles were opened on the superstructure as per reference images. The funnel was lamentably open and empty from above, so a blocking plate was fitted, onto which exhausts of various diameters were fit, cut from tube stock. I should become very well acquainted with my tube cutter over the nect few weeks.
 Where necessary, the holes
for the railing stanchions were filled using stretched sprue. A small deck
extension was added from sheet to the quarterdeck where the additional inclined
ladder was sited.
Where necessary, the holes
for the railing stanchions were filled using stretched sprue. A small deck
extension was added from sheet to the quarterdeck where the additional inclined
ladder was sited.
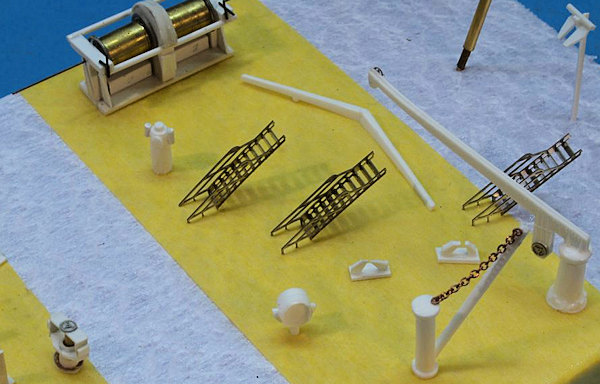
I used generic PE by German manufacturer Saemann extensively throughout this build. His inclined ladders, vertical ladder stock, railing stanchions and handwheels of various diameters helped me a lot. These handwheels went into the net winch, the direction finder, and a very small one was used in one bridge window as centrifugal disc. 0.3 mm blackened copper wire was used to make the numerous eyebolts and blocks needed. Several odds and ends like bitts and fairleads were made from styrene stock, a number of small vents were made from brass tubing and solder wire.
The trawler net doors, which keep the mouth of the net open when deployed, were built from styrene stock and brass. The net winch was built to the dimensions of the kit part using styrene stock, brass tubing and PE handwheels.
 The masts were made from
various diameters of brass tubing procured from Albion Alloys, taking the kit
items as guides for size. Care was taken to mount brass tubing to the decks to
receive the masts and mount them later on in the correct angle.
The masts were made from
various diameters of brass tubing procured from Albion Alloys, taking the kit
items as guides for size. Care was taken to mount brass tubing to the decks to
receive the masts and mount them later on in the correct angle.
Having found I had not enough life raft canisters, I took an impression from the one I had and duplicated it in dental resin to arrive at the right number.
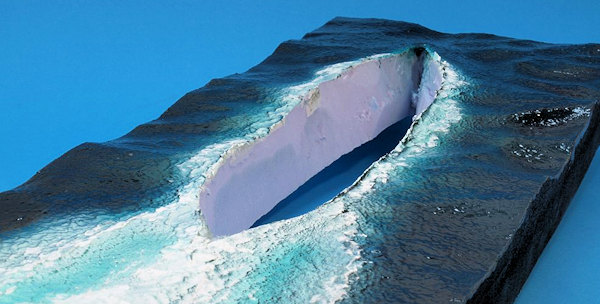
I tend to try something new in each build. This time, there were two techniques. I tried to improve my method of making my seascapes and lend them a more "organic" look. To this purpose, I started with cutting a piece of the right size from fine-grained insulation foam board. Into this, a cutout for the hull was made and the hull fit in as desired. Instead of shaping the seacape with a knife, a rasp or sandpaper, I utilized a gas burner you can buy to make crème brulée. The technique needs good ventilation and a proper amount of control, but leaves you with quite credible representations of waves. Depending on the intensity of the heat, you can also produce coarser surfaces that work well in the wake of the ship. After some attempts (I made five bases in all) I was quite happy with the result. I only needed some limited sanding to clean up the base after my attacks with the gas burner. That reduced the amount of dust and dirt in the modeling den to hitherto inconceivably low levels. Now the model was blended into the base. I wrapped the hull into clingfilm and filled the gaps between the hull and the base with acrylic caulking from the hardware supermarket. After two days curing time, the hull was removed and any excess caulking trimmed.
That done, I took fast-curing PVA glue and brushed that onto the base, except in the wake area which I wanted as rough as possible. The stuff is self-leveling and further enhances the organic look. Other modelers use watercolor paper soaked in CA glue or papier maché to this end, I found my new approach to be quite simple and fast - obviously after having gone through my learning curve.
 I followed this (after
proper curing time - this is important) by stippling white wall paint to the
base. That produces the slightly irregular surface that - when glossy - best
simulates water. I then sprayed first an intense shade of green and then a dark
blue, working from different directions to make the end result not too uniform.
That fully dry, the base was glosscoated using a rattle can from the hardware
supermarket. I prefer a solvent-based product to acrylics here. That dry, I
continued as usual, adding gloss clear acrylic gel to the areas near the hull to
add some depth. This was followed by a light drybrushing with white artist´s oil
paint, and the application of cotton wool to the bow wave and the wake
immediately astern the vessel.
I followed this (after
proper curing time - this is important) by stippling white wall paint to the
base. That produces the slightly irregular surface that - when glossy - best
simulates water. I then sprayed first an intense shade of green and then a dark
blue, working from different directions to make the end result not too uniform.
That fully dry, the base was glosscoated using a rattle can from the hardware
supermarket. I prefer a solvent-based product to acrylics here. That dry, I
continued as usual, adding gloss clear acrylic gel to the areas near the hull to
add some depth. This was followed by a light drybrushing with white artist´s oil
paint, and the application of cotton wool to the bow wave and the wake
immediately astern the vessel.
But I had to build the model before that, obviously. All the subassemblies so far completed and test-fitted, I thoroughly de-greased everything with lighter fluid, let that dry and then sprayed my hull with my tried and trusted solvent-based primer from the hardware supermarket rattle can. Only to find out that the stuff did not stick to the model at all. Which dissatisfied me more than just a tiny bit. My mood was a bit like Sauron´s on one of those days of phantom pain from his lost finger. I had to remove the stuff from the hull using sticky tape and sandpaper as best as I could, but now needed to find out what would stick to the hull. Tests of the primer on fresh styrene stock sheet showed that it would not stick to that, either, so I figured out I must have either got a bad batch or they had changed the formula somehow.
I tried a can of
transparent plastic primer I had got from a shop specializing on automotive
paints years ago. That did work, and reassured me no end. So now I was able to
spray the hull in brick red, mask it, spray the upper hull in dark grey, and
spray the deck and inside of the bulkheads a reddish brown. That went
surprisingly well, and I made very good progress over the course of one weekend.
For the paint scheme, I decided to digress both from what Ross Tiger now wears
and from what the kit instructions
 want. I used a dark grey for the hull, as
pure black would be much too stark. The sides of the forecastle and the bridge
and upper superstructure were painted white, whereas the lower level of the
superstructure was painted brown. The steel decks were painted Medium Sea Grey,
whereas the funnel was painted Pale Grey Blue. The funnel cap was painted dark
grey. The masts were painted a shade of ochre.
want. I used a dark grey for the hull, as
pure black would be much too stark. The sides of the forecastle and the bridge
and upper superstructure were painted white, whereas the lower level of the
superstructure was painted brown. The steel decks were painted Medium Sea Grey,
whereas the funnel was painted Pale Grey Blue. The funnel cap was painted dark
grey. The masts were painted a shade of ochre.
A bit of work was involved with the Ross company flag. The kit decal has it in blue whereas it is indubitably green. Not being able to make my own decals, and unable to find a five-pointed star of the right size, I ended up buying stars for table decorations, spraying two of the smallest size in white, and gluing them to the green flag I had painted on the funnel.
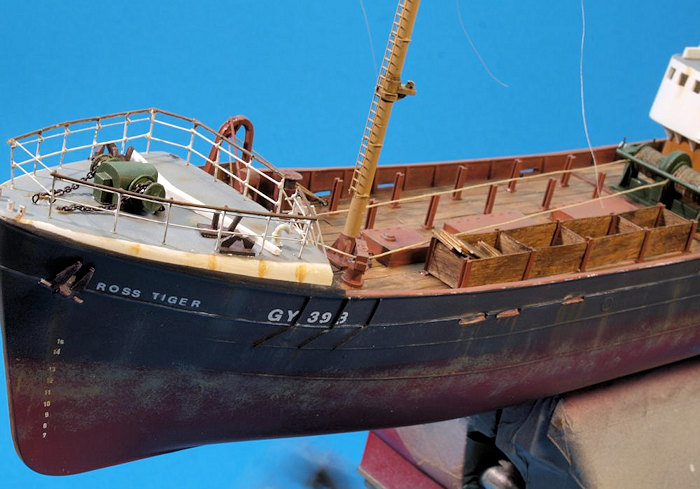
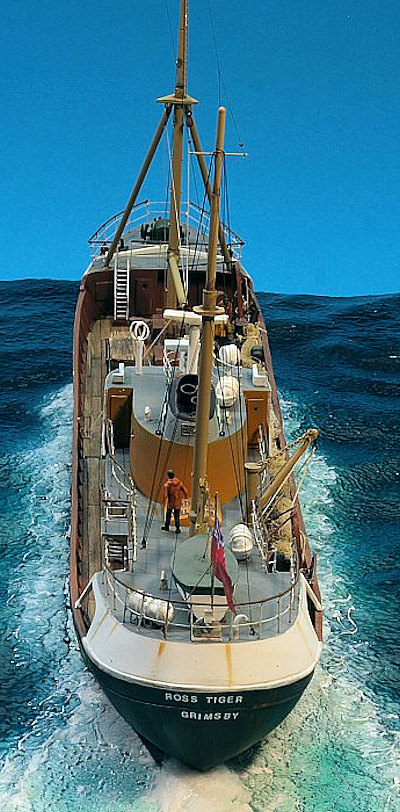
That done, the fun part came - weathering. These vessels were truly hard-worked ships, operating in a harsh environment. Especially their starboard side, where the net was handled alongside the hull, showed serious wear and tear. So I used various shades of oil paints to produce hull streaking and rust stains, plus simulated marine growth around the waterline. The superstructure was weathered in a more restrained manner. Oils washes were used to accentuate recessed details, and some drybrushing brought out raised details. The ship´s name and registration number were applied using dry transfers at this stage.
 The other new technique I
gave a try was making my own deck planking. Having removed the coarse kit deck
detailing, I could either scribe the deck to simulate individual planks, and
paint it as convincingly as possible, or try another approach. As I reckoned
both the scribing and the painting would be above my skills, I opted for plan B.
The other new technique I
gave a try was making my own deck planking. Having removed the coarse kit deck
detailing, I could either scribe the deck to simulate individual planks, and
paint it as convincingly as possible, or try another approach. As I reckoned
both the scribing and the painting would be above my skills, I opted for plan B.
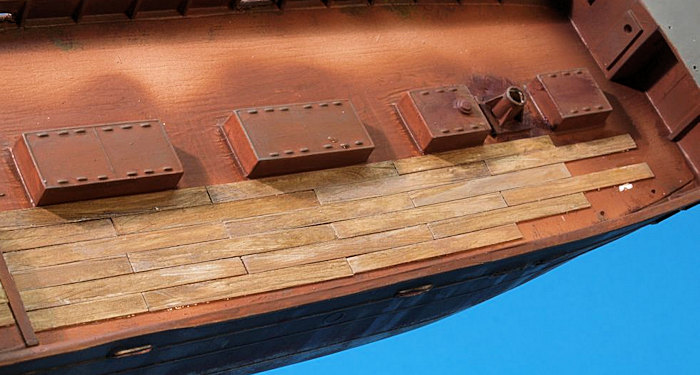
I used .25 mm styrene sheet and cut individual planks out of it using my Chopper. Scalewise, the planks would be around 5.40 metres or 18 ft long, and around ten inches wide. That is a bit wide, but my natural laziness tends to come through. These styrene strips were mounted on masking tape, quite a lot of them actually. I then used a curved rasp to score them lengthwise in a more or less random manner to add some structure to the material. That done, they were primed and then sprayed a tan shade acrylic. That cured, I used a rather wide brush lightly loaded with first ochre and then dark artist´s oils and lightly applied those lengthwise and in a random manner to simulate wood. I ended up with a sheet full of planks with a wooden look, and a generally uniform but yet individual look. In fact, I produced two batches, one lighter than the other, to provide variation.
These planks were now glued
to the main deck using CA glue, as I was worried plastic glue would melt the
thin material and/or attack the coat of
 paint. As the CA does not chemically
interact with either styrene or paint, that went well. In the end, I need about
four hours to apply the deck planking, and was quite happy with the result, the
more so after applying a black wash and thus accentuating the seams.
paint. As the CA does not chemically
interact with either styrene or paint, that went well. In the end, I need about
four hours to apply the deck planking, and was quite happy with the result, the
more so after applying a black wash and thus accentuating the seams.
I prepared styrene stock for the "boxes" on deck where the fish was stored prior to gutting and transfer to the fish hold in the same manner. The framing for the boxes was made from styrene "H" profiles.
Next came adding all the railings. I decided to divert from my usual build sequence in order to have as much space around the railings as possible, so left off the bridge and any deck fittings for the time being. The individual stanchions were glued into pre-drilled holes as securely as possible. I chose the height of the railings after the kit items, and had to shorten the Seamann stanchions a bit to arrive at the right height. There are smaller stanchions in his program, but they do not have the right number of holes for bars. The railings are a bit on the tall side, yet, but I have the nagging feeling that some dimensions of the model are a bit off anyway. I don´t feel much inclination of pursuing that thought much further. The railing bars were added using both .2 and .1 mm wire. The uppermost bar, or rather the handrail, was made from .3 mm wire. The rounded section at the stern was annealed prior to bending it and gluing it to the stanchions. That was a bit of work but it looks better than the kit parts. The railings were handpainted after assembly, using a brown shade for the handrail in order to optically reduce the height yet a bit.
 Having prepared, painted
and weathered all the subassemblies, they were now duly added to the model,
beginning with the main superstructure. This also received its share of railing
around the open steering position. Having added all the detail to the stern
area, I tackled the open deck. First, the scratchbuilt net winch was installed.
It had been provided with rigging thread prior to adding it to the model. Now I
was able to add the various gear associated with handling the net and leading
the threads from the winch through it, securing them in strategically placed
eyebolts.
Having prepared, painted
and weathered all the subassemblies, they were now duly added to the model,
beginning with the main superstructure. This also received its share of railing
around the open steering position. Having added all the detail to the stern
area, I tackled the open deck. First, the scratchbuilt net winch was installed.
It had been provided with rigging thread prior to adding it to the model. Now I
was able to add the various gear associated with handling the net and leading
the threads from the winch through it, securing them in strategically placed
eyebolts.
The real net is a fiendishly complicated piece of gear. I saw no way I would be able to model it convincingly, so I decided to show it stowed on deck, like on the museum ship today. Our guide had told us the nets in his days were not the plastic kind but still made from natural fibres. So I took some of the netting I had found on a box of decorative pumpkins a few years ago and sprayed it in a brownish hue. I then tied it together in a sausage-like thread reaching from the fore net boom to the stern one. The net has some prominent sinkers, rather large spheres that keep the mouth of the net open. These were replicated by beads of 4 mm diameter I got from SWMBO´s stock. They were pretty, bright and gaily coloured. I sprayed them dull black and then added a sickly greenish-grey hue to hint at marine wear and tear. These beads were threaded on a piece of rigging thread, and that assembly was tied to the net "sausage". Liberal application of CA glue brought the thing into shape, and it was glued to the deck using PVA glue.
The forecastle fittings were added, comprising the anchor winch, bitts and fairleads, and suitably blackened anchor chain.
Now I was able to add the masts and their associated rigging. Everything taut and excesses trimmed, I made some rounds of rigging thread and secured them around the positions where they would be stowed.
A flagstaff was added to the stern from wire stock, the Red Ensign from the decal sheet was applied to aluminum foil and glued to a piece of rigging thread, which in turn was added to the flagstaff.
 The ship was now virtually
complete, but still without a crew. Extensive searches of model railroading
webshops showed me some figure sets that might work. The model´s scale, as
furtively mentioned above, is not exactly and totally the alleged 1:142, so
neither European N scale at 1:160 or 1:144 scale would work. I finally found a
set of construction workers by Preiser in TT scale, which is 1:120. When they
were delivered, they fit very well. They needed some limited repainting and a
serious grunging with a dark wash, and then looked the part. They were glued to
the model with CA glue.
The ship was now virtually
complete, but still without a crew. Extensive searches of model railroading
webshops showed me some figure sets that might work. The model´s scale, as
furtively mentioned above, is not exactly and totally the alleged 1:142, so
neither European N scale at 1:160 or 1:144 scale would work. I finally found a
set of construction workers by Preiser in TT scale, which is 1:120. When they
were delivered, they fit very well. They needed some limited repainting and a
serious grunging with a dark wash, and then looked the part. They were glued to
the model with CA glue.
Having rechecked the model and its paintwork, everything was blended in and sealed with an acrylic flat coat, using Winsor & Newton´s Galleria medium, mixed with window cleaner and Vallejo´s Flow Improver. That works well for me.
Now the last task on the model was to fill all the windows and scuttles with canopy PVA glue and add the centrifugal disc to one bridge window into the fresh PVA. That cured nice and clear.
| CONCLUSIONS |
This still is a good and valid kit, and one well worth buying. It´s up to anyone what amount of modifications to apply, the kit provides a sound base and ample space for detail work.
19 July 2016
Copyright ModelingMadness.com
If you would like your product reviewed fairly and fairly quickly, please contact the editor or see other details in the Note to Contributors.