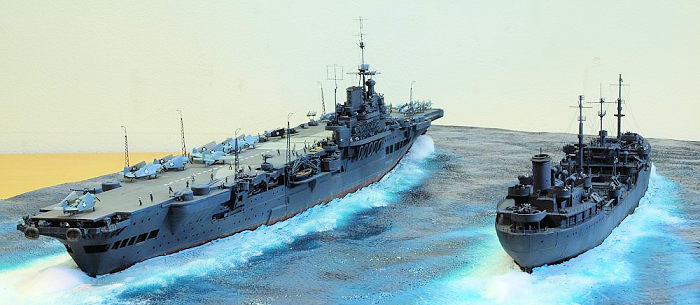
Heller 1/400 USS Robin (HMS Victorious)
| KIT #: | 81089 |
| PRICE: | $ |
| DECALS: | |
| REVIEWER: | Frank Spahr |
| NOTES: | Considerable aftermarket and scratchbuilding required. |
| HISTORY |
I have a deep-seated weakness for old model kits. Not necessarily for any old clunker, but I do enjoy the challenge of making something hopefully better and more detailed from a simple base. Add to that the limited availability of certain subjects in kit form. Quite often an old kit is (yet) the only game in town, if you want a model of a certain subject.
For an interesting read on the 'USS Robin' and her operations in the Solomons, visit this link. Ed
| THE KIT |
Royal Navy aircraft carriers have so far been less
kitted than other subjects. So you need to belatedly thank Heller for producing
both the Illustrious class armoured carriers and the Colossus Class light
carriers in their WW2 guise. Sadly, both kits are certainly not up to current
standards and in the Heller scale of 1:400.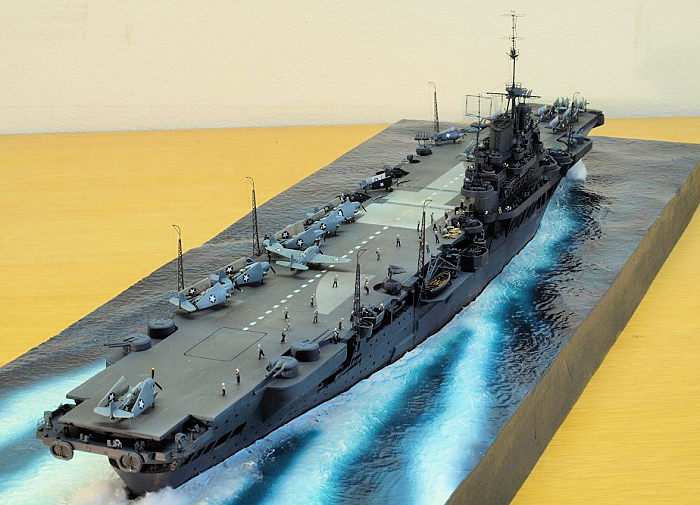
I had obtained an Illustrious kit about ten years ago, and had over the years at least decided how to build it. In the Anatomy of the Ship volume on HMS Victorious I had found references to her service in the Pacific in 1943 with the US Navy, under the codename of „USS Robin“. The ship had operated a complement of US aircraft, had been refitted with a lot of US gear and painted in the US Measure 21 camouflage scheme. That looked an interesting project, but quite a lot of other projects happened before I took any real steps.
In fact, I felt it might soon be too late to obtain the plethora of aftermarket goodies needed for the project, as the niche for detailing old Heller stuff seemed to shrink whilst I was watching. The main supplier of 1:400 items, L´Arsénal, had switched owners and it was anyone´s guess how long they would keep up their impressive catalogue. Moreover WEM, manufacturer of the indispensable PE set, had ceased to be. I was unsure how long the new owners would stock the more uncommon PE.
So I started making a list of the vessel´s fit at
the time of her USN service, and scrutinized the available period images until
choosing one as my reference. This image was printed in the AOTS volume but also
available on the internet, and I tried to stick as closely to it as possible. It
had been taken before or after a RAS manoeuvre, and there was a tanker in the
vicinity. Rather late into the project, to make matters more in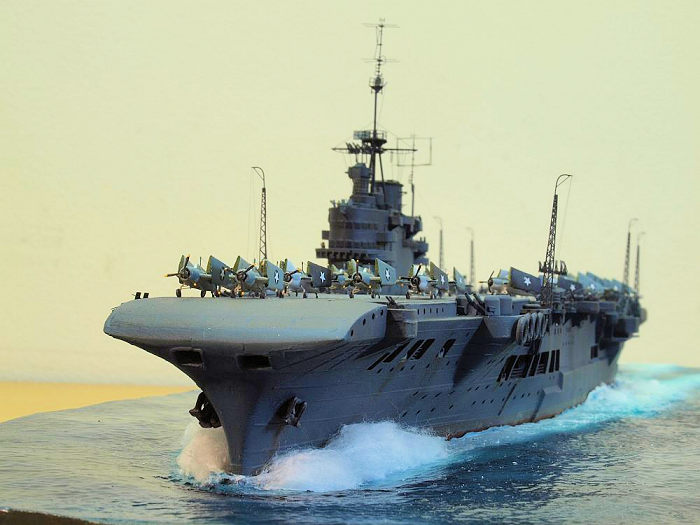 teresting, I
chose to add the tanker.
teresting, I
chose to add the tanker.
The reference images showed the USS Cimarron, a T3 tanker, but I intended to utilize the 1:400ish Esso Glasgow kit of a T2 tanker instead. I had built this kit before and knew it contained some of the gun emplacements needed for a wartime version. The T2 was the closest I would get to my reference image without scratchbuilding a whole vessel.
In the end, I needed the entire air group, all the guns, some of the directors, plus bits and bobs like life rafts, and I needed some scratchbuilding. The shopping list at L´Arsénal was long and cost several times the price of the kits. I found this project finally justified buying a Punch and Die set, I chose the one from Rptoolz of Hungary. The one thing that was unavailable was quite a crucial item to someone like me who is not up to too much scratchbuilding. It was the WEM resin correction set for the carrier´s island, which was out of production and unlikely to be produced again. I was lucky that Peter Hall, formerly WEM´s kit and PE designer and now head of his own company Atlantic Models, supplied his last remaining item to me. Thank you very much, Peter, you are a true gentleman!
| CONSTRUCTION |
Getting started on such a project is tricky. I
chose a two-pronged approach and both started the carrier´s hull and its
air group. The hull because it´s a logical starting point and I needed it for the
base, the airgroup because it can easily be as much work as a ship and I wanted
to have this repetitive work out of the way as lo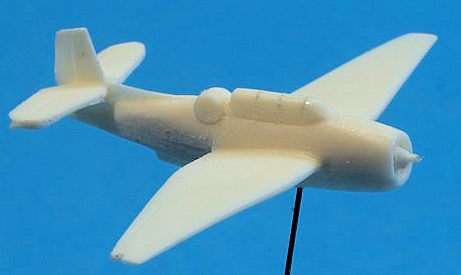 ng as I was still reasonably
motivated. I wouldn´t want to hurry through building the planes just to get the
project completed.
ng as I was still reasonably
motivated. I wouldn´t want to hurry through building the planes just to get the
project completed.
Wilfried Eck, a most accomplished plane modeler from Nuremberg, helped me in finding out which paint schemes and marking the aircraft had sported. On perusing the reference images from the day in 1943 when some aircraft made a pass over the carrier and took several photos, I first checked the numbers of Wildcats and Avengers and how they were deployed on the deck. Most had their wings folded, save one Avenger. And they were in two different paint schemes, some in the earlier blue grey over grey, and some in the later Tricolor scheme. Mr Eck helped me to get this right, and my friend Frank Ilse donated some surplus national insignia decals (which would have been hard to get otherwise).
The L´Arsénal resin planes sported PE props and
landing gears, but were scant on detail. Trying to find a balance between the
level of detail aimed at and my skills, I did the following: Some cuts with a
razor saw adde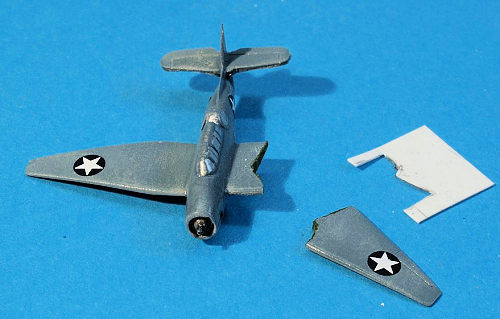 d some structure to the cockpits. The wings and stabilizers were
thinned out. Small holes were drilled to accept the antenna masts and the
Avengers´ ventral and ball turret guns. Somewhat larger holes were drilled for
the Avengers´ exhausts. The planes were then mounted on thin wire and painted.
After priming, one basic colour was sprayed and the rest was brush painted. The
planes were then glosscoated and decaled. The next step was to make sheet
templates for the wingfold cuts. All planes but one had their wings removed.
Next came work on the landing gears. The PE wheels looked too skinny, so I used
my new Punch and Die to punch reinforcements from thin sheet to beef them up a
bit. The PE prop tips were painted yellow, the hubs silver. It was a bit of work
to attach all the landing gears and the props, plus the gun barrels and antenna
masts from .2 mm wire. Finally, antenna wires were added from Caenis
monofilament, and the planes were flatcoated.
d some structure to the cockpits. The wings and stabilizers were
thinned out. Small holes were drilled to accept the antenna masts and the
Avengers´ ventral and ball turret guns. Somewhat larger holes were drilled for
the Avengers´ exhausts. The planes were then mounted on thin wire and painted.
After priming, one basic colour was sprayed and the rest was brush painted. The
planes were then glosscoated and decaled. The next step was to make sheet
templates for the wingfold cuts. All planes but one had their wings removed.
Next came work on the landing gears. The PE wheels looked too skinny, so I used
my new Punch and Die to punch reinforcements from thin sheet to beef them up a
bit. The PE prop tips were painted yellow, the hubs silver. It was a bit of work
to attach all the landing gears and the props, plus the gun barrels and antenna
masts from .2 mm wire. Finally, antenna wires were added from Caenis
monofilament, and the planes were flatcoated.
At this point, I securely stored them in a padded box and continued work on the carrier.
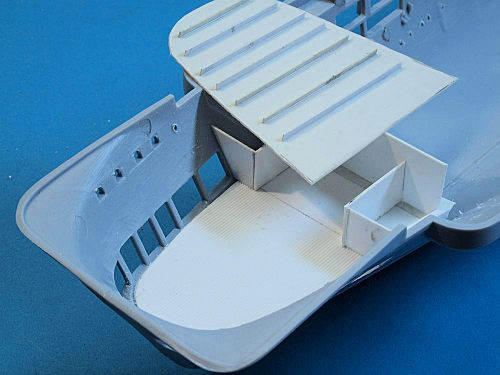 Once the hull halves were assembled, I started
preparing a base for the model, using insulation foam board in my usual method.
I also started work on the island, removing the misshapen parts and grafting the
WEM resin to it. Inside the hull, the quarterdeck took the most effort, as it
needed to be redone completely. The wooden deck was made from the classic
Evergreen V-groove sheet, with various fittings made from styrene stock and
leftover PE.
Once the hull halves were assembled, I started
preparing a base for the model, using insulation foam board in my usual method.
I also started work on the island, removing the misshapen parts and grafting the
WEM resin to it. Inside the hull, the quarterdeck took the most effort, as it
needed to be redone completely. The wooden deck was made from the classic
Evergreen V-groove sheet, with various fittings made from styrene stock and
leftover PE.
I also made a cut into the hull to house the
intricate PE stern platform missing from the kit. This platform later turned out
to be my bane in this project. I kept comparing the various drawings in the AOTS
book with the model and tried to correct what I saw and felt able to do. The
numerous hull inserts were addressed as subassemblies and detailed to a certain
level. I also tried to fi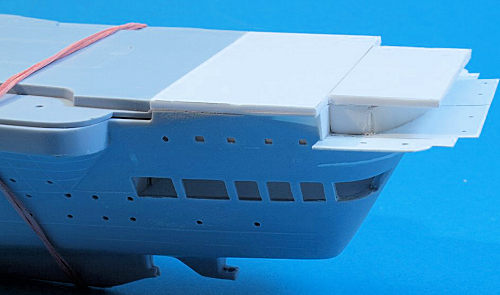 nd out where additional platforms had to be built to
house the extra U.S. equipment. Whenever I had the time and no motivation for
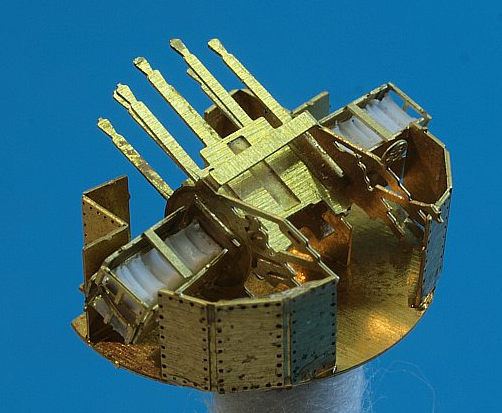
other subassemblies, I worked on items such as cranes, AA guns, directors and so
on. There are quite a number of the ubiquitous 20 mm Oerlikon AA guns on this
kit, to just name the most numerous item.
nd out where additional platforms had to be built to
house the extra U.S. equipment. Whenever I had the time and no motivation for
other subassemblies, I worked on items such as cranes, AA guns, directors and so
on. There are quite a number of the ubiquitous 20 mm Oerlikon AA guns on this
kit, to just name the most numerous item.
The stern area had to be redone several times
until I was finally happy. The first thing I found out was that the WEM PE
platform was too low in the hull and would not fit, let alone enable guns or
searchlights to be placed on it. So I had to close the cutout I had made and
scratchbuild a platform somewhat higher up, plus the adjacent bulkheads and the
supports for the platform. Parts of the hull were puttied with Apoxie
 Sculp and
later heavily modified. The stern section of the flightdeck also had to be
rebuilt. It had been lengthened during the US refit and the original round-down
made level, to increase deck parking space.
Sculp and
later heavily modified. The stern section of the flightdeck also had to be
rebuilt. It had been lengthened during the US refit and the original round-down
made level, to increase deck parking space.
The third homemade stern deck finally turned out as desired. Its supports were homemade, too, after my attempts at utilizing the WEM PE items had failed. But that only happened when I was half done with painting the hull.
Before I started painting, I detailed the island. That turned out quite an effort in its own right, as there were various platforms and sponsons not present in the kit or resin parts, all of which needed to be scratchbuilt. Moreover, the masts needed to be built in metal, and the PE antennas made. The classic Type 271 radar lantern was cast from a mold made from a resin item from another kit.
| COLORS & MARKINGS |
When the subassemblies were done, I started
painting. The hull was de-greased, primed and then sprayed first in hull red for
the lower hull. I used a Lifecolor shade for that. The upper hull was sprayed in
three shades of Vallejo blue and grey, to arrive at a representation of the Navy
Blue applied during the US refit.
 The shading aimed at making the surface varied
and not too uniform. The hull was weathered using artist´s oils, mostly where
the bow wave would hit the paint and around the waterline. I used rust rather
sparingly.
The shading aimed at making the surface varied
and not too uniform. The hull was weathered using artist´s oils, mostly where
the bow wave would hit the paint and around the waterline. I used rust rather
sparingly.
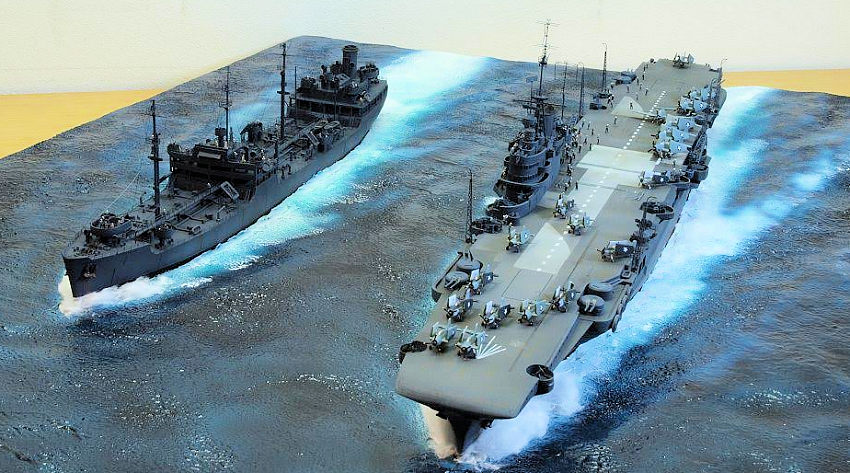
At about that time I took the plunge and decided to add the tanker and needed a common base for both vessels. So the already painted hull was masked and used to make a fitting cutout in a really large piece of foam board. I have kept both hulls removable and can present the vessels on the common base at a model show, or individually at home.
The bases were prepared in my usual method. The wave pattern was produced with a gas burner (very carefully and only with adequate ventilation). Areas outside the water disturbed by the ships were lightly sanded and further smoothened by application of PVA glue. The final surface texture was achieved by stippling white wall paint to the bases. They were then sprayed in two shades of acrylics, green and blue, this time aiming at a more greenish hue. After allowing two weeks for drying, the bases were sealed with clear gloss from a rattle can, and wave effects enhanced by the use of heavy clear gloss acrylic gel and drybrushing with white artist´s oil paint. Cotton wool coated with Future was used for the bow and stern waves.
| FINAL CONSTRUCTION |
Checking on whether I had everything for final
assembly, I tried to obtain enough of the excellent NorthStar figures. They are
hard to get. I also looked into shapeways for items I might need, and ordered a
number of Ca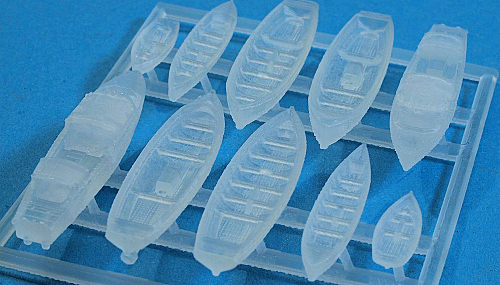 rley Floats, a set of RN boats, and figures. The figures were
nothing to write home about, but the boats and the floats were just brilliant.
They looked fine straight from the box, but only after priming and painting did
I see how crisp and neat they were. I also used NorthStar USN floats which come
with a PE mesh, and are also excellent articles. A number of boxes, crates and
barrels were also made from styrene stock.
rley Floats, a set of RN boats, and figures. The figures were
nothing to write home about, but the boats and the floats were just brilliant.
They looked fine straight from the box, but only after priming and painting did
I see how crisp and neat they were. I also used NorthStar USN floats which come
with a PE mesh, and are also excellent articles. A number of boxes, crates and
barrels were also made from styrene stock.
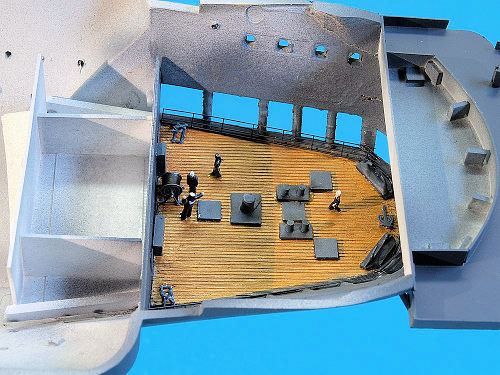
Final assembly started with adding the numerous hull inserts, and the sequence of scratchbuilt parts for the quarterdeck, the stern platform and the flight deck extension. Mating the flightdeck to the hull was tricky and needed strength, a bit like a shotgun wedding. When the flightdeck was finally secured to the hull, it needed painting. I had to mask all around the deck, and then prime it and apply the deck camo as I had conjectured it from the photos available. There is no hard evidence beyond those images, let alone any paint references, so the only thing to do was to make it as similar to the references as possible. I used several shades of grey, with the markings in white. After all the masking and spraying, the deck was weathered to a limited degree. I aimed at a well-kept deck with ordinary signs of wear and tear, nothing spectacular.
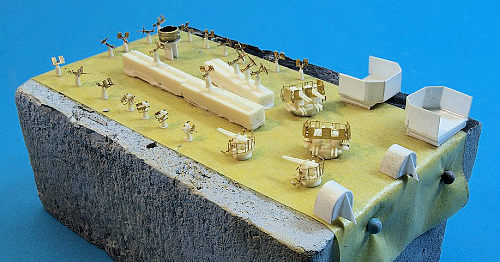 That done, the really quite intricate and delicate
island was mounted on the deck, followed by the plethora of subassemblies I had
prepared. I do enjoy this final stage of a build, when the many foam board
blocks that house the subassemblies are emptied and the model really comes to
life. The aircraft were retrieved from their padded boxes, and placed on the
deck according to my reference image. I had no fitting deck vehicles and could
see none, so I omitted them. A goodly number of NorthStar sailors (officers and
crew) were placed on the bridge, the deck and the sponsons, aiming at a
distribution that made sense and looked reasonably similar to what my reference
image showed. A number of people on the island were placed to starboard,
watching the yet to be built tanker.
That done, the really quite intricate and delicate
island was mounted on the deck, followed by the plethora of subassemblies I had
prepared. I do enjoy this final stage of a build, when the many foam board
blocks that house the subassemblies are emptied and the model really comes to
life. The aircraft were retrieved from their padded boxes, and placed on the
deck according to my reference image. I had no fitting deck vehicles and could
see none, so I omitted them. A goodly number of NorthStar sailors (officers and
crew) were placed on the bridge, the deck and the sponsons, aiming at a
distribution that made sense and looked reasonably similar to what my reference
image showed. A number of people on the island were placed to starboard,
watching the yet to be built tanker.
I waited with adding the intricate radar antennae as long as I could. The model received only very limited rigging, I used Caenis flyfishing thread as usual. A final flat coat sealed glue spots and other blemishes, and I called work on my USS Robin quits.
| CONCLUSIONS |
 This was my most involved, lengthy and expensive
build so far. I have since seen far better results obtained from the same Heller
kit, but still am quite happy with mine. It is close to the ultimate niche
product – an outdated plastic kit in a scale that time forgot, and of a subject
that does not seem overly popular with kit manufacturers. So I was happy that I
was able to get the big heap of aftermarket items needed, from the classic resin
and PE stuff to the latest efforts in 3D printing.
This was my most involved, lengthy and expensive
build so far. I have since seen far better results obtained from the same Heller
kit, but still am quite happy with mine. It is close to the ultimate niche
product – an outdated plastic kit in a scale that time forgot, and of a subject
that does not seem overly popular with kit manufacturers. So I was happy that I
was able to get the big heap of aftermarket items needed, from the classic resin
and PE stuff to the latest efforts in 3D printing.
Now it was time to complement the carrier with the USN tanker.
Dramatic closing music and announcer commenting that you should tune in next time for the next exciting adventure. Ed.
| REFERENCES |
Ross Watton: The Aircraft Carrier HMS Victorious, Anatomy of the Ship series.
Excellent info on the „USS Robin“, including my reference image, is to be found here:
http://www.armouredcarriers.com/uss-robin-hms-victorious/
Wilfried Eck´s pages on WW2 USN aircraft camouflage (in German):
http://www.pmcn.de/ABC/USN%20Markings%20I/USN%20Markings%20I.htm
9 October 2017
Copyright ModelingMadness.com
If you would like your product reviewed fairly and fairly quickly, please contact the editor or see other details in the Note to Contributors.
Back to the Main Page Back to the Review Index Page Back to the Previews Index Page