
Orange Hobby 1/700 HMS Ocean
| KIT #: | 7030 |
| PRICE: | $55.00 |
| DECALS: | One options |
| REVIEWER: | Frank Spahr |
| NOTES: | Resin with p.e. parts |
| HISTORY |
(This
section courtesy of Lars Scharff of modellmarine.de)
 As of
2014, the helicopter carrier HMS Ocean is the Royal Navy´s sole aircraft
carrier, with HMS Illustrious decommissioned and the new HMS Queen Elizabeth´s
commissioning to be expected not before 2017, or rather later.
As of
2014, the helicopter carrier HMS Ocean is the Royal Navy´s sole aircraft
carrier, with HMS Illustrious decommissioned and the new HMS Queen Elizabeth´s
commissioning to be expected not before 2017, or rather later.
The vessel was
designed as a helicopter carrier to support amphibious forces. The hull form is
said to be based on the Invincible light aircraft carrier class, but built to
civilian standards. Troops can be landed via the embarked helicopters, and light
vehicles may be landed using the four embarked LCVP landing craft. There is a
stern ramp, but no well deck as in a dock landing ship.
 Ocean
is 203.4 m long, 35 m wide and has a fullyloaded displacement of 21,500 tons.
Two diesels provide a top speed of 18 knots. The complement is 465 persons, 830
troops can be embarked.
Ocean
is 203.4 m long, 35 m wide and has a fullyloaded displacement of 21,500 tons.
Two diesels provide a top speed of 18 knots. The complement is 465 persons, 830
troops can be embarked.
Ocean´s armament is
limited to three Phalanx CIWS, four 30 mm guns and machine guns. Up to 22
helicopters may be embarked, including the full range of types in service (Sea
King, Chinook, Merlin, Lynx and Apache). Ocean can also operate as an ASW
carrier with Merlin ASW helicopters.
After Invincible´s
decommissioning in 2005, Ocean was refurbished to operate Harriers, albeit
lacking a ski ramp, the aircraft would have had to take off vertically, limiting
their payload. After the Harrier fleet was phased out, this option is lost.
| THE KIT |
 I was
very enthusiastic when Orange Hobby produced their first naval kits with very
interesting subjects, so I bought a number of them. Amongst them was this
contemporary British vessel. The kit is very intricately detailed and provides
options for deployed vehicle ramps, LCVP and mexeflote.
I was
very enthusiastic when Orange Hobby produced their first naval kits with very
interesting subjects, so I bought a number of them. Amongst them was this
contemporary British vessel. The kit is very intricately detailed and provides
options for deployed vehicle ramps, LCVP and mexeflote.
Luckily for me, I did not begin the kit
for quite some while, so was able to learn from other modelers´ experiences. It
seems that these early OH kits were covered with an extremely tenacious residue
of mold release agent or some other residue. Several modelers found out the hard
way that normal parts preparation procedures would not suffice to make the paint
stick to the resin. Any attempt at handling or masking would lift the paint off.
A friend of mine even trashed a model after a particularly nasty paint disaster.
My modeling pal Sven Schönyan of
www.modellmarine.de and
www.ssnmodellbau.de
devised a method of tackling the issue, which I followed in my build,
successfully.
| CONSTRUCTION |
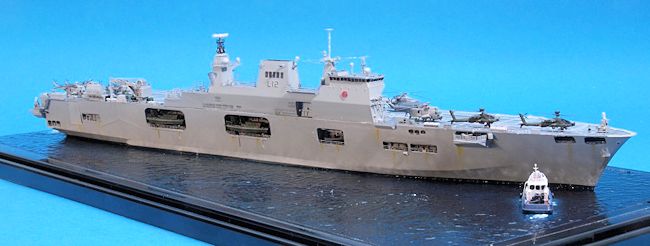
I decided to build
Ocean in calm water, prior to being moored and with two tugs in assistance.
Orange Hobby´s two modern tugs proved an excellent addition to the model, and I
found out that a modestly sized base would suffice for the presentation.
 In
preparing the resin I followed Sven´s recommendations. All resin parts were
brushed with a silicon remover from the hardware supermarket, and set aside
overnight. The next day and using gloves, I brushed off the silicon remover with
warm water and dried the parts. Prior to priming all resin parts were sprayed
with lighter fuel for further degreasing. For priming, ordinary hardware store
primer from the rattle can was used. The parts were then sprayed with Vallejo
acrylics. Artist´s oils were used for drybrushing and washing.
In
preparing the resin I followed Sven´s recommendations. All resin parts were
brushed with a silicon remover from the hardware supermarket, and set aside
overnight. The next day and using gloves, I brushed off the silicon remover with
warm water and dried the parts. Prior to priming all resin parts were sprayed
with lighter fuel for further degreasing. For priming, ordinary hardware store
primer from the rattle can was used. The parts were then sprayed with Vallejo
acrylics. Artist´s oils were used for drybrushing and washing.
Both kits are, as I
already mentioned, extremely detailed and pretty demanding from my personal
point of view. Many parts are virtually invisible without optivisors and very,
very delicate. I got my first inkling when I built the two tugs. The kit has
been scaled down from the company´s 1:350 offering. That makes sure you get
loads of detail, but also demands a zen-like exercise in patience and composure.
I did not manage to use all parts provided, some of them were so ridiculously
small they defied seeing, let alone handling them. Nonetheless I completed both
small models over the course of a weekend.
In building the sea
base, I marked the shapes of the hulls on my Trumpeter display box. Ocean was to
receive two screws which could be threaded through holes drilled in the base and
fixed with nuts. Gluing the screws to the resin proved tricky, as neither CA
glue nor dental resin would stick easily. But with some grinding and providing
undercuts some kind of grip was achieved in the end. The tugs did not receive
any screws due to their small size, only the shape of the hulls was marked.
 The base
was then prepared as usual with me: White wall paint was stippled onto it with a
large brush, in order to provide a somewhat realistic surface structure. That
dried, green and blue acrylics were sprayed to get the desired shades. After
everything was thoroughly dry, the base was sealed with clear high gloss
solvent-based lacquer from a rattle can.
The base
was then prepared as usual with me: White wall paint was stippled onto it with a
large brush, in order to provide a somewhat realistic surface structure. That
dried, green and blue acrylics were sprayed to get the desired shades. After
everything was thoroughly dry, the base was sealed with clear high gloss
solvent-based lacquer from a rattle can.
Ocean´s hull is the
most complex single part. Firstly, the many large pouring stubs had to be sawed
off. After clearing the part up, it was primed as described above and sprayed
black for the boot topping, light grey for the hul sides and dark grey for the
decks. Vallejo acrylics were used, and a lot of brush-painting was involved. I
was very happy with the dry transfers for the flight deck. They mostly fit well
and felt easier to work with to me than decals. I applied the entire deck
markings in about half an hour.
From now on,
building the model was mainly an exercise in patience. I worked my way through
the various steps of the instructions, often ignoring the recommended sequence.
Where possible, suabassemblies were built separate from the model and only
attached once it seemed to make sense. As usual, I worked from the centre to the
periphery to minimize self-inflicted damage. The sheer number of subassemblies
and details meant weeks of modeling without any visible progress. I felt as if I
might be caught in subassembly hell for a few ages sometimes. But at some time I
arrived at the point when I realized I was making some headway and a bit later I
was able to add parts to the hull. At this point things got interesting again.
Especially the numerous floodlight gantries and the many intricate platforms
with their spidery railings taxed my patience.
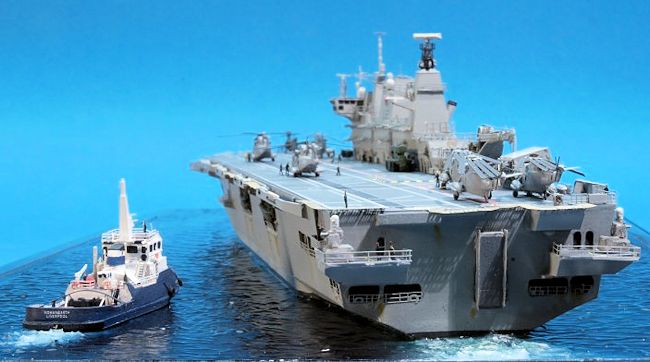 But
finally the ship was really done, and I had the pleasant task of bringing life
to the deck. The kit air group, albeit highly detailed little kits in
themselves, is rather measly in numbers, and there are no deck vehicles at all.
So I procured WEM deck vehicles and additional Sea Kings from L´Arsénal. Those
were no proper RN types, but an image search on the net showed that virtually
anything with rotors in the British forces´ inventory had at some point in time
been parked on that deck, so I didn´t bother. It might have been some sort of
ferry mission for anything I cared. A number of Lion Roar PE figures brought
more life to the deck, and after a final flat coat I was able to mount all three
vessels to the base. Any remaining gaps were filled with clear gloss acrylic
gel, and finally the cover was put over the very, very delicate models.
But
finally the ship was really done, and I had the pleasant task of bringing life
to the deck. The kit air group, albeit highly detailed little kits in
themselves, is rather measly in numbers, and there are no deck vehicles at all.
So I procured WEM deck vehicles and additional Sea Kings from L´Arsénal. Those
were no proper RN types, but an image search on the net showed that virtually
anything with rotors in the British forces´ inventory had at some point in time
been parked on that deck, so I didn´t bother. It might have been some sort of
ferry mission for anything I cared. A number of Lion Roar PE figures brought
more life to the deck, and after a final flat coat I was able to mount all three
vessels to the base. Any remaining gaps were filled with clear gloss acrylic
gel, and finally the cover was put over the very, very delicate models.
| CONCLUSIONS |
This sort of kit from my personal view
explores the limits of the medium and the modelers. Several PE parts were so
finely etched they were unusable. Generally speaking, the PE design is the
typical current
 Asian
design with very little room around the PE parts, making them very hard to
remove from the fret. I much prefer the WEM style with more room for my fine
scissors to work. You need to know about the mould release agent problem, and I
would recommend to treat all the OH kits with extra care in preparing the resin.
The instructions might be a bit clearer and the English a bit less arbitrary.
The air group is very small, and deck vehicles should be a must in such a kit.
Asian
design with very little room around the PE parts, making them very hard to
remove from the fret. I much prefer the WEM style with more room for my fine
scissors to work. You need to know about the mould release agent problem, and I
would recommend to treat all the OH kits with extra care in preparing the resin.
The instructions might be a bit clearer and the English a bit less arbitrary.
The air group is very small, and deck vehicles should be a must in such a kit.
But: If you embark on this project and bring all your patience to bear, you´ll be rewarded with a very highly detailed model. The shapes of modern warships are not everyone´s cup of tea, and I have had fellow modelers pronouncing this vessel as terminally ugly. Nonetheless Ocean is a rather efficient and functional design on limited resources, and to me she doesn´t look too bad at all!
November 2014 If you would like your product reviewed fairly and fairly quickly, please
contact
the editor or see other details in the
Note to
Contributors.