| KIT #: | 05202 |
| PRICE: | $ |
| DECALS: | |
| REVIEWER: | Frank Spahr |
| NOTES: | Restoration |
| HISTORY |
 The Goodwin Sands are
an extensive system of sands in the Southeast of Britain off the Kentish
coast. Their size and shape is constantly changing. They have been a
navigation hazard since the dawn of time, and have caused an estimated 2,000
shipwrecks. Since 1795, lightships have been deployed to warn shipping of
them. Today only one unmanned lightship remains towards the east of the
system, but there used to be up to five manned vessels around the Goodwin
sands at any time.
The Goodwin Sands are
an extensive system of sands in the Southeast of Britain off the Kentish
coast. Their size and shape is constantly changing. They have been a
navigation hazard since the dawn of time, and have caused an estimated 2,000
shipwrecks. Since 1795, lightships have been deployed to warn shipping of
them. Today only one unmanned lightship remains towards the east of the
system, but there used to be up to five manned vessels around the Goodwin
sands at any time.
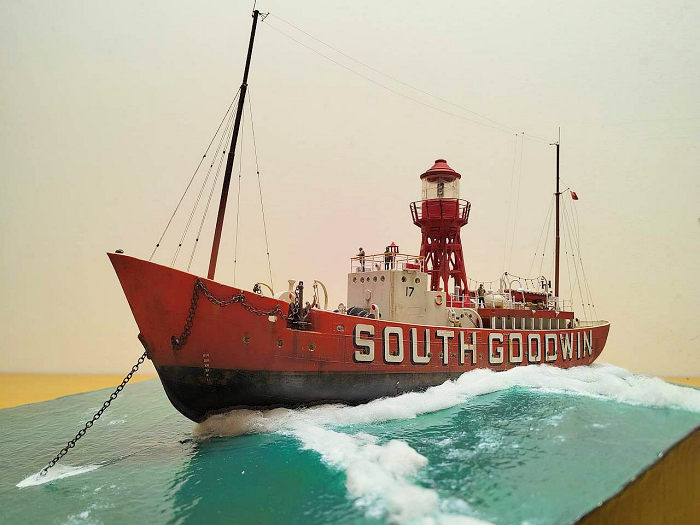
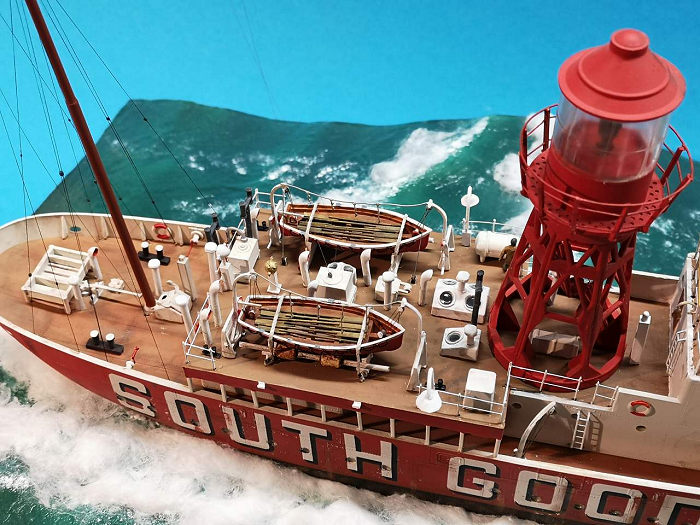
British lightships belong to Trinity House, as well as the lighthouses. The ships themselves have no names, only numbers, but their respective station is painted very large on their hulls.
LV (Light vessel) 90 was commissioned in 1937. It was 36 metres long and displaced 317 tons. The ship had no engine or screw, its diesel generators provided power for the beacon, the foghorn, the hull´s illumination and the needs of the crew of seven. Lightship crews served one month straight at sea until they were relieved. If the weather allowed it.
In the night of 27 November, 1954 LV 90´s anchor started dragging in a severe storm, and the vessel drifted off its position and onto one of the sandbanks, where it was was thrown onto its side, with only a bit of the port side remaining above the waves.
The only survivor on board was Ronald Murton, an ornithologist. He had been deployed onto the vessel for the Ministry of Agriculture to observe migratory birds. He narrowly saved himself out of the capsized hull, clinging to some bracing. In the event, his ordeal lasted for eight hours in cold and storm, and soaked with ice cold water.
The other lightships had observed what happened to LV 90, and radioed for lifeboat assistance. But the lifeboats were unable to get close enough to the wreck. Only a US helicopter flying out of RAF Manston on the Isle of Thanet sighted the lone survivor at all. Due to being low on fuel, the Sikorsky H-19 had to return to Manston to refuel, before an attempt at rescuing Murton could be made. On the aircraft´s return, Murton was able to grip a line lowered from the helo and let himself be winched into the aircraft. To me, this is a virtually superhuman effort after eight hours of clinging to the wreck.
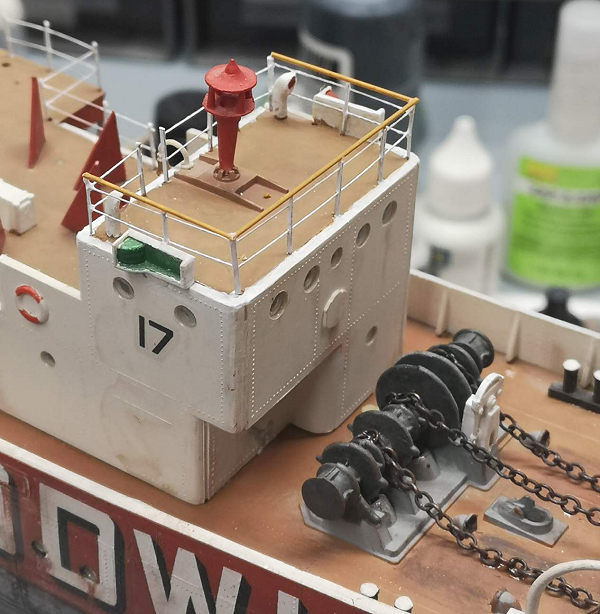
The lightship was replaced by a new vessel (LV 17), which served until 2006 when it was decommissioned without replacement.
Today, some former British lightships are still extant, some as museum ships, others are now accomodation or restaurants. One of them, the former LV 13, is a restaurant in Hamburg. I once dined aboard a former German lightship, which is now a museum ship in Emden, and found it a memorable experience.
| THE KIT |
FROG issued this kit in 1962. As was the habit at the time, the scale wasn´t much talked about, but it seems to be around 1:110. At the time, several vessels of this type were still in service, but the model was marketed under the name of the one lost so tragically in 1954. But with the number 17 of the replacement.
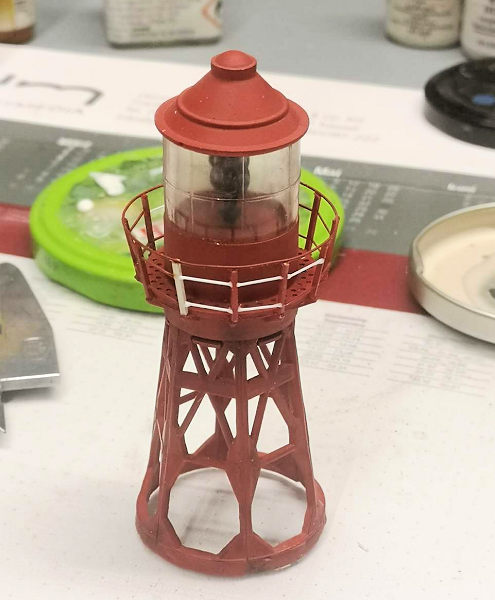
Like many of these vintage kits, it is basically correct, partly well detailed, but not without some clunky details. The hull plating is nicely executed, it may be exaggerated, but it looks fine to me. The rather complex curved railing around the beacon is represented as a clear part onto which the railing is to be painted. This was state of the art back in 1962, and aimed at the mostly younger potential builders. The kit has railings, which was not a given at the time, but they are on the clunky side and need bending to shape.
Like other FROG molds, these were sold off to the Eastern Bloc in the 1970s and used by their manufacturers. In 1996 Revell issued the kit under their label, now listing the scale as 1:144. I bought one of these kits about 1998 and had big fun building it.
 kiI
had just restarted building plastic models and was beginning to detail my
models with simple means. Thist gave me ample opportunities for that. Armed
with Evergreen styrene stock and various gauges of brass wire, I replaced
the entire railings, even those on the beacon. I annealed brass wire and
shaped it into the uppermost beacon handrail, whilst the stanchions and
lower bars were made from styrene stock and stretched sprue. I also replaced
the kit´s anchor chains with real chains, and I drilled the portholes open.
I detailed the hull illumination lights using stretched sprue and lead foil.
kiI
had just restarted building plastic models and was beginning to detail my
models with simple means. Thist gave me ample opportunities for that. Armed
with Evergreen styrene stock and various gauges of brass wire, I replaced
the entire railings, even those on the beacon. I annealed brass wire and
shaped it into the uppermost beacon handrail, whilst the stanchions and
lower bars were made from styrene stock and stretched sprue. I also replaced
the kit´s anchor chains with real chains, and I drilled the portholes open.
I detailed the hull illumination lights using stretched sprue and lead foil.
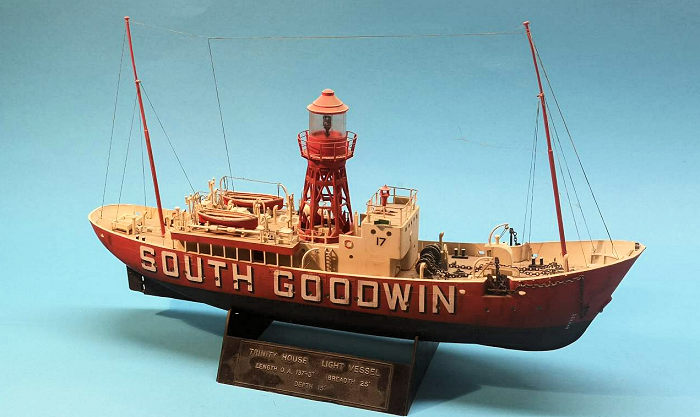
For the paint scheme, I followed the kit instructions. More on that later. The huge decals for the hull were relievingly easy to work with, and they did not silver. I did some heavy weathering using pastel chalks and artist´s oils. Finally, I placed the model on the kit display stand and was quite proud of my effort. I even wrote one of my first build reviews for this site on the project, back in 1999.
The model was first placed into a cupboard behind glass. After moving into my own house, I placed it as a decoration on a bathroom shelf, until it was replaced by something else. Finally it landed on the topmost shelf of a rack in my study. Where it gathered dust for a long time.
Late in 2024, I renovated and redecorated. That was a great opportunity to de-clutter, and I have to say quite a lot of older models were culled at the time. This one almost was binned, too, until I remembered the fun I had in building it and how much I still liked it. Wikipedia may have influenced me, as at about that time the loss of LV 17 figured in their anniversaries. So I decided to try overhauling the dusty old model, with an open outcome. The bin was still an option.
| THE OVERHAUL |
 On
New Year´s Eve I photographed the dusty model and planned what to do with
it. Originally, I only wanted to dust the model, replace the soft and bent
plastic masts and railings, rig it afresh and place it on a seascape. But
like in any renovation or home improvement, things should develop otherwise.
On
New Year´s Eve I photographed the dusty model and planned what to do with
it. Originally, I only wanted to dust the model, replace the soft and bent
plastic masts and railings, rig it afresh and place it on a seascape. But
like in any renovation or home improvement, things should develop otherwise.
It was surprisingly easy to remove the masts and railings, some could be simply pulled out of their mounting holes. But at some point, the model toppled onto its side, damaging the railing at the beacon. Upon examining the damage I realized I had (whyever?) glued the whole beacon tower out of alignment with its deck supports. So off it had to go, too. Moreover, I now saw that I should have paid more attention to removing mold seams and ejector pin marks. Well, seeing that nagged me, and I soon found I couldn´t live with it. One of my beliefs is that detailing and build quality should be on a consistent level throughout a model. So I finally removed virtually all the deck fittings to rework them.
In the event, I looked into all the parts I had removed, cleaned up the seams, sanded them where necessary, mounted them on pins and prepared them for painting. I also realized I had acquired some new tools and capabilities over the past 25 years. My new small USB handpiece was much better suited to drill out the cowl vent openings than my Dremel back then, to name just one thing.
It was obviously paramount to know where to return all those parts to later on. The photos I had taken pre-renovation and the kit instructions I had downloaded from Scalemates should prove very helpful in that respect when the time came.
 The
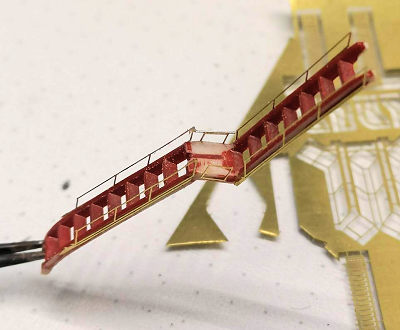
beacon tower needed the abovementioned repairs to the railings, tedious but
doable. Moreover I looked through my leftover PE and found some railings
which just might work on the long inclined ladder to the beacon. They were
added and the ladder arrangement repainted.
The
beacon tower needed the abovementioned repairs to the railings, tedious but
doable. Moreover I looked through my leftover PE and found some railings
which just might work on the long inclined ladder to the beacon. They were
added and the ladder arrangement repainted.
The hull just needed some minor repairs to the paintjob. Luckily I found an acrylic shade that virtually matched the red enamel paint used in 1998. I enhanced the weathering especially around the waterline, using artist´s oils.
The decks needed a lot of cleanup by filling and sanding before I could start repainting them. And this is where I encountered an earlier mistake I could not rectify. All the decks had been painted in a brown, wooden shade. And yes, this is how the kit instructions had demanded it. I checked.
But I´m pretty sure the original vessel had no wooden decks. If so, possibly on the bridge deck and maybe on the boat deck, but I´d rather expect them to have been green or grey. I might have repainted almost all the decks, but not those on the main deck below the boat deck. Doing it without removing the boat deck would have been a poor compromise, and messy, and a poor result. Removing the boatdeck would have been flirting with the disaster of the old and brittle styrene cracking beyond repair. Well, dear kids at home, this is why the decks have the wrong shade. And yes, it is my model, so I am free to do as I please. I found an acrylic shade that near matched the Revell enamel used on the decks, and repainted them where necessary.
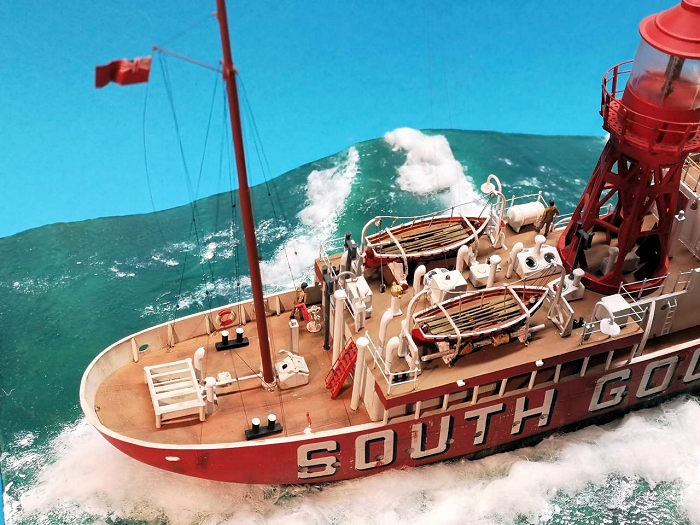
Turning to the boats, I found ejector pin marks inside them. That necessitated their removal with rotating instruments, and a repaint of the insides. It was similar on the insides of the breastwork on the foredeck. I reworked and refined the boat fittings with new oars, pulleys and small winches. I had trouble making the semicircular lifelines rigged around the boats. In the end I found blackened .3 mm wire which was malleable and easy to shape, trim and glue. The davits were also cleaned up, repainted and lightly detailed. I cleaned up the nasty ejector pin marks on the griping spars, and made brackets for them both at the boat cradles and the edge of the hull where they would be deployed during boat operations.
I remade the masts using Albion Alloys brass tubing in varying gauges, with fittings made from generic PE designed by my friend Torben. Thank you! I tried to make things fine, yet sturdy enough. I also made antenna spreaders from leftover pieces of railing. It´s good to keep all those leftover PE parts. I added PE eyebolts to belay the rigging on the decks.
The skylights looked better after I drilled them where I had added PVA glue in 1998, and added neat new rims to all the openings made from PE handwheels. They would receive fresh PVA „glazing“ at the end of the project. I covered the portholes in the hull using Humbrol Maskol for painting and the final flat coat.
To add life to the deck, I ordered Preiser figures of construction workers in TT scale (1:120). They worked equally well as with my Grimsby trawler, but this time I made sure to fill the ejector pin marks on their backs before repainting and weathering them.
| THE BASE |
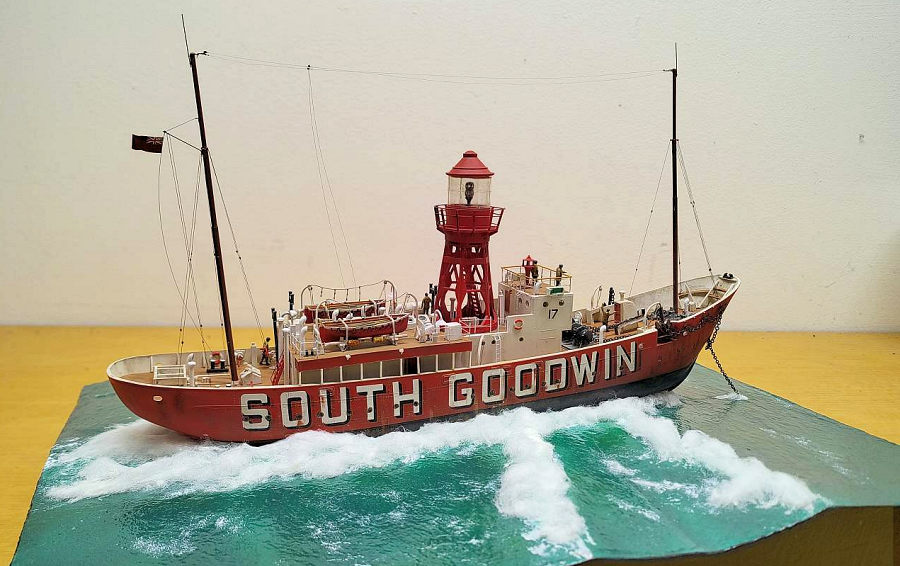
 As
usual, I prepared the base very early on, when the risk of damaging the
model was low. I wanted to show the vessel in heavy seas, with its anchor
chain taut, riding out a storm. Without power, the vessel would always have
the bow against prevailing winds and currents.
As
usual, I prepared the base very early on, when the risk of damaging the
model was low. I wanted to show the vessel in heavy seas, with its anchor
chain taut, riding out a storm. Without power, the vessel would always have
the bow against prevailing winds and currents.
So I needed a thicker base than usual due to the height of the waves. I decided to use a baseplate of normal height, and with a cutout for the hull to save on height. The wave pattern proper would be made from four sections of foam board, cut to size to fit around the hull and make the seascape. Pieces of this size would also fit into my foam cutter and ease work.
Having cut all the pieces to the required size and shape, I glued the sections to the base using PVA glue. After curing, I masked the hull using kip tape insulated with vaseline. Having placed the hull on the base in the desired position and angle, I filled any remaining gaps between the base pieces and the hull using generic acrylic caulking. That needed two days of curing time.
Now I sanded the sides of the base and the remaining seams between the base pieces, before I added white wall paint in a stippling motion. I needed three layers for good coverage, and the stippling gave me the slightly irregular surface that would reflect the light like water on completion.
The crests of the waves and the areas where I wanted spray were now sculpted with acrylic modeling paste. That done, I added colour, using a deep green in varying shades. That completed, I added acrylic gloss clear until the base reflected the light as desired. Further accentuations were done using clear gloss acrylic gel and white artist´s oil paint.
To simulate spray, I glued sections of white cotton wool with clear gloss acrylic gel where needed. Unruly fibres were blended in using acrylic clear gloss by Humbrol.
| FINAL PARTS |
 Then
came the point when I returned parts to the model, a good sign of progress.
As always, I worked from the center to the periphery, to minimize collateral
damage. Yet this time I started with the boat deck railings, as I had better
access to them before installing the cowl vents and the boat installation. I
used Saemann PE stanchions trimmed to the right height and glued into newly
drilled mounting holes. The horizontal bars/wires were made from 0.2 mm
brass wire. Those installed, the railings were brushpainted.
Then
came the point when I returned parts to the model, a good sign of progress.
As always, I worked from the center to the periphery, to minimize collateral
damage. Yet this time I started with the boat deck railings, as I had better
access to them before installing the cowl vents and the boat installation. I
used Saemann PE stanchions trimmed to the right height and glued into newly
drilled mounting holes. The horizontal bars/wires were made from 0.2 mm
brass wire. Those installed, the railings were brushpainted.
Now I added the rest of the deck fittings. I had prepared Seamann PE ladders to replace the kit parts, and had found fitting handrails not just for the beacon ladder, but also for the long inclined ladder to the stern. Those were added now, followed by the boats and their assorted equipment. Now I added the numerous cowl vents of different lengths.
That done, I made the bridge railings, this time with a „wooden“ handrail made from styrene stock. Once they were painted, I added bridge equipment and figures.
The paint and weathering on the foredeck needed some rework, and I relaid and reglued the anchor chains. The main anchor had been lost at some point, but that didn´t matter as I was placing the vessel on a seascape. I had read somewhere that these vessels had mushroom-type anchors anyway, but I couldn´t be bothered to change the remaining two anchors.
With almost everything on board, I added the prepared and painted masts and rigged them with black UNI thread. Insulators were hinted at with beads of PVA glue, painted grey. The red ensign was made from a leftover white ensign decal. I mounted it on aluminum foil, masked the Union flag, and painted the white areas red. Now I was able to bring it into the desired shape, glue it to a piece of .1 mm wire and add it to the mast.
 With
bated breath, I very carefully glued the two antenna spreaders to their
mountings on the masts. After the glue had cured, I rigged the antenna
wires, using Shelf Oddity´s .06 mm rigging wire. I used PVA glue, having to
tilt the model strongly, and was once more glad for the vise I bought so
many years ago. Now I was able to add the downwards leading wires, from the
same thin wire stock.
With
bated breath, I very carefully glued the two antenna spreaders to their
mountings on the masts. After the glue had cured, I rigged the antenna
wires, using Shelf Oddity´s .06 mm rigging wire. I used PVA glue, having to
tilt the model strongly, and was once more glad for the vise I bought so
many years ago. Now I was able to add the downwards leading wires, from the
same thin wire stock.
Finally I added the two lights for the illumination of the hull, as they extend beyond the hull and are rather prone to damage. Having added all the parts, I gave the model its final flat coat of forgiveness. The later visible area of the lower hull was glosscoated in order to look wet.
Now I was able to mount the model on the prepared base and glue the anchor chain into the opening I had prepared for it. Some blending in of the hull and some more wave and wake effects completed the project.
| CONCLUSIONS |
Now this was a lot of fun, the second time around. I did enjoy the build process in the Nineties, but this renovation was fun on a different level. My earlier mistakes and technical weaknesses notwithstanding, it was fun improving something I had liked in the first place, and working on it without any instructions or directions. Nothing and nobody is perfect, but a lot of things can make your life just that enjoyable tad brighter and more fulfilled. Modeling projects of this kind belong quite high on the respective list to me.
If anyone would like to build their own lightship, there is now a dedicated PE set by Atlantic Models (ATEMisc 07). It wasn´t relevant for me anymore, but if you find a kit and intend to build it, this set might help.
| REFERENCES |
https://en.wikipedia.org/wiki/Lightvessel_stations_of_Great_Britain
https://en.wikipedia.org/wiki/List_of_lightvessels_of_Great_Britain
ttps://maritimearchaeologytrust.org/lighthouses-and-lightvessels/
https://www.trinityhouse.co.uk/
https://jayseaarchaeology.wordpress.com/2017/08/06/the-loss-of-the-south-goodwin-lightship-lv-90/
https://en.wikipedia.org/wiki/Goodwin_Sands
https://friendsoflv50.org.uk/history/life-aboard/
2
8 April 2025
Copyright ModelingMadness.com. All rights reserved. No
reproduction in part or in whole without express permission from the editor.
If you would like your product reviewed fairly and fairly quickly, please
contact the editor or see other details in the
Note to
Contributors.