| KIT #: | A14021 |
| PRICE: | @ 60€ |
| DECALS: | One option |
| REVIEWER: | Frank Spahr |
| NOTES: |
| HISTORY |
The „Age of Invincible“ is drawing to a close; only one of the three highly
successful light carriers is being kept in service, and only as a helicopter
carrier. It´s a good time to remember the Invincibles, and the Airfix kit is a
good vehicle as any.
 carrier CVA-01 and to completely abolish fixed-wing shipboard
aircraft was a veritable earthquake for the service. Patient and skillful
negotiations yet succeeded in keeping at least HMS Ark Royal for longer in
service than planned, and to establish a new class of ships with limited air
assets.
carrier CVA-01 and to completely abolish fixed-wing shipboard
aircraft was a veritable earthquake for the service. Patient and skillful
negotiations yet succeeded in keeping at least HMS Ark Royal for longer in
service than planned, and to establish a new class of ships with limited air
assets.
At
the time, the RN was abandoning its worldwide capabilities with the loss of
British overseas possessions, and centered on its NATO commitment, mainly for
budgetary reasons. One key task in the NATO environment was to control and
possible deny Soviet submarines passage of the GIUK gap, the approaches to the
North Atlantic between Greenland, Iceland and the UK. Apart from patrol vessels
equipped with sonar and ASW weaponry, it was argued that larger,
helicopter-carrying vessels would be more efficient in patroling these hostile
seas. The class was termed a through-deck cruiser, in order not to raise
suspicion of re-introducing carriers into the inventory.
As
Soviet marine surveillance aircraft also played a significant role in the
assumed scenario, some limited capability of addressing these shadowers was
thought useful. Hence, a navalized version of the already successful VTOL
Harrier aircraft, the Sea Harrier, was developed. The air group of the new ships
was meant to be composed of mainly Sea King and Wessex helicopters and some
Harriers for self-protection and to „hack the shad“. One decisive modification
of the project rose from personal initiative of Lt. Cdr. Doug Taylor; the „ski
jump“ retrofitted to Invincible´s bow and integrated in a larger version into
her sister ships allowed the Harriers a short take-off with a much larger
payload than possible in pure vertical take-off mode. What had started as a
floating ASW helicopter base had gradually evolved into a small, modest aircraft
 carrier. The navy acknowledged it by commissioning Invincible not with a
C-prefix for cruiser, but an R-prefix for aircraft carrier.
carrier. The navy acknowledged it by commissioning Invincible not with a
C-prefix for cruiser, but an R-prefix for aircraft carrier.
The new naval assets would almost have been axed when the new conservative
government launched a strategic defence review, aiming at trimming the navy down
to its bare NATO commitment. Coincidentally, the Falklands War broke out right
at the time and the excellent performance of HMS Invincible gave her and her
sister ships a new lease of life. The three vessels were gradually modernized and
converted to make the absolute most of their small hulls. CIWS was added after
the Falklands experience, and the deck configuration was modified with a view to
accommodating as many aircraft as possible. The three Invincible class ships
formed the backbone of the RN for 25 years and saw action in the Gulf and the
Adriatic, apart from numerous cruises and exercises.
A new round of defence cuts first saw the demise of the Sea Harrier in late 2005, and a new and severe strategic defence review in 2010 ended Harrier service altogether. Invincible had been inoperative from 2005 on, and was soon scrapped in Turkey. Ark Royal was decommissioned early in 2011, and Illustrious is currently the only operative unit, albeit limited to the helicopter carrier role envisaged at the beginning. She will decommission in 2014, and the UK will be without an aircraft carrier until (and if) any of the two new Queen Elizabeth class vessels are put into service.
| THE KIT |
I
got this kit as a birthday present from my modeling pals, complete with the fine
PE set from White Ensign Models, and a CD with many reference images. Now I know
there is a lot of wailing and gnashing of teeth re this kit´s ill fit and clunky
detail, but to me as an Airfix aficionado (read that as hopeless addict with
inbuilt rose-tinted glasses, if you like) it wasn´t that hard at all. It was
Airfix´ first new warship kit virtually since the
 real Illustrious was put into
service, and hence a must have for me. I bought two extra sprues with aircraft
at the Airfix booth at Scale Model World, plus the accompanying PE parts at WEM.
I also purchased WEM´s resin upgrade set for the Sea Kings. Armed with all these
goodies plus some useful books, I set to work.
real Illustrious was put into
service, and hence a must have for me. I bought two extra sprues with aircraft
at the Airfix booth at Scale Model World, plus the accompanying PE parts at WEM.
I also purchased WEM´s resin upgrade set for the Sea Kings. Armed with all these
goodies plus some useful books, I set to work.
First of all, I needed to determine the timeframe I wanted to show. The kit
shows Illustrious after her last major refit which was completed in 2005. I
absolutely wanted Sea Harriers aboard, so the timeframe was narrowed to the
second half of 2005 until the type´s demise.
Sifting through RN reports, I chose the exercise „Neptune Warrior“ in the
fall of 2005, for which I had a list of aircraft present. So there are both Sea
Harriers and Harriers GR 7/9 present, as well as Merlin helicopters for general
use and Sea King AsaC 7 for AEW purposes.
| CONSTRUCTION |
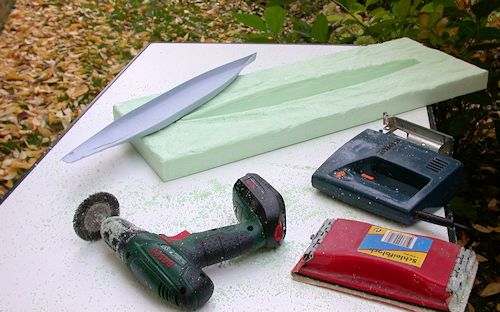 the foam board
and acrylic caulking were used to sculpt the bow wave; the disturbed water in
the ship´s wake was simulated by (gently!) spraying brush cleaner onto the base.
That stuf dissolves the polystyrene and leaves a bubbly surface. Secure adequate
ventilation and go easy on the stuff, as it´ll otherwise melt through the entire
base. Don´t ask me why I know.
the foam board
and acrylic caulking were used to sculpt the bow wave; the disturbed water in
the ship´s wake was simulated by (gently!) spraying brush cleaner onto the base.
That stuf dissolves the polystyrene and leaves a bubbly surface. Secure adequate
ventilation and go easy on the stuff, as it´ll otherwise melt through the entire
base. Don´t ask me why I know.
Parallel to that, I built the model´s core, the hangar deck and the various boat
decks visible through hull cutouts. As the hangar deck is only accessible
through the aircraft lifts, not much would be visible here, and I followed Tom
Cleaver´s advice of not building any stuff you can´t see later anyway. The
aircraft lifts would be posed in the raised position.
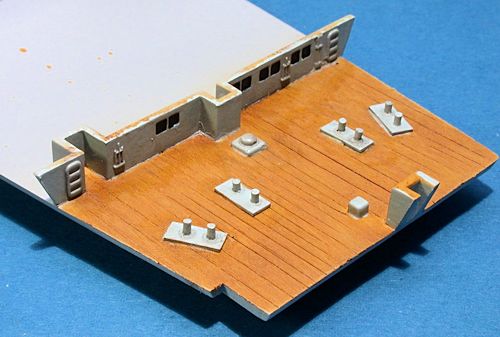 Even though not much is visible here later, I did some additional detailing of
the quarterdeck. The fours large bitts were scratchbuilt, and the deck received
some scribing to simulate wood planking with acrylics and some drybrushing with
artist´s oils.
Even though not much is visible here later, I did some additional detailing of
the quarterdeck. The fours large bitts were scratchbuilt, and the deck received
some scribing to simulate wood planking with acrylics and some drybrushing with
artist´s oils.
The first PE parts were used in the boat decks, all of which were pre-painted
and weathered prior to being glued to the hull. Assembling the hull went easier
and with a much better fit than expected and experienced by fellow modelers,
even the transom stern succumbed to some coaxing and some pressure.
Adding the lower hull followed next, and went well, too – but as always with me,
a serious amount of puttying and sanding was needed to get the joint reasonably
flush. To handle the model during construction, screws were fixed into the lower
hull to be held by my vise. I experienced some trouble with paint lifting off
when I 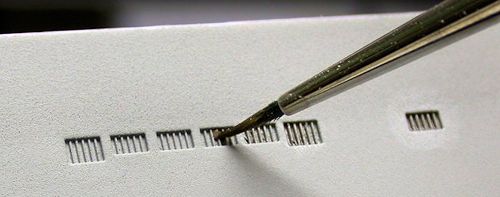 masked the boot topping, but was able to repair it somehow. I did not
replace the molded on hull gratings with PE parts, I was happy enough with their
look after receiving a dark wash.
masked the boot topping, but was able to repair it somehow. I did not
replace the molded on hull gratings with PE parts, I was happy enough with their
look after receiving a dark wash.
I
had to fill some oversize holes in the flight deck meant to accommodate flagpoles
before gluing it to the hull. I needed some serious pressure here, and ended up
with some gaps, but none I could not manage. During the necessary waits for
drying and curing, I had already pre-built the superstructure. The numerous
subassemblies of such a project speed building it up actually, as there´s always
something else to do once you need to wait for something.
| COLORS & MARKINGS |
The base was now painted with white wall paint in a stippling motion, in order
to seal the foam board, to blend everything in, and to replicate the slightly
irregular surface of water. Several thinner layers may be applied, and the
resulting surface is sandable, too. After I was satisfied with the structure of
the base, I sprayed it first in Revell Aqua #48 green, and then in vallejo Model
Air Insignia Blue, which allows quite pleasing and realistic blendings between
white, green and blue. Now it was drying time – the water-based wall paint and
acrylic paint has to be fully cured before the next step, which may easily take
a few weeks, depending on the layer. If the base is sealed too early using my
medium of choice,
 which is solvent-based clear gloss spray from a rattle can,
excess moisture will still evaporate and leave bubbles in the surface. So here
is a point that needs time.
which is solvent-based clear gloss spray from a rattle can,
excess moisture will still evaporate and leave bubbles in the surface. So here
is a point that needs time.
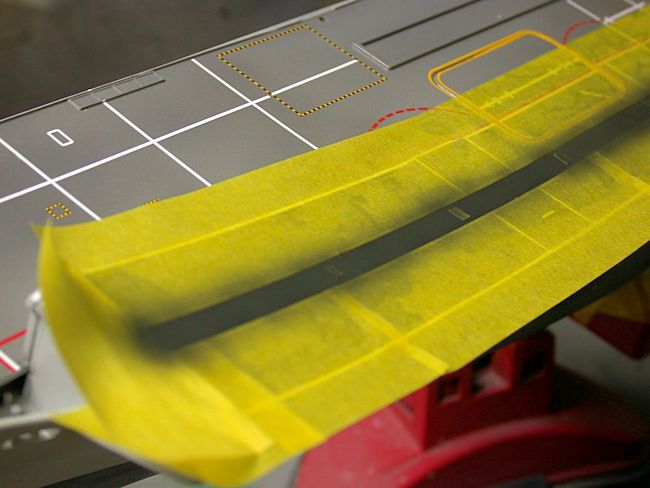
Returning to the ship, I now started
painting and decaling the flight deck. Airfix has out a major goof into it, as
the start line is not uniformly black but only on the ski jump and in flight
deck colour for the rest of the deck. This is not correct. After a lot of
thought I decided on this slightly nerve-wracking approach: The deck was sprayed
in an appropriate shade, making sure that were some variations. It was then
sealed with clear gloss prior to decaling. Now all the decals were applied, and
I was not happy at all with their fit around the lifts. Hence the rather wonky
look when viewed from astern. The decals were sealed with clear gloss again, and
time allowed for curing. Inexplicably, the huge letter „L“ identifying the
vessel, is missing from the decal sheet. It was masked and sprayed instead. Now
came the stressful part. The too light area of the start line was painstakingly
masked, as well as the numbers within indicating the distance left for the
pilot. That done, the area was carefully sprayed flat black and the masking tape
removed with held breath. Luckily, everything held and nothing was lifted off.
My relief was palpable.
| CONSTRUCTION CONTINUES |
The island meant a lot of serious work, and serious PE work at that. But
initially it meant a lot of filling and sanding to get rid of unsightly seams,
and a lot more work to spruce up the look of the bridge. I did not use the PE
parts for the numerous window wiper motors, but rather used styrene stock. Now I
had to proceed step by step through the PE set instructions, crossing of any
completed item on a way that look as if it
 wouldn´t end at times. Numerous radar
arrays, railings, platforms and all sort of doodads were addressed and placed on
adhesive tape on foam blocks prior to painting.
wouldn´t end at times. Numerous radar
arrays, railings, platforms and all sort of doodads were addressed and placed on
adhesive tape on foam blocks prior to painting.
Nonetheless I did complete the island after a few weeks of work. I just left off
the masts and some other subassemblies for the time being, as I now had to
address the next tricky bits, the numerous catwalks surrounding the flight deck.
The kit parts are solid and clunky and do not look the part. WEM offers finely
etched gratings and wants you to combine these with parts you need to cut off
the kit parts. Plus you have oodles of triangular supports to be fitted below
the catwalks. That meant a LOT of careful sawing and equally careful gluing in
order not to flood the nice PE detail with glue. In regard of my completed
flight deck I meant to assemble and paint the catwalks separate from the ship
and only ad them once completed. That
worked quite smartly during dryfitting, but sadly the catwalks displayed a most
annoying tendency to warp once they were glued to the hull. I was neither
particularly relaxed nor in a remarkably cheerful frame of mind at the time, but
nonetheless somehow fixed the vicious little buggers and straightened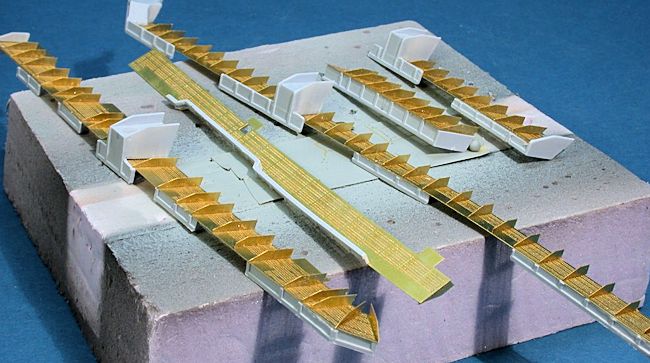 them out.
Mostly. Partially. As much as I could get away with, anyway. Some careful
filling of gaps completed this step, but not to my satisfaction.
them out.
Mostly. Partially. As much as I could get away with, anyway. Some careful
filling of gaps completed this step, but not to my satisfaction.
A
ship that size has loads of life raft canisters. WEM offers PE bases for these,
and these were duly cut from the fret and painted, but in the end I shied away
from sawing all the molded assemblies apart and discarded the lot. I built these
items from the box and even feel they do a good job of straightening those pesky
catwalks.
Several other subassemblies were built parallel to that, some of them were
modified more heavily than others. The Coles crane needed a lot of work both in
detailing the cabin and the boat crane needed some good cleaning up and adding
PE parts. The PE lighting gantries were easier to work with than anticipated,
and look much be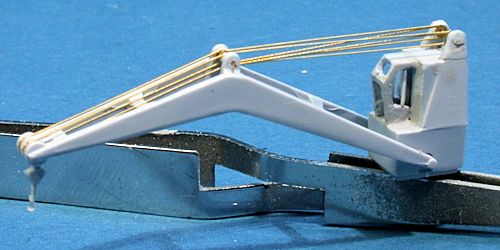 tter than the kit parts. I neither counted my hours nor the
parts used in this kit, but it must have been hundreds of both.
tter than the kit parts. I neither counted my hours nor the
parts used in this kit, but it must have been hundreds of both.
Finally it all came together, I even got through my most loathed task of rigging
the antennae and signal lines. I used UNI 8/0 flyfishing line, glued to the
start point of any individual line with CA gel. That cured, the line was led to
its end point, and some weight applied to get tension. Then thin CA was used to
glue the line to its end point, and after curing, the excess was trimmed using a
fresh blade.
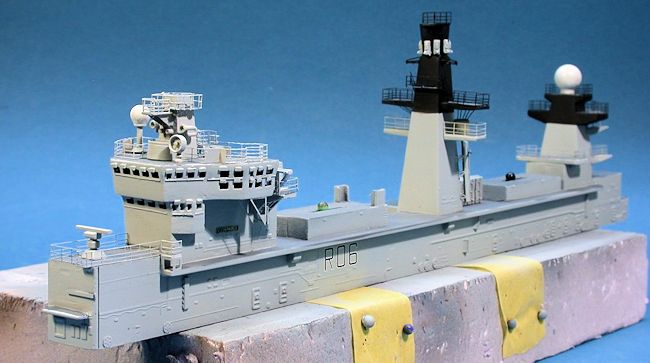
The ship received only limited weathering, being out of her refit only for a
short time, some hull streaking was carefully applied using artist´s oils. The
flightdeck was weathered using pastel chalks. After applying the PE nameplates
and ship´s crests I considered the vessel proper as completed.
All carrier builders know that building the ship is the smaller part of the
project, even with such a diminutive vessel when compared to a full sized CVN. A
carrier deck in action is packed with planes, vehicles, people and all sorts of
equipment, and I wanted mine to look the part – and I wanted to hint at the
astonishing capacity and capabilities of these „baby carriers“. The kit includes
the Coles crane and two tractors; the PE set comprises forklift trucks, carts
for ordnance, towing bars for the aircraft and access ladders for the Harriers.
The forklift trucks had to be built around a core to be made from styrene stock,
which wnet really well. Working with styrene and the Chopper (TM) anyway, I
scratchbuilt a third tractor.
 I
finally addressed the aircraft. I´ve never liked clear styrene aircraft, but
would really have appreciated having the Harriers large and well visible
canopies provided in clear styrene, thank you very much. As it was, they did not
convince me. So I looked for a way to get clear canopies, and ended up with this
approach: I took impression of both types of assembled Harriers and handed those
to a dental technician, who cast them with clear dental resin in the required
numbers and handed them back to me. Cured under pressure, the material was
really clear. I then polished the canopies and
carefully sawed them out of the resin. The opaque canopies of my Harriers were
likewise sawed out, and then the clear parts were fitted to the Harriers, all in
all a quite laborious process. The area where the canopy was glued to the
Harrier was painted black, any remaining gaps were infilled with white glue. The
canopies were then masked with Humbrol Maskol, and the aircraft primed. They
were then detailed with PE underwing racks, outriggers and heat shields. Each GR
model had eight underwing pylons. After PE application, the Harriers were
painted, glosscoated, decaled and slightly weathered. The recessed panel
trenches produce a
I
finally addressed the aircraft. I´ve never liked clear styrene aircraft, but
would really have appreciated having the Harriers large and well visible
canopies provided in clear styrene, thank you very much. As it was, they did not
convince me. So I looked for a way to get clear canopies, and ended up with this
approach: I took impression of both types of assembled Harriers and handed those
to a dental technician, who cast them with clear dental resin in the required
numbers and handed them back to me. Cured under pressure, the material was
really clear. I then polished the canopies and
carefully sawed them out of the resin. The opaque canopies of my Harriers were
likewise sawed out, and then the clear parts were fitted to the Harriers, all in
all a quite laborious process. The area where the canopy was glued to the
Harrier was painted black, any remaining gaps were infilled with white glue. The
canopies were then masked with Humbrol Maskol, and the aircraft primed. They
were then detailed with PE underwing racks, outriggers and heat shields. Each GR
model had eight underwing pylons. After PE application, the Harriers were
painted, glosscoated, decaled and slightly weathered. The recessed panel
trenches produce a
 lively enough surface on their own, you don´t want to enhance
that. After a final flat coat the canopies were de-masked.
lively enough surface on their own, you don´t want to enhance
that. After a final flat coat the canopies were de-masked.
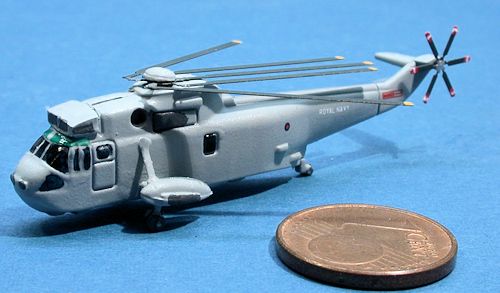
The helicopters´ canopies remained solid
and were painted dark blue and green respectively. Some acesses were opened, and
the unsightly massive sponsons of the Sea Kings removed and replaced by the WEM
PE items. Some PE went into the rotor assemblies, and the WEM resin searchwater
radars improved the Sea Kings´ looks a lot.
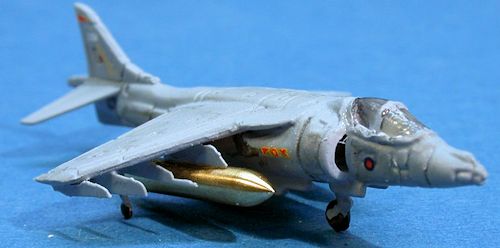
As
the Harriers looked a bit bland without any external stores (and I treasure my
sanity or what left thereoff too much to try and make sidewinders from sprue and
microscopic PE fins, thank you very much) I asked around. As no parts were
easily available, I was very happy when my friend Frank Ilse, master USN carrier
builder com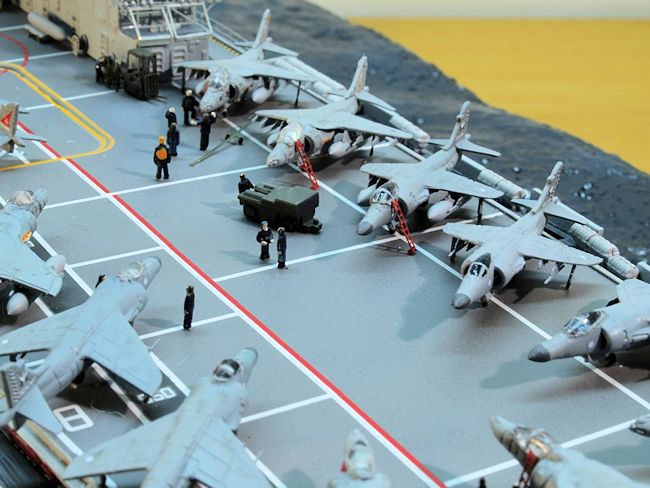 missioned my friend
Burkhardt Masch of BMK to produce auxiliary fuel tanks in machined brass. I got
some of the first production run and found they improved the Harriers´ looks
markedly.
missioned my friend
Burkhardt Masch of BMK to produce auxiliary fuel tanks in machined brass. I got
some of the first production run and found they improved the Harriers´ looks
markedly.
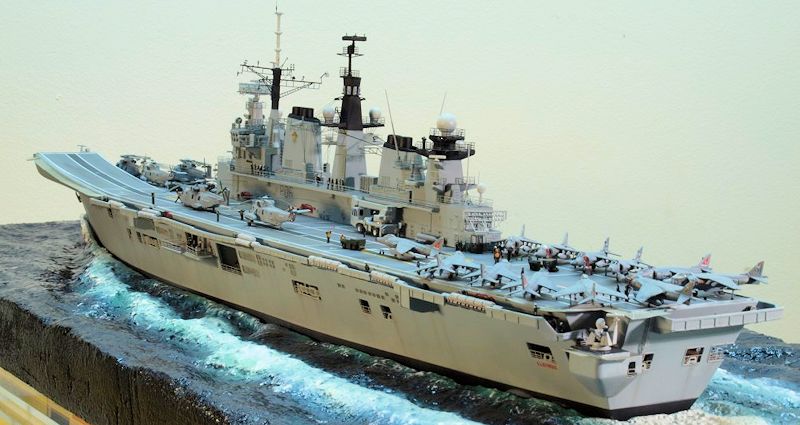
All that done, I was able to line up my aircraft and vehicles on the flight deck. The scene shows the begin of the day´s flight operations. Both the plane guard and the AEW helicopter are about to take off; replacements are at the ready; the entire aft part of the deck is crammed with Harriers soon to take off via the ski jump. A number of figures, mostly from PitRoad, appropriately painted, and some PE accessories were used to bring more life to the deck. A final coat of matt varnish and application of PVA glue to „glaze“ the brudge windows completed the project, before the vessel was placed on its base and into the custom made display box.
| CONCLUSIONS |
 Airfix fans tend to be more lenient towards a kit´s shortcomings than the
general modeling public. That said, I´m not blind and see that other
manufacturers
produce kits with better fit and finer detail. Nonetheless I found no
insurmountable obstacles and regard the kit a good base for any refinements
modelers should fancy. If you intend to build an Invincible class carrier in the
popular scale of 1:350, it´s the only game in town anyway, and you either have
to live with it or chose another project.
Airfix fans tend to be more lenient towards a kit´s shortcomings than the
general modeling public. That said, I´m not blind and see that other
manufacturers
produce kits with better fit and finer detail. Nonetheless I found no
insurmountable obstacles and regard the kit a good base for any refinements
modelers should fancy. If you intend to build an Invincible class carrier in the
popular scale of 1:350, it´s the only game in town anyway, and you either have
to live with it or chose another project.
| REFERENCES |
Tim McLelland: Harrier. Hersham 2011
Denis J. Calvert / Gary Madgwick: HMS Ark Royal – 50 years of flight 1955-2005.
Wantage 2007 (Even though dealing with AR and not Lusty, a good book on the air
group, and the squadrons would rotate on any of the three carriers currently in
commission anyway)
Additional aircraft
Airfix AH 0022 (Price via Airfix 5 GBP)
Photoetch by WEM: HMS Illustrious Ultimate Set WEM 35142 (@ 82 €); additional PE
for the air group WEM 35137 (@ 11 €), sufficient for one set AH 0022.
Resin upgrade parts for the Sea Kings WEM PRO 3526 (@ 6 €)
Machined brass fuel tanks BMK 3507 (10 pieces), price @ 11 €
Frank Spahr
March 2014
If you would like your product reviewed fairly and fairly quickly, please contact the editor or see other details in the Note to Contributors.