Airfix 1/72 RAF Air-Sea Rescue Launch
| KIT #: | 05281 |
| PRICE: | OOP |
| DECALS: | One option |
| REVIEWER: | Frank Spahr |
| NOTES: | Xtradecal 48151 |
| HISTORY |
 The RAF´s Marine Branch operated a fleet of fast
motor launches to rescue downed aircrews. The service operated between 1918 and
1986. Having started with slower and less capable vessels, the beginning of the
1930s saw faster and more capable vessels introduced into service. Their hulls
were similar to contemporary Motor Torpedo Boats, they were developed by British
Powerboat Inc., based at Hythe in Hampshire. Based upon war experience, 69 units
of an improved Type 2 63 ft. HSL (High Speed Launch) were built. Due to the
typical shape of their decks and low superstructure, they were also called
whalebacks. Three 500 hp Napier Sea Lion petrol engines gave them a maximum
speed of 36 knots, and a range of 500 nautical miles. The boats were armed from
the outset; they had two bomber-style perspex turrets, designed by Vickers, and
each armed with one 7.7 mm MG. Originally, their decks were painted bright
yellow to ease identification for friendly aircrew. War experience showed that
these vessels were targeted by enemy planes. Hence, their AA complement was
augmented by more twin MG´s, and a stern-mounted Oerlikon 20 mm gun. The vessel
had a crew of nine.
The RAF´s Marine Branch operated a fleet of fast
motor launches to rescue downed aircrews. The service operated between 1918 and
1986. Having started with slower and less capable vessels, the beginning of the
1930s saw faster and more capable vessels introduced into service. Their hulls
were similar to contemporary Motor Torpedo Boats, they were developed by British
Powerboat Inc., based at Hythe in Hampshire. Based upon war experience, 69 units
of an improved Type 2 63 ft. HSL (High Speed Launch) were built. Due to the
typical shape of their decks and low superstructure, they were also called
whalebacks. Three 500 hp Napier Sea Lion petrol engines gave them a maximum
speed of 36 knots, and a range of 500 nautical miles. The boats were armed from
the outset; they had two bomber-style perspex turrets, designed by Vickers, and
each armed with one 7.7 mm MG. Originally, their decks were painted bright
yellow to ease identification for friendly aircrew. War experience showed that
these vessels were targeted by enemy planes. Hence, their AA complement was
augmented by more twin MG´s, and a stern-mounted Oerlikon 20 mm gun. The vessel
had a crew of nine.
Apart from their main area of operation around the British Isles, HSL´s were deployed worldwide wherever the RAF operated. All told the Air Sea rescue Service saved the lives of 8,000 soldiers and 5,000 civilians during WW2.
| THE KIT |
 With a copyright of 1978 stamped inside the hull,
this kit is one of the later of the classic Airfix kits. My kit belongs to the
2005 reissue, the latest reissue was 2013. As of now, the kit is not in the
Airfix range.
With a copyright of 1978 stamped inside the hull,
this kit is one of the later of the classic Airfix kits. My kit belongs to the
2005 reissue, the latest reissue was 2013. As of now, the kit is not in the
Airfix range.
The kit comprises 155 parts molded in grey and clear styrene, decals for three vessels and a flag printed on paper. The parts are neatly molded with only a few sink areas, and fit in general is good. Four crew figures are included. Most of the parts are well usable; the parts for the mast are somewhat crude and soft due to the material, and will bend easily upon applying rigging. The clear parts for the machine gun turrets are on the thick side and have rather large mounting pins. Their surrounding gun depression limiters are molded solid instead of as rails. The hull sides are smooth, whilst the original shows the vertical outer hull planking. The transom has exhaust openings, but no cooling water outlets.
All in all this is an excellent base for some old fashioned modeling fun.
| CONSTRUCTION |
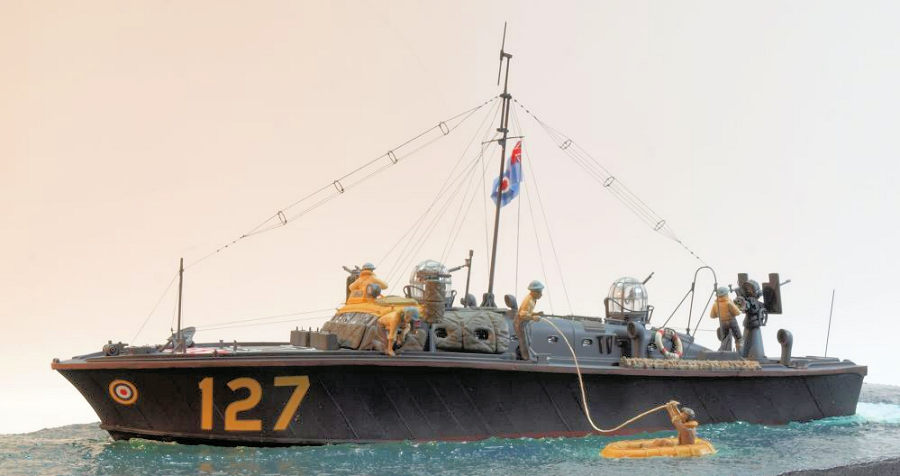
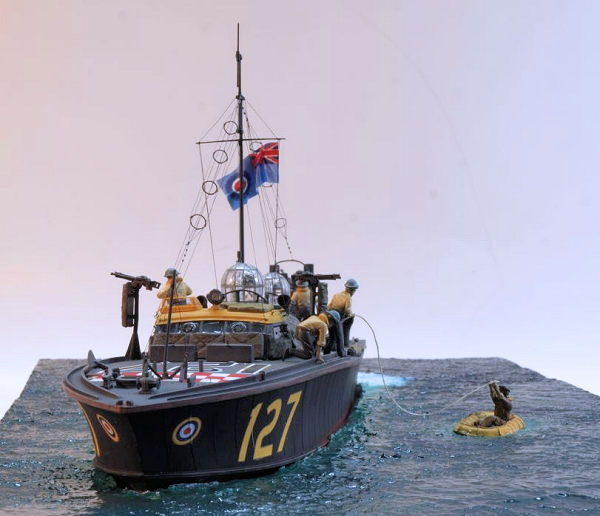
First of all I thought about how to present the model. I didn´t feel up to creating the waves and wake of running at high speed, so I decided to model the boat picking up a downed pilot. That needed more figures. A friend of mine hinted my at some sets from CMK for the Revell Gato submarine, and I used one of these. It contained a downed pilot in his inflatable dinghi, and two crew members throwing him a line and helping him. All of them Americans, obviously. In the end I discarded the CMK dinghi and used the one that came with the HSL kit, as it was more nicely detailed. I reckoned that the RAF did pick up a lot of US pilots, so the pilot´s uniform wasn´t a problem. For the USN crew members, I provided british-style helmets for them and left the rest of their outfits as is.
Building the vessel, I first assembled the hull halves and fit the superstructure to the deck. I found only two areas that needed filler here. I scribed the hull sides to hint at the diagonal planking. At the transom, I added metal tubing for the cooling water outlets. I added a styrene profile to the hull bottom to have something to fix my mounting screws to.
I did some thinking to ease painting and add some
detail to the wheelhouse. The kit transparencies would need s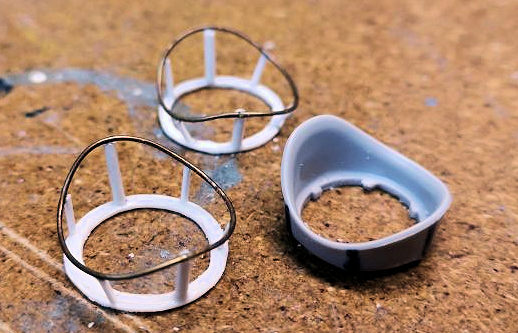 ome serious and
risky masking, so I planned to do without them. For the front windows, I added
framing from styrene stock, and made the centrifugal disks from stock PE handwheels with most of the spokes sawed away. The large transparent part for
the rear side of the wheelhouse would be replaced later in the build by a piece
of a blister pack cut to size. The framing belonging to the rear windows was
also added from styrene stock. The front and side windows would at the end of
build be made from PVA glue.
ome serious and
risky masking, so I planned to do without them. For the front windows, I added
framing from styrene stock, and made the centrifugal disks from stock PE handwheels with most of the spokes sawed away. The large transparent part for
the rear side of the wheelhouse would be replaced later in the build by a piece
of a blister pack cut to size. The framing belonging to the rear windows was
also added from styrene stock. The front and side windows would at the end of
build be made from PVA glue.
I tackled more subassemblies at that time. Building a launch in its late-war fit needed full armament. I did like the kit Oerlikon quite well, I just added some generic PE and a bit of metal tubing for the barrel´s muzzle. The complete rebuild of the mast and the stern antenna mounting was more complex, but I think it paid off, as the result is crisper, thinner and yet sturdier than the kit items. Rebuilding the barrel deflection limiters from annealed brass wire and styrene made a crucial difference in the look of the gun turrets.
Most of the other kit parts were used from the box. I added some PE „hinges“ and „locks“ to the ammo boxes using spare PE items. I had to temporary remove two of the molded on air scoops from the foredeck, in order to install the large checkerboard decal. I saved them to replace them later.
| COLORS & MARKINGS |
 I primed the subassemblies with black Stynylrez
primer. The lower hull received a coat bright red over the black, resulting in a
nice brick red as intended. After masking, the upper hull and superstructure
were sprayed in three shades of grey to add variation and hint at some wear and
tear. I have painted the deck edge washboard a wooden tone, without any
references, just because I liked the look. I painted the molded-on scrambling
nets tan and added a brown wash. I approached the splinter shield matting for
the superstructure similarly, as I liked them to contrast with the paintjob.
I primed the subassemblies with black Stynylrez
primer. The lower hull received a coat bright red over the black, resulting in a
nice brick red as intended. After masking, the upper hull and superstructure
were sprayed in three shades of grey to add variation and hint at some wear and
tear. I have painted the deck edge washboard a wooden tone, without any
references, just because I liked the look. I painted the molded-on scrambling
nets tan and added a brown wash. I approached the splinter shield matting for
the superstructure similarly, as I liked them to contrast with the paintjob.
In 1944, only the wheelhouse roof was painted yellow to aid recognition – I appreciated that a lot as it meant much less masking. I used some ochre/brown washing for accnetuation and hint at wear and tear.
The rather large decals were applied after glosscoating the model with Future, and the decals worked quite nicely. Micro Set and Sol were used. After curing I sealed them with Future and then with an acrylic clear flat coat.
| BUILDING THE BASE |
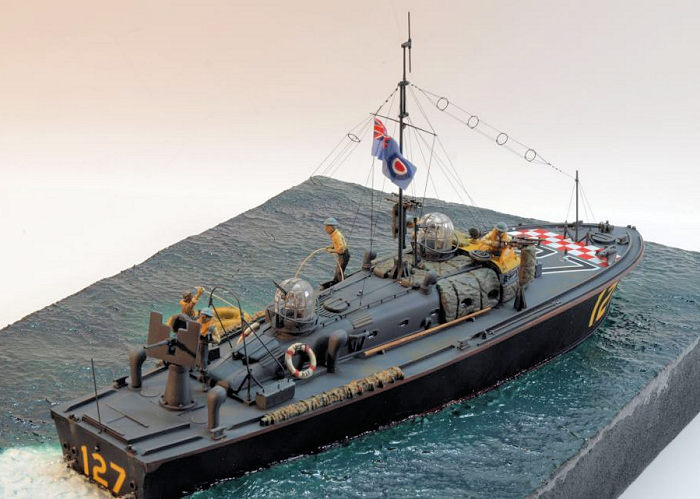
As usual, I made the base very early in the project,
working with a hull that was only assembled. I amde two bases with differing
wave patterns, and returned to the first after having almost completed the
second, as I liked the calmer waters around the boat better. It only has white
water around the transom where the engines are running. The dinghi was placed in
a convenient spot on the base, and the water round it made slightly
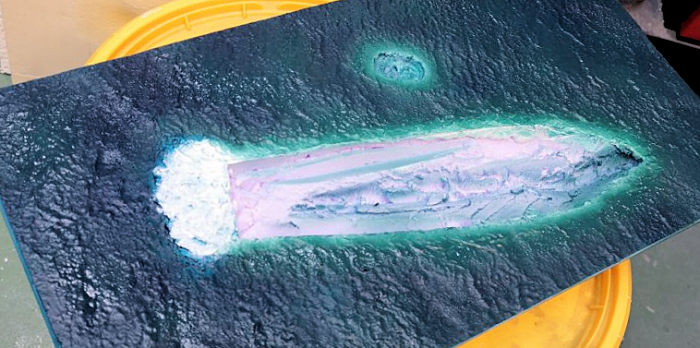 lighter in colour. After the base ahd been gloss coated, I added some limited wave effect
using clear gloss heavy body acrylic gel and white artist´s oil paint.
lighter in colour. After the base ahd been gloss coated, I added some limited wave effect
using clear gloss heavy body acrylic gel and white artist´s oil paint.
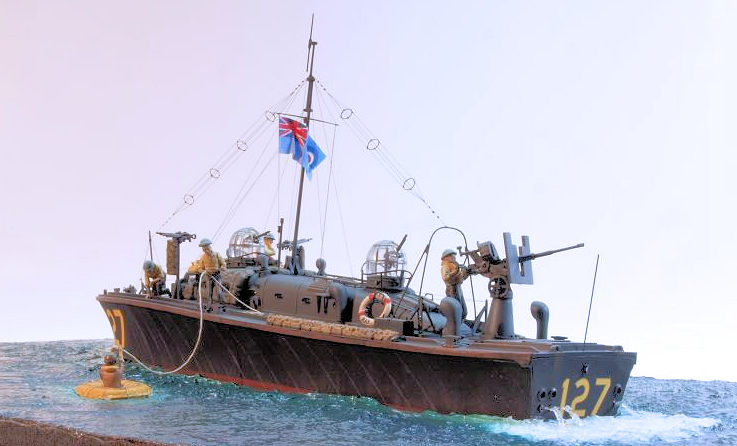
I now could mount the subassemblies to the model, and also added some more weathering with artist´s oils, though only to a limited degree. After I had mounted the masts, I took a deep breath and tackled my first cage aerials ever. They are apparent in the box art, and also in the reference images and films I had watched. I considered them important for the overall look of the model in this scale, so I had to do it. I followed the logical and useful method detailed by Ulf Lundberg here, but would never dare try it in smaller scales.
 All that done, I used my flat coat of forgiveness and
absolution to hide as many blemishes as possible. Now I was able to add the
transparencies, as in the piece of blister packing and PVA canopy gue applied
with a long-haired brush.
All that done, I used my flat coat of forgiveness and
absolution to hide as many blemishes as possible. Now I was able to add the
transparencies, as in the piece of blister packing and PVA canopy gue applied
with a long-haired brush.
On Jim Baumann´s counsel, I replaced the paper flag with a thinner version I had printed on cigarette paper. This one looks much more like the real thing.
The boat was mounted on the base with acrlyic gel, the figures were added to the boat with quick-drying and flat-curing white glue. One of the sailors has just thrown a line to the downed pilot (this was a recommendation by our own Bill Michaels aka rcboater).
That done, the build was complete.
| CONCLUSIONS |
I very much enjoyed this project, it took what I like best about modeling. I enjoy the finished model, and it´s one you don´t see that often. The gun turrets are its biggest weakness in my book. I´m sure somebody could 3D print their entire framework in one neat and delicate go. They´d only need some paint and then the individual panes could easily be made from PVA glue. ...
| REFERENCES |
https://en.wikipedia.org/wiki/Royal_Air_Force_Marine_Branch
16 March 2021
Copyright ModelingMadness.com. All rights reserved
If you would like your product reviewed fairly and fairly quickly, please contact the editor or see other details in the Note to Contributors.
Back to the Main Page Back to the Review Index Page Back to the Previews Index Page