Hasegawa 1/450 HMS Vanguard
| KIT #: | 40006 |
| PRICE: | $50.00 'used' |
| DECALS: | None |
| REVIEWER: | Marcello Rosa |
| NOTES: |
| HISTORY |
Just before World War II the Royal Navy planned a
class of 6 new battleships named the Lion class, which was to be armed with 16”
guns. They resembled the King George V class in many ways, but also included
design improvements such as a transom stern and improved armour and underwater
protection. But the new guns and turrets proved troublesome to produce, and to
save time the Lion design was modified to use 4 existing twin 15” mounts
originally build for the battlecruisers Glorious and Courageous (which were
converted to carriers). The
 resulting
ship, HMS Vanguard, was the Royal Navy’s last battleship, and in my view one of
the finest looking military ships ever built. Unfortunately, several cycles of
redesign and shifting priorities in ship production meant that Vanguard was not
commissioned until after the war’s end.
resulting
ship, HMS Vanguard, was the Royal Navy’s last battleship, and in my view one of
the finest looking military ships ever built. Unfortunately, several cycles of
redesign and shifting priorities in ship production meant that Vanguard was not
commissioned until after the war’s end.
The improvements over the KGV class were substantial, including a flared bow which greatly improved stability in rough seas, heating in many of the combat-critical equipment (to increase suitability for arctic conditions), air conditioning, and the ability to fire all armament under radar-guided remote control. Despite all of this, the combination of post-war austerity and the perceived irrelevance of this type of ship in age of the aircraft carrier meant that Vanguard had a short career, mostly consisting of NATO exercises and taking members of the Royal family to distant parts of the Empire. She completed sea trials at the end of 1946, but only served until 1960, including 5 years in reserve.
| THE KIT |
 I consider
Vanguard an extremely good looking ship, and decided a long time ago that I had
to build her model. What I didn't realise was that is not an easy proposition.
At the time I embarked on this project the only realistic possibility was the
kit released by Hasegawa in 1969, which can still be found for relatively low
prices on auction sites and swap meetings. Of course, proving once again one of
the laws of scale modelling, soon after I started two newly tooled releases were
announced, one being a 1/350 resin kit by the ChuanYu company (currently selling
for an eye-watering price) and a 1/700 Flyhawk (still tagged as a “future
release”).
I consider
Vanguard an extremely good looking ship, and decided a long time ago that I had
to build her model. What I didn't realise was that is not an easy proposition.
At the time I embarked on this project the only realistic possibility was the
kit released by Hasegawa in 1969, which can still be found for relatively low
prices on auction sites and swap meetings. Of course, proving once again one of
the laws of scale modelling, soon after I started two newly tooled releases were
announced, one being a 1/350 resin kit by the ChuanYu company (currently selling
for an eye-watering price) and a 1/700 Flyhawk (still tagged as a “future
release”).
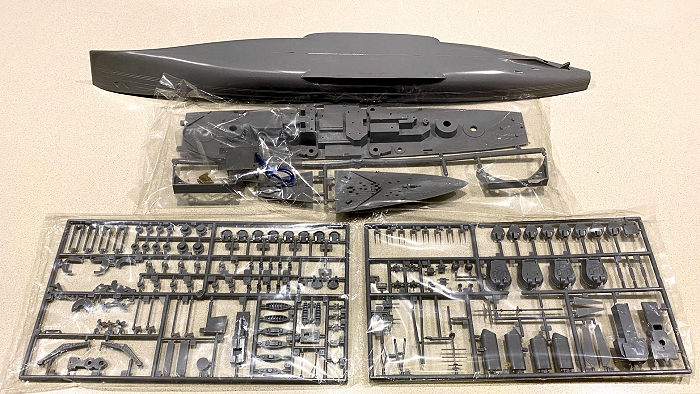
Having a crystal ball warning me about the new kits would have been useful by mid-2023. Instead, I decided to build this old one, and just try to make it as good as I could. Yet, even after reading all negative reviews online, I still was not prepared for how primitive this kit is. It has a grand total of 70 different parts (145 in total, accounting for multiple copies of items such as gun barrels). There is zero detail. For example, the superstructure parts were like Lego blocks with no portholes, raised or engraved detail - except that, unlike Lego blocks, they did not fit well with each other. Every single part had flash, and even more troublesome, mould ejection seams which made mandatory sanding every nook and cranny. The kit comes with a little electric motor that connects to a single shaft and propeller, in case you want to make it a motorised toy. It is hard to believe that Hasegawa was still reboxing it as late as 2011.
| CONSTRUCTION |
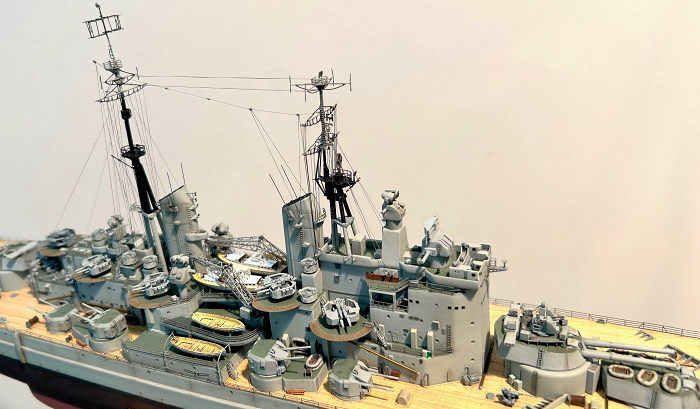
Never a build was more deserving of the name of this review site than this one. What started as a “let’s improve it a bit” quickly escalated into a serious exercise of “let’s see how much lipstick this pig can take”. The only original parts that made to the end were the hull, deck, major building blocks of the superstructure, and stacks. Even these were modified. For the rest, you can assume it was either 3D printed, part of a photoetch upgrade, or scratch built. The wooden deck is from Artworx. A photoetch set from Atlantic Models was used for masts, safety nets, ladders, railing, davits, doors, hatches, radars and other antennas, funnel grills, crane jibs and hooks, 20mm Oerlikons, jack and ensign staffs, cable drum ends, bridge rear side platforms, anchors, and anchor chains. 3D printed parts were from Micro Master (main and secondary armament, boats, mushroom vents), DiStefano 3D (single and sextuple Bofors), and from a big favour from my friend Azrael (Type 262 directors, and Carley floats). A lot of extra detail was scratch built from Evergreen and spare pieces of photoetch.
 Below is a
short version; if you are interested in a blow-by-blow account, please check
this link. The
construction started with making the hull more presentable. This included
sanding it smooth, and engraving hull plates, drilling portholes and scuppers,
and fixing the shape of the “fin” that leads to the rudder. The latter is too
short in comparison with the real thing, a compromise made to allow this kit to
be motorised. Reference pictures also show that the kit’s rudder, propellers and
propeller brackets all have wrong shapes and sizes, which required some putty to
fix. Armour belt extensions were crafted from Evergreen sheets. Draught mark
decals were applied and sealed with SMS clear gloss.
Below is a
short version; if you are interested in a blow-by-blow account, please check
this link. The
construction started with making the hull more presentable. This included
sanding it smooth, and engraving hull plates, drilling portholes and scuppers,
and fixing the shape of the “fin” that leads to the rudder. The latter is too
short in comparison with the real thing, a compromise made to allow this kit to
be motorised. Reference pictures also show that the kit’s rudder, propellers and
propeller brackets all have wrong shapes and sizes, which required some putty to
fix. Armour belt extensions were crafted from Evergreen sheets. Draught mark
decals were applied and sealed with SMS clear gloss.
Next came putting together the deck and superstructure. The bad fit between main parts means that it is better to build, fill and sand these to your full satisfaction before adding any of the smaller detail (either plastic and photoetch). Deserving special mention here are the sextuple Bofors platforms, which once in place become impossible to sand. I ended up cutting disks of Evergreen and cementing them on top, to avoid having to deal with this problem. I also took the opportunity to drill all portholes at this stage. Before applying the wooden deck I painted all horizontal surfaces that were supposed to be dark grey. Another hard learned lesson was to sand smooth all the engraved deck detail, including the anchor chains and planking, to ensure good adhesion of the wooden deck. On the positive side, the Artworx deck fits like a glove around every detail.
With the main parts in place, the job became one of adding detail to the superstructure. For this, the TopDrawings book is your best friend. First I added representations of the myriad things attached to the decks and vertical surfaces, including ammo boxes, lockers, pipes, ladders and many things I can’t even name. This process employed Evergreen, hypodermic needles, and leftover bits of resin and photoetch. Then, working from inside out, the finer sub-assemblies: Cranes, boats, weapons, breakwater ramparts, mushroom vents, inner layers of railing, and ladders, for example. The very last thing was the external railing.
The masts were built as independent sub-assemblies and added at the end. First I glued the tripods and shafts in place with white glue. This allowed me to adjust the length of the individual legs to ensure that the final products would be vertical. Once satisfied they were yanked out, and built separately using the Atlantic Models photoetch and bits of Evergreen. The mast sub-assemblies were not added to the model until the very end. Rigging used a combination of Uschi 0.03 line and human hair.
| COLORS & MARKINGS |
 The main
colour for all vertical surfaces was Tamiya TS-81 (Royal light grey, from rattle
cans). SMS black was airbrushed for the boot line, and mixes of Tamiya XF-7 and
XF-9 (red, and hull red) were airbrushed below the waterline. The horizontal
surfaces were brush-painted or airbrushed with XF-22 (RLM grey). This was all
covered with SMS clear gloss in preparation for the weathering stage.
The main
colour for all vertical surfaces was Tamiya TS-81 (Royal light grey, from rattle
cans). SMS black was airbrushed for the boot line, and mixes of Tamiya XF-7 and
XF-9 (red, and hull red) were airbrushed below the waterline. The horizontal
surfaces were brush-painted or airbrushed with XF-22 (RLM grey). This was all
covered with SMS clear gloss in preparation for the weathering stage.
Weathering was mostly based on Tamiya weathering master powders for rust and a bit of soot. To create a suggestion of a scum line I spread some splotches of Tamiya deep green (XF-26) and spread them with white spirits, using a flat brush. Once happy with that , everything was sealed with airbrushed SMS flat clear.
This kit comes with no markings whatsoever. The flags were laser printed at home, and the draught markings were from Sovereign Hobbies (RN draught markings 1/400 scale). The bridge windows and ship’s crest were home printed in Expert’s Choice clear decal film.
| CONCLUSIONS |
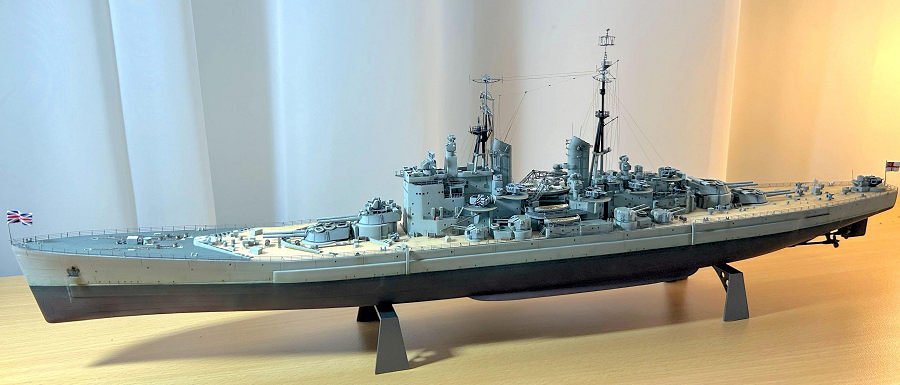
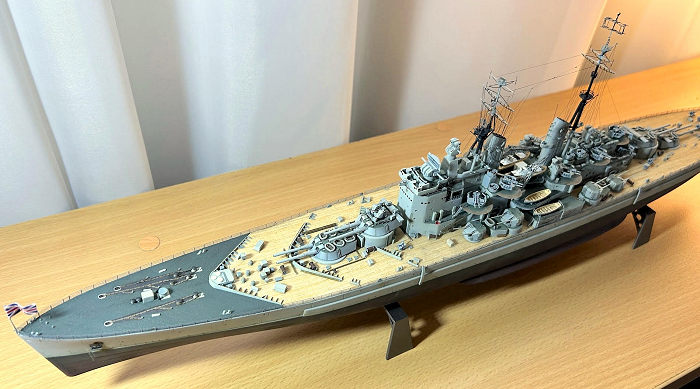
In summary, my advice would be to avoid this kit and wait for one of the new ones. I managed to get my Vanguard, but it took me enough time that I could have used to built 2 or 3 stress-free, and arguably more satisfying ships. However, if you have one in the stash and want a challenge, then be prepared to use the aftermarket options and for a fair amount of scratch building. My end result still has some inaccuracies, but I think it passes as a fair representation of what Vanguard looked like soon after commissioning. If you would like to see more pictures of the construction process, or ask questions, please visit my modelling web site.
| REFERENCES |
You really need this book to be able to do any justice to Vanguard. It is hard to find, but my local library managed to get it on loan from Poland: https://www.scalemates.com/books/the-british-battleship-hms-vanguard-topdrawings-123-witold-koszela--132395
A very useful video showing an accurate 3D model is provided by the Lloyd’s Register Foundation: https://hec.lrfoundation.org.uk/whats-on/hms-vanguard
There are lots of freely available, good quality reference photos, at: https://www.destinationsjourney.com/historical-military-photographs/british-battleship-hms-vanguard/
5 July 2024
Copyright ModelingMadness.com. All rights reserved. No reproduction in part or in whole without express permission.
If you would like your product reviewed fairly and fairly quickly, please contact the editor or see other details in the Note to Contributors.