| KIT #: | 5302 |
| PRICE: | $152.95 SRP |
| DECALS: | One option |
| REVIEWER: | Scott Lyle |
| NOTES: |
| HISTORY |
Like most of us, I knew about the dramatic end of the HMS
Hood. What I didn’t know much about
was the ship’s pre-WWII career.
 Commissioned
in May 1920, the Hood became the flagship of the Battlecruiser Squadron of the
Atlantic Fleet. In the early 1920s
she sailed virtually all over the world in various capacities, “showing the
flag” as it were. She received a
substantial refit from May 1929 to March 1931 and again in 1932.
In January 1935 near Gibraltar she was accidentally rammed by HMS Renown,
damaging her propeller and putting an 18” deep dent in her hull.
After repairs she was present in the Mediterranean for parts of the
Spanish Civil War before entering port again for an overhaul that ran from
January 1939 to August 1939. She
was to receive a very substantial modernizing in 1941, but the outbreak of WWII
prevented that from happening. As a
result when she entered the war many of her systems and machinery were in fairly
poor shape.
Commissioned
in May 1920, the Hood became the flagship of the Battlecruiser Squadron of the
Atlantic Fleet. In the early 1920s
she sailed virtually all over the world in various capacities, “showing the
flag” as it were. She received a
substantial refit from May 1929 to March 1931 and again in 1932.
In January 1935 near Gibraltar she was accidentally rammed by HMS Renown,
damaging her propeller and putting an 18” deep dent in her hull.
After repairs she was present in the Mediterranean for parts of the
Spanish Civil War before entering port again for an overhaul that ran from
January 1939 to August 1939. She
was to receive a very substantial modernizing in 1941, but the outbreak of WWII
prevented that from happening. As a
result when she entered the war many of her systems and machinery were in fairly
poor shape.
Her first action in the war was to lead sweeps into
the North Sea and northern Atlantic in search of German raiders, but she never
saw any action. After a brief time
escorting troop convoys she ported in Plymouth for a refit that lasted from
December 1939 until late May 1940, after which she was the flagship of Force H
in Gibraltar. When the Vichy French
fleet refused to surrender in June 1940, Hood took part in the attack near Oran,
finally firing her guns in anger and inflicting damage on the French fleet.
In August 1940 she was sent back to Scapa Flow where
she helped to hunt the German pocket battleship Admiral Scheer before undergoing
another refit in Rosyth in February 1941.
In March she was sent to hunt the Scharnhorst and Gneisenau, without any
luck. Lastly in May 1941 she
undertook her
 fateful
voyage to intercept the brand new German battleship, the Bismarck in the North
Atlantic. Accompanied by the new
battleship Prince of Wales, on May 24, 1941 the two ships found the Bismarck and
its escort, the heavy cruiser Prinz Eugen, in the Straits of Denmark between
Iceland and Greenland. In the
ensuing gunfight a 15” shell from the Bismarck hit the Hood’s aft end,
penetrated her magazines, and exploded.
The explosion rapidly set off ammunition explosions throughout the ship
resulting in a massive explosion that broke the ship in two.
She sank within 3 minutes, leaving only 3 survivors out of her crew of
over 1,400. An immensely popular
ship back home, the news of her loss shocked Britain and prompted a huge outcry
for revenge – “Sink the Bismarck!”
fateful
voyage to intercept the brand new German battleship, the Bismarck in the North
Atlantic. Accompanied by the new
battleship Prince of Wales, on May 24, 1941 the two ships found the Bismarck and
its escort, the heavy cruiser Prinz Eugen, in the Straits of Denmark between
Iceland and Greenland. In the
ensuing gunfight a 15” shell from the Bismarck hit the Hood’s aft end,
penetrated her magazines, and exploded.
The explosion rapidly set off ammunition explosions throughout the ship
resulting in a massive explosion that broke the ship in two.
She sank within 3 minutes, leaving only 3 survivors out of her crew of
over 1,400. An immensely popular
ship back home, the news of her loss shocked Britain and prompted a huge outcry
for revenge – “Sink the Bismarck!”
| THE KIT |
Despite its popularity the Hood has
only been issued as an injection molded kit in 1/350 scale by Trumpeter.
The good news is that it is an excellent kit, highly detailed and very
accurate. Being so popular, it is
also well supported by a slew of photo etch sets, resin upgrade sets, turned
metal gun 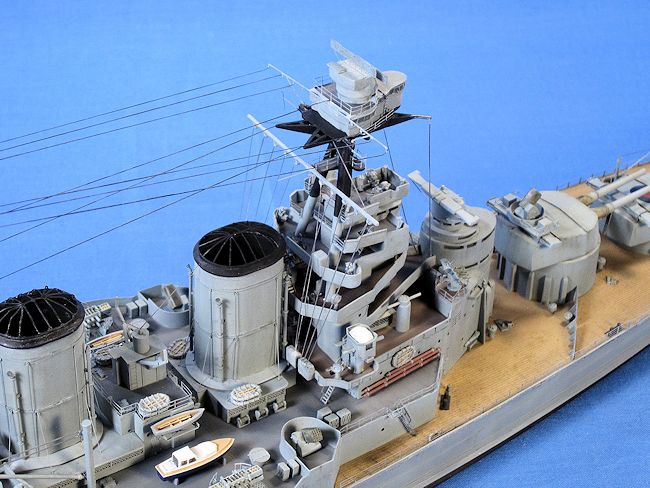 barrels
and wooden deck overlays, allowing the modeler to indulge his Hood fancy to the
fullest.
barrels
and wooden deck overlays, allowing the modeler to indulge his Hood fancy to the
fullest.
Trumpeter’s Hood comes to you in a big sturdy box,
compartmentalized on the inside to protect the various parts.
The hull is molded in two pieces split at the water line, allowing the
modeler to choose between building a full hull model or a seagoing model.
If one builds the waterline version there is a one-piece flat part to fit
to the bottom of the hull. If one
chooses to build the full hull version the kit provides a rugged looking display
base and nameplate.
There are two bags containing two deck sections
each, and eight sprues chock full of nicely detailed parts.
Trumpeter includes a very small of fret of photo etch parts, and a small
sheet of decals for the ship’s flags.
The instruction booklet is large and nicely illustrated, and a large full
color fold-out gives you the painting instructions using Gunze paints.
As other modelers on this site have pointed out the
#1 reference for anything Hood related is the excellent website
www.hmshood.com.
This site, maintained by the HMS Hood Association, is not only a wealth
of knowledge and history about the real Hood, but also features excellent
articles for building model Hoods.
I leaned on two articles in particular, “Trumpeter’s 1/350 Scale Hood – Basic
Review Plus Improvement Suggestions” by F.W.Allen, and “Paint Schemes of H.M.S.
Hood, 1920-1941.” The first article
points out sensible corrections that can be made to the model while not
overwhelming a Hood novice like myself, while the second gives you excellent
painting information for the entire life of the Hood.
 Another reference, or more accurately, work of art, are the
online photos of a completed 1/350 Trumpeter Hood by Mr. Nick Dogger.
In short, Mr. Dogger’s Hood is a masterpiece.
Mr. Dogger detailed the model so thoroughly it makes your head swim.
He set his model in a realistic ocean base complete with crew members
maintaining and working on the Hood.
Small boats come and go as men walk about and paint crews on tiny
scaffolds paint the ship’s hull.
His rigging is incredible, and his detail is a thing of beauty.
Even if you’re not overly interested in the Hood or ship models in
general, do yourself a favor and go online and look for the photos of Mr.
Dogger’s Hood – you will be amazed and inspired.
Another reference, or more accurately, work of art, are the
online photos of a completed 1/350 Trumpeter Hood by Mr. Nick Dogger.
In short, Mr. Dogger’s Hood is a masterpiece.
Mr. Dogger detailed the model so thoroughly it makes your head swim.
He set his model in a realistic ocean base complete with crew members
maintaining and working on the Hood.
Small boats come and go as men walk about and paint crews on tiny
scaffolds paint the ship’s hull.
His rigging is incredible, and his detail is a thing of beauty.
Even if you’re not overly interested in the Hood or ship models in
general, do yourself a favor and go online and look for the photos of Mr.
Dogger’s Hood – you will be amazed and inspired.
Back to the build.
A couple of years ago I built Trumpeter’s Graf Spee and had good luck
complementing it with Eduard’s photo etch set, so for this build I bought
Eduard’s #53020 photo etch set and also Aber’s #L-30 metal gun barrel set.
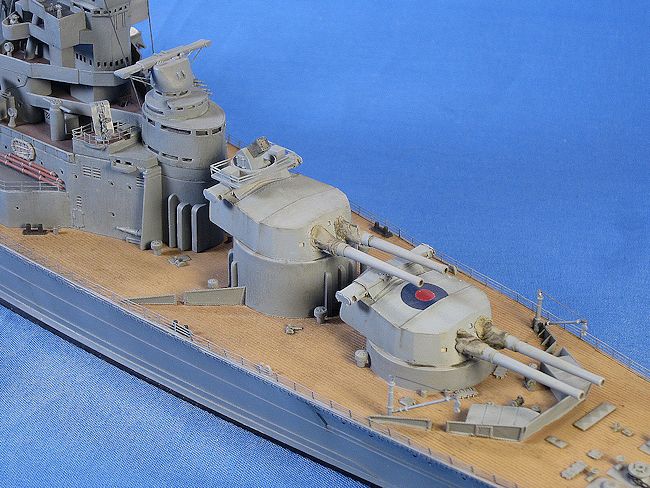
The FW Allen article points out that the only real sin committed by
Trumpeter was how it molded the main gun turrets – in short, they’re not very
accurate. I replaced them with a
resin gun turret set from White Ensign Models.
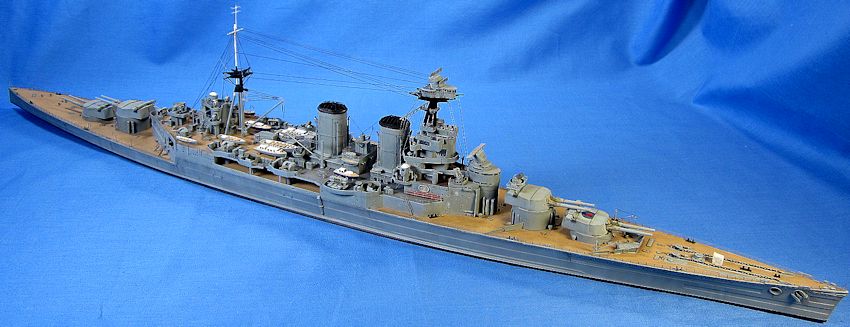
From time to time I find myself really looking forward to building a big ship model. All those decks and ladders and guns! After reading many positive reviews of the model online, I dove in.
| CONSTRUCTION |
With any big ship kit, you have to have a strategy as to
how you’re going to build and paint the thing.
For this build I decided to first attach the main deck sections to the
hull and then paint and weather them, followed by building and painting the
superstructure module by module.
Starting with the hull, I first performed a little
surgery - removing the molded on degaussing cables on either side of the hull.
The degaussing cables don’t have to be removed, but the Eduard set
provides more accurate photo etch replacements, so after a long night of
trimming and scraping I was able to glue the long thin photo etch cables into
place. I positioned each piece on
the hull and then brushed on very thin CA glue using a “Microbrush”, a very
small plastic brush that comes in packs of 10.
The microbrush
 was
perfect for attaching the photo etch to the plastic without overloading the area
with CA glue.
was
perfect for attaching the photo etch to the plastic without overloading the area
with CA glue.
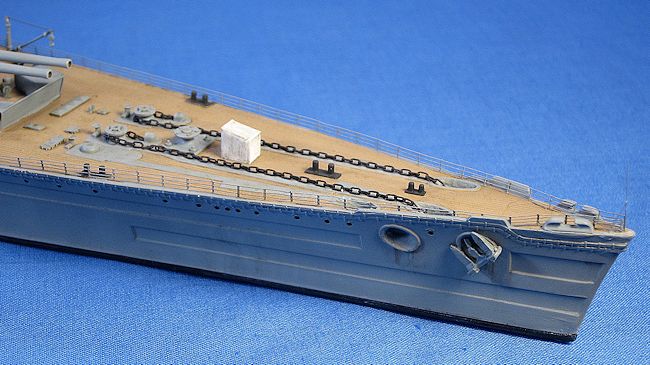
Up next I glued the three main deck sections to the
hull. There are no seams to worry
about - the joint between the forward deck and the center deck is hidden by the
breakwaters (forgive my lack of correct naval terminology) on either side of the
“B” turret, and the rear deck is stepped down to a lower level.
I used my Dremel to carve out the three holes on the forward deck and the
corresponding holes in the hull for the anchor chains.
I then packed some Crayola Air Drying clay into the bow and hollowed it
out with a tooth pick to create the “tunnels” the anchor chains traveled
through. Much to my chagrin the
clay shrank as it dried, leaving large cracks that had to be filled with
Squadron Green Putty. I next
attached the PE railings to the hull and then headed to the spray booth for my
first painting session.
I first applied a light coat of Tamiya’s Spray
Primer to the hull and decks, and then pre-shaded the deck with Tamiya XF-64 Red
Brown. That was followed by some
Tamiya XF-78 Wooden Deck Tan, sprayed lightly and randomly to let the
pre-shading show through.
To paint the hull I first pre-shaded it with Testors
Gunship Gray, and then sprayed Testors Medium Gray FS 35237 over that.
I had to hold the hull upside down and airbrush carefully so that none of
the gray would get on the just-painted wooden decking.
I next lightened the Medium Gray with some Testors Flat
White and airbrushed some random splotches on to the hull to replicate some
fading and streaking.
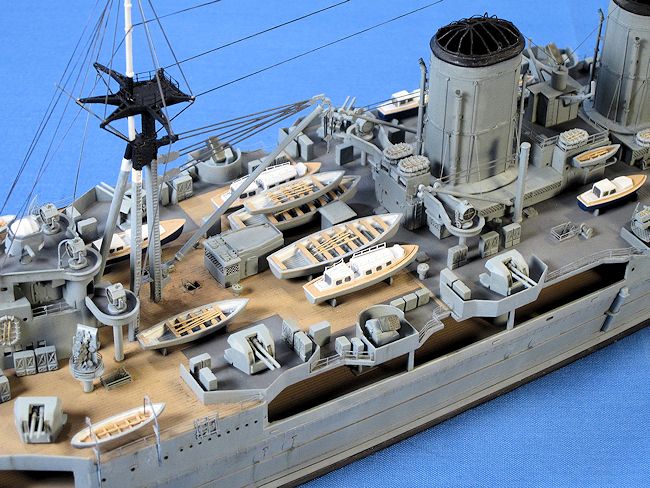
 With the hull and wooden decks now painted, I began
building up the superstructure assemblies.
Following the instructions I first began attaching the “walls” of the
various lower compartments to the main deck, painting them Medium Gray as I
went. Once they were set and a few
small gaps were filled I glued the “up deck” (Trumpeter’s words, not mine) into
place. It too needed some sanding
to get it to fit properly. I also
masked off the surrounding areas and painted its wood areas and also its steel
decking Testors Gunship Gray. The
vertical surfaces and deck details were painted Testors Medium Gray by hand.
With the hull and wooden decks now painted, I began
building up the superstructure assemblies.
Following the instructions I first began attaching the “walls” of the
various lower compartments to the main deck, painting them Medium Gray as I
went. Once they were set and a few
small gaps were filled I glued the “up deck” (Trumpeter’s words, not mine) into
place. It too needed some sanding
to get it to fit properly. I also
masked off the surrounding areas and painted its wood areas and also its steel
decking Testors Gunship Gray. The
vertical surfaces and deck details were painted Testors Medium Gray by hand.
From this point the sequence basically remained the
same; assemble a superstructure module, add any photo etch I saw fit to add,
fill any gaps, paint it by hand, and then glue it to the ship.
There were frustrations.
Dealing with lots of tiny photo etch parts did get old, as did trying to handle
a model that was increasingly full of said parts without knocking any off.
I didn’t use all of the Eduard photo etch parts by any stretch of the
imagination, just the ones I thought I could handle and would make an impact on
the finished product. When I had
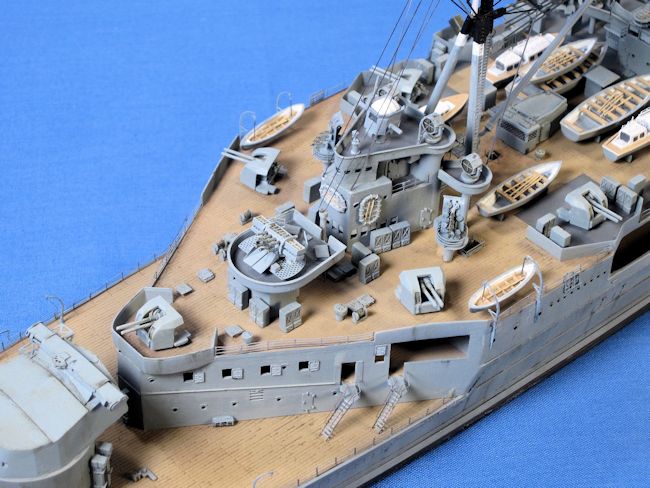
the bridge structure complete except for the spotting platform (the uppermost
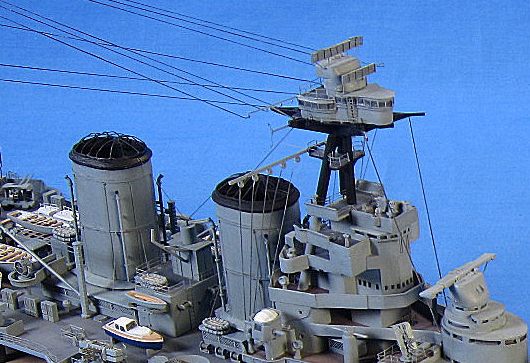
platform on top of the tripod), I started on the smokestacks.
My references show the smokestacks had several support wires all around
them, so I added those drilling tiny holes top and bottom and running clear
fishing line through them. The
photo etch grills on top were fiddly, especially when I mashed the hell out of
one with my finger, but isn’t that what photo etch is supposed to do – drive you
to the edge of insanity?
At this point the model’s structures were largely
complete, but I hadn’t added any guns, cranes, lifeboats or rigging.
I decided to weather the model before adding those easily knocked off
items.
| COLORS & MARKINGS |
When that was dry I sprayed a very thin mix of 50/50 Tamiya Black/Red Brown onto the various seams and crevices of the model to provide some post-shading and streaking effects. I tried to keep it subtle because at this scale, it’s an effect that is easily overdone.
| FINAL CONSTRUCTION |
 Back at the workbench, it was time to rig the model – a
task I dread! I used small dabs of
CA glue to attach EZ Line and stretched sprue to the various masts, using
pictures of Mr. Dogger’s model as a reference.
With that (thankfully) finished it was time to add the final guns,
cranes, and lifeboats. I worked
from the center of the ship out, working slowly and deliberately so as to not
knock off any of the detail.
Back at the workbench, it was time to rig the model – a
task I dread! I used small dabs of
CA glue to attach EZ Line and stretched sprue to the various masts, using
pictures of Mr. Dogger’s model as a reference.
With that (thankfully) finished it was time to add the final guns,
cranes, and lifeboats. I worked
from the center of the ship out, working slowly and deliberately so as to not
knock off any of the detail.
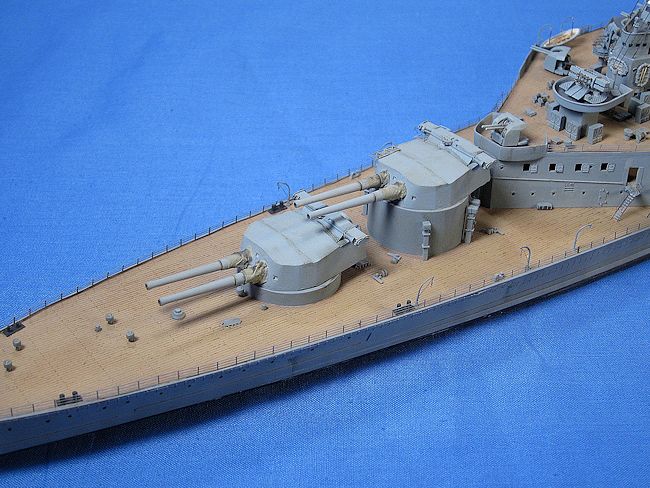
The last step was to assemble the White Ensign resin
main gun turrets. This set gives
you the choice of either early or late model rangefinders, in both open or
closed configurations. I chose the
late, open types. Once I assembled
the gun turrets I added the Aber gun barrels, and then fashioned blast bags out
of tissue paper soaked in water and white glue.
I then primed them, painted them, and weathered them.
The final step was to brush-paint over any areas
that were glossy due to the CA glue.
I did this using Vallejo’s Matt finish, and the model was finally done.
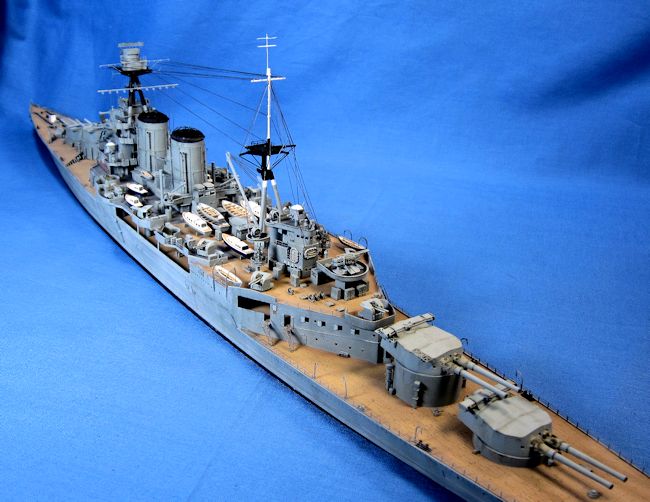
| CONCLUSIONS |
Building a big ship model requires a bit different
mindset than an aircraft or an AFV, but the results are worth it.
Trumpeter’s Hood is a fine tribute to a tragic ship.
| REFERENCES |
-
F.W. Allen, HMS Hood Association website, “Trumpeter’s
1/350 Scale Hood – Basic Review Plus Improvement Suggestions”
-
HMS Hood Association website, “Paint Schemes of the
H.M.S. Hood, 1920-1941”
-
Osprey Publications, New Vanguard #88, “British
Battlecruisers 1939-45”
- Wikipedia,
the Online Encyclopedia
March 2015 If you would like your product reviewed fairly and
fairly quickly, please
contact
the editor or see other details in the
Note to
Contributors.