| KIT #: | ? |
| PRICE: | $ |
| DECALS: | Yes |
| REVIEWER: | Frank Spahr |
| NOTES: | Resin multi-media kit |
| HISTORY |
HMS Hermes (R12) was a British aircraft carrier of the Centaur class. Laid down in 1944 as HMS Elephant, construction was suspended in 1945. Only in 1952 was work resumed, mainly to clear the slipway. The ship was completed only in 1959 as HMS Hermes. The vessel benefited from the progress made since being laid down. She received most of the improvements incorporated into the great reconstruction of HMS Victorious, ending up looking quite differently from the other ships of this class. Hermes had a true angled deck, powerful steam catapults and a massive 3D search radar. Yet the ship was smaller than Victorious, a disadvantage in an age of ever larger and heavier carrier aircraft.
 Hermes´early air wing comprised
Supermarine Scimitar, De Havilland Sea Vixen and Fairey Gannet fixed-wing
aircraft, together with Westland Whirlwind helicopters. Later on, Blackburn
Buccaneer also operated from Hermes. Efforts to use the British version of the
F-4 Phantom II aboard Hermes were prevented by the size of the flight deck.
Britain also looked into the sale of Hermes to Australia, but the Australian
government decided against it.
Hermes´early air wing comprised
Supermarine Scimitar, De Havilland Sea Vixen and Fairey Gannet fixed-wing
aircraft, together with Westland Whirlwind helicopters. Later on, Blackburn
Buccaneer also operated from Hermes. Efforts to use the British version of the
F-4 Phantom II aboard Hermes were prevented by the size of the flight deck.
Britain also looked into the sale of Hermes to Australia, but the Australian
government decided against it.
In the early Seventies Hermes was converted to a Commando carrier. Her catapults and arrestor gear were removed, same as the huge air search radar. Instead, accommodation for 800 troops was created and eight landing craft added. The air wing now exclusively comprised Sea King helicopters. The growing Soviet submarine threat caused a further reconstruction in the late Seventies. To enable the carrier for the ASW role and to counter Soviet long range maritime surveillance aircraft, the ship received a „ski jump“ at her bow to operate Sea Harriers effectively. She was now equipped similarly to the new „through deck cruisers“ of the Invincible class, but with space for a larger air wing.
Nonetheless the 1981 Defence Review
demanded decommissioning Hermes for 1982. Immediately before that, the ship was
able to prove itself as flagship of the British task group in the Falklands War.
Hermes was made combat ready in extreme haste and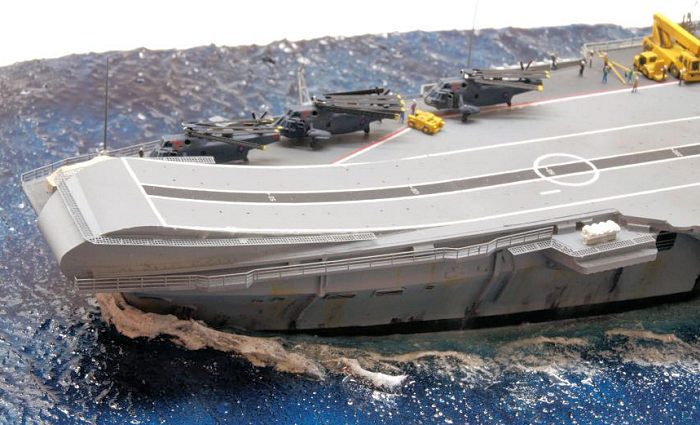 left Portsmouth on 5 April for
the South Atlantic. In addition to her normal air wing, she later embarked RAF
Harriers. During the conflict, she operated an air wing of 16 RN Harriers, 10
RAF Harriers and 10 Sea King.
left Portsmouth on 5 April for
the South Atlantic. In addition to her normal air wing, she later embarked RAF
Harriers. During the conflict, she operated an air wing of 16 RN Harriers, 10
RAF Harriers and 10 Sea King.
As the most valuable British unit, she was a prime enemy target. Hence she was normally placed as far away from the Falklands as feasible with the Harriers´ range. To the luck of the British, Hermes was neither damaged by enemy action nor did her systems break down until the Argentine forces on the islands capitulated. Hermes returned to the UK on 21 July, 1982, after 108 days at sea, heavily weathered and greeted by masses cheering from boats and shore.
Hermes´ further service with the Royal Navy did only last for about two years, until she was decommissioned in 1984 and sold to India in 1986. India renamed her in INS Viraat, and she served another 30 years in the Indian Navy. She was taken out of active service in 2016 and formally decommissioned in 2017. This made her the last Indian warship still built in Britain, and the longest-serving carrier worldwide.
As happens so often, Hermes´ worth as a piece of naval history was appreciated, and several attempts at preserving her were started. As it happens equally often, the project proved too expensive, and in 2020 the decision was taken to scrap her. She has since been brought to Alang and is being dismantled there.
| THE KIT |
Orange Hobby produced two versions of HMS Hermes kits, as she appeared in 1982 during Operation Corporate and her later fit in the Indian Navy. I bought the former version soon after it was presented, I think it may have been around 2012.
The rather small box is jam-packed
with a large number of well-cast resin parts, satcom radomes machined from
brass, a decal sheet, several very finely etched PE frets of varying thickness,
and a comprehensive and very densely printed set of instructions. The kit is
very complete, save aircraft and deck vehicles.
 Only two Harriers and Sea Kings
respectively are included, together with four tow tractors and PE tow bars. The
aircraft are intricate kits of their own, with PE stabilizers, outriggers, underwing hardpoints and refueling probes for the Harrier, and a similar level
of detail for the helicopters. The rather prominent Coles crane is sadly missing
and hard to come by.
Only two Harriers and Sea Kings
respectively are included, together with four tow tractors and PE tow bars. The
aircraft are intricate kits of their own, with PE stabilizers, outriggers, underwing hardpoints and refueling probes for the Harrier, and a similar level
of detail for the helicopters. The rather prominent Coles crane is sadly missing
and hard to come by.
I obtained additional sets of four Harriers and Sea Kings soon after getting the kit, plus a set of Sea Kings from L´Arsénal.
Over the next years, I did sometimes take the (increasingly dustier) box from the stash, open it, have a look at the equally intimidating instruction sheet and PE frets, and carefully closed and returned the box. Building Orange Hobby´s HMS Ocean and modern tugboats kits a while later helped to yet increase my trepidation.
In the end it was the hot and treacherously virus-free summer of 2020 until I summoned the courage to start the project.
| CONSTRUCTION |
Early Orange Hobby kits (I can´t speak for the more recent offerings) suffered from a problem with paint adhesion to the resin parts. Any attempt at masking would lead to paint liftoff. A friend of mine discarded the model of the Swedish stealth corvette for that reason. Normal parts preparation would not suffice. I can but assume a particularly tenacious mold release agent was used by the casters, and could not be removed by normal procedures. I had made the same experience building the HMS Ocean kit. Upon recommendation of Sven Schönyan of SSN Modellbau I used silicone remover on the larger kit parts. It was applied liberally and repeatedly with a brush and was washed off with warm soapy water after curing. That did help, but not completely.
 The next step was to remove the
massive pour plugs from the hull parts with a diamond disc, and then adding
styrene tubing into the hull to accept the mounting screws. I further
complicated work by adding a sheet of styrene to the bottom of the hull to allow
parts of the boot topping to be visible in a seaway. That needed quite some
trimming, and sanding, and filling.
The next step was to remove the
massive pour plugs from the hull parts with a diamond disc, and then adding
styrene tubing into the hull to accept the mounting screws. I further
complicated work by adding a sheet of styrene to the bottom of the hull to allow
parts of the boot topping to be visible in a seaway. That needed quite some
trimming, and sanding, and filling.
A project like this consists of so many subassemblies that you can work on a large number at the same time, and not have to wait for this or that item to set or cure or whatever. I tend to identify the most problematic and daunting subassemblies and start them first. The rationale being that if I botch any of those, I might just as well bin the entire project without investing any more work. That particularly holds true for lattice masts, radar arrays, aircraft lift support framing or evil spawn from the deepest abyss like the British Sea Slug missile launcher. So I tackled the most difficult items first and was happy I got them done, despite their quite obvious delicateness.
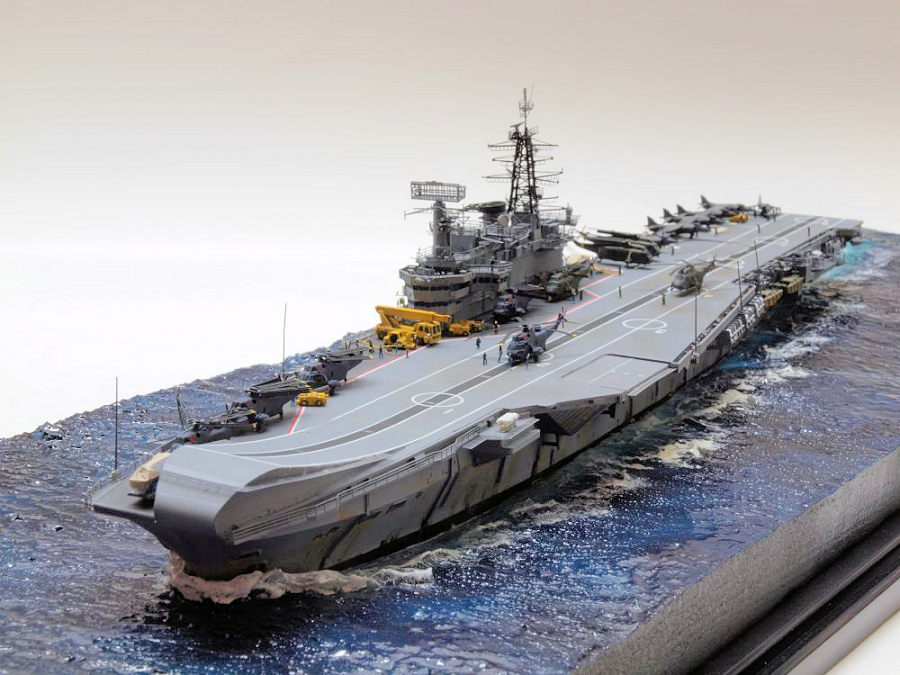
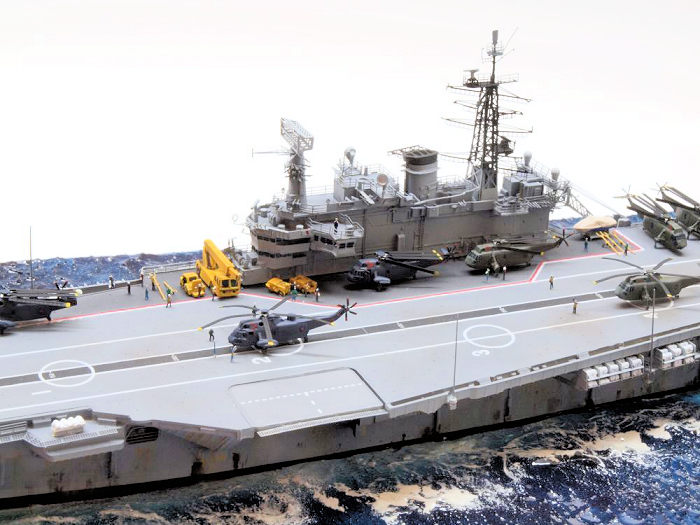
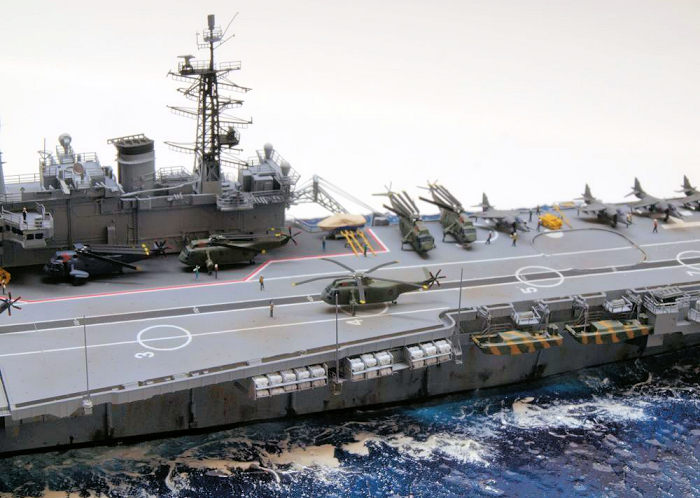
So I plodded on through the long list of subassemblies, and got most of them done. The island is festooned with racks of floodlights, dozens of them all around the structure, and those little cuties are really tiny. Moreover, there are a serious number of racks for life raft canisters, looking a bit like letter cases. Apart from those, there´s any amount of other fiddly stuff to be added to the island and all around the hull. Eight landing craft are to be built and mounted on davits, there are two Seacat launchers with their directors, plus an aircraft crane and any number of catwalks and railings.
All this took time, as I find it
hard to work like this for too long at a time, so this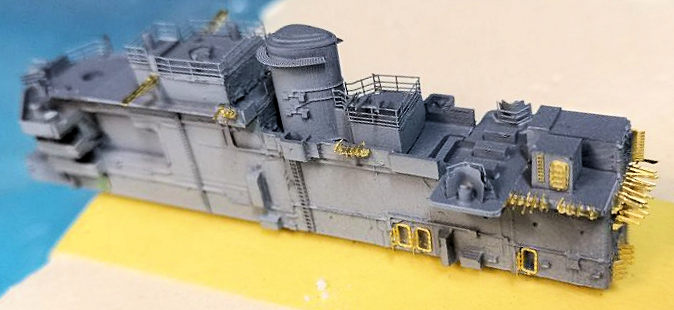 project in the end took
more than six months. There were some items I refused to build, most notably the
PE bridge window screen wipers, which were so ridiculously small and delicate
that I started cackling at the notion of working with them. And you know where
cackling leads to. I collected the prepared subassemblies on foam board blocks,
marked with parts numbers.
project in the end took
more than six months. There were some items I refused to build, most notably the
PE bridge window screen wipers, which were so ridiculously small and delicate
that I started cackling at the notion of working with them. And you know where
cackling leads to. I collected the prepared subassemblies on foam board blocks,
marked with parts numbers.
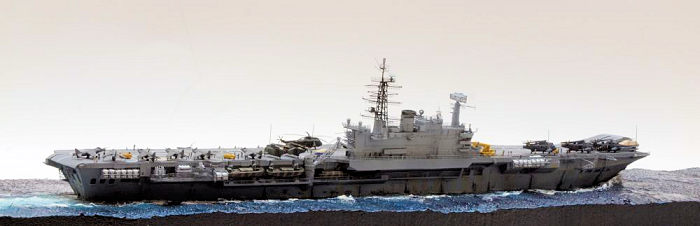
Before painting or detailing the hull, I prepared the base. I had finally taken the plunge and bought a hot-wire foam cutter, a good investment. Now I was able to make quite neat cuts, and could even thin down my base, which would have been impossible before.
I started by marking the hull shape on the piece of foam board, and then prepared the wave pattern with a gas torch (only under proper ventilation, obviously). I then made the hull cutout and cut the piece to size and strength – that made for crisper borders than using the gas torch after cutting.
Any remaining gaps between hull and board were filled with acrylic caulking, and the base was painted and glossed and effects added in my usual manner. The idea was to only add the model to the base when both were completed.
Now I was able to seriously de-grease the hull and prime it with Stynylrez, the best water-based primer I know of. Sadly I should find that even all the effort hadn´t been enough when it came to masking the flight deck.
| COLORS & MARKINGS |
I chose Vallejo ModelAir 71046 Pale
Blue Grey for the vertical surfaces, Stynylrez Grey Primer for the horizontal
and Stynylrez Black Primer for the boot topping. The life raft canisters were
painted Stynylrez White Primer. For the landing craft, I used some
likely-looking green and brown shades of ModelAir. The area of the flight deck
next to the isl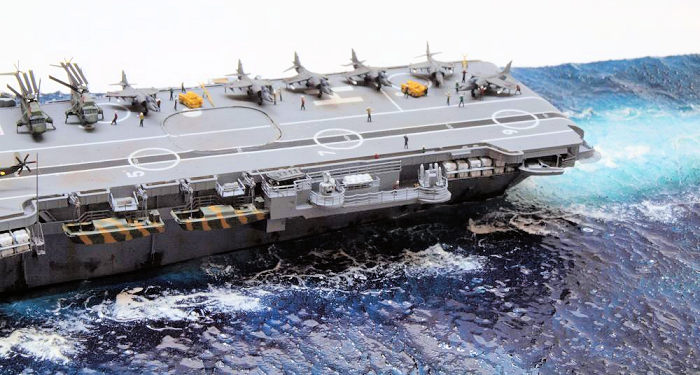 and needed to be painted a darker grey, and needed to conform to
the demarcating decal stripes. That proved tricky, and I copied the decal sheet,
cut the demarcation out and masked the deck accordingly. In this process, some
paint liftoff on the flight deck occurred and needed repairs. That done, I
glossed the flight deck with Future and let that cure, before I took the plunge
and applied the rather iffy decals. That didn´t work without problems and I
ended up with a not perfect result, but with the best I could possibly achieve.
and needed to be painted a darker grey, and needed to conform to
the demarcating decal stripes. That proved tricky, and I copied the decal sheet,
cut the demarcation out and masked the deck accordingly. In this process, some
paint liftoff on the flight deck occurred and needed repairs. That done, I
glossed the flight deck with Future and let that cure, before I took the plunge
and applied the rather iffy decals. That didn´t work without problems and I
ended up with a not perfect result, but with the best I could possibly achieve.
The decals were sealed with yet more Future and then with a flat coat, prior to weathering the flight deck (moderately) and the hull (seriously), both with artist´s oils.
Parallel to that I continued on my subassemblies, completing them, and then priming, painting and weathering them. The island was completed with almost all details before adding it to the hull at a very late stage in or to avoid collateral damage wherever possible.
Finally, after some tricky situations and demanding catwalks and whatnots to be dealt with, I only had to add some few iffy parts to the edges of the flight deck. I held these back until work on the deck was completed. That needed aircraft, vehicles and personnel.
| FINAL CONSTRUCTION |
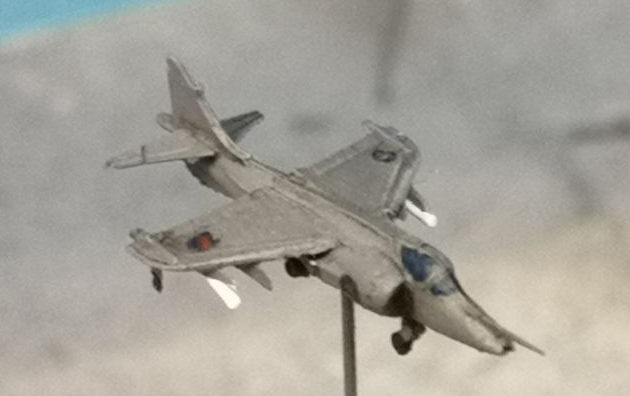
Unfortunately I haven´t been able
to source more Harriers, so I was limited to six of them. Building them was
demanding, and I only added mock „missiles“ from thin wire painted white and was
happy I got the very fine parts processed correctly. I opted against using the
decals and rather painted the roundels. The planes should have had drop tanks,
but I skipped those. The blue-grey ASW helos by Orange Hobby were built from the
box, which was demanding enough. Again I rather painted the very limited
markings. Drybrushing and a dark wash were used on all aircraft. The olive green
„Commando“ helos were made from the
 L´Arsénal offerings, and needed trimming the
sponsons. In reality, there are far more differences between the two versions,
but I hoped to get away with it in that scale.
L´Arsénal offerings, and needed trimming the
sponsons. In reality, there are far more differences between the two versions,
but I hoped to get away with it in that scale.
Luckily I found a WEM forklift and a Coles Crane in my stash, remnants of the 1:700 HMS Illustrious I built in 2011. Together with the Orange Hobby tow tractors and tow bars they brought some more life to the deck. For the displacement of the aircraft on deck I consulted a former crew member of Hermes – thanks a lot, Peter!
After all the aircraft and vehicles had been glued to the deck, I added PE crew figures from Lion Roar. I gave them a bit more body with medium CA glue and painted them as per photographic references. There must be about 50-60 of them on the deck.
Finally I added the previously held back flight deck edge details such as whip antennae and the aircraft crane, before I gave the entire model a final friendly flat coat of forgiveness. Now I was able to glue the model to the base with clear acrylic gel and call things quits.
| CONCLUSIONS |
This is not a particularly large model, but one that is jam-packed with details and terminal iffiness. It´s a really demanding kit, but well worth building. The only fly in the ointment is the paint adhesion issue, but I hope this was limited to the very early kits.
| REFERENCES |
https://en.wikipedia.org/wiki/HMS_Hermes_(R12)
Brown, David K / Moore, George: Rebuilding the Royal Navy. Barnsley 2003
Hobbs, David: British Aircraft Carriers. Barnsley 2013
2 August 2021
Copyright ModelingMadness.com. All rights reserved. No reproduction in part or
in whole without express permission.
If you would like your product reviewed fairly and
fairly quickly, please
contact
the editor or see other details in the
Note to
Contributors.