Kombrig 1/700 HMS Duncan
| KIT #: | 70265 |
| PRICE: | around 48 Euros |
| DECALS: | not required |
| REVIEWER: | Frank Spahr |
| NOTES: | Resin kit |
| HISTORY |
 The
Duncan-class of British battleships were specifically designed to counter the
threat of the Russian Peresviet
– Class of battleships and their estimated speed of 19 knots. So this class of
ships had the same armament as preceding classes, but a stronger powerplant,
less displacement and reduced armour protection. They reached the projected 19
knots, but the design was considered unsatisfactory due to the reduced size and
poor disposition of their armour. Moreover, the Russian ships actually only
reached 18 knots and only had 10 inch main guns instead of 12 inch with the
British. So it was until the advent of the battlecruiser, several years later,
that ships with focus on speed and armament, but with lack of protection were
built.
The
Duncan-class of British battleships were specifically designed to counter the
threat of the Russian Peresviet
– Class of battleships and their estimated speed of 19 knots. So this class of
ships had the same armament as preceding classes, but a stronger powerplant,
less displacement and reduced armour protection. They reached the projected 19
knots, but the design was considered unsatisfactory due to the reduced size and
poor disposition of their armour. Moreover, the Russian ships actually only
reached 18 knots and only had 10 inch main guns instead of 12 inch with the
British. So it was until the advent of the battlecruiser, several years later,
that ships with focus on speed and armament, but with lack of protection were
built.
Of the six ships in the class, Montagu was lost after grounding on Lundy Island in 1906, whilst Russell was lost to a mine in 1916 and Cornwallis to torpedo hits in 1917, both off Malta.
HMS Duncan was laid down at Thames Iron Works in Blackwall in 1899 and commissioned in 1903. Prior to the war, she served on various stations and had been reduced to the Second Fleet as a training ship in 1913. Prior to the outbreak of hostilities, she had a refit and joined the Grand Fleet when war broke out. During the war, she served on various stations including the Adriatic and the Aegean. She was paid off in February 1917, to provide crews for anti-submarine vessels and from then on was kept in reserve, until she was sold for scrap in 1920. She was involved in two collisions: She collided with HMS Albion in Lerwick in 1905, and grounded off Lundy Island during the salvage operations after the grounding of Montagu.
| THE KIT |
 This is
your typical Kombrig kit as I´ve already built several. Very neatly and
intricately modeled on the drawings in R.A. Burt´s book on British
Pre-Dreadnoughts, very neatly and finely cast, with oodles of fine resin parts,
yet no PE. Pretty basic instructions, no decals, but a reasonable painting
guide. All of it packed into a small and pretty flimsy cardboard box, so there
was breakage, but luckily nothing that really counted.
This is
your typical Kombrig kit as I´ve already built several. Very neatly and
intricately modeled on the drawings in R.A. Burt´s book on British
Pre-Dreadnoughts, very neatly and finely cast, with oodles of fine resin parts,
yet no PE. Pretty basic instructions, no decals, but a reasonable painting
guide. All of it packed into a small and pretty flimsy cardboard box, so there
was breakage, but luckily nothing that really counted.
Some parts - in my personal view - look better if replaced by machined brass, as in the gun barrels, and some are – again in personal my view – unusable in resin and need a metal replacement, as in the masts and yardarms, plus the boat davits. Having some good documentation and some generic PE plus brass parts will surely help in building.
| CONSTRUCTION |
I got this kit from a
friend who had decided he would quit building in such a small scale. At the
time, at least ten years ago, I was still more active in 1:700, but the kit
languished in my stash nonetheless. Only early in 2023 did I pull it out, on the
rationale that my time to quit this scale is approaching now, too. So I started
by selecting a suitable Trumpeter display box and mounted the hull onto it. Two
screws glued into
 holes
drilled into the hull and holes drilled through the base helped, and made for a
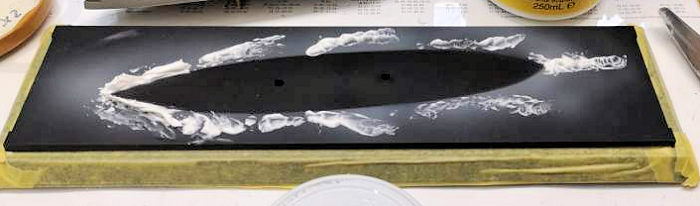
stable mounting of the model during the building process. Having misted over the
mounted hull with grey primer to determine its perimeter, I then sculpted what
limited waves I wanted to show with the vessel moving through calm water.
holes
drilled into the hull and holes drilled through the base helped, and made for a
stable mounting of the model during the building process. Having misted over the
mounted hull with grey primer to determine its perimeter, I then sculpted what
limited waves I wanted to show with the vessel moving through calm water.
That done, I applied white wall paint to the base in a stippling motion, let it dry thoroughly, and then sprayed the base with green and blue until I reached a satisfying and (to me) credible result. Now I let the base fully dry, before I applied white oil paint for the foam effects and then glosscoated it, and only then started on the ship in earnest.
Things intervened, and I frankly couldn´t be bothered to tackle this small and intricate model. In January 2024 I made a fresh start, and in retrospect the delay was a good idea. I for one can´t force myself to model successfully. I need to be in proper shape and frame of mind if the result shall be anything worthwhile.
So I gave the kit parts a fresh look and decided what to keep and what to replace and what to detail. As there is no dedicated PE set, I needed to use my stash of WEM PE sets for the period, namely those for HMS Tiger and HMS Chester, but I also stole from some others in my stash wherever it seemed convenient.
 I decided
to rebuild both bridges entirely, as they had canvas-covered railings and the
molded-on ones were too solid for my liking. That took some effort but the end
result looks more convincing to me. Mind you, as always your point of view may
differ from mine, and that´s entirely OK. Both ways.
I decided
to rebuild both bridges entirely, as they had canvas-covered railings and the
molded-on ones were too solid for my liking. That took some effort but the end
result looks more convincing to me. Mind you, as always your point of view may
differ from mine, and that´s entirely OK. Both ways.
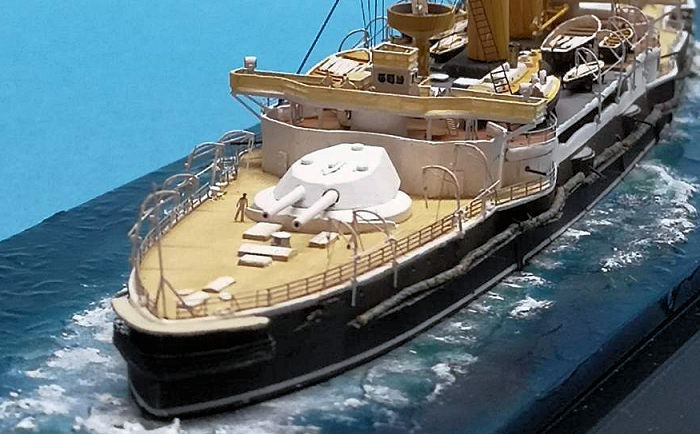
I was lucky to find funnel caps that worked for the kit parts, which I had drilled out a tad. The barrels for the main and secondary artillery were replaced with conveniently-sized items by Master.
I rebuilt the masts from machined brass parts and PE and only retained the fighting tops and searchlights. That made for better and much-needed stability and would preclude warping.
To accommodate the torpedo net shelves, I added supports from thin stock styrene to the hull. The shelves themselves were pieced together from parts from the abovementioned PE sets. For the small guns on the deck below the boat deck I used PE 20 mm Oerlikons.
| COLORS & MARKINGS |
 Markings
there are none on this model. But there was a lot of painting and masking going
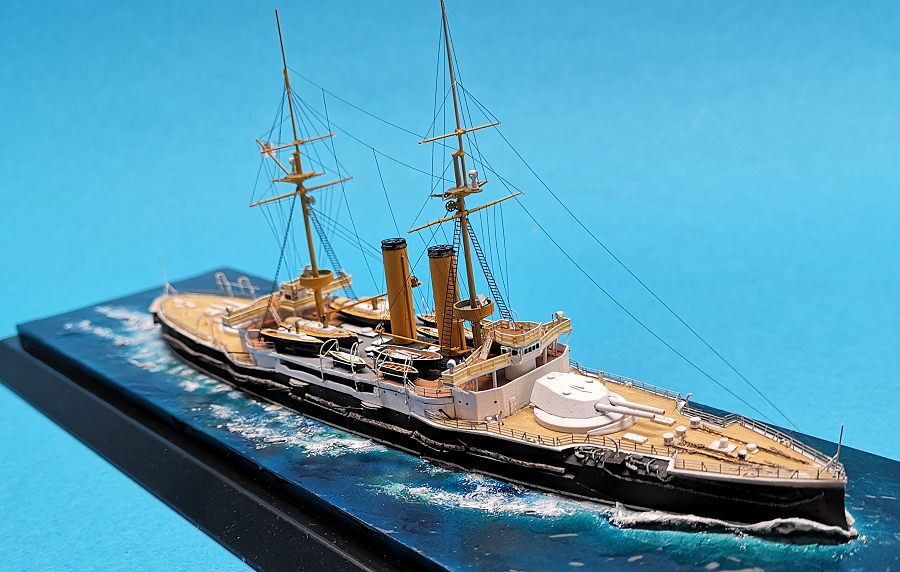
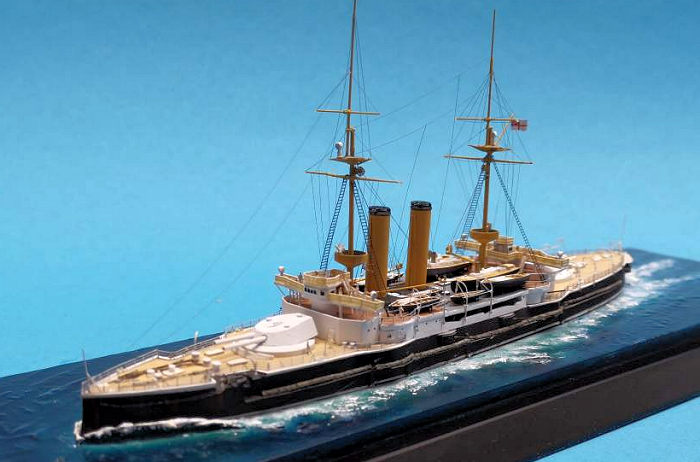
on. Duncan had for a short time sported the classic and classy Victorian livery,
and that was what looked most appealing to me. With the black and white hull,
wooden and linoleum and steel decks, and a white stripe at the waterline, I was
kept busy. Stynylrez primer in both white and black helped well, like many times
before. The rest are reasonably appropriate Vallejo shades. The model wasn´t
weathered at all, except some very faint rust streaks below the anchors. Only
the wooden decks and the boat interiors got a wash to let the lovely details
stand out.
Markings
there are none on this model. But there was a lot of painting and masking going
on. Duncan had for a short time sported the classic and classy Victorian livery,
and that was what looked most appealing to me. With the black and white hull,
wooden and linoleum and steel decks, and a white stripe at the waterline, I was
kept busy. Stynylrez primer in both white and black helped well, like many times
before. The rest are reasonably appropriate Vallejo shades. The model wasn´t
weathered at all, except some very faint rust streaks below the anchors. Only
the wooden decks and the boat interiors got a wash to let the lovely details
stand out.
| FINAL CONSTRUCTION |
Having my subassemblies ready, it was time to bring them together. Which includes rigging, which is easily my least favourite task in modeling. But I had a new tool to try in this case – .06 mm Modelkasten wire. This is a very fine wire with a dull and greyish surface, which is sold rolled up, but will straighten out once unrolled and keep that straight shape. I assume it´s some kind of Nitinol alloy as it´s used on root canal instruments. That material is quite forgiving and tough, and glues well with medium CA glue. It doesn´t need painting in my experience, which is an added bonus. The only downside is that you can´t tension it, like you do with stretched sprue or UNI Caenis thread – both of which get more tension by (very carefully) applying heat.
So I tested the material
on the funnel stays, and was quite happy with the result. From then on it was
mainly a matter of finding the amount of concentration and dedication to achieve
a passable result to complete the model. As always, I worked from the center to
the periphery to minimize collateral damage. So the bridges were added after the
funnels and their stays. Then came the boats using PE cradles from my stock.
Followed by inclined ladders, any railings on that level and the masts. Having
added the masts, I added the rigging, leaving out
 the fore
stays for now. For the ratlines I used the leftovers from the GMM sheet for my
Mauretania project.
the fore
stays for now. For the ratlines I used the leftovers from the GMM sheet for my
Mauretania project.
Having got so far, I added the torpedo nets, using conveniently-sized thread infused with PVA glue and painted. Now came the remaining parts for the fore and aft decks. I pieced together the railings and then added the stern walk I had prepared earlier, leaving the aft main gun turret off for now. I drilled a hole in the aft barbette, and threaded a screw into it. That would be used for manipulating the model onto its base at the very end.
I used the kit anchors after some cleanup, and also used the molded on anchor chains, only adding some stoppers from PE chain. PE chain was also used for the outboard anchor chains.
Having added flagstaffs and a flag decal from my stocks, the model was almost complete. I now proceeded to add the torpedo net booms from .1 mm wire, but refrained from adding more rigging for them. Then came the outboard davits and a bit of rigging for them, using PE parts from the HMS Chester sheet. A number of Lion Roar PE figures were added only at this stage. I might have done it earlier. Then came the forestays.
Now followed some paint touchups and checks, before I misted a generous flat coat over the entire model to blend things in and hide as many flaws as possible.
That cured, I opened the vise that had held the model over the building process, held the model by the screw protruding from the aft barbette, and placed it on the completed base. Having secured it with the screws from below, I could remove the barbette screw and finally add the rear turret, completing the build.
| CONCLUSIONS |
Getting this one done was a step forward in getting over the burnout that led to my retirement. I was rather pleased with the Modelkasten wire, and I like the overall look of the model in its very late Victorian livery. It doesn´t take up much display space and is a bit of an achievement.
| REFERENCES |
https://en.wikipedia.org/wiki/HMS_Duncan_(1901)
Burt, R.A.: British Battleships 1889-1904. New revised edition. Barnsley 2013
Dingle, Nicholas: British Warships 1860-1906, a Photographic Record. Barnsley 2009
Gibbons, Tony: The complete Encyclopedia of Battleships and Battlecruisers. London 1983
Frank Spahr
19 September 2024 Copyright ModelingMadness.com. All rights reserved. No
reproduction in part or in whole without express permission. If you would like your product reviewed fairly and fairly quickly, please
contact the editor or see other details in the
Note to
Contributors.